Dinosaur Amigurumi Crochet Pattern With Hat
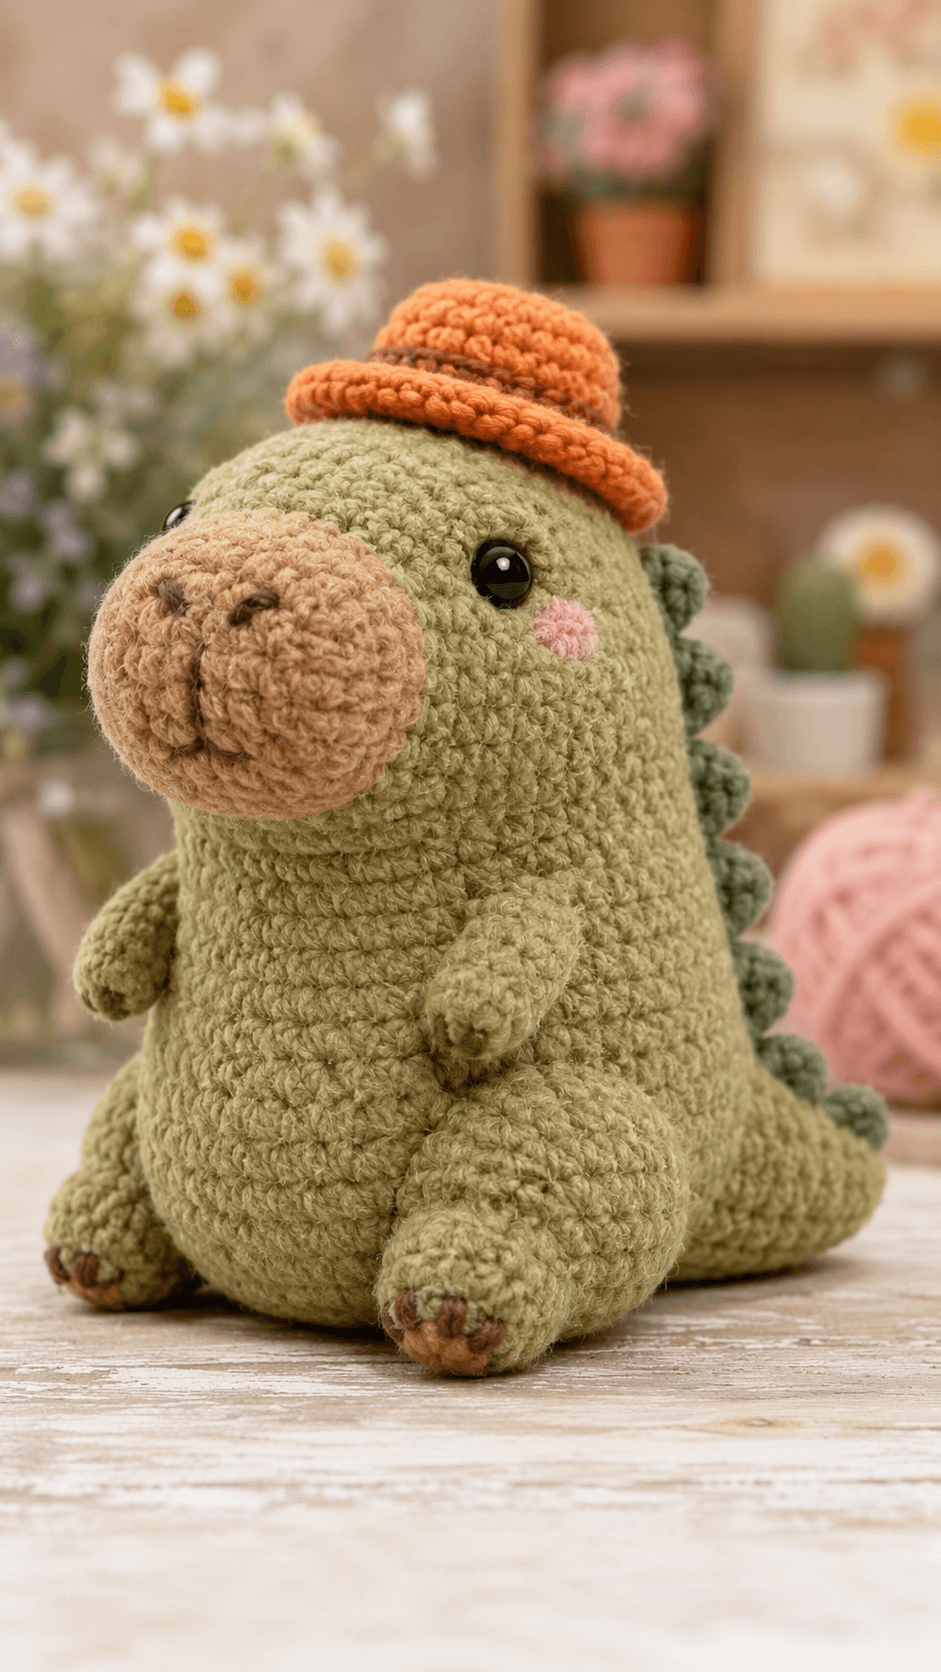
That blunt oval snout changes the whole build sequence. This dinosaur amigurumi crochet pattern is shaped around a forward-set muzzle, a seated base, DK to light-worsted yarn, a 3.25 mm hook, and a finished height of about 25 cm. It suits an intermediate maker because the body proportions matter more than the stitch menu. The result works as nursery decor or desk display.
The Design: What Makes This Dinosaur Different
This version is not built like a long-neck dinosaur or a flat no-sew plush. The head and body stay separate in concept even when the silhouette reads as one rounded mass, because the photo shows a distinct face projection, a wide seated belly, and a tail that props the dinosaur from behind. A second structural choice is the oversized snout. That piece has to be crocheted as a short oval dome instead of a flat patch, or the front view collapses. The back spikes also matter. Small rounded bumps, not sharp triangles, keep the outline soft and match the reference better. One common mistake in a crochet dinosaur pattern is placing the legs too low and too narrow. Then the toy tips backward and the chest looks hollow. Here the limbs sit forward enough to support the seated posture while the tail handles the rear balance.
Project Info at a Glance
| Skill Level | Time | Finished Size | Hook | Best For |
|---|---|---|---|---|
| Intermediate | 6–8 hours | About 25 cm seated | 3.25 mm | Display plush, nursery shelf, gift make |
Materials and Tools
Yarn
- Sage green — DK or light worsted — about 80 g — cotton blend or matte acrylic
- Beige — same weight — about 20 g — for snout
- Dark sage — same weight — about 10 g — for back spikes
- Orange — same weight — about 15 g — for hat
- Brown — scrap amount — for claws and hat band
- Dusty pink — scrap amount — for cheek patches
Tools
- Hook 3.25 mm
- 10 mm safety eyes
- Polyester stuffing
- Tapestry needle
- Stitch markers
- Scissors
Abbreviations
MR = magic ring, sc = single crochet, inc = increase, dec = decrease, sl st = slip stitch, ch = chain, BLO = back loop only, FO = fasten off. Use an invisible decrease on visible shaping rounds so the head and body narrow without leaving hard corners.
Pattern — Step by Step
Continuous spiral unless noted.
Head (Make 1)
Yarn: sage green — Standard amigurumi math adapted to photo proportions
R1: 6 sc in MR (6)
R2: inc x6 (12)
R3: [sc, inc] x6 (18)
R4: [2 sc, inc] x6 (24)
R5: [3 sc, inc] x6 (30)
R6: [4 sc, inc] x6 (36)
R7–13: sc around (36)
R14: [4 sc, dec] x6 (30)
R15: sc around (30)
R16: [3 sc, dec] x6 (24)
R17: sc around (24)
Insert eyes between R10 and R11, about 8 stitches apart. Stuff firmly before closing.
R18: [2 sc, dec] x6 (18)
R19: [sc, dec] x6 (12)
R20: dec x6 (6)
FO. Leave a 20 cm tail.
Body (Make 1)
Yarn: sage green — Standard amigurumi math adapted to photo proportions
R1: 6 sc in MR (6)
R2: inc x6 (12)
R3: [sc, inc] x6 (18)
R4: [2 sc, inc] x6 (24)
R5: [3 sc, inc] x6 (30)
R6: [4 sc, inc] x6 (36)
R7–12: sc around (36)
R13: [4 sc, dec] x6 (30)
R14–15: sc around (30)
R16: [3 sc, dec] x6 (24)
R17–18: sc around (24)
Stuff the lower belly densely. Keep the upper neck area lighter so the head can sit forward.
R19: [2 sc, dec] x6 (18)
R20: sc around (18)
FO. Leave a 30 cm tail.
Snout (Make 1)
Yarn: beige — Custom shaping for the pictured muzzle
R1: 6 sc in MR (6)
R2: inc x6 (12)
R3: [sc, inc] x6 (18)
R4: [2 sc, inc] x6 (24)
R5–7: sc around (24)
R8: [2 sc, dec] x6 (18)
R9: sc around (18)
Stuff lightly so the snout stays rounded, not rigid. Embroider nostrils before attachment.
FO. Leave a 35 cm tail.
Arms / Front Legs (Make 2)
Yarn: sage green — Standard amigurumi math
R1: 6 sc in MR (6)
R2: [sc, inc] x3 (9)
R3–5: sc around (9)
R6: [sc, dec] x3 (6)
R7–8: sc around (6)
Stuff only the lower half. Flatten top edge.
FO. Leave a 20 cm tail.
Back Legs (Make 2)
Yarn: sage green — Standard amigurumi math adapted to seated base
R1: 6 sc in MR (6)
R2: inc x6 (12)
R3: [sc, inc] x6 (18)
R4–5: sc around (18)
R6: [sc, dec] x6 (12)
R7–8: sc around (12)
Add brown claw stitches across the front edge after sewing. Stuff moderately. Flatten top edge.
FO. Leave a 25 cm tail.
Tail (Make 1)
Yarn: sage green — Custom shaping for rear support
R1: 6 sc in MR (6)
R2: [sc, inc] x3 (9)
R3: [2 sc, inc] x3 (12)
R4: sc around (12)
R5: [3 sc, inc] x3 (15)
R6: sc around (15)
R7: [4 sc, inc] x3 (18)
R8–10: sc around (18)
Stuff lightly toward the base only. Keep the tip flexible so it sits on the table without pushing the body upward.
FO. Leave a 30 cm tail.
Back Spikes (Make 6)
Yarn: dark sage — Rounded spikes to match the photo
Spike A x2:
R1: 6 sc in MR (6)
R2: sc around (6)
R3: [sc, inc] x3 (9)
R4: sc around (9)
Spike B x2:
R1: 6 sc in MR (6)
R2: [sc, inc] x3 (9)
R3: sc around (9)
R4: [2 sc, inc] x3 (12)
Spike C x2:
R1: 6 sc in MR (6)
R2: [sc, inc] x3 (9)
R3: [2 sc, inc] x3 (12)
R4: sc around (12)
Do not stuff. Flatten each piece before sewing into a soft ridge.
FO. Leave 15 cm tails.
Cheek Patches (Make 2)
Yarn: dusty pink — Flat circle
R1: 6 sc in MR (6)
R2: inc x6 (12)
FO. Leave a 15 cm tail.
Hat Crown (Make 1)
Yarn: orange — Accessory from the photo
R1: 6 sc in MR (6)
R2: inc x6 (12)
R3: [sc, inc] x6 (18)
R4: [2 sc, inc] x6 (24)
R5–7: sc around (24)
FO.
Hat Brim (Make 1)
Yarn: orange
R1: 6 sc in MR (6)
R2: inc x6 (12)
R3: [sc, inc] x6 (18)
R4: [2 sc, inc] x6 (24)
R5: [3 sc, inc] x6 (30)
R6: BLO sc around (30)
FO. Sew crown to center of brim. Wrap a strand of brown yarn as the hat band.
Assembly
- Sew the head to the body with the face angled slightly downward, not straight upright.
- Pin the snout centered low on the face so its top edge sits below the eye line.
- Sew the snout in place and add a small amount of extra stuffing as you close the last third.
- Attach the cheek patches one round below the eyes and just outside the snout edge.
- Sew the arms high on the body, about one round below the neck join.
- Sew the back legs to the lower front sides so the dinosaur rests on both feet when seated.
- Attach the tail low on the back centerline and angle it outward so it acts as a rear prop.
- Sew the spikes from crown to tail base, using the largest pair at mid-back.
- Place the hat slightly off center toward the front of the head and tack it down through the brim only.
- Embroider brown claw tips and the mouth line, then reshape the stuffing by hand.
The finished dinosaur should sit without rocking, with the snout projecting forward and the tail lightly touching the surface.
7 Technical Tips
- Move your stitch marker every round on the head. A drift of even one stitch will pull the eye spacing off center by the time you reach round 10.
- Do not overstuff the snout. Too much fill turns the muzzle into a ball and removes the flatter front plane visible in the photo.
- Use invisible decreases on rounds 14, 16, 18, and 19 of the head. Standard decreases leave a ridge that becomes obvious beside the safety eyes.
- Insert the eyes before the last two decrease rounds. On a 36-stitch head, waiting until 18 stitches or fewer makes the washers harder to seat cleanly.
- Stuff the body in two densities. Firm fill in the bottom 60 percent prevents collapse, while softer fill near the neck keeps the head angle easier to adjust.
- Pin all six spikes before sewing any of them down. A spacing error of more than 1 cm is visible immediately on a short-backed dinosaur like this one.
- Weave tails horizontally through at least 4 to 5 stitches inside the body. Short vertical burying often creates bumps on compact amigurumi surfaces.
Conclusion
This dinosaur amigurumi crochet pattern works because the construction follows the photo instead of forcing a generic plush body to do all the work. The snout projects first. Then the belly widens. After that, the tail and leg placement stabilize the seated pose, while the spikes, cheeks, and hat finish the silhouette. Make one sample in the listed colors, photograph it from the front and three-quarter view, and check the snout depth before scaling the pattern up. Share the result on Pinterest and Instagram with #DinosaurAmigurumiWithHat. One useful question remains: did you place your hat directly over the crown, or slightly forward to balance the oversized snout?That blunt oval snout changes the whole build sequence. This dinosaur amigurumi crochet pattern is shaped around a forward-set muzzle, a seated base, DK to light-worsted yarn, a 3.25 mm hook, and a finished height of about 25 cm. It suits an intermediate maker because the body proportions matter more than the stitch menu. The result works as nursery decor or desk display.
The Design: What Makes This Dinosaur Different
This version is not built like a long-neck dinosaur or a flat no-sew plush. The head and body stay separate in concept even when the silhouette reads as one rounded mass, because the photo shows a distinct face projection, a wide seated belly, and a tail that props the dinosaur from behind. A second structural choice is the oversized snout. That piece has to be crocheted as a short oval dome instead of a flat patch, or the front view collapses. The back spikes also matter. Small rounded bumps, not sharp triangles, keep the outline soft and match the reference better. One common mistake in a crochet dinosaur pattern is placing the legs too low and too narrow. Then the toy tips backward and the chest looks hollow. Here the limbs sit forward enough to support the seated posture while the tail handles the rear balance.
Project Info at a Glance
| Skill Level | Time | Finished Size | Hook | Best For |
|---|---|---|---|---|
| Intermediate | 6–8 hours | About 25 cm seated | 3.25 mm | Display plush, nursery shelf, gift make |
Materials and Tools
Yarn
- Sage green — DK or light worsted — about 80 g — cotton blend or matte acrylic
- Beige — same weight — about 20 g — for snout
- Dark sage — same weight — about 10 g — for back spikes
- Orange — same weight — about 15 g — for hat
- Brown — scrap amount — for claws and hat band
- Dusty pink — scrap amount — for cheek patches
Tools
- Hook 3.25 mm
- 10 mm safety eyes
- Polyester stuffing
- Tapestry needle
- Stitch markers
- Scissors
Abbreviations
MR = magic ring, sc = single crochet, inc = increase, dec = decrease, sl st = slip stitch, ch = chain, BLO = back loop only, FO = fasten off. Use an invisible decrease on visible shaping rounds so the head and body narrow without leaving hard corners.
Pattern — Step by Step
Continuous spiral unless noted.
Head (Make 1)
Yarn: sage green — Standard amigurumi math adapted to photo proportions
R1: 6 sc in MR (6)
R2: inc x6 (12)
R3: [sc, inc] x6 (18)
R4: [2 sc, inc] x6 (24)
R5: [3 sc, inc] x6 (30)
R6: [4 sc, inc] x6 (36)
R7–13: sc around (36)
R14: [4 sc, dec] x6 (30)
R15: sc around (30)
R16: [3 sc, dec] x6 (24)
R17: sc around (24)
Insert eyes between R10 and R11, about 8 stitches apart. Stuff firmly before closing.
R18: [2 sc, dec] x6 (18)
R19: [sc, dec] x6 (12)
R20: dec x6 (6)
FO. Leave a 20 cm tail.
Body (Make 1)
Yarn: sage green — Standard amigurumi math adapted to photo proportions
R1: 6 sc in MR (6)
R2: inc x6 (12)
R3: [sc, inc] x6 (18)
R4: [2 sc, inc] x6 (24)
R5: [3 sc, inc] x6 (30)
R6: [4 sc, inc] x6 (36)
R7–12: sc around (36)
R13: [4 sc, dec] x6 (30)
R14–15: sc around (30)
R16: [3 sc, dec] x6 (24)
R17–18: sc around (24)
Stuff the lower belly densely. Keep the upper neck area lighter so the head can sit forward.
R19: [2 sc, dec] x6 (18)
R20: sc around (18)
FO. Leave a 30 cm tail.
Snout (Make 1)
Yarn: beige — Custom shaping for the pictured muzzle
R1: 6 sc in MR (6)
R2: inc x6 (12)
R3: [sc, inc] x6 (18)
R4: [2 sc, inc] x6 (24)
R5–7: sc around (24)
R8: [2 sc, dec] x6 (18)
R9: sc around (18)
Stuff lightly so the snout stays rounded, not rigid. Embroider nostrils before attachment.
FO. Leave a 35 cm tail.
Arms / Front Legs (Make 2)
Yarn: sage green — Standard amigurumi math
R1: 6 sc in MR (6)
R2: [sc, inc] x3 (9)
R3–5: sc around (9)
R6: [sc, dec] x3 (6)
R7–8: sc around (6)
Stuff only the lower half. Flatten top edge.
FO. Leave a 20 cm tail.
Back Legs (Make 2)
Yarn: sage green — Standard amigurumi math adapted to seated base
R1: 6 sc in MR (6)
R2: inc x6 (12)
R3: [sc, inc] x6 (18)
R4–5: sc around (18)
R6: [sc, dec] x6 (12)
R7–8: sc around (12)
Add brown claw stitches across the front edge after sewing. Stuff moderately. Flatten top edge.
FO. Leave a 25 cm tail.
Tail (Make 1)
Yarn: sage green — Custom shaping for rear support
R1: 6 sc in MR (6)
R2: [sc, inc] x3 (9)
R3: [2 sc, inc] x3 (12)
R4: sc around (12)
R5: [3 sc, inc] x3 (15)
R6: sc around (15)
R7: [4 sc, inc] x3 (18)
R8–10: sc around (18)
Stuff lightly toward the base only. Keep the tip flexible so it sits on the table without pushing the body upward.
FO. Leave a 30 cm tail.
Back Spikes (Make 6)
Yarn: dark sage — Rounded spikes to match the photo
Spike A x2:
R1: 6 sc in MR (6)
R2: sc around (6)
R3: [sc, inc] x3 (9)
R4: sc around (9)
Spike B x2:
R1: 6 sc in MR (6)
R2: [sc, inc] x3 (9)
R3: sc around (9)
R4: [2 sc, inc] x3 (12)
Spike C x2:
R1: 6 sc in MR (6)
R2: [sc, inc] x3 (9)
R3: [2 sc, inc] x3 (12)
R4: sc around (12)
Do not stuff. Flatten each piece before sewing into a soft ridge.
FO. Leave 15 cm tails.
Cheek Patches (Make 2)
Yarn: dusty pink — Flat circle
R1: 6 sc in MR (6)
R2: inc x6 (12)
FO. Leave a 15 cm tail.
Hat Crown (Make 1)
Yarn: orange — Accessory from the photo
R1: 6 sc in MR (6)
R2: inc x6 (12)
R3: [sc, inc] x6 (18)
R4: [2 sc, inc] x6 (24)
R5–7: sc around (24)
FO.
Hat Brim (Make 1)
Yarn: orange
R1: 6 sc in MR (6)
R2: inc x6 (12)
R3: [sc, inc] x6 (18)
R4: [2 sc, inc] x6 (24)
R5: [3 sc, inc] x6 (30)
R6: BLO sc around (30)
FO. Sew crown to center of brim. Wrap a strand of brown yarn as the hat band.
Assembly
- Sew the head to the body with the face angled slightly downward, not straight upright.
- Pin the snout centered low on the face so its top edge sits below the eye line.
- Sew the snout in place and add a small amount of extra stuffing as you close the last third.
- Attach the cheek patches one round below the eyes and just outside the snout edge.
- Sew the arms high on the body, about one round below the neck join.
- Sew the back legs to the lower front sides so the dinosaur rests on both feet when seated.
- Attach the tail low on the back centerline and angle it outward so it acts as a rear prop.
- Sew the spikes from crown to tail base, using the largest pair at mid-back.
- Place the hat slightly off center toward the front of the head and tack it down through the brim only.
- Embroider brown claw tips and the mouth line, then reshape the stuffing by hand.
The finished dinosaur should sit without rocking, with the snout projecting forward and the tail lightly touching the surface.
7 Technical Tips
- Move your stitch marker every round on the head. A drift of even one stitch will pull the eye spacing off center by the time you reach round 10.
- Do not overstuff the snout. Too much fill turns the muzzle into a ball and removes the flatter front plane visible in the photo.
- Use invisible decreases on rounds 14, 16, 18, and 19 of the head. Standard decreases leave a ridge that becomes obvious beside the safety eyes.
- Insert the eyes before the last two decrease rounds. On a 36-stitch head, waiting until 18 stitches or fewer makes the washers harder to seat cleanly.
- Stuff the body in two densities. Firm fill in the bottom 60 percent prevents collapse, while softer fill near the neck keeps the head angle easier to adjust.
- Pin all six spikes before sewing any of them down. A spacing error of more than 1 cm is visible immediately on a short-backed dinosaur like this one.
- Weave tails horizontally through at least 4 to 5 stitches inside the body. Short vertical burying often creates bumps on compact amigurumi surfaces.
Conclusion
This dinosaur amigurumi crochet pattern works because the construction follows the photo instead of forcing a generic plush body to do all the work. The snout projects first. Then the belly widens. After that, the tail and leg placement stabilize the seated pose, while the spikes, cheeks, and hat finish the silhouette. Make one sample in the listed colors, photograph it from the front and three-quarter view, and check the snout depth before scaling the pattern up. Share the result on Pinterest and Instagram with #DinosaurAmigurumiWithHat. One useful question remains: did you place your hat directly over the crown, or slightly forward to balance the oversized snout?









