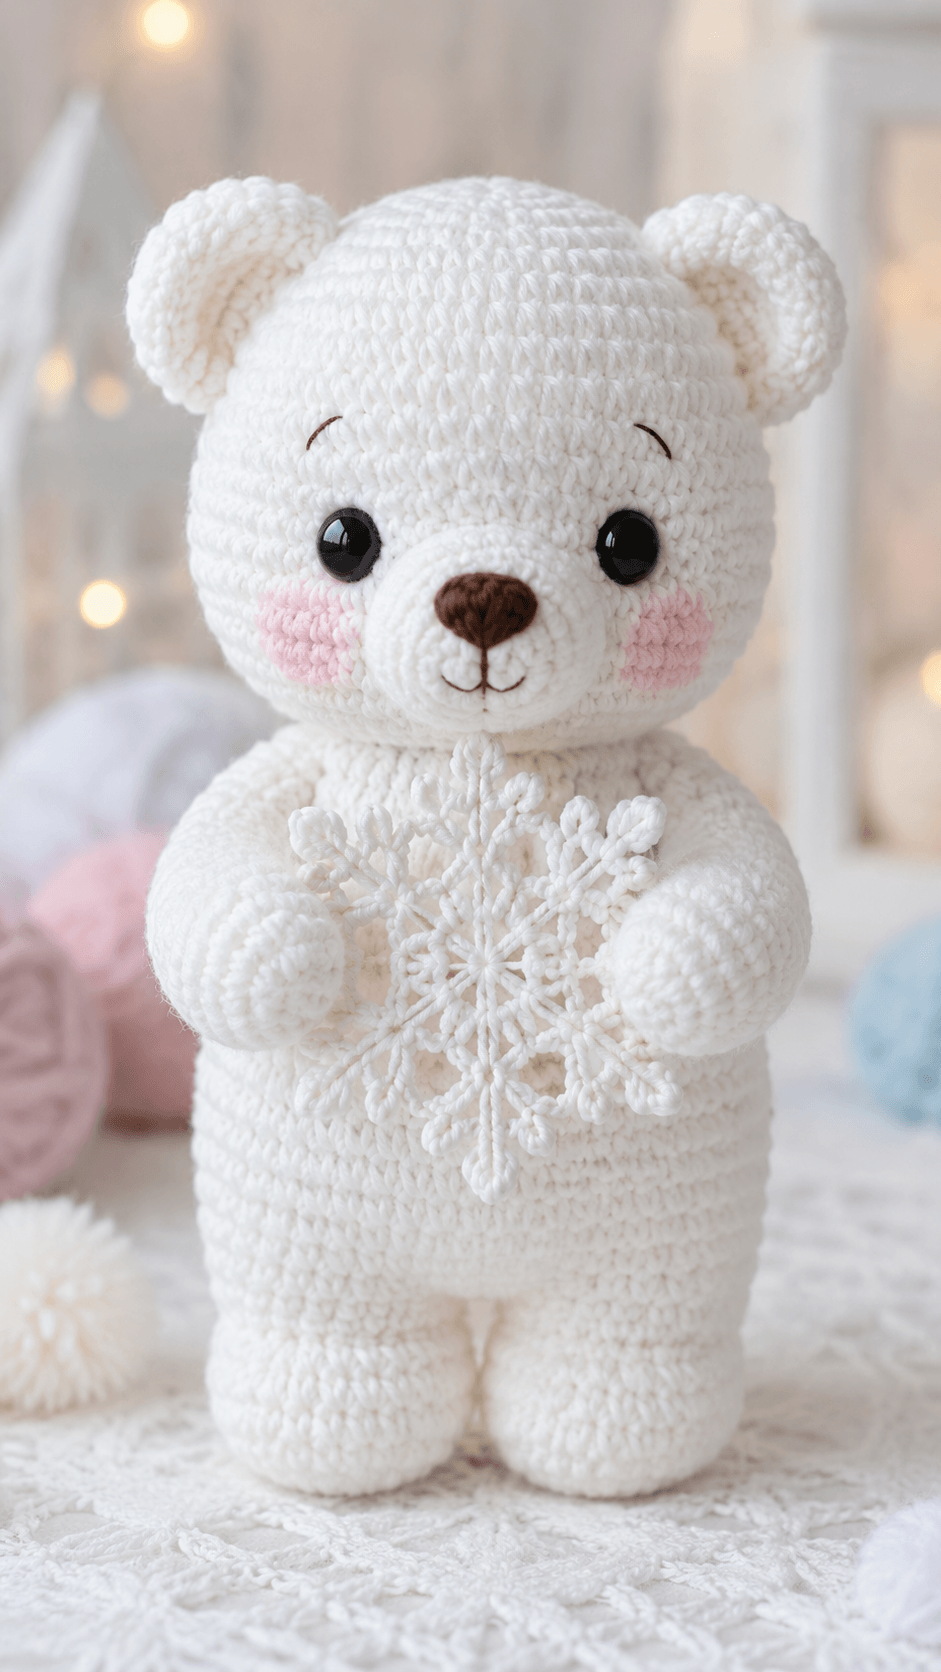
A polar bear only looks convincing in white when the muzzle stays distinct from the head. This polar bear crochet pattern builds a standing bear with a broad face, compact ears, straight body, and front paws positioned to hold a crochet snowflake. It uses worsted-weight yarn and a 3.5 mm hook for dense fabric and clear shaping. Skill level: intermediate. The finished piece works as winter shelf decor, nursery styling, or a seasonal handmade gift.
The Design: What Makes This Polar Bear Different
You are not building a generic teddy and recoloring it white. The face has to carry the species. That means the ears stay small and rounded, the muzzle projects only slightly, and the head remains larger than the torso. A crochet polar bear plush also needs better facial contrast than a brown bear. White yarn can flatten the features fast, so the nose, cheek placement, and eye spacing do more work than usual. The photographed version also holds a snowflake, which changes the arm position. They cannot hang at the sides. Both arms need to sit forward at an even height or the accessory looks dropped into the body instead of held. The body itself is simpler than the head. Straight sides and separate feet keep the bear upright. A common mistake with a winter bear crochet design is overstuffing the muzzle. That pushes the nose too far out and turns the silhouette toward a dog rather than a polar bear.
Project Info at a Glance
| Skill Level | Time | Finished Size | Hook | Best For |
|---|---|---|---|---|
| Intermediate | 6–8 hours | Approx. 24–28 cm tall | 3.5 mm | Winter decor, nursery display, handmade holiday gift |
Materials and Tools
Yarn
- White — worsted/aran — approx. 170 g — for head, body, arms, legs, ears, muzzle, and snowflake
- Pale pink — worsted — approx. 10 g — for cheek patches
- Brown — worsted — approx. 10 g — for nose
- Black embroidery floss — small amount — for mouth and brows
Tools
- Hook 3.5 mm
- Safety eyes 10–12 mm
- Stuffing
- Tapestry needle
- Stitch markers
- Straight pins
- Scissors
Abbreviations
MR = magic ring, sc = single crochet, inc = increase, dec = decrease, sl st = slip stitch, ch = chain, BLO = back loop only, dc = double crochet, tr = treble crochet.
Invisible decrease reduces bulk on white fabric, where ordinary decreases show faster under direct light.
Pattern — Step by Step
Work in a continuous spiral unless noted. Use a marker in the first stitch of each round.
Head (Make 1)
Yarn: white — standard amigurumi sphere
R1: 6 sc in MR (6)
R2: inc x6 (12)
R3: (sc, inc) x6 (18)
R4: (2 sc, inc) x6 (24)
R5: (3 sc, inc) x6 (30)
R6: (4 sc, inc) x6 (36)
R7: (5 sc, inc) x6 (42)
R8-R14: sc around (42)
R15: (5 sc, dec) x6 (36)
R16: (4 sc, dec) x6 (30)
Insert eyes between R10 and R11, about 10 stitches apart.
R17: (3 sc, dec) x6 (24)
Stuff firmly.
R18: (2 sc, dec) x6 (18)
R19: (sc, dec) x6 (12)
R20: dec x6 (6)
Fasten off. Leave 25 cm tail.
Body (Make 1)
Yarn: white — standing body with straight sides
Make legs first.
Leg 1:
R1: 6 sc in MR (6)
R2: inc x6 (12)
R3-R5: sc around (12)
Fasten off first leg.
Leg 2:
R1: 6 sc in MR (6)
R2: inc x6 (12)
R3-R5: sc around (12)
Do not fasten off.
Join legs with 3 ch.
R6: 12 sc around first leg, 3 sc in chain, 12 sc around second leg, 3 sc on opposite side of chain (30)
R7-R12: sc around (30)
R13: (3 sc, dec) x6 (24)
R14-R16: sc around (24)
R17: (2 sc, dec) x6 (18)
R18-R19: sc around (18)
Stuff legs firmly and upper body slightly softer.
Fasten off. Leave 30 cm tail.
Arms (Make 2)
Yarn: white
R1: 6 sc in MR (6)
R2: inc x6 (12)
R3-R4: sc around (12)
R5: (2 sc, dec) x3 (9)
R6-R11: sc around (9)
Stuff only the hand end. Leave the upper arm soft for easier positioning around the snowflake.
Flatten and sc through both sides across 4 sts.
Fasten off. Leave 25 cm tail.
Ears (Make 2)
Yarn: white
R1: 6 sc in MR (6)
R2: inc x6 (12)
R3: (sc, inc) x6 (18)
R4: sc around (18)
Flatten and sc through both sides across 8 sts.
Fasten off. Leave 18 cm tail.
Muzzle (Make 1)
Yarn: white — small oval muzzle
Ch 7.
R1: sc in 2nd ch from hook, 4 sc, 3 sc in last ch, working on opposite side 4 sc, 2 sc in last ch (14)
R2: inc, 4 sc, inc x3, 4 sc, inc x2 (20)
R3: sc around (20)
R4: sc around (20)
Stuff lightly only at center.
Fasten off. Leave 30 cm tail.
Nose (Make 1)
Yarn: brown
R1: 6 sc in MR (6)
R2: (sc, inc) x3 (9)
R3: sc around (9)
Flatten slightly into an oval before sewing.
Fasten off. Leave 15 cm tail.
Cheek Patches (Make 2)
Yarn: pale pink — flat circle
R1: 6 sc in MR (6)
R2: inc x6 (12)
Sl st to close.
Fasten off. Leave 12 cm tail.
Feet Front Bumps (Optional, Make 2)
Yarn: white — for the rounded foot fronts visible in the photo
R1: 6 sc in MR (6)
R2: inc x6 (12)
R3: sc around (12)
Flatten and sew low on each leg front.
Fasten off. Leave 15 cm tail.
Snowflake (Make 1)
Yarn: white — flat applique adapted to photo scale
R1: 6 sc in MR, sl st to first sc (6)
R2: *ch 7, sl st in 2nd ch from hook, sl st in next 2 ch, ch 3, sl st in 2nd ch from hook, sl st in next ch, sl st in same base st, sl st in next st* repeat from * to * 6 times.
Fasten off. Leave 20 cm tail for sewing or tacking between paws.
Assembly
- Sew the muzzle to the lower center of the head.
- Sew the brown nose to the top half of the muzzle and embroider one short vertical mouth line under it.
- Embroider the brows one to two rounds above the eyes with a slight upward outer curve.
- Sew the cheek patches below the eyes and outside the muzzle width.
- Sew the ears to the upper sides of the head, keeping them small and slightly forward.
- Sew the head to the body, centering it directly over the neck opening.
- Sew the arms to the upper torso at equal height, angled inward toward the center front.
- Sew the optional foot front bumps low on each leg if extra rounding is needed.
- Place the snowflake between both paws and tack it at three points: left paw, right paw, and center chest area if needed.
- Adjust stuffing by hand, straighten the head, and steam-shape lightly if the white fabric ripples.
The piece is complete when the bear stands balanced and the snowflake stays centered between both paws.
7 Technical Tips
- Mark the eye line before attaching the muzzle. White yarn hides reference points fast, and uneven eye spacing is harder to fix after the muzzle goes on.
- Keep the muzzle stuffing light. Overfilling pushes the nose outward and shortens the face visually by at least one round.
- Use invisible decreases on the head. Standard decreases leave darker shadow points on white fabric, especially around the lower half of the face.
- Stuff the legs more firmly than the torso. A soft lower half makes the standing body buckle at the ankles.
- Pin both arms with the snowflake in place before sewing. Even a 5 mm height difference makes the accessory tilt immediately.
- Keep the ears small and low. Ears taller than about one-third of the head side height push the design toward a teddy bear instead of a polar bear.
- Block the snowflake lightly before attachment. An unshaped applique curls inward and disappears against the front body.
Conclusion
This polar bear crochet pattern relies on proportion more than detail count. The head carries the species, the straight body keeps the figure upright, and the snowflake gives the front view a winter-specific focal point. White yarn leaves no room for loose shaping, so the muzzle depth, arm height, and ear scale matter more than extra surface decoration. Next step: crochet the head and one arm first, then test the snowflake diameter against the paw width before finishing the second arm. Share the finished bear on Pinterest and Instagram with #PolarBearSnowflakePattern. Did your snowflake stay flat once both paws were sewn into place?









