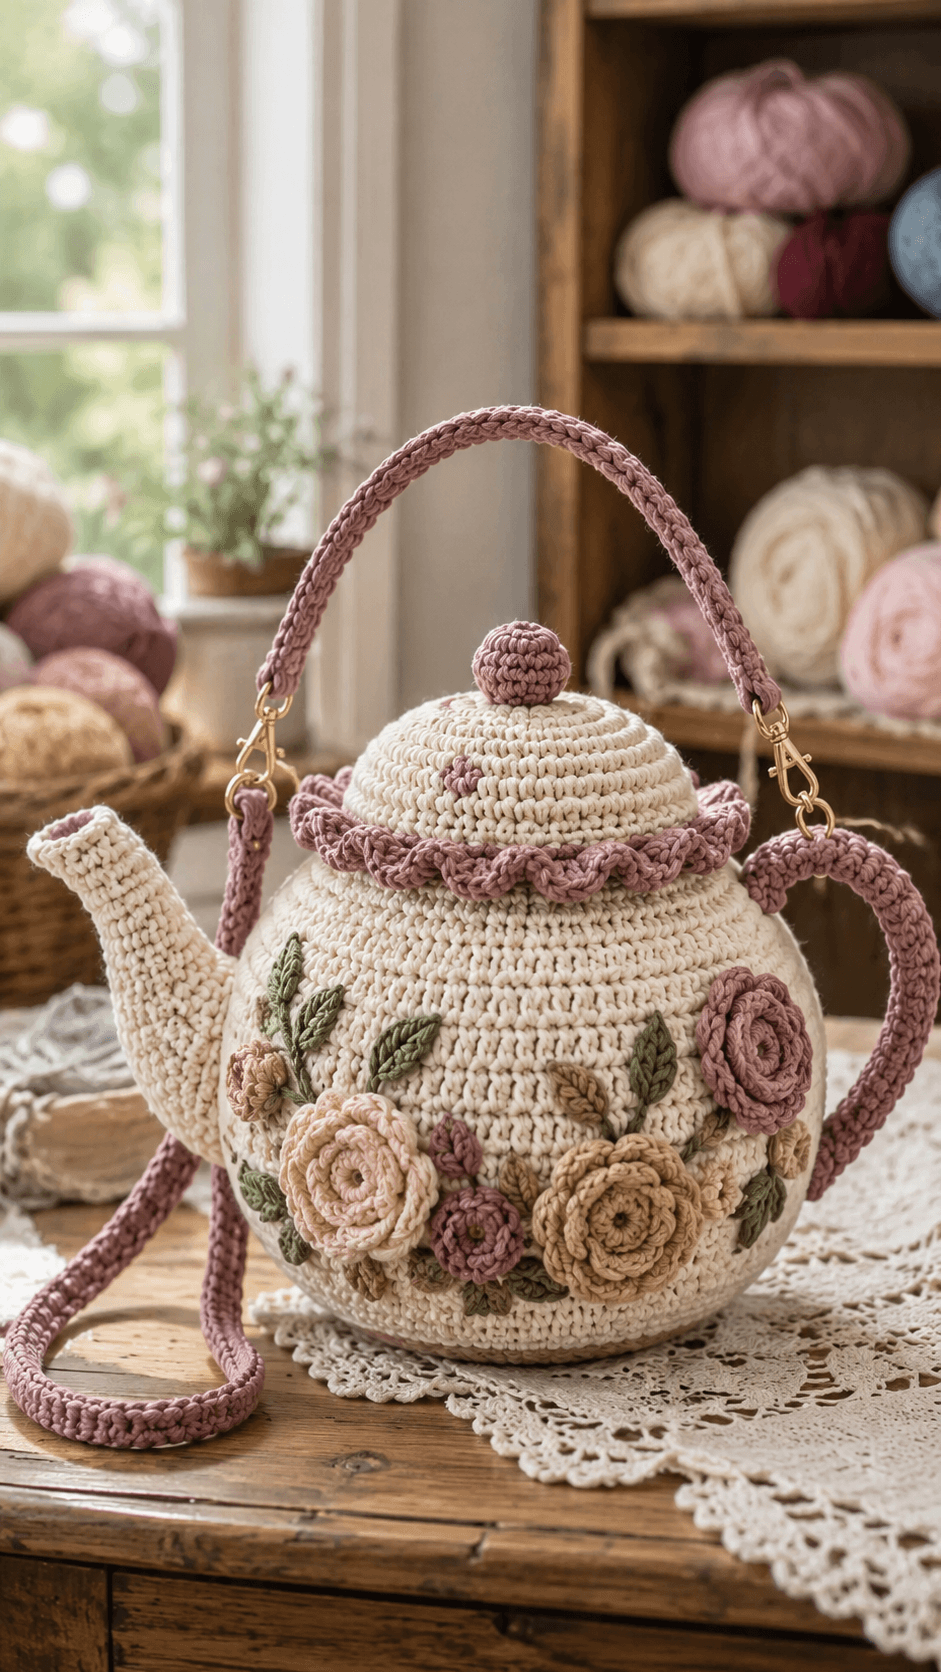
A teapot bag only works when the rounded body stays full while the spout, lid, and handle remain distinct from every viewing angle. That structural balance defines this floral teapot crochet bag pattern. The sample shown here uses a soft cream base, mauve edging, raised crochet roses, embroidered leaves, and a long strap to turn a novelty teapot shape into a wearable accessory. It suits intermediate crocheters who can manage shaped construction, appliqué placement, and firm assembly across multiple curved parts.
The Design: What Makes This Teapot Bag Different
This bag depends on silhouette before surface detail. The body is built as a rounded teapot form, not a standard purse with decorations added later. That means the widest area needs enough depth for storage, while the top narrows under the lid so the piece still reads clearly as a teapot.
The second design choice is the floral band. Raised roses and leaf embroidery sit across the lower front half, which gives the bag a vintage teacup-and-teapot look without covering the full body. In a crochet novelty bag, that placement matters because too many appliqués can hide the main shape.
The third choice is color separation. Cream forms the pot body, while dusty mauve is used for the handle, strap, lid trim, and decorative accents. One common mistake with a crochet teapot purse is making the spout too soft or too short. That weakens the teapot outline immediately and makes the piece look like an ordinary round bag with a side tab.
Project Info at a Glance
| Skill Level | Time | Finished Size | Hook | Best For |
|---|---|---|---|---|
| Intermediate | 8–14 hours | Approx. 24–30 cm wide excluding strap | 3.5–4.5 mm | Novelty handbags, tea-themed gifts, craft fairs, display accessories |
Materials and Tools
Yarn
- Cream cotton yarn — worsted weight — approx. 220–320 g
- Dusty mauve cotton yarn — approx. 80–130 g
- Soft pink cotton yarn — small amount for flowers
- Beige or taupe cotton yarn — small amount for flowers
- Olive or sage green cotton yarn — small amount for leaves
Tools
- Crochet hook 3.5 mm to 4.5 mm
- Tapestry needle
- Stitch markers
- Scissors
- Optional magnetic snap or zipper
- Optional fabric lining and sewing needle
Abbreviations
- MR = magic ring
- ch = chain
- sl st = slip stitch
- sc = single crochet
- hdc = half double crochet
- dc = double crochet
- inc = increase
- dec = decrease
- rep = repeat
- BLO = back loop only
For a shaped handbag, firmness matters more than speed. Loose stitches make the body sag and reduce the definition between the pot, lid, and spout.
Construction Overview
This bag is built in sections. The main body is crocheted as a rounded vessel shape, either in two joined panels or as a shaped three-dimensional form. The spout and handle are made separately and attached to opposite sides. A lid section with a small top knob sits above the upper opening, and a long strap is fixed to the sides with hardware or reinforced joins. Raised roses and embroidered leaves are added last across the front for the vintage floral finish.
Main Teapot Body
The body should be deep and rounded, with the widest point in the middle and a slightly narrower top. That profile is what makes the finished piece read as a teapot rather than a round canteen bag. Dense single crochet or half double crochet works well because it gives enough structure for the decorative surface details.
- Begin with an MR or circular panel in cream.
- Increase evenly to create the rounded side of the pot.
- Work enough rounds or rows to form a full front and back panel if using a two-piece method.
- Join the panels with side depth or work upward in shaped rounds if using a one-piece method.
- Leave an opening near the upper center for access to the bag interior.
The lower half should stay generous enough to hold small daily items. The top should narrow only slightly so the silhouette stays readable without reducing usability too much.
Spout
The spout is one of the most important structural details. It needs to taper outward from the body and rise at a slight upward angle. If it sits too low or remains too wide, the teapot effect weakens immediately.
- Begin at the body-side attachment point in cream.
- Work a tapered tube or wedge shape using gradual decreases and short rows as needed.
- Keep the base wider than the tip.
- Lightly stuff or reinforce the spout only if required to hold its angle.
- Attach it securely to one side of the body.
Handle
The handle should curve clearly away from the body and mirror the scale of the spout. The sample uses mauve for contrast, which separates the handle visually from the cream teapot body and makes the shape easier to read.
- Chain to the required handle length.
- Work back in sc or hdc for several rows to create a firm strap-like handle.
- Curve it into a rounded teapot handle shape.
- Attach both ends to the side opposite the spout.
Lid and Knob
The lid sits on the top opening and should look distinct from the body, even if the bag opens through a zipper or hidden gap underneath it. A contrasting scalloped or ruffled mauve edge helps define the transition. The small top knob finishes the teapot silhouette.
- Work a shallow circular lid in cream sized to the upper opening.
- Add a mauve edging round around the lid.
- Create a small rounded knob in mauve.
- Attach the knob to the lid center.
- Sew the lid to the top edge or position it above a closure opening.
Closure Options
The sample is decorative first, but the bag still needs a usable opening. A zipper hidden below the lid is the cleanest option. A magnetic snap can also work if the opening is small and the body is firm enough to stay closed when worn.
- Install a zipper inside the upper opening if a secure closure is needed.
- Use a magnetic snap for a simpler finish.
- Keep the closure line hidden under the lid section when possible.
Floral Appliqués
The floral band gives the bag its vintage teapot character. The sample uses layered roses in soft pink, mauve, cream, and taupe with embroidered leaves placed between them. That arrangement keeps the decoration concentrated across the lower front half rather than covering the entire bag.
Roses
- Work several small spiral or layered rose motifs in soft neutral shades.
- Vary the size slightly for a more natural arrangement.
- Keep the flowers shallow enough that they do not snag easily in use.
Leaves
- Crochet small leaf motifs or embroider leaves directly onto the body.
- Place them between and behind the roses to build a continuous floral band.
Shoulder Strap
The long mauve strap turns the novelty piece into a wearable bag. It should be narrow but reinforced, and the attachment points need to be strong enough to handle the weight of the filled bag.
- Chain to the desired strap length.
- Work back and forth in dense stitches until the strap reaches the required width.
- Attach hardware if desired.
- Sew or clip the strap securely to both sides of the upper body.
Assembly
- Complete the cream teapot body first.
- Attach the spout to one side.
- Sew the mauve handle to the opposite side.
- Install the closure inside the upper opening if using one.
- Attach the lid and top knob.
- Arrange and sew the rose appliqués across the lower front body.
- Add the leaves between the flowers.
- Attach the long shoulder strap with reinforced joins or hardware.
- Weave in all ends securely on the inside.
Optional Reinforcement
If the bag will be carried regularly, add a fabric lining and reinforce the spout, handle, and strap join points. A lightly structured lining helps the teapot shape stay round and keeps smaller items from pressing visibly against the stitch fabric. For display use, the body can stay softer. For daily wear, more structure usually works better.
Color Placement Notes
Keep the body and spout in cream, use dusty mauve for the handle, strap, lid trim, and knob, and work the floral appliqués in soft pink, taupe, mauve, and cream with muted green leaves. That arrangement matches the sample and keeps the teapot silhouette clear while still adding a decorative floral band.
Common Failure Points
- Bag losing its teapot shape: The body fabric is too loose or too soft. Use a smaller hook or add lining for structure.
- Spout drooping: The spout is too long or not reinforced at the base. Shorten it slightly or stabilize the join.
- Handle pulling away: The side attachment points are too narrow. Reinforce the handle ends and sew through multiple rows.
- Lid looking flat: There is not enough contrast or edge definition between lid and body. Add a firm trim round or ruffle edge.
- Floral appliqués crowding the shape: Too many flowers are placed too high on the body. Keep the arrangement low and concentrated.
Where This Bag Works Best
This style works well as a novelty handbag, tea-party accessory, craft fair statement piece, themed photo prop, or gift for tea and crochet enthusiasts. It performs best with light daily essentials such as a phone, wallet, keys, and small cosmetics. Because the shape is decorative first, it is more effective as a special-use bag than a large everyday tote.
Conclusion
A floral teapot crochet bag succeeds when the round body stays full, the spout and handle remain readable, and the floral appliqués support rather than hide the silhouette. Focus on firm fabric, balanced side construction, and a controlled floral arrangement across the lower front. For the closest match to the sample, use a cream teapot body, dusty mauve trim and strap, and soft raised roses with embroidered leaves. Once finished, the bag works as both functional accessory and clear teapot-themed crochet statement piece.









