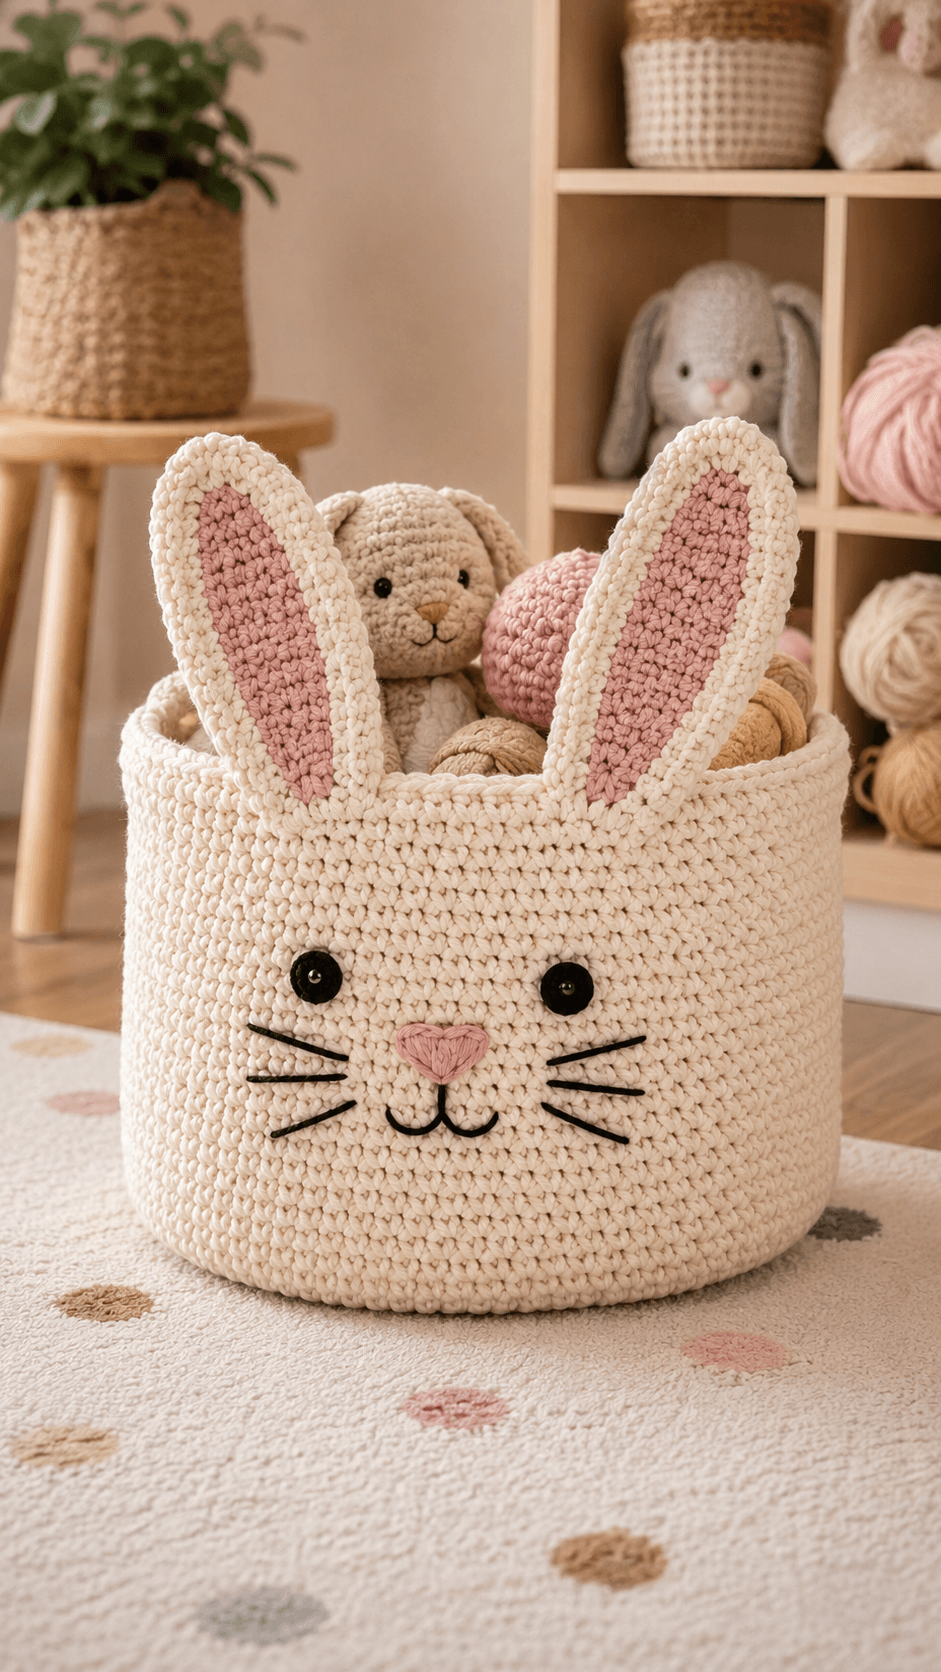
A bunny basket only works when the walls stay rigid enough to stand upright while the ears remain tall and centered above the rim. That structural balance defines this bunny crochet basket pattern. The sample shown here uses a cream cotton body, pink inner ears, safety eyes, embroidered whiskers, and a small stitched nose to turn a plain storage basket into a rabbit-themed nursery piece. It suits intermediate crocheters who can manage firm rounds, shaped appliqué attachment, and neat facial placement on a functional container.
The Design: What Makes This Bunny Basket Different
This basket depends on structure first. The body is a simple cylinder, but the yarn choice and stitch density keep it from collapsing once toys, yarn, or plush items are placed inside. In an animal crochet basket, that matters more than decorative detail because the piece still needs to function as storage.
The second design choice is ear scale. The ears are long enough to read clearly as rabbit ears, yet wide enough at the base to sit securely on the rim without folding over. That proportion keeps the basket playful without making the top edge unstable.
The third choice is facial simplicity. Small dark eyes, a pink nose, and black whiskers create a readable bunny face without overloading the front panel. One common mistake with a bunny crochet basket is placing the face too high on the wall. That pushes the features into the rim area and makes the proportions look cramped.
Project Info at a Glance
| Skill Level | Time | Finished Size | Hook | Best For |
|---|---|---|---|---|
| Intermediate | 5–8 hours | Approx. 22–28 cm wide x 20–25 cm tall excluding ears | 4.5–6 mm | Nursery storage, toy baskets, yarn organization, seasonal decor |
Materials and Tools
Yarn
- Cream cotton yarn — worsted or bulky — approx. 250–400 g
- Pink cotton yarn — small amount for inner ears and nose
- Black yarn — small amount for whiskers and mouth
Tools
- Crochet hook 4.5 mm to 6 mm
- Tapestry needle
- Stitch markers
- Scissors
- Safety eyes or black buttons
- Optional rope or interfacing for extra structure
Abbreviations
- MR = magic ring
- ch = chain
- sl st = slip stitch
- sc = single crochet
- hdc = half double crochet
- dc = double crochet
- inc = increase
- dec = decrease
- rep = repeat
- BLO = back loop only
For a storage basket, firmness matters more than speed. Loose stitches make the sides bow outward and weaken the face placement on the front panel.
Construction Overview
This basket is worked from the base upward in continuous or joined rounds. The bottom is crocheted as a flat circle, then the sides are built straight up to form a sturdy cylinder. Two ears are made separately and attached to the rim. Pink inner ear panels are added on top of the cream ear shapes. The eyes, nose, mouth, and whiskers are attached last so the facial expression can be centered after the basket shape is complete.
Base
The base must stay flat and dense enough to support the full basket. A simple circular start in single crochet works well because it creates a stable foundation and keeps the lower edge clean.
- Begin with an MR in cream.
- Work the first round in sc.
- Increase evenly each round until the base reaches the desired diameter.
- Check the circle regularly so it stays flat without rippling.
- Mark the final round before transitioning to the side walls.
Basket Walls
The side walls should rise straight from the base. Working one round in BLO at the transition point helps define the bottom edge and makes the basket turn upward cleanly. After that, even rounds of sc or another dense stitch keep the cylinder firm and usable.
- Work one transition round in BLO to create the base edge.
- Continue in even rounds without increases.
- Keep tension tight and consistent so the walls hold their shape.
- Stop when the basket reaches the planned height.
- Finish with a clean upper rim round.
If extra structure is needed, use a smaller hook than usual or crochet around soft rope in the final rounds. That helps the rim stay level once the ears are attached.
Bunny Ears
The ears are the key silhouette detail. They need to be long, slightly tapered, and wide enough at the base to anchor securely to the rim. The sample shows upright ears with rounded tops rather than pointed ones, which keeps the basket looking soft and child-friendly.
Outer Ears
- Work two cream ear shapes as elongated ovals or tapered flat panels.
- Increase gradually through the lower section to widen the ear base.
- Maintain the middle height, then round the top edge.
- Fasten off with a long tail for sewing.
Inner Ears
- Work two smaller pink inner ear panels.
- Keep the same overall shape as the cream ears but reduce the size evenly.
- Sew each pink panel onto the center of a cream ear.
The inner ears should sit slightly inside the edge of the cream outer ears so the border remains visible all the way around.
Face Details
The face should sit in the upper front half of the basket wall, not directly under the rim. That leaves enough cream space above the eyes and enough room below the mouth to keep the expression balanced.
Eyes
- Place two black safety eyes or sew two small black circles on the front.
- Keep the spacing symmetrical and slightly wider than the nose width.
Nose
- Embroider or crochet a small pink triangle or heart-shaped nose.
- Attach it centered below the eyes.
Mouth and Whiskers
- Use black yarn to embroider a short line downward from the nose.
- Add two curved mouth lines below it.
- Embroider three whiskers on each side, angled slightly outward.
Keep the whiskers narrow and even. Thick whisker stitches can overpower the rest of the face immediately.
Assembly
- Complete the base and side walls first.
- Finish the upper rim and confirm the basket stands evenly.
- Sew the pink inner ears onto the cream ear pieces.
- Attach the ears to the back half of the rim or near the side-back positions, depending on the look you want.
- Place the eyes on the front panel and check spacing before securing.
- Attach or embroider the nose below the eyes.
- Stitch the mouth and whiskers last.
- Weave in all ends securely on the inside.
Optional Reinforcement
If the basket is intended for daily storage, add reinforcement to the rim or line the inside with fabric. A simple fabric liner can help the basket walls stand more smoothly, while a reinforced rim keeps the ears upright. For nursery decor, a slightly softer structure is often enough. For toy storage, firmer walls usually work better.
Color Placement Notes
Keep the full basket body and outer ears cream, the inner ears and nose soft pink, and the whiskers and mouth black. That arrangement matches the sample and keeps the bunny face clear without extra appliqué layers. A beige base can work, but the pink inner ears need enough contrast to remain visible from a distance.
Common Failure Points
- Basket walls collapsing: The stitch fabric is too loose for a storage piece. Use a smaller hook or sturdier cotton yarn.
- Ears flopping outward: The ear bases are too narrow or loosely sewn. Widen the base and reinforce the seam at the rim.
- Face looking off-center: The features were attached before the basket was fully shaped. Stuff or support the basket first, then place the face.
- Rim buckling: Too many stitches were added in the final rounds. Recount the wall rounds before finishing the edge.
- Whiskers dominating the face: The embroidered lines are too thick or too long. Shorten them and keep the yarn tension light.
Where This Basket Works Best
This style works well in nurseries, playrooms, craft corners, and seasonal displays where the full bunny face stays visible. It functions best as a light storage basket for plush toys, yarn, baby items, or soft accessories. Because the ears create a taller silhouette, it also works well on shelves and floors where the top edge will not be hidden behind other objects.
Conclusion
A bunny crochet basket succeeds when the body stays firm, the ears stay upright, and the face remains centered on the front wall. Focus on dense stitches, stable ear attachment, and restrained facial details. For the closest match to the sample, use a cream cylindrical basket, tall rounded ears with pink centers, and a simple embroidered nose, mouth, and whiskers. Once finished, the piece works as both practical storage and a clear rabbit-themed decor accent.