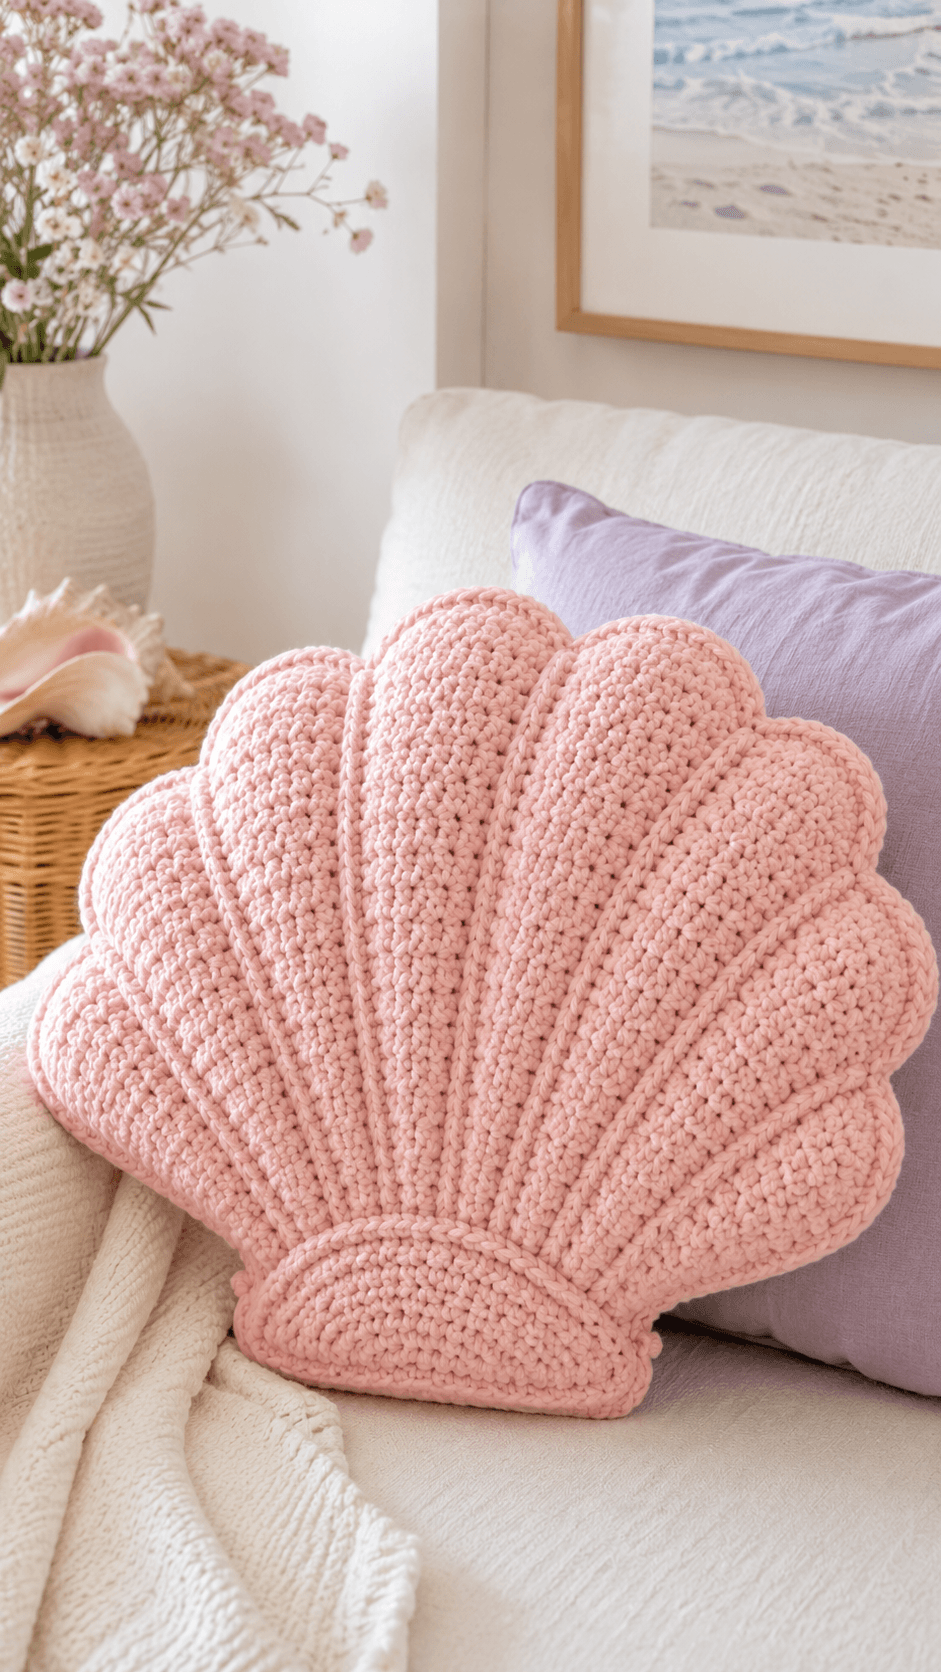
Seashell pillows only work when the fan ridges stay evenly spaced from the base curve to the outer edge. That structural rule defines this pink seashell crochet pillow pattern. The sample shown here uses soft blush yarn, rounded shell lobes, raised dividing ridges, and thick stuffing to create a sculpted coastal accent pillow. It suits intermediate crocheters who can manage shaped panels, symmetric increases, and clean seaming on a firmly stuffed decorative piece.
The Design: What Makes This Seashell Pillow Different
This pillow depends on contour more than stitch complexity. The shell shape is created by repeated curved sections that widen upward from a narrow base. If those sections are uneven, the piece stops reading as a shell and starts looking like a generic scalloped cushion.
The second design choice is the raised ridge detail. Each ridge separates the shell panels and adds depth across the front surface. In a crochet shell pillow, that spacing matters because the ridges define the fan structure even when the pillow is viewed from the side.
The third choice is softness. Thick yarn and dense stuffing give the shell a rounded, padded profile rather than a flat appliqué look. One common mistake with a seashell crochet cushion is underfilling the side lobes. That causes the outer curves to collapse and weakens the full shell outline.
Project Info at a Glance
| Skill Level | Time | Finished Size | Hook | Best For |
|---|---|---|---|---|
| Intermediate | 6–10 hours | Approx. 35–45 cm wide | 5.5–7 mm | Sofas, beds, nursery decor, coastal room accents |
Materials and Tools
Yarn
- Blush pink yarn — bulky or aran weight — approx. 300–500 g
Tools
- Crochet hook 5.5 mm to 7 mm
- Tapestry needle
- Stitch markers
- Scissors
- Polyfill stuffing or pillow fill
- Optional fabric backing for extra stability
Abbreviations
- MR = magic ring
- ch = chain
- sl st = slip stitch
- sc = single crochet
- hdc = half double crochet
- dc = double crochet
- inc = increase
- dec = decrease
- rep = repeat
- BLO = back loop only
For a shaped pillow, consistent stitch height matters more than speed. One tight panel beside a loose panel makes the shell curve asymmetrical after stuffing.
Construction Overview
This pillow is made as two matching shell-shaped panels joined around the edge and stuffed firmly before closing. The front can include raised ridges worked directly into the shaping, or those ridges can be added afterward with surface crochet. The shell begins at a compact curved base, then expands into multiple rounded lobes across the top. Once both panels are complete, they are seamed together and filled to preserve the fan shape.
Base Shape
The lower part of the shell should stay narrower and slightly rounded. That base anchors the full silhouette and keeps the top fan from looking too wide. A semicircular start or shallow oval start works well for this type of cushion.
- Begin with a short foundation chain or curved base section.
- Work outward in rows or rounds, increasing gradually to widen the shell.
- Keep both sides even so the base remains centered.
- Mark the positions where each shell ridge will rise through the body.
Shell Fan Panels
The sample shows several rounded vertical sections spreading upward from the base. Each section should widen slightly as it moves toward the top edge. The center panel is usually the tallest, while the side panels curve outward and end lower to create the shell outline.
- Build the body with shaped rows that expand from the middle outward.
- Increase within each section to create a broad, rounded upper edge.
- Reduce height gradually on the outermost side panels so the shell tapers naturally at both ends.
- Repeat the same shaping for the back panel.
Raised Ridge Detail
The ridges are what separate this from a plain scalloped pillow. They should run from the base upward between each fan section and remain visible after stuffing. Surface slip stitch, front post texture, or chain-overlay detailing can all work for this effect.
- Mark equal ridge lines across the shell front.
- Add raised texture along each marked line using surface crochet or built-in texture rows.
- Keep the ridges centered so the fan sections stay balanced.
Front and Back Panels
The back can match the front exactly for a fully shaped cushion, or it can be kept simpler with reduced texture if you want less bulk. The sample reads as a soft sculpted shell, so a matching back panel gives the cleanest result.
- Make two shell-shaped panels in the same size.
- Check both panels against each other before seaming.
- Correct any uneven top lobes before assembly.
Assembly
- Place both panels with right sides facing outward.
- Join around the edge with sc, slip stitch seaming, or whip stitch.
- Leave an opening near the lower side or base.
- Stuff the pillow firmly, paying special attention to the upper lobes and outer corners.
- Shape the shell by hand as you add filling.
- Close the remaining opening neatly.
- Adjust the ridge lines so they stay visible on the finished cushion.
Stuffing Notes
The shell should feel full but not rigid. Too little filling makes the ridges sink inward. Too much filling stretches the stitch definition and rounds off the fan detail. Fill the base first, then the center, then each outer lobe separately so the shape stays even from side to side.
Optional Finishing Details
A simple edge round can refine the outline if needed, but the shell silhouette should remain the main feature. Avoid heavy borders. They blur the lobe transitions and make the pillow read less clearly as a shell. For a cleaner finish, use invisible seaming and weave all ends toward the inside of the pillow.
Color Placement Notes
Keep the full pillow in one soft pink shade for the closest match to the sample. That single-color approach lets the ridges and panel shaping provide the contrast. Variegated yarn would interfere with the shell structure, while a second contrast color along the ridges would make the piece look more graphic than soft.
Common Failure Points
- Top lobes uneven: The side sections do not match in row count or increase rate. Measure each lobe before fastening off.
- Shell shape collapsing: The pillow is underfilled, especially at the outer upper curves. Add stuffing to each lobe separately.
- Ridges disappearing: The texture lines are too shallow or stretched by overstuffing. Use firmer ridge construction and moderate filling.
- Base leaning to one side: Increases were worked unevenly from the start. Recheck the foundation and midpoint markers.
- Seam looking bulky: The join method is too heavy for the yarn weight. Switch to a flatter seam or work the closing stitches more loosely.
Where This Pillow Works Best
This style works best on sofas, daybeds, nursery chairs, and bedrooms with soft coastal or pastel decor. It performs as an accent cushion first rather than an everyday support pillow, so it looks strongest where the full shell silhouette can stay visible. Paired with plain square cushions, it adds shape variation without needing extra embellishment.
Conclusion
A pink seashell crochet pillow succeeds when the fan panels stay even, the ridge lines stay visible, and the stuffing supports the full outline without flattening the texture. Focus on symmetrical shaping, controlled panel spacing, and firm but measured filling. For the closest match to the sample, use one blush shade, keep the base compact, and build broad rounded lobes that spread upward like a shell fan. Once finished, the piece works as both cushion and sculptural crochet decor.









