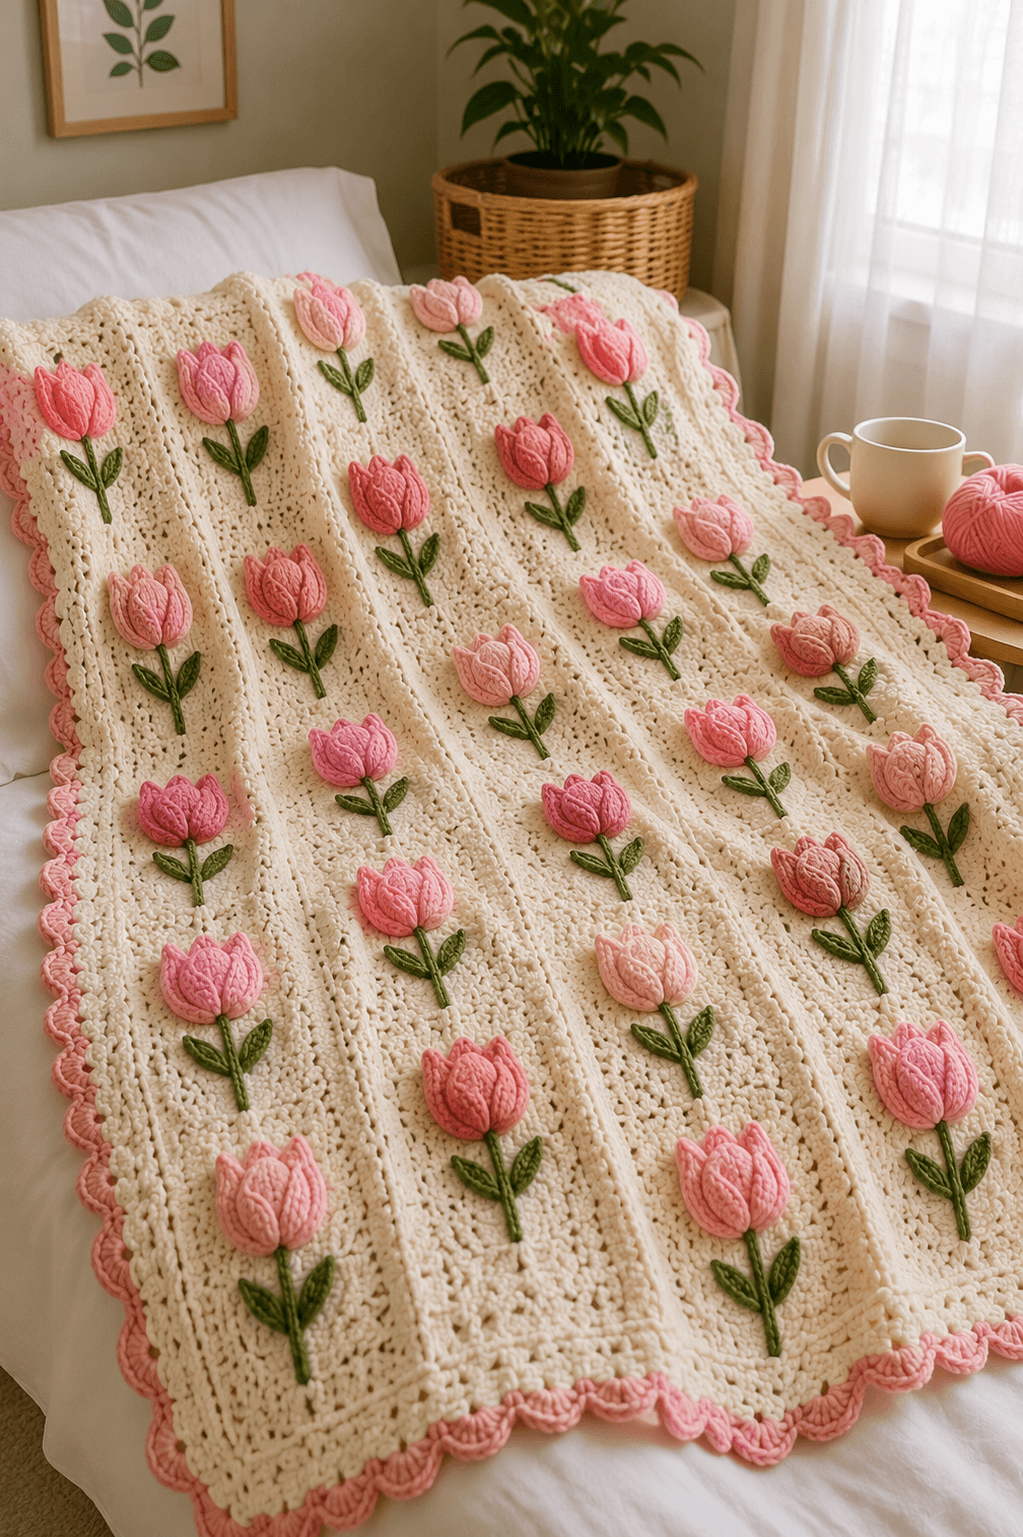
Raised tulip appliqués change the function of a blanket from flat fabric to textured floral paneling. That single choice defines this pink tulip crochet blanket pattern. The sample shown here uses a soft cream base, multiple shades of pink for the flowers, green stems and leaves, and a scalloped border that frames the full layout. It suits intermediate crocheters who can manage consistent row tension, appliqué placement, and border shaping across a larger piece.
The Design: What Makes This Tulip Blanket Different
This blanket depends on contrast between a quiet base and dimensional floral elements. The cream background is deliberately plain in color, but not flat in structure. Vertical ridges and open stitch channels run through the body, which gives the surface enough movement to support repeated appliqué motifs without looking crowded.
The second decision is spacing. Each tulip sits in its own visual column with enough distance around the stem and leaves to keep the layout orderly. That matters in a floral crochet blanket because dense placement can make the surface look heavy and uneven once the blanket is draped over a bed or chair.
The third decision is the border finish. A pink scalloped edge softens the rectangular outline and ties the flower color back into the frame. One common mistake with a tulip crochet throw is attaching appliqués before the base is fully blocked or measured. That throws off alignment and makes the tulip rows drift across the blanket.
Project Info at a Glance
| Skill Level | Time | Finished Size | Hook | Best For |
|---|---|---|---|---|
| Intermediate | 18–30 hours | Approx. 90 x 120 cm to 110 x 140 cm | 4.5–5.5 mm | Lap blankets, nursery decor, bed layering, spring home accents |
Materials and Tools
Yarn
- Cream yarn — worsted or aran weight — approx. 700–1000 g
- Light pink yarn — worsted weight — approx. 120–180 g
- Medium pink yarn — worsted weight — approx. 120–180 g
- Dark pink yarn — worsted weight — approx. 100–150 g
- Green yarn — worsted weight — approx. 120–180 g
Tools
- Crochet hook 4.5 mm to 5.5 mm
- Tapestry needle
- Stitch markers
- Scissors
- Measuring tape
- Blocking tools, optional
Abbreviations
- ch = chain
- sl st = slip stitch
- sc = single crochet
- hdc = half double crochet
- dc = double crochet
- tr = treble crochet
- BLO = back loop only
- FLO = front loop only
- rep = repeat
- sp = space
For this type of project, row consistency matters more than speed. Small differences in stitch height become visible once the appliqué flowers are attached in repeated columns.
Construction Overview
This blanket is built in two stages. First, the rectangular base is worked in rows with a lightly textured stitch pattern that creates vertical flow across the fabric. Then the tulip motifs are crocheted separately and sewn or slip stitched onto the base in evenly spaced lines. Stems and leaves are attached beneath each bloom, followed by a scalloped edge worked around the entire blanket.
Base Blanket Structure
The base should be dense enough to support appliqués without sagging, but open enough to keep the blanket flexible. A simple repeat using double crochet, post stitches, or narrow eyelet columns works well for the look shown in the sample. The goal is not heavy texture. The goal is controlled vertical rhythm.
- Chain to your target width.
- Work a foundation row in dc or hdc.
- Build the body using a repeating stitch pattern that creates narrow raised channels or soft ribbing.
- Check width every 10–12 rows so the edges stay square.
- Continue until the blanket reaches the desired length.
- Fasten off and block lightly before placing any appliqués.
Tulip Motif Layout
The photographed blanket uses repeated tulip appliqués arranged in offset vertical columns. That spacing keeps the eye moving across the full surface without crowding the center. Several shades of pink are used, which prevents the blanket from looking too uniform and gives the floral layer more depth.
A practical layout is to divide the blanket into equal columns, then mark each tulip position before sewing. Keep the top and side margins consistent. Offset alternating rows slightly if a less rigid arrangement is preferred, but maintain the same spacing from one flower to the next.
How to Crochet the Tulip Flowers
Tulip Head
- Chain a small base or begin with a compact oval.
- Work layered petal shapes using hdc, dc, and tr to form the rounded outer edges.
- Create one central petal and two side petals so the flower reads clearly as a tulip rather than a generic blossom.
- Use light, medium, and dark pink shades across different motifs for variation.
The tulip head should remain slightly cupped. A flat flower loses the upright tulip silhouette once attached to the blanket.
Stem
- Chain to the desired length.
- Work back along the chain with sl st or sc for a narrow, firm stem.
- Leave a tail at both ends for sewing.
Leaves
- Chain a short foundation.
- Work along both sides of the chain with increasing stitch height toward the center, then decrease symmetrically.
- Make two leaves per flower.
- Sew them at slight outward angles so the stem does not look rigid.
Assembly
- Block the finished base blanket and let it dry fully.
- Lay the blanket flat and mark the tulip positions with stitch markers.
- Place all flower heads first to confirm spacing.
- Attach stems directly below each flower.
- Sew the leaves on both sides of the lower stem area.
- Check column alignment from top to bottom before securing the final few motifs.
- Weave in all ends on the wrong side.
Border
The sample uses a pink scalloped border that frames the cream body and ties the edge back to the flowers. Start with a balancing round of sc around the full blanket, working extra stitches into each corner. Then add scallops using a repeat such as shell groups separated by anchor stitches. Keep the corner treatment consistent so the rectangle stays flat.
- Join pink yarn in any corner.
- Work one round of sc evenly around the blanket.
- Add extra stitches in each corner to prevent pulling.
- Work scallops with shell groups across each side.
- Adjust the final repeat only if needed to maintain symmetry.
Color Placement Notes
Use cream for the entire base, green for stems and leaves, and vary the tulips across at least three pink shades. That color arrangement matches the photographed blanket and keeps the floral layer readable against the neutral background. A single pink shade can work, but multiple tones produce better visual separation between adjacent motifs.
Common Failure Points
- Uneven tulip rows: The blanket was not measured before appliqué placement. Mark a full grid first.
- Base fabric puckering: The flowers were sewn on too tightly. Leave enough ease for the blanket to drape.
- Border ruffling: Too many stitches were added along the edges. Reduce the stitch count on the next attempt.
- Tulips looking flat: The petal shaping is too shallow or the motifs were overblocked. Keep the flower heads slightly dimensional.
- Leaning stems: The stems were attached after the flowers without checking center alignment. Position the stem first, then secure the bloom.
Where This Blanket Works Best
This style works well as a decorative throw on a bed, reading chair, nursery rocker, or guest room bench. The floral appliqué surface makes it more visual than a standard textured blanket, so it performs best where the full front can be seen. It also suits spring decor, handmade gifts, and room styling built around soft pink and botanical tones.
Conclusion
A pink tulip crochet blanket works when the base stays orderly and the appliqué placement stays precise. Focus on straight rows, measured spacing, and consistent flower shaping. Those elements determine the finished look more than the stitch pattern alone. For the closest match to the sample, keep the base cream, vary the tulips across several pink shades, and finish with a soft scalloped border. Once assembled, the blanket reads as both functional crochet and structured floral decor.









