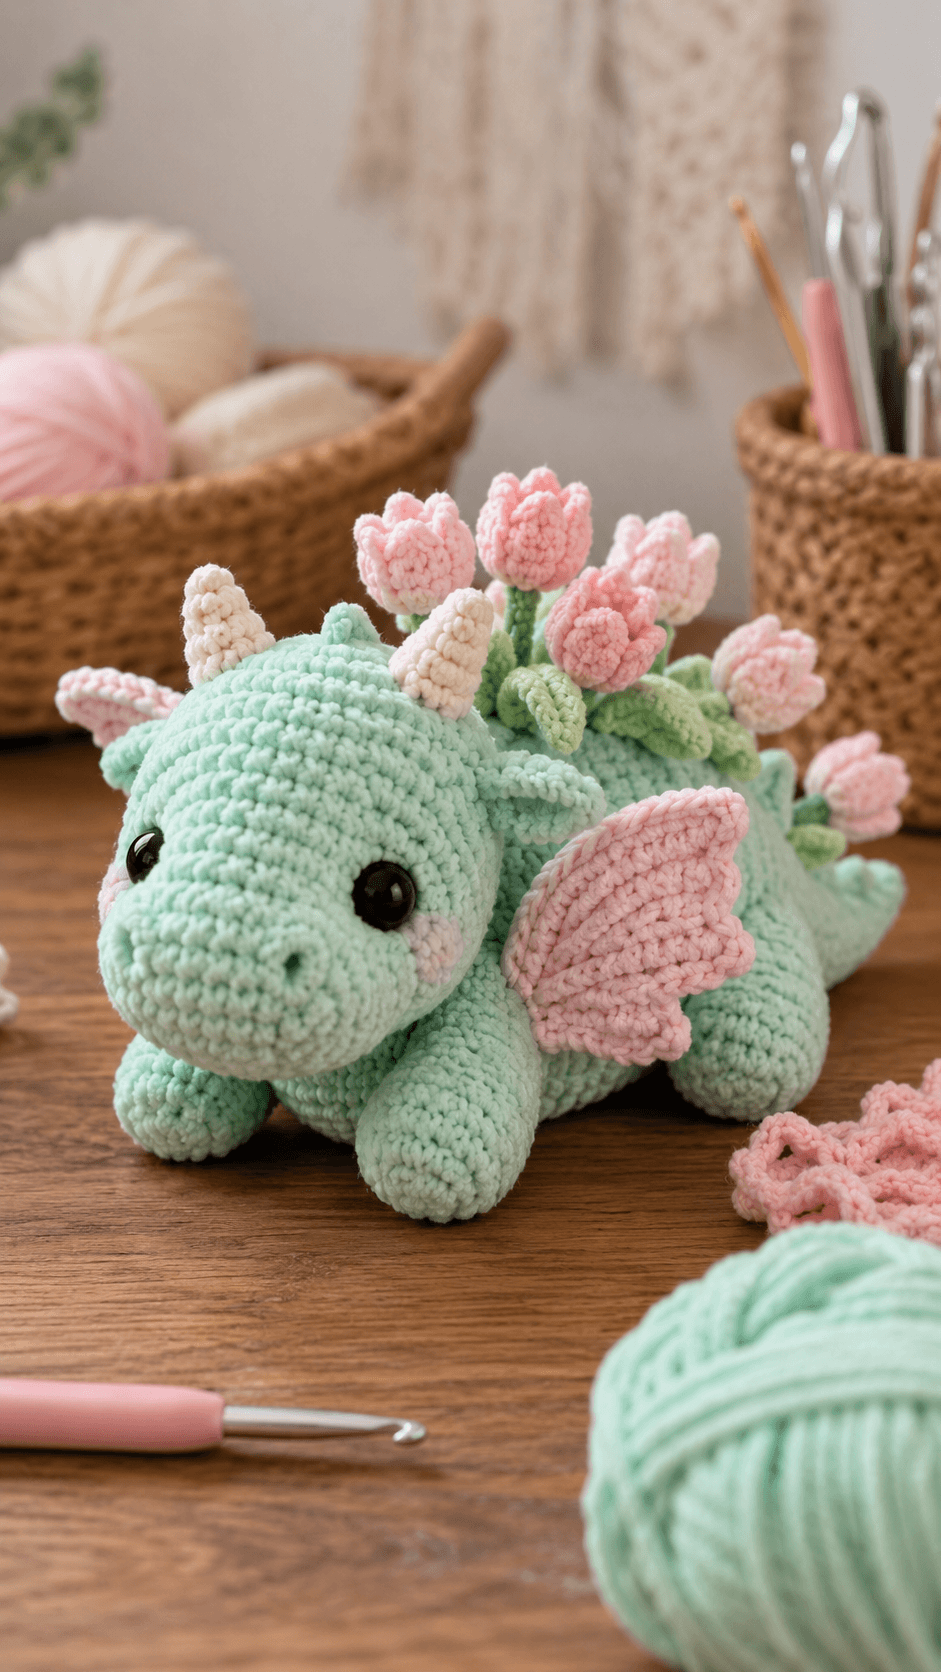
A dragon carrying tulips on its spine fails the moment the back arch collapses. This dragon amigurumi crochet pattern uses plush chenille yarn, a 5.0 mm hook, and a low crawling body about 26 cm long. The build suits an easy-to-low-intermediate maker who can manage spiral rounds, flat wing rows, and controlled stuffing. It works as a nursery shelf piece, spring market item, or photo prop with more visual range than a standard sitting dragon.
The Design: What Makes This Dragon Different
The photographed dragon is not built around height. It is built around length, head width, and back load. That changes the drafting immediately. A standard upright fantasy dragon can hide weak shaping inside the neck and belly. This one cannot. The body must stay low so the tulips read as a planted garden rather than a crown, and the snout has to stay broad so the toy reads as soft dragon instead of dinosaur.
You need three structural decisions. First, the head stays at a medium 36-stitch plateau, then narrows slowly. That keeps room for 12 mm eyes and a blunt plush muzzle. Second, the body becomes an oval tube with a flatter underside, because a flower dragon amigurumi has to support stitched stems without rolling. Third, the wings are kept short and rounded. Large wings would block the tulip cluster and pull the silhouette backward. A common error with a plush dragon crochet pattern is placing the back legs too far rearward. That breaks the crawl pose and leaves the chest floating above the surface.
Project Info at a Glance
| Skill Level | Time | Finished Size | Hook | Best For |
|---|---|---|---|---|
| Easy to low-intermediate | 6–8 hours | About 26 cm long | 5.0 mm | Spring décor, nursery shelf, handmade gift, market table |
Materials and Tools
Yarn
- Mint green plush yarn — bulky chenille — about 120 g — Hobbii Honey Bunny, Dolphin Baby, or similar
- Soft pink yarn — bulky or smooth cotton blend — about 20 g — for wings, tulips, and cheek patches
- Cream yarn — small scrap amount — for horns
- Leaf green yarn — about 15 g — for stems, leaves, and back bumps
- Black embroidery floss — scrap amount — for nostril detail if needed
Tools
- Hook 5.0 mm
- Safety eyes 12 mm
- Polyester stuffing
- Tapestry needle
- Stitch markers
- Pins
- Scissors
Abbreviations
MR / sc / inc / dec / sl st / ch / BLO / hdc / dc.
Invisible decrease is used on the visible shaping rounds because chenille yarn exaggerates ordinary decreases and leaves a stepped line across the snout and belly.
Pattern — Step by Step
Work in a continuous spiral unless noted. This is an original pattern drafted from the photographed dragon and standard amigurumi stitch math.
Head (Make 1)
Yarn: mint green
R1: 6 sc in MR (6)
R2: inc ×6 (12)
R3: (sc, inc) ×6 (18)
R4: (2 sc, inc) ×6 (24)
R5: (3 sc, inc) ×6 (30)
R6: (4 sc, inc) ×6 (36)
R7–10: sc around (36)
R11: (4 sc, dec) ×6 (30)
R12: sc around (30)
Place eyes between R8 and R9, spaced 8 stitches apart. Add extra stuffing through the front half of the head first so the snout stays broad.
R13: (3 sc, dec) ×6 (24)
R14: (2 sc, dec) ×6 (18)
R15: (sc, dec) ×6 (12)
R16: dec ×6 (6)
Fasten off. Close the opening. Leave a 25 cm tail.
Body (Make 1)
Yarn: mint green
Ch 8.
R1: Starting in 2nd ch from hook, sc 6, 3 sc in last ch, working on opposite side sc 5, inc in last st (16)
R2: inc, sc 5, inc ×3, sc 5, inc ×2 (22)
R3: (sc, inc), sc 5, (sc, inc) ×3, sc 5, inc, sc, inc (28)
R4: (2 sc, inc), sc 5, (2 sc, inc) ×3, sc 5, 2 sc, inc, sc, 2 sc, inc (34)
R5: 34 sc around (34)
R6: inc, 16 sc, inc, 16 sc (36)
R7–15: sc around (36)
R16: (4 sc, dec) ×6 (30)
R17–18: sc around (30)
Stuff the chest and middle firmly. Keep the underside flatter than the back. The flower bed sits better on a slightly rounded top line and a denser lower line.
R19: (3 sc, dec) ×6 (24)
R20: sc around (24)
R21: (2 sc, dec) ×6 (18)
Fasten off. Leave a 30 cm tail for sewing to the head.
Front Legs (Make 2)
Yarn: mint green
R1: 6 sc in MR (6)
R2: inc ×6 (12)
R3–5: sc around (12)
R6: (4 sc, dec) ×2 (10)
R7–9: sc around (10)
Stuff the paw and lower half only. Flatten the top before sewing. Fasten off. Leave a 20 cm tail.
Back Legs (Make 2)
Yarn: mint green
R1: 6 sc in MR (6)
R2: inc ×6 (12)
R3: (sc, inc) ×6 (18)
R4–5: sc around (18)
R6: (4 sc, dec) ×3 (15)
R7: sc around (15)
R8: (3 sc, dec) ×3 (12)
R9–10: sc around (12)
Stuff lightly. Pin the legs in a tucked crawl position before sewing. Fasten off. Leave a 20 cm tail.
Horns (Make 2)
Yarn: cream
R1: 6 sc in MR (6)
R2: sc around (6)
R3: (2 sc, inc) ×2 (8)
R4: sc around (8)
R5: (3 sc, inc) ×2 (10)
R6: sc around (10)
Stuff very lightly so the horn tips stay pointed. Fasten off. Leave a 15 cm tail.
Ear Fins (Make 2)
Yarn: mint green with optional pink inner embroidery
R1: 6 sc in MR (6)
R2: (sc, inc) ×3 (9)
R3: (2 sc, inc) ×3 (12)
Flatten into a half-moon shape. Fasten off. Leave a 12 cm tail.
Wings (Make 2)
Yarn: soft pink
Ch 7.
Row 1: Starting in 2nd ch from hook, sc 6, ch 1 turn (6)
Row 2: inc, sc 4, inc, ch 1 turn (8)
Row 3: inc, sc 6, inc, ch 1 turn (10)
Row 4: inc, sc 8, inc, ch 1 turn (12)
Row 5: inc, sc 10, inc, ch 1 turn (14)
Row 6: sc across (14), ch 1 turn
Row 7: dec, sc 10, dec (12), ch 1 turn
Row 8: dec, sc 8, dec (10), ch 1 turn
Row 9: dec, sc 6, dec (8)
Work 18 sc evenly around the wing edge for a smoother outline if needed. Do not stuff. Fasten off. Leave a 20 cm tail.
Tail (Make 1)
Yarn: mint green
R1: 6 sc in MR (6)
R2: sc around (6)
R3: (2 sc, inc) ×2 (8)
R4–5: sc around (8)
R6: (3 sc, inc) ×2 (10)
R7–9: sc around (10)
R10: (4 sc, inc) ×2 (12)
R11–14: sc around (12)
Stuff lightly toward the base and leave the tail tip softer so it curves down. Fasten off. Leave a 25 cm tail.
Back Bumps (Make 5)
Yarn: leaf green
R1: 6 sc in MR (6)
R2: (sc, inc) ×3 (9)
R3: sc around (9)
Fasten off. Leave a 12 cm tail.
Cheek Patches (Make 2)
Yarn: soft pink
R1: 6 sc in MR (6)
R2: inc ×6 (12)
Fasten off. Leave a short tail.
Tulip Buds (Make 7)
Yarn: soft pink
R1: 6 sc in MR (6)
R2: (sc, inc) ×3 (9)
R3–4: sc around (9)
R5: (sc, dec) ×3 (6)
Stuff only the top half if you want fuller buds. Keep the lower half narrow for stem attachment. Fasten off. Leave a 15 cm tail.
Tulip Stems (Make 7)
Yarn: leaf green
Ch 7.
Row 1: Starting in 2nd ch from hook, sl st in each chain back to base (6)
Fasten off. Leave a 10 cm tail on each end.
Leaves (Make 8)
Yarn: leaf green
Ch 6.
Row 1: Starting in 2nd ch from hook, sl st, sc, hdc, sc, sl st. Work the opposite side of the chain: sl st, sc, hdc, sc, sl st.
Fasten off. Leave a 10 cm tail.
Assembly
- Sew the head to the front body opening with the snout angled slightly downward.
- Attach the front legs just below the head seam, spaced so the chest stays low to the table.
- Sew the back legs at the widest body point and angle them slightly outward.
- Attach the tail centered at the rear opening and curve it gently to one side.
- Sew the horns on top of the head, about 4 stitches apart.
- Attach the ear fins just outside and slightly behind the horns.
- Sew the cheek patches below the eyes, keeping them low and subtle.
- Attach the wings to the upper sides of the body, one to two rounds behind the front legs.
- Sew the back bumps along the spine from neck toward tail, leaving space between them for flowers.
- Attach stems to tulip buds, then sew the tulips and leaves between the back bumps in an irregular cluster.
The completed dragon should rest on four points, keep the chin low, and carry the tulips above the spine without leaning to one side.
7 Technical Tips
- Mark the underside center of the body during the first oval rounds. Lose that line and the legs drift, which makes the dragon twist when it is set down.
- Do not overfill the last third of the tail. A rigid tail lifts the rear body and removes the crawling profile.
- Install the 12 mm eyes before the head drops under 30 stitches. Late insertion in chenille yarn distorts the eye holes and widens the face.
- Pin all seven tulips before sewing any of them. One stem placed more than about 1 cm off the spine centerline can pull the back cluster sideways.
- Use invisible decreases on the head, body taper, and legs. Plush yarn hides stitch definition, but it does not hide hard angle changes.
- Keep the wings short enough that their bottom edges stop above the foreleg midpoint. Longer wings collide with the table surface and force the body upward.
- Weave chenille tails through at least 5 internal stitches, then reverse direction once. A single pass is not enough friction for a handled plush dragon.
Conclusion
This flower garden dragon amigurumi works because the body stays low, the snout stays broad, and the tulips stay centered over a stable spine. The shaping is not complicated, but placement is strict. Start with the head, test the eye spacing, then build the body firm enough to support the flower cluster before assembly. Share the finished dragon on Pinterest and Instagram with one top view to show the tulips and one side view to show the crawl pose. Use the tag #FlowerGardenDragon. One question is worth checking before you call it done: do your tulips rise from the spine, or do they sit too far out on one side?









