Introduction
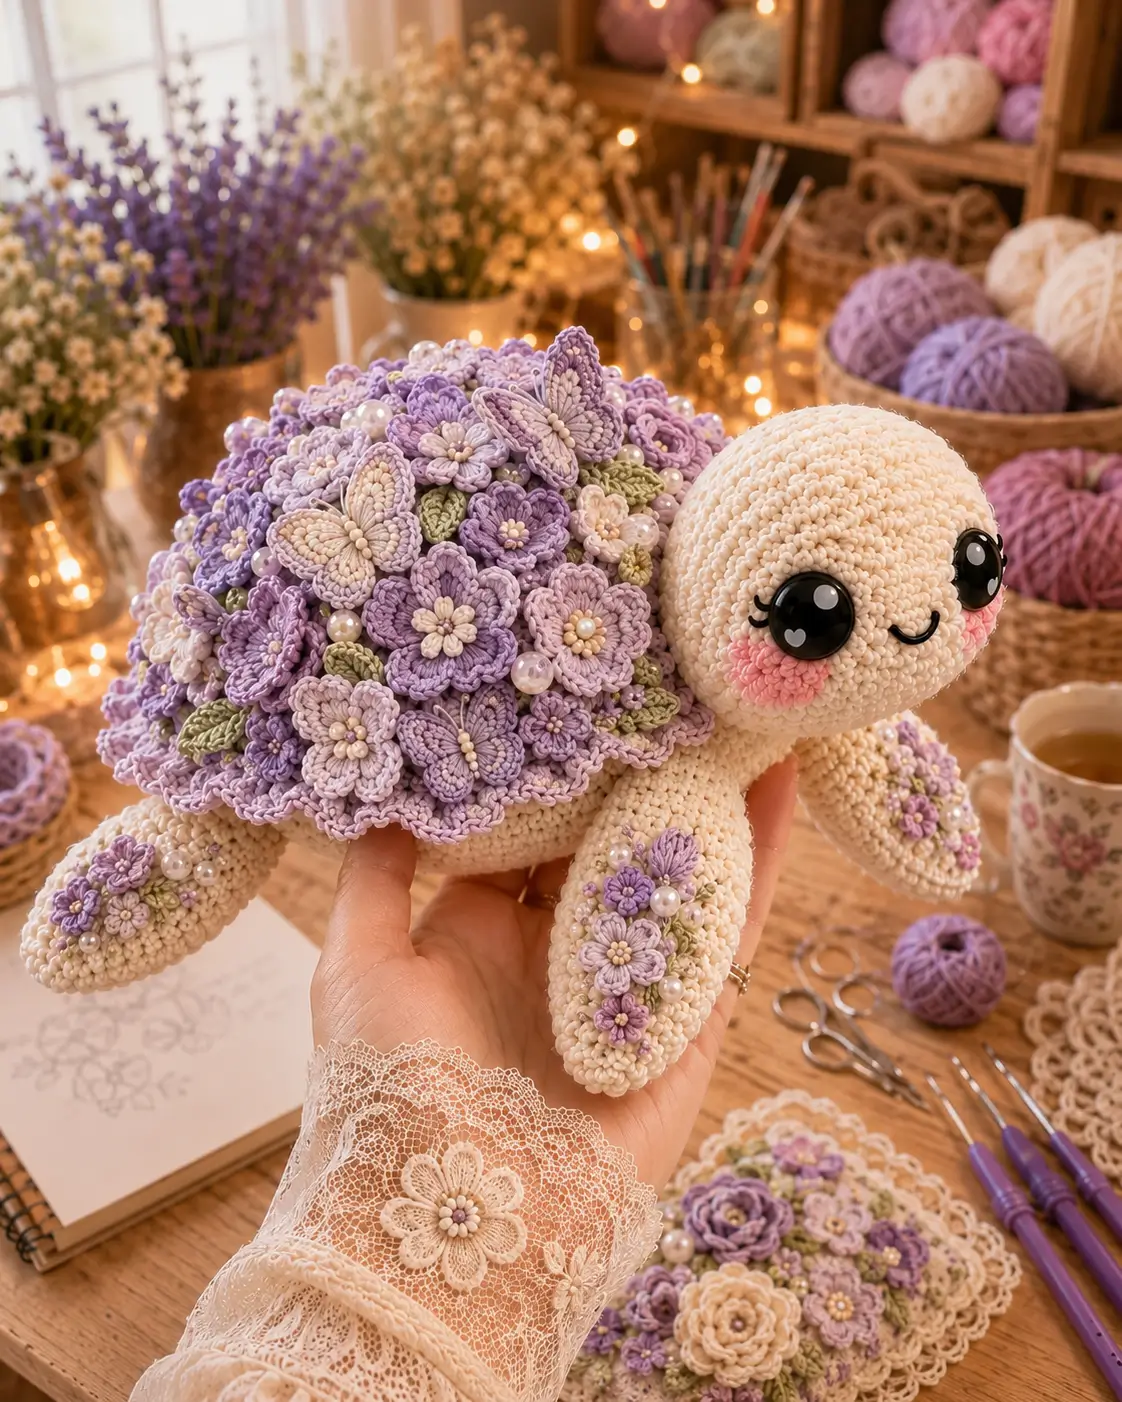
A sea turtle has no visible neck until the shell says where the body stops; this flower sea turtle amigurumi crochet pattern solves that with a raised floral carapace. You will make an ivory DK-to-worsted turtle, lavender shell blooms, pearl accents, and butterfly appliqués at about 25 cm long. The skill level is intermediate. The finished piece works as a display sample because the shell layout stays readable from above.
The Design: What Makes This Flower Sea Turtle Different
This turtle is built around a forward-heavy head, a low oval body, and a separate floral shell cap. The head needs a 42-stitch plateau so the 18 mm eyes sit without crowding the mouth; the body uses the same plateau but longer middle rounds, which keeps the toy from tipping nose-down. A second shell cap lets the maker sew flowers through the cap only, not through the stuffed body. That matters when pearls are added later. This floral shell amigurumi also uses narrow front flippers, because wide flat fins would hide under the flower rim. The common mistake in a lavender turtle crochet pattern is placing all blooms at equal size. Real depth comes from three scales: large blossoms, small filler flowers, and leaves between them.
Project Info at a Glance
| Skill Level | Time | Finished Size | Hook | Best For |
|---|---|---|---|---|
| Intermediate | 6–8 hours | 25 cm long | 2.5 mm | Display piece, photo prop, market sample |
Finished size and hook choice are aligned with flower turtle and sea turtle sources using 2.5 mm hooks and 25 cm sizing options. Source
Materials and Tools
Yarn
- Ivory body yarn — DK/worsted cotton-acrylic — 75 g — YarnArt Jeans, Paintbox Cotton DK, or similar smooth yarn.
- Lavender shell flowers — DK/worsted — 35 g — use two lavender values for depth.
- Pale lilac and blush filler flowers — DK/worsted — 20 g combined.
- Sage green leaves — DK/worsted — 12 g.
- Cream butterfly wings and flower centers — DK/worsted — 10 g.
- Black embroidery thread — small amount for mouth and lashes.
- Pink cheek yarn — small amount for two flat circles.
Published flower turtle sources give color amounts in grams, while sea turtle sources show that larger 10-inch turtles may need much more main yarn. This draft uses the larger end because the photo shell has many appliqués. Source
Tools
- Hook 2.5 mm
- 18 mm safety eyes or embroidered eyes for child-safe work
- Polyester stuffing
- Yarn needle
- Stitch markers
- Long pins
- Scissors
- Pearl beads, 6–8 mm, about 18–24 pieces
- Sewing thread matching ivory or clear nylon thread for pearls
Abbreviations
MR = magic ring; sc = single crochet; inc = 2 sc in one stitch; dec = invisible decrease; sl st = slip stitch; ch = chain; BLO = back loop only; hdc = half double crochet; dc = double crochet; FO = fasten off. Invisible decrease works through the front loops of the next 2 stitches before finishing one sc, which removes the hole at the closing curve.
Pattern — Step by Step
Continuous spiral unless noted. Stitch counts are checked with six-stitch amigurumi math: increases add 6 stitches, decreases remove 6 stitches, and large rounded parts plateau at 42 stitches.
Head
Yarn: ivory — Source: Standard amigurumi math; turtle head structure cross-checked with a public 6-sc MR turtle head source. Source
R1: 6 sc in MR (6)
R2: inc ×6 (12)
R3: (1 sc, inc) ×6 (18)
R4: (2 sc, inc) ×6 (24)
R5: (3 sc, inc) ×6 (30)
R6: (4 sc, inc) ×6 (36)
R7: (5 sc, inc) ×6 (42)
R8–R14: sc around (42)
R15: (5 sc, dec) ×6 (36)
R16: (4 sc, dec) ×6 (30)
R17: (3 sc, dec) ×6 (24)
R18: (2 sc, dec) ×6 (18)
R19: (1 sc, dec) ×6 (12)
R20: dec ×6 (6)
Insert eyes between R10 and R11, 12 stitches apart. Add firm stuffing before R18 closes the opening.
Fasten off. Leave 25 cm tail.
Body
Yarn: ivory — Source: Standard amigurumi math; public flower turtle body sources use counted body rounds with joined head and fins. Source
R1: 6 sc in MR (6)
R2: inc ×6 (12)
R3: (1 sc, inc) ×6 (18)
R4: (2 sc, inc) ×6 (24)
R5: (3 sc, inc) ×6 (30)
R6: (4 sc, inc) ×6 (36)
R7: (5 sc, inc) ×6 (42)
R8–R16: sc around (42)
R17: (5 sc, dec) ×6 (36)
R18: (4 sc, dec) ×6 (30)
R19: (3 sc, dec) ×6 (24)
R20: (2 sc, dec) ×6 (18)
R21: (1 sc, dec) ×6 (12)
R22: dec ×6 (6)
Stuff firmly enough that the underside stays oval, not round like a ball.
Fasten off. Leave 30 cm tail.
Raised Shell Base
Yarn: pale lavender or ivory — Source: Standard amigurumi math; flower shell sources support a separate decorative shell section. Source
R1: 6 sc in MR (6)
R2: inc ×6 (12)
R3: (1 sc, inc) ×6 (18)
R4: (2 sc, inc) ×6 (24)
R5: (3 sc, inc) ×6 (30)
R6: (4 sc, inc) ×6 (36)
R7: (5 sc, inc) ×6 (42)
R8–R12: sc around (42)
R13: BLO (5 sc, dec) ×6 (36)
Do not close this piece. It sits like a dome over the body and carries the flowers, butterflies, and pearls.
Fasten off. Leave 60 cm tail for sewing.
Front Flippers
Yarn: ivory — Source: Standard amigurumi math; public flower turtle sources use four fins attached around the shell/body. Source
Make 2.
R1: 6 sc in MR (6)
R2: inc ×6 (12)
R3: (1 sc, inc) ×6 (18)
R4–R7: sc around (18)
R8: (1 sc, dec) ×6 (12)
R9–R12: sc around (12)
R13: flatten and sc through both layers across (6)
Stuff the wide end lightly only. Leave the narrow seam flat for sewing under the shell edge.
Fasten off. Leave 35 cm tail.
Back Flippers
Yarn: ivory — Source: Standard amigurumi math; back flippers are shorter than front flippers to keep the turtle profile tapered.
Make 2.
R1: 6 sc in MR (6)
R2: inc ×6 (12)
R3–R7: sc around (12)
R8: flatten and sc through both layers across (6)
Do not stuff heavily. A flat back flipper sits cleaner under the floral shell rim.
Fasten off. Leave 30 cm tail.
Tail
Yarn: ivory — Source: Standard amigurumi math; public flower turtle sources also include tail placement after the shell/body section. Source
R1: 6 sc in MR (6)
R2–R4: sc around (6)
Pinch the last round into a small cone. Add no stuffing unless the yarn is very limp.
Fasten off. Leave 25 cm tail.
Cheek Patches
Yarn: blush pink — Source: Standard flat circle math.
Make 2.
R1: 6 sc in MR (6)
R2: inc ×6 (12)
Sl st to first stitch (12)
Keep these flat. Sew one patch below each eye, slightly toward the mouth curve.
Fasten off. Leave 20 cm tail.
Large Lavender Flowers
Yarn: lavender, lilac, or pale pink — Source: Standard appliqué construction; flower turtle sources use shell flowers as the dominant surface feature. Source
Make 10–12.
R1: 6 sc in MR (6)
R2: inc ×6 (12)
R3: *(sl st, ch 2, 2 dc in next st, ch 2, sl st in next st)* ×6 around (6 petals)
Add a cream French knot or pearl to the center. Make at least four flowers in a darker lavender so the shell does not flatten visually.
Fasten off. Leave 25 cm tail.
Small Filler Flowers
Yarn: pale lilac and blush — Source: Standard appliqué construction.
Make 14–18.
R1: 6 sc in MR (6)
R2: *(sl st, ch 2, hdc, ch 2, sl st)* in each stitch around (6 petals)
Use these between the large flowers and near the flippers. Small flowers hide shell gaps without adding too much height.
Fasten off. Leave 20 cm tail.
Sage Leaves
Yarn: sage green — Source: Standard flat appliqué math.
Make 18–24.
Row 1: ch 6; from 2nd ch, sc, hdc, dc, hdc, sc; ch 1, rotate to underside, sc, hdc, dc, hdc, sc; sl st to base (10)
Pin leaves under flower edges before sewing. Let 2–3 mm of green show between lavender flowers.
Fasten off. Leave 18 cm tail.
Butterfly Appliqués
Yarn: cream and lavender — Source: Standard amigurumi wing circles; included because the photo shell has visible butterfly details.
Make 3 butterflies.
Upper wings, make 2 per butterfly:
R1: 6 sc in MR (6)
R2: inc ×6 (12)
R3: (1 sc, inc) ×6 (18)
R4: sc around (18)
Fasten off. Leave 15 cm tail.
Lower wings, make 2 per butterfly:
R1: 6 sc in MR (6)
R2: inc ×6 (12)
R3: sc around (12)
Fasten off. Leave 15 cm tail.
Body: ch 8, sl st in 2nd ch from hook and across (7)
Overlap upper wings above lower wings and sew the chain body over the center seam. Add 3 tiny cream beads down the butterfly body if the piece will be displayed only.
Fasten off. Leave 20 cm tail.
Pearl Clusters
Material: 6–8 mm pearl beads — Source: photo-matched accessory placement.
Make 18–24 bead placements.
Place 1 pearl at the center of 6 large flowers. Place 8–10 pearls in gaps near the highest shell curve. Add remaining pearls in pairs beside butterflies.
Do not place pearls along the underside edge. Beads there will catch on fabric and tilt the turtle when displayed.
Tie off thread inside the shell cap before final shell attachment.
Embroidered Mouth and Lashes
Thread: black embroidery thread — Source: photo-matched facial detail.
Cut 45 cm of black thread. Stitch a shallow U-shaped mouth under the eyes, centered 2 rounds below the eye line. Add three short lash stitches at the outer side of each eye, each about 5–6 mm long.
Anchor thread behind the cheek patches so knots do not show on the face.
Weave ends inside the head.
Assembly
- Pin the head to the front of the body between body R8 and R15, with the eyes level and the mouth facing slightly upward. Sew around the neck twice using the 25 cm head tail.
- Place the raised shell base on top of the body so the open shell rim covers the neck join by 3–4 mm. Sew only halfway around first, then check symmetry from above.
- Attach cheek patches under the eyes after the head is fixed. Put each patch one round below the eye base and one stitch outward from the mouth curve.
- Pin front flippers under the front shell rim at a forward angle of about 35 degrees. Sew through the flat seam and the underside of the body, not through the flowered shell.
- Pin back flippers lower and farther apart than the front flippers. Keep their outer tips visible from above by 1–1.5 cm.
- Sew the tail at the back center, directly under the shell rim. Angle it slightly down so it does not compete with the floral shell.
- Finish sewing the shell base to the body after all limbs are secure. Add extra stitches at the front rim because the flowered cap carries weight.
- Arrange large flowers first, starting with one at the crown of the shell. Work outward in a loose spiral rather than in straight rows.
- Add leaves, small flowers, butterflies, and pearls in that order. Keep the butterflies on the upper third of the shell where their wings remain visible.
- Weave all yarn tails through the shell cap, then through the body, and trim only after checking for loose petals.
The completed turtle has a raised floral shell, four low flippers, a centered head, and balanced shell weight.
7 Technical Tips
- Eye placement failure mode: crossed expression. Keep the 18 mm eyes 12 stitches apart between R10 and R11; closer spacing makes the face look pinched after cheeks are added.
- Stuffing failure mode: rolling body. Fill the body until it resists light pressure, then press the underside flat before closing R22.
- Shell failure mode: flower collapse. Sew flowers to the shell cap before attaching the cap fully, because a loose cap gives room to bury tails without crushing petals.
- Stitch marker failure mode: diagonal face seam. Move the marker every round and check that R7 increases are not drifting toward one eye.
- Invisible decrease failure mode: visible holes. Work decreases through front loops only on head R15–R20 and body R17–R22.
- Pearl placement failure mode: tilted display. Keep every pearl at least 1 cm above the shell rim so beads do not touch the table surface.
- Pinning failure mode: hidden flippers. Pin each front flipper so 2 cm remains visible beyond the shell edge before sewing through the flat seam.
Conclusion
This design turns a basic turtle body into a structured display piece by separating the shell cap from the stuffed body. That one construction choice gives you room for layered lavender flowers, butterflies, pearls, and hidden yarn tails without distorting the oval underside. For the next step, make one test flower and one test leaf before starting the full shell layout, then compare their scale against the 42-stitch shell plateau. Share the finished flower sea turtle amigurumi crochet pattern sample on Pinterest and Instagram with #FlowerSeaTurtle. Which shell detail should sit highest on this turtle: the largest lavender flower, the first butterfly, or the pearl cluster?









