Introduction
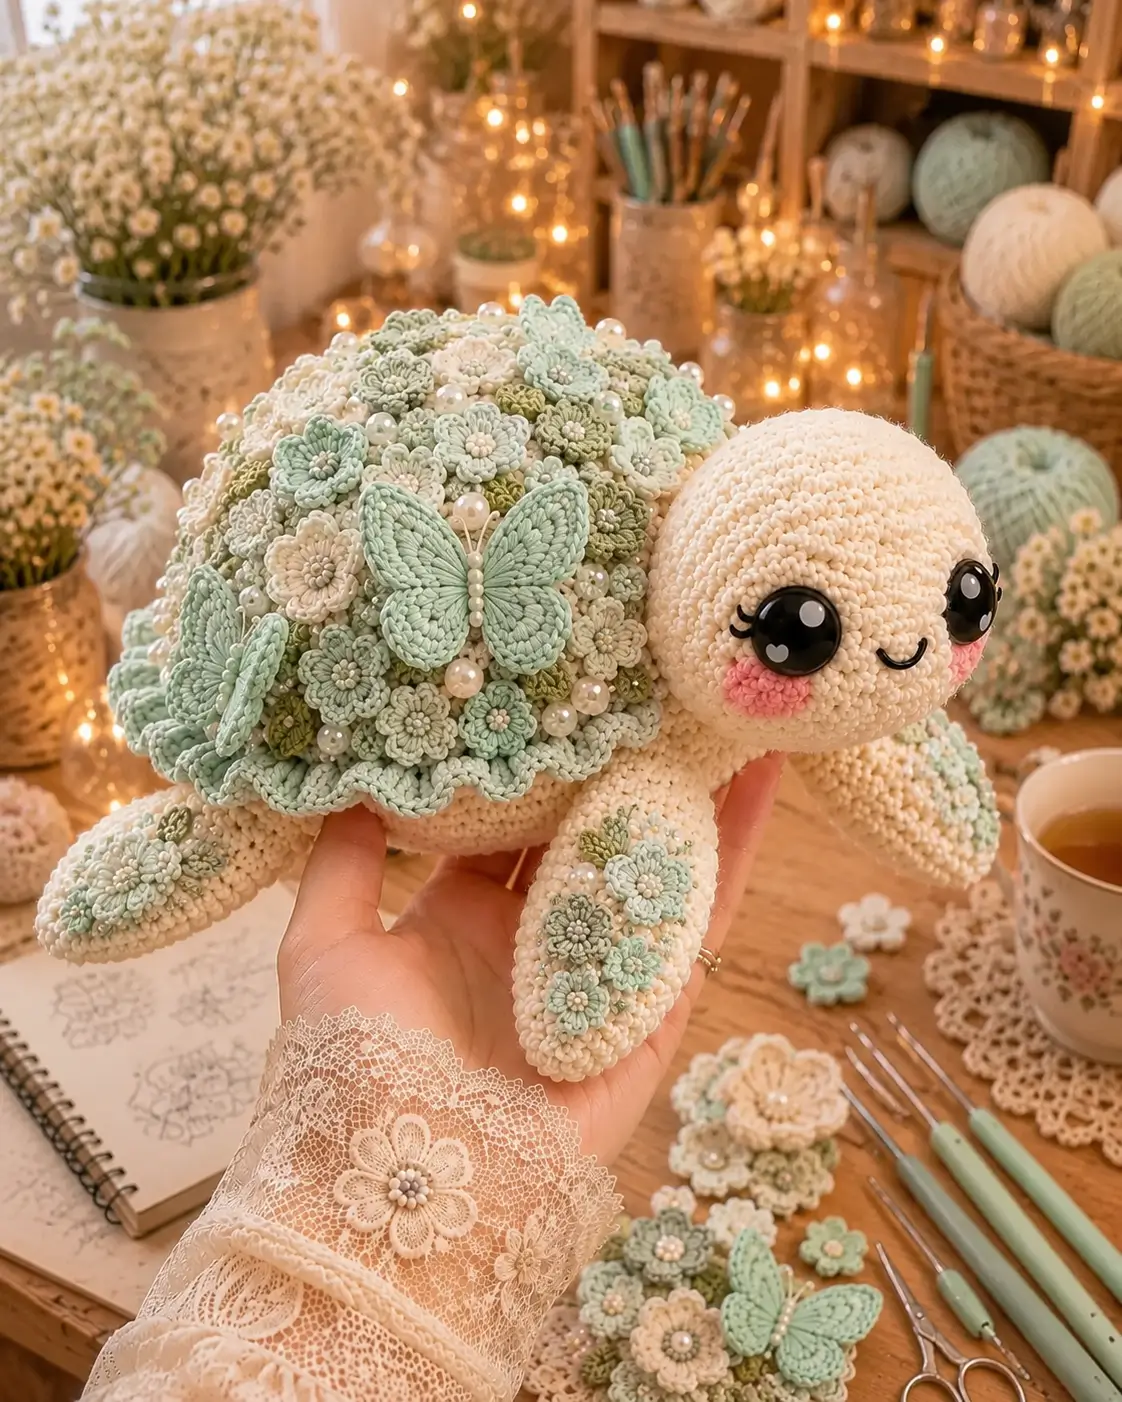
A turtle wears its ribs on the outside, so the shell has to read before the face does. This turtle amigurumi crochet pattern builds a chunky cream turtle with a sage flower-shell, butterfly appliqués, pearl accents, 18 mm eyes, and a 17 cm reference size. Use chunky chenille, a 5.0 mm hook, and intermediate skills for a display piece that tests shaping, pinning, and surface decoration.
The Design: What Makes This Turtle Different
The photo is not a plain oval turtle. Its shell is a raised garden cap, so the base cannot be flat; it needs a 42-stitch dome that sits over a stuffed cream belly. Put the head forward and slightly downward, not centered on the shell, because a turtle face projects from under the carapace. You control the gaze first; the maker then balances the appliqué weight so the flower turtle amigurumi does not roll backward. The second structural choice is a firm front-flipper pair with lighter stuffing than the head. They act as visible supports. Common mistake: covering the shell with flowers before assembly. That hides the seam line and makes the crochet turtle pattern harder to square at the belly.
Project Info at a Glance
| Skill Level | Time | Finished Size | Hook | Best For |
|---|---|---|---|---|
| Intermediate | Base turtle 1–2 hr; décor adds more | 17 cm chenille reference | 5.0 mm | Decorative display; embroider eyes for young-child toys |
The 17 cm, 5.0 mm, and 18 mm eye data comes from a chenille turtle reference; simple turtle sources may finish faster before shell decoration.
Materials and Tools
Yarn
- Cream — chunky chenille or super bulky velvet chenille — 60 g — Hobbii Toucan, Premier Parfait Chunky, or similar
- Sage mint — chunky chenille — 55 g — Hobbii Toucan, Premier Parfait Chunky, or similar
- Pale green — DK or worsted cotton for flowers — 15 g — Scheepjes Catona, Paintbox Cotton, or similar
- Ivory — DK or worsted cotton for flowers — 15 g — Scheepjes Catona, Paintbox Cotton, or similar
- Olive green — DK or worsted cotton for accent flowers — 8 g — Scheepjes Catona, Paintbox Cotton, or similar
- Blush pink — chunky or worsted scrap — 5 g — for cheek patches
Published turtle references list 75 g chenille for a two-color plush turtle and smaller worsted gram totals around 30 g cream plus shell colors, so the decorated shell needs extra accent reserve.
Tools
- Hook 5.0 mm
- 18 mm black safety eyes
- Polyester stuffing
- Yarn needle
- Locking stitch markers
- Pins
- Black embroidery floss
- Pearl beads, 20–28 pieces
- Sewing needle and strong thread for beads
Safety eyes can be a choking hazard in toys for children under three; embroider the eyes when the finished turtle is intended for that age group.
Abbreviations
MR = magic ring; sc = single crochet; inc = 2 sc in one stitch; dec = single crochet decrease; sl st = slip stitch; ch = chain; BLO = back loop only; FLO = front loop only; dc = double crochet; hdc = half double crochet. An invisible decrease works through front loops only and keeps the head, body, and shell closure from leaving six visible bars.
Pattern — Step by Step
Continuous spiral unless noted. Count every round before moving on.
Head (Make 1)
Yarn: cream — Source: Standard amigurumi math, scaled from verified turtle head construction.
R1: 6 sc in MR (6)
R2: inc ×6 (12)
R3: (sc, inc) ×6 (18)
R4: (2 sc, inc) ×6 (24)
R5: (3 sc, inc) ×6 (30)
R6: (4 sc, inc) ×6 (36)
R7: (5 sc, inc) ×6 (42)
R8–R15: sc around (42)
R16: (5 sc, dec) ×6 (36)
R17: sc around (36)
R18: (4 sc, dec) ×6 (30)
R19: (3 sc, dec) ×6 (24)
Place eyes between R10 and R11, 11 stitches apart. Begin stuffing before the opening narrows.
R20: (2 sc, dec) ×6 (18)
R21: (sc, dec) ×6 (12)
R22: dec ×6 (6)
Fasten off. Close through front loops. Leave 25 cm tail.
Body / Belly (Make 1)
Yarn: cream — Source: Standard amigurumi math.
R1: 6 sc in MR (6)
R2: inc ×6 (12)
R3: (sc, inc) ×6 (18)
R4: (2 sc, inc) ×6 (24)
R5: (3 sc, inc) ×6 (30)
R6: (4 sc, inc) ×6 (36)
R7: (5 sc, inc) ×6 (42)
R8–R17: sc around (42)
R18: (5 sc, dec) ×6 (36)
R19: sc around (36)
R20: (4 sc, dec) ×6 (30)
R21: (3 sc, dec) ×6 (24)
Stuff firmly enough that the belly does not collapse under the shell.
R22: (2 sc, dec) ×6 (18)
R23: (sc, dec) ×6 (12)
R24: dec ×6 (6)
Fasten off. Close through front loops. Leave 30 cm tail.
Shell Dome (Make 1)
Yarn: sage mint — Source: Standard amigurumi math; photo-scaled shell.
R1: 6 sc in MR (6)
R2: inc ×6 (12)
R3: (sc, inc) ×6 (18)
R4: (2 sc, inc) ×6 (24)
R5: (3 sc, inc) ×6 (30)
R6: (4 sc, inc) ×6 (36)
R7: (5 sc, inc) ×6 (42)
R8–R18: sc around (42)
R19: BLO (5 sc, dec) ×6 (36)
R20: (4 sc, dec) ×6 (30)
Fasten off. Leave 45 cm tail for sewing to body.
Shell Scallop Border (Make 1)
Yarn: pale green — Source: Standard border math.
Attach yarn to any front loop left from Shell Dome R19.
Border round: [sl st, skip 1 st, 5 dc in next st, skip 1 st] repeat around the 36 front-loop base stitches; adjust final repeat with one skipped stitch if needed (9 scallops).
Fasten off. Weave tail under shell stitches.
Front Flippers / Front Legs (Make 2)
Yarn: cream — Source: Standard amigurumi math.
R1: 6 sc in MR (6)
R2: inc ×6 (12)
R3: (sc, inc) ×6 (18)
R4–R8: sc around (18)
R9: (sc, dec) ×6 (12)
R10: sc around (12)
Stuff only the front half. Flatten the open edge.
Closing row: sc through both layers across 6 stitch pairs (6).
Fasten off. Leave 25 cm tail on each flipper.
Back Flippers / Back Legs (Make 2)
Yarn: cream — Source: Standard amigurumi math.
R1: 6 sc in MR (6)
R2: inc ×6 (12)
R3: (sc, inc) ×6 (18)
R4–R6: sc around (18)
R7: (sc, dec) ×6 (12)
R8: sc around (12)
Do not overstuff. The back flippers need to sit flatter than the front flippers.
Closing row: sc through both layers across 6 stitch pairs (6).
Fasten off. Leave 25 cm tail on each flipper.
Tail (Make 1)
Yarn: cream — Source: Standard amigurumi math.
R1: 6 sc in MR (6)
R2–R4: sc around (6)
Flatten the opening.
Closing row: sc through both layers across 3 stitch pairs (3).
Fasten off. Leave 20 cm tail.
Cheek Patches (Make 2)
Yarn: blush pink — Source: Standard flat-circle math.
R1: 6 sc in MR (6)
R2: inc ×6 (12)
Sl st to first stitch (12).
Fasten off. Leave 15 cm tail for sewing.
Small Shell Flowers (Make 16–22)
Yarn: ivory, pale green, and olive — Source: Standard appliqué math.
R1: 6 sc in MR (6)
R2: inc ×6 (12)
Petal round: [sl st, ch 2, 2 dc in same stitch, ch 2, sl st in next stitch] ×6, using all 12 anchor stitches (6 petals).
Fasten off. Leave 20 cm tail for each flower. Add one pearl bead at the center after the flowers are sewn to the shell.
Butterfly Wings (Make 2 Butterflies)
Yarn: sage mint — Source: Standard flat-circle math.
For each butterfly, make 2 large wings:
R1: 6 sc in MR (6)
R2: inc ×6 (12)
R3: (sc, inc) ×6 (18)
Fasten off. Leave 15 cm tail.
For each butterfly, make 2 small wings:
R1: 6 sc in MR (6)
R2: inc ×6 (12)
Fasten off. Leave 15 cm tail.
Pin two large wings above two small wings. Sew at the center line only so the wing edges lift slightly.
Butterfly Body and Antennae (Make 2)
Yarn: cream or pearl thread — Source: Photo feature; standard chain construction.
Ch 7 (7).
Row 1: sl st in second ch from hook and across (6).
Fasten off. Sew down the center of the four butterfly wings. Add 4–5 pearl beads along the body line and stitch two short black antennae with embroidery floss.
Pearl Bead Accents
Source: Photo feature; no stitch rounds.
Sew 20–28 pearl beads across the shell after all flowers and butterflies are pinned. Keep at least 1 cm between beads near flipper seams so the shell edge remains flexible.
Assembly
- Pin the shell dome over the body with the R19 scallop edge sitting slightly below the widest belly round.
- Sew the shell to the body using the long sage tail, catching one body stitch for every shell stitch.
- Pin the head to the front underside of the shell, centered between the front flippers.
- Sew the head with two passes: one around the neck edge and one through the lower head into the body.
- Place the cheek patches below the eyes, 2 rounds lower than the eye line, and sew with blush tails.
- Embroider the mouth as a shallow U between the cheek patches, then add lashes beside each eye.
- Attach front flippers at the front lower body, angled 30 degrees outward.
- Attach back flippers near the rear underside, flatter than the front pair.
- Sew the tail at the rear center, tucked under the shell edge.
- Pin flowers first, butterflies second, pearls last; sew only after the layout is balanced from front, side, and top views.
The finished turtle has a raised floral shell, forward-facing head, four visible flippers, cheek patches, butterflies, and pearl accents.
7 Technical Tips
- Stitch marker drift: If the marker moves more than 3 stitches off center by R15 of the head, the face will twist. Reset the marker at the back of the head before eye placement.
- Stuffing firmness: A soft body will dent under the 42-stitch shell dome. Pack the belly until it springs back after a thumb press.
- Invisible decrease gaps: Regular decreases on chunky yarn leave bar-shaped holes on R20–R24 of the body. Use front-loop invisible decreases and pull each decrease tight before the next stitch.
- Eye placement timing: Add the 18 mm eyes before Head R20. After the opening reaches 18 stitches, the washers are harder to press flat inside the stuffed head.
- Velvet or chenille tension: Chunky chenille can hide missed stitches on the shell plateau. Count every 42-stitch round because one skipped stitch pulls the shell border off-center.
- Pinning failure: Flowers sewn before pinning can make one side of the shell heavier. Pin every flower and butterfly, then lift the turtle by the belly to test balance.
- Tail weaving: Short tails can work loose under bead weight. Leave at least 20 cm on appliqués and weave through three different directions before cutting.
Conclusion
This decorated turtle works because the shell is treated as the main structure, not as an afterthought. Finish the base first, then build the flower layer in pinned sections: large flowers near the crown, smaller flowers near the scallop edge, butterflies offset from center, and pearls only after the crochet pieces are fixed. Your next step is to make one test flower and place it on the shell before crocheting the full set. Share the finished turtle on Pinterest and Instagram with the top-view shell layout visible. Use #FlowerShellTurtle. For this turtle amigurumi crochet pattern, would you place the largest butterfly at the shell crown or slightly toward the left flipper?









