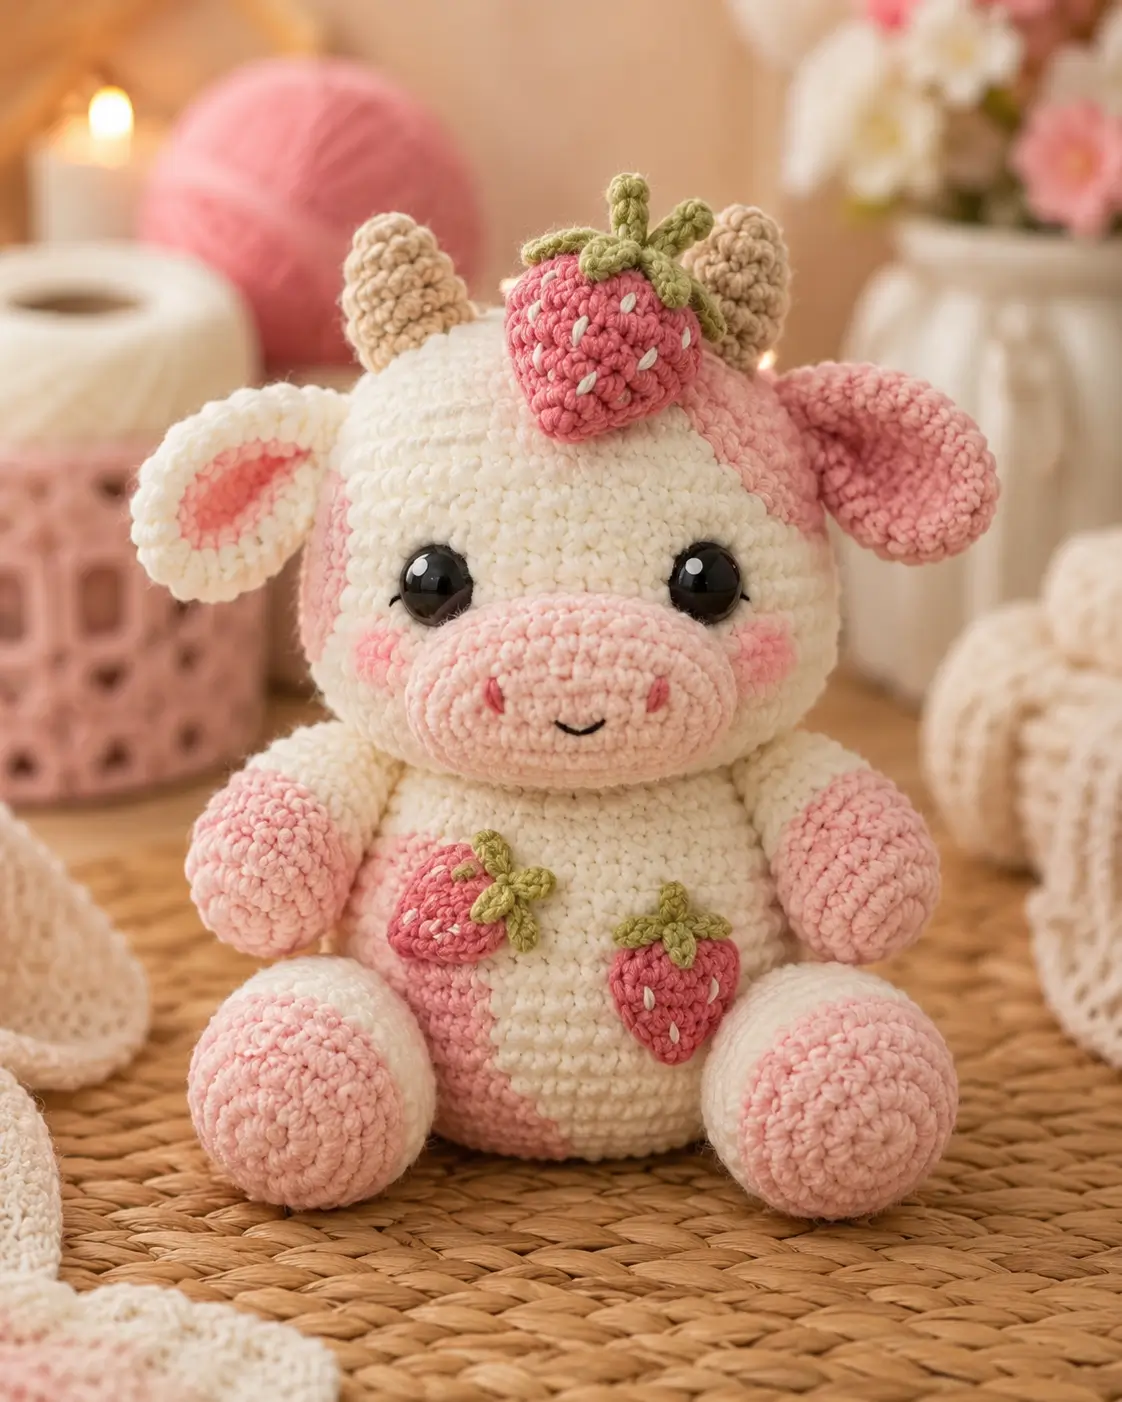
A strawberry cow has to carry fruit above the eyes without hiding the horns. This strawberry cow amigurumi pattern uses chunky velvet yarn, a 4.5 mm hook, and 12–14 mm safety eyes to make a 30 cm sitting toy. Build it as an intermediate project with separate snout, ears, limbs, cheek patches, and strawberry appliqués. The broad base makes it stable for shelf display.
The Design: What Makes This Strawberry Cow Different
Two design choices control this cow: a low oval snout and a high crown strawberry. The snout is wider than it is tall, so the face reads as bovine rather than bear-like. Horns sit behind the forehead fruit, not beside the ears, because the strawberry needs a clean outline in front view. Place the fruit first. The maker then pins horns and ears around that fixed point.
A crochet strawberry cow plush also needs enough body weight to sit upright. This chunky cow crochet pattern keeps the body at a 36-stitch plateau with a pink base, which gives the toy a rounded seat. Common error: sewing the back legs too high. That tilts the body backward and hides the belly strawberries.
Project Info at a Glance
| Skill Level | Time | Finished Size | Hook | Best For |
|---|---|---|---|---|
| Intermediate | 5+ hours | 30 cm | 4.5 mm | Sitting plush display |
Materials and Tools
Yarn
- Cream white — super bulky velvet chenille — 100 g — Himalaya Dolphin Baby 80301 or similar
- Blush pink — super bulky velvet chenille — 50 g — Himalaya Dolphin Baby 80324 or similar
- Strawberry pink — super bulky velvet chenille — 20 g — same yarn family
- Sage green — super bulky or worsted held double — 10 g — leaf tops
- Beige — super bulky velvet chenille — 15 g — horns
- Black embroidery yarn — scrap — mouth and nostrils
- White embroidery yarn — scrap — strawberry seeds
Tools
- Hook 4.5 mm
- Safety eyes 12–14 mm
- Polyester stuffing
- Yarn needle
- Locking stitch markers
- Pins
- Scissors
- Black sewing thread for eye reinforcement if gifting to adults only
Safety eyes are not recommended for children under age 3; embroidered eyes are the safer substitution for baby items.
Abbreviations
- MR = magic ring
- sc = single crochet
- inc = 2 sc in one stitch
- dec = invisible decrease
- sl st = slip stitch
- ch = chain
- BLO = back loop only
- FO = fasten off
Invisible decrease goes through the front loops of the next two stitches before pulling through, which reduces bulk on plush yarn closures.
Pattern — Step by Step
Continuous spiral unless noted. Counts appear at the end of every round.
Head
Yarn: cream white.
R1: 6 sc in MR (6)
R2: inc ×6 (12)
R3: (sc, inc) ×6 (18)
R4: (2 sc, inc) ×6 (24)
R5: (3 sc, inc) ×6 (30)
R6: (4 sc, inc) ×6 (36)
R7: sc around (36)
R8: sc around (36)
R9: sc around (36)
R10: sc around (36)
R11: sc around (36)
R12: sc around (36)
Insert eyes between R9 and R10, 9 stitches apart. Leave enough room for the snout centered below.
R13: (4 sc, dec) ×6 (30)
R14: (3 sc, dec) ×6 (24)
R15: (2 sc, dec) ×6 (18)
Stuff firmly at the cheeks and crown. Keep the lower front slightly flat for the snout.
R16: (sc, dec) ×6 (12)
R17: dec ×6 (6)
Fasten off. Leave 20 cm tail and close the final gap.
Body
Yarn: blush pink for base, then cream white.
R1: 6 sc in MR with blush pink (6)
R2: inc ×6 (12)
R3: (sc, inc) ×6 (18)
R4: (2 sc, inc) ×6 (24)
R5: (3 sc, inc) ×6 (30)
R6: (4 sc, inc) ×6 (36)
R7: change to cream white, sc around (36)
R8: sc around (36)
R9: sc around (36)
R10: sc around (36)
R11: sc around (36)
R12: sc around (36)
R13: sc around (36)
Stuff the lower body more firmly than the upper body. A dense base keeps the toy seated.
R14: (4 sc, dec) ×6 (30)
R15: (3 sc, dec) ×6 (24)
R16: (2 sc, dec) ×6 (18)
R17: (sc, dec) ×6 (12)
R18: dec ×6 (6)
Fasten off. Leave 30 cm tail for sewing body to head.
Arms / Front Legs
Yarn: blush pink, then cream white. Make 2.
R1: 6 sc in MR with blush pink (6)
R2: inc ×6 (12)
R3: sc around (12)
R4: sc around (12)
R5: change to cream white, sc around (12)
R6: sc around (12)
R7: sc around (12)
R8: sc around (12)
R9: sc around (12)
R10: sc around (12)
Stuff only the pink hoof and lower half. Leave the top flat for sewing.
Fasten off. Leave 25 cm tail.
Back Legs
Yarn: blush pink, then cream white. Make 2.
R1: 6 sc in MR with blush pink (6)
R2: inc ×6 (12)
R3: (sc, inc) ×6 (18)
R4: sc around (18)
R5: sc around (18)
R6: change to cream white, sc around (18)
R7: (sc, dec) ×6 (12)
R8: sc around (12)
R9: sc around (12)
Stuff the front of the foot firmly and leave the last round soft.
Fasten off. Leave 30 cm tail.
Ears
Yarn: cream white outer ear, blush pink inner ear.
Make 2 outer ears.
R1: 6 sc in MR with cream white (6)
R2: inc ×6 (12)
R3: (sc, inc) ×6 (18)
R4: sc around (18)
R5: sc around (18)
R6: (sc, dec) ×6 (12)
Flatten the ear. Do not stuff.
Make 2 inner patches.
R1: 6 sc in MR with blush pink (6)
R2: inc ×6 (12)
Fasten off. Sew one inner patch to each flattened outer ear.
Horns
Yarn: beige. Make 2.
R1: 6 sc in MR (6)
R2: sc around (6)
R3: sc around (6)
R4: sc around (6)
Stuff with the end of a hook only if the horn collapses.
Fasten off. Leave 20 cm tail.
Snout
Yarn: blush pink.
Ch 6.
R1: starting in second ch from hook, sc 1, sc 3, 3 sc in last ch, work along the other side, sc 3, inc in final base stitch (12)
R2: inc, sc 3, inc ×3, sc 3, inc ×2 (18)
R3: sc around (18)
R4: sc around (18)
Embroider two short nostrils in strawberry pink or darker pink before sewing. Add a small black mouth after the snout is attached.
Fasten off. Leave 35 cm tail.
Cheek Patches
Yarn: blush pink. Make 2.
R1: 6 sc in MR (6)
R2: inc ×6 (12)
Fasten off. Leave 20 cm tail. Keep them flat, not stuffed.
Side Head Patches
Yarn: blush pink. Make 2.
R1: 6 sc in MR (6)
R2: inc ×6 (12)
R3: sc around (12)
Fasten off. Sew one patch behind each eye area, partly under the ear line.
Head Strawberry
Yarn: strawberry pink and sage green.
R1: 6 sc in MR with strawberry pink (6)
R2: inc ×6 (12)
R3: (sc, inc) ×6 (18)
R4: sc around (18)
R5: sc around (18)
R6: (sc, dec) ×6 (12)
R7: dec ×6 (6)
Fasten off. Close point. Embroider five or six white seed stitches.
Leaf top: with sage green, ch 5, sl st back down the chain, sl st into the strawberry top. Repeat for 5 leaves. Fasten off and leave 25 cm tail for sewing.
Belly Strawberries
Yarn: strawberry pink and sage green. Make 2.
R1: 6 sc in MR with strawberry pink (6)
R2: inc ×6 (12)
R3: sc around (12)
R4: sc around (12)
R5: dec ×6 (6)
Fasten off. Close point. Add three white seed stitches to each small strawberry.
Leaf top: with sage green, ch 4, sl st back down the chain, sl st into the top. Repeat for 4 leaves. Fasten off. Leave 20 cm tail.
Tail
Yarn: cream white and blush pink.
Ch 8 with cream white.
Row 1: sc in second ch from hook and across (7)
Fasten off the chain strip. Add three 8 cm blush pink strands to the end and knot them as a tassel. Trim to 3 cm.
Assembly
- Sew the head to the body with the body opening centered under the head closure.
- Pin the snout between the eyes, with its top edge one round below the eye line.
- Sew the snout down, adding a small amount of stuffing before closing the last 2 cm.
- Embroider the mouth under the snout and place nostrils two stitches apart.
- Sew cheek patches below the eyes, angled toward the snout.
- Attach ears on the upper sides of the head, then sew horns just inside the ears.
- Sew the head strawberry between the horns, slightly forward of the crown center.
- Attach arms to the upper body and back legs to the lower front body.
- Sew two belly strawberries on the cream body, offset rather than level.
- Add the tail to the rear body and weave all yarn tails through stuffed sections.
The finished cow has a 36-stitch head, 36-stitch body, two horns, two ears, four limbs, cheek patches, and three strawberry appliqués.
7 Technical Tips
- Stitch marker drift: If the first stitch moves more than 2 stitches by R10, the snout will sit off center. Reset the marker at the front midpoint before placing eyes.
- Stuffing firmness: Understuffed bodies fold at the neck seam after assembly. Pack the lower body until it resists light thumb pressure but still springs back.
- Invisible dec gaps: Velvet yarn can expose stuffing when decreases are loose. Pull each dec tight before starting the next sc, especially on head R15–R17.
- Eye placement timing: Safety eyes must be inserted before the head drops below 18 stitches. For this cow, place them between R9 and R10, 9 stitches apart.
- Velvet tension: A 4.5 mm hook can still leave gaps if loops are tall. Keep loop height under 4 mm on the hook shaft for denser fabric.
- Pinning error: Horns sewn too far outward disappear behind the ears in front view. Pin horns no more than 3 stitches from the crown strawberry edge.
- Tail weaving: Short tails pull out of chenille faster than cotton. Weave every sewing tail through at least 4 cm of stuffed fabric before trimming.
Conclusion
This build works because the fruit placement is planned before the horns, ears, and face are sewn. Keep the body base firm, hold the head at a slight forward angle, and check the snout width before final stitching. For a cleaner finish, sew the belly strawberries after the legs are attached; that spacing stops the fruit from disappearing behind the feet. Save the strawberry cow amigurumi pattern to Pinterest, then post the finished version on Instagram with #StrawberryCow. Next step: make one test strawberry in scrap yarn before sewing the crown fruit. Which part should sit highest on your cow: the horns or the forehead strawberry?









