Introduction
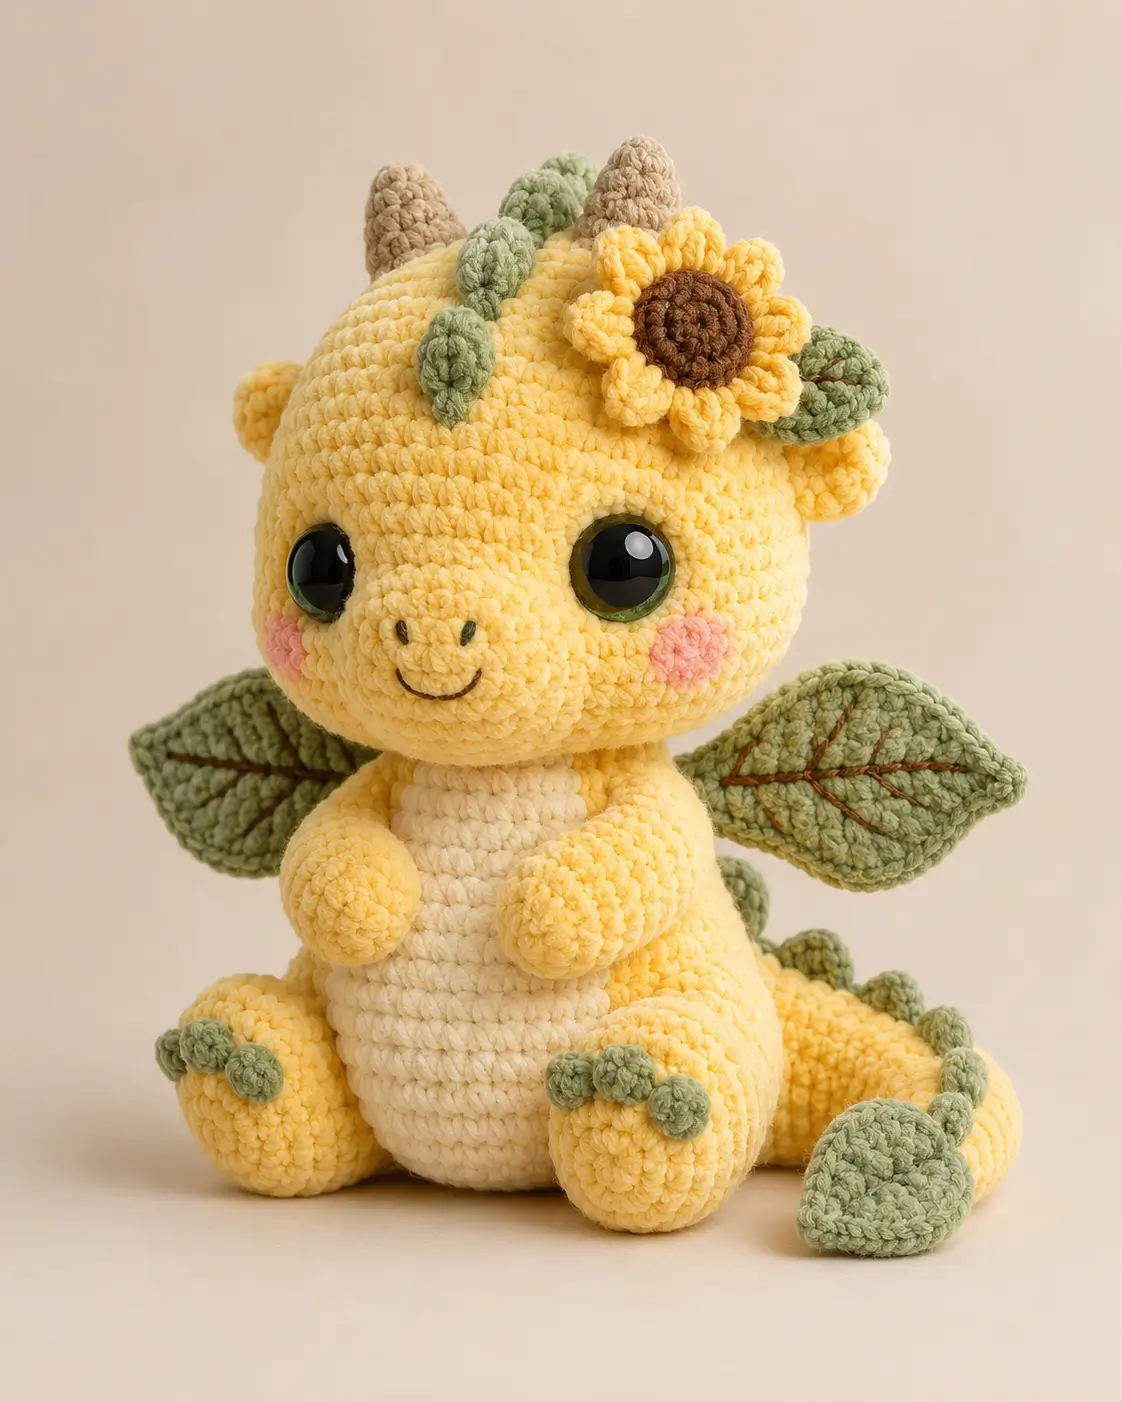
A dragon with leaf wings has to read as a reptile before the sunflower steals the crown. This dragon amigurumi crochet pattern uses bulky velvet yarn, 18 mm safety eyes, firm stuffing, and a 5.0 mm hook to make a 25 cm intermediate plush. Build it when a display piece needs height, face detail, and a tail that helps the body sit without wire.
The Design: What Makes This Dragon Different
The head is wider than the body because the eyes, snout, horns, cheeks, and flower all compete for space. You shape that width with a 42-stitch plateau, then pull the lower rounds inward so the face stays round instead of turning into a ball. The body uses the same large plateau but stands taller, giving the cream belly panel enough room to show. For this sunflower dragon amigurumi, the wings are leaves rather than bat wings, so they are worked flat and embroidered with a center vein. The common mistake in a crochet dragon pattern is making every add-on the same scale. Horns, toe nubs, cheeks, and petals need separate sizing. Small parts. Controlled placement. The maker gets a cleaner dragon when the flower sits above the eye line rather than over the brow.
Project Info at a Glance
| Skill Level | Time | Finished Size | Hook | Best For |
|---|---|---|---|---|
| Intermediate | 6–8 hours | 25 cm | 5.0 mm | Shelf plush, fantasy nursery decor, photo prop |
Materials and Tools
Yarn
- Soft yellow bulky velvet yarn — bulky / chenille — 150 g
- Cream bulky velvet yarn — bulky / chenille — 30 g
- Sage green bulky velvet yarn — bulky / chenille — 35 g
- Tan bulky velvet yarn — bulky / chenille — 10 g
- Brown worsted or velvet yarn — small amount
- Pink velvet yarn — small amount
- Black embroidery floss — small amount
- Brown embroidery floss — small amount
Tools
- Hook 5.0 mm
- 18 mm safety eyes
- Polyester stuffing
- Tapestry needle
- Locking stitch markers
- Straight pins
- Scissors
Abbreviations
MR = magic ring; sc = single crochet; inc = 2 sc in next stitch; dec = single crochet 2 stitches together; sl st = slip stitch; ch = chain; BLO = back loop only; FLO = front loop only; hdc = half double crochet; dc = double crochet.
Invisible decrease: work through the front loops of the next two stitches before completing one sc so the reduction does not ridge the velvet.
Pattern — Step by Step
Continuous spiral unless noted.
Head
Yarn: soft yellow
R1: 6 sc in MR (6)
R2: inc ×6 (12)
R3: (sc, inc) ×6 (18)
R4: (2 sc, inc) ×6 (24)
R5: (3 sc, inc) ×6 (30)
R6: (4 sc, inc) ×6 (36)
R7: (5 sc, inc) ×6 (42)
R8–15: sc around (42)
R16: (5 sc, dec) ×6 (36)
R17: (4 sc, dec) ×6 (30)
R18: (3 sc, dec) ×6 (24)
R19: (2 sc, dec) ×6 (18)
R20: (sc, dec) ×6 (12)
R21: dec ×6 (6)
Insert safety eyes between R12 and R13, 9 stitches apart, before closing. Stuff firmly after R17, adding small pieces of stuffing around the cheeks.
Fasten off. Leave 25 cm tail.
Body
Yarn: soft yellow
R1: 6 sc in MR (6)
R2: inc ×6 (12)
R3: (sc, inc) ×6 (18)
R4: (2 sc, inc) ×6 (24)
R5: (3 sc, inc) ×6 (30)
R6: (4 sc, inc) ×6 (36)
R7: (5 sc, inc) ×6 (42)
R8–13: sc around (42)
R14: (5 sc, dec) ×6 (36)
R15–16: sc around (36)
R17: (4 sc, dec) ×6 (30)
R18–19: sc around (30)
R20: (3 sc, dec) ×6 (24)
R21: (2 sc, dec) ×6 (18)
R22: (sc, dec) ×6 (12)
R23: dec ×6 (6)
Stuff the lower body firmly so the dragon can sit. Keep the neck slightly flatter than the base.
Fasten off. Leave 35 cm tail.
Cream Belly Patch
Yarn: cream
R1: ch 9, starting in 2nd ch from hook, sc 8, ch 1, turn (8)
R2: inc, sc 6, inc, ch 1, turn (10)
R3: sc across, ch 1, turn (10)
R4: inc, sc 8, inc, ch 1, turn (12)
R5–11: sc across, ch 1, turn (12)
R12: dec, sc 8, dec, ch 1, turn (10)
R13: dec, sc 6, dec, ch 1, turn (8)
R14: sc around the full edge; place 2 sc into each corner curve (36 approx.)
Fasten off. Leave 40 cm tail for sewing.
Snout
Yarn: soft yellow
R1: 6 sc in MR (6)
R2: inc ×6 (12)
R3: (sc, inc) ×6 (18)
R4–5: sc around (18)
R6: (sc, dec) ×6 (12)
Stuff very lightly. The snout should stay low, not spherical.
Fasten off. Leave 30 cm tail.
Arms / Front Legs
Yarn: soft yellow
Make 2.
R1: 6 sc in MR (6)
R2: inc ×6 (12)
R3–5: sc around (12)
R6: dec ×6 (6)
R7–8: sc around (6)
Stuff only the paw end. Flatten the top before sewing.
Fasten off. Leave 25 cm tail on each arm.
Back Legs
Yarn: soft yellow
Make 2.
R1: 6 sc in MR (6)
R2: inc ×6 (12)
R3: (sc, inc) ×6 (18)
R4–6: sc around (18)
R7: (sc, dec) ×6 (12)
R8: dec ×6 (6)
Stuff the front of each foot firmly. Leave the back half softer so the leg can sit flat against the body.
Fasten off. Leave 30 cm tail on each leg.
Green Toe Nubs
Yarn: sage green
Make 6.
R1: 6 sc in MR (6)
R2: sc around (6)
Fasten off. Leave 15 cm tail on each nub.
Horns
Yarn: tan
Make 2.
R1: 6 sc in MR (6)
R2: sc around (6)
R3: inc ×6 (12)
R4–5: sc around (12)
Do not stuff heavily. Pin the horns before sewing so the tips lean slightly outward.
Fasten off. Leave 25 cm tail on each horn.
Leaf Wings
Yarn: sage green
Make 2. Worked in rows.
R1: ch 9, starting in 2nd ch from hook, sc 8, ch 1, turn (8)
R2: inc, sc 6, inc, ch 1, turn (10)
R3: sc across, ch 1, turn (10)
R4: inc, sc 8, inc, ch 1, turn (12)
R5–6: sc across, ch 1, turn (12)
R7: dec, sc 8, dec, ch 1, turn (10)
R8: sc across, ch 1, turn (10)
R9: dec, sc 6, dec, ch 1, turn (8)
R10: dec, sc 4, dec, ch 1, turn (6)
R11: dec, sc 2, dec, ch 1, turn (4)
R12: dec ×2 (2)
Border: sc evenly around the wing, placing 3 sc into the pointed tip.
Fasten off. Leave 35 cm tail. Embroider one brown center vein from base to tip, then add 3 diagonal veins per side.
Tail
Yarn: soft yellow
R1: 6 sc in MR (6)
R2: sc around (6)
R3: inc ×6 (12)
R4–5: sc around (12)
R6: (sc, inc) ×6 (18)
R7–10: sc around (18)
R11: (2 sc, inc) ×6 (24)
R12–16: sc around (24)
Stuff from the tip in small sections. Leave the base open for sewing.
Fasten off. Leave 45 cm tail.
Dorsal Green Spikes
Yarn: sage green
Make 7.
R1: 6 sc in MR (6)
R2: inc ×6 (12)
R3: sc around (12)
R4: dec ×6 (6)
Fasten off. Leave 20 cm tail on each spike.
Cheek Patches
Yarn: pink
Make 2.
R1: 6 sc in MR (6)
R2: inc ×6 (12)
sl st to first stitch (12)
Fasten off. Leave 20 cm tail on each cheek.
Sunflower Center
Yarn: brown
R1: 6 sc in MR (6)
R2: inc ×6 (12)
R3: (sc, inc) ×6 (18)
R4: sc around (18)
Fasten off. Leave 25 cm tail.
Sunflower Petals
Yarn: yellow
Make 10.
R1: ch 5, starting in 2nd ch from hook, sc, hdc, dc, hdc (4)
R2: work down the opposite side of the chain: hdc, dc, hdc, sc (8)
sl st into first stitch (8)
Fasten off. Leave 12 cm tail on each petal.
Flower Leaf
Yarn: sage green
R1: ch 7, starting in 2nd ch from hook, sc, hdc, dc, dc, hdc, sc (6)
R2: work down the opposite side of the chain: sc, hdc, dc, dc, hdc, sc (12)
sl st into first stitch (12)
Fasten off. Leave 20 cm tail.
Assembly
- Sew the head to the top of the body with the face centered above the belly line.
- Attach the cream belly patch from just under the neck to the lower front body, smoothing it flat before the final stitches.
- Sew the snout between the eyes, centered over R14–17 of the head, then embroider two vertical nostrils and a small curved smile.
- Stitch the cheek patches to either side of the snout, one round below the eyes.
- Sew the arms to the upper front body so the paws rest partly over the belly patch.
- Attach the back legs low on the body, then sew three green toe nubs to the front edge of each foot.
- Sew the tail to the back base of the body and angle it to one side for sitting support.
- Attach the leaf wings to the back body between the neck and tail, with the tips pointing outward.
- Sew horns to the top of the head, then place green dorsal spikes from behind the horns down the head and onto the tail.
- Build the sunflower by sewing petals behind the brown center, add the green leaf, then stitch the flower above the dragon’s right eye.
The finished plush sits with the tail and back legs forming a three-point base.
7 Technical Tips
- Stitch marker drift: if the marker moves more than 2 stitches left by R10 of the head, the eye line will tilt. Move the marker only after finishing a full round, not during a count check.
- Stuffing firmness: the head needs enough fiberfill to resist a 1 cm thumb press. A soft head lets the 18 mm eyes pull inward and flatten the snout.
- Invisible decrease gap: velvet yarn can expose white stuffing when the hook grabs full stitches. Work decreases through front loops only on R16–21 of the head and R20–23 of the body.
- Eye placement timing: lock the safety backs before R17 of the head. Later placement forces the hand through a 24-stitch opening and can stretch the lower face.
- Velvet tension failure: loose tension makes the 42-stitch head plateau grow wider than the body. Keep the working loop just large enough to slide over the 5.0 mm hook shaft.
- Pinning error: wings sewn without pins usually land at different heights. Pin both wing bases across the same two body rounds, then check the silhouette from the front.
- Tail weaving issue: a tail joined with only one pass can rotate under the dragon. Sew around the base twice, then bury the yarn tail through the body for at least 8 cm.
Conclusion
This pattern works because the dragon structure stays clear under the botanical details: broad head, compact body, wide feet, visible wings, raised horns, and a tail that supports the seated pose. Block the leaf wings flat for 20 minutes before final sewing, then check the flower angle from the front and side. For the next build, swap the sunflower for a daisy or move the dorsal spikes lower along the tail. Save this dragon amigurumi crochet pattern to Pinterest, post the finished plush on Instagram, and tag it with #SunflowerDragonAmigurumi. Which detail should carry more weight on this dragon: the green leaf wings or the sunflower crown?









