Introduction
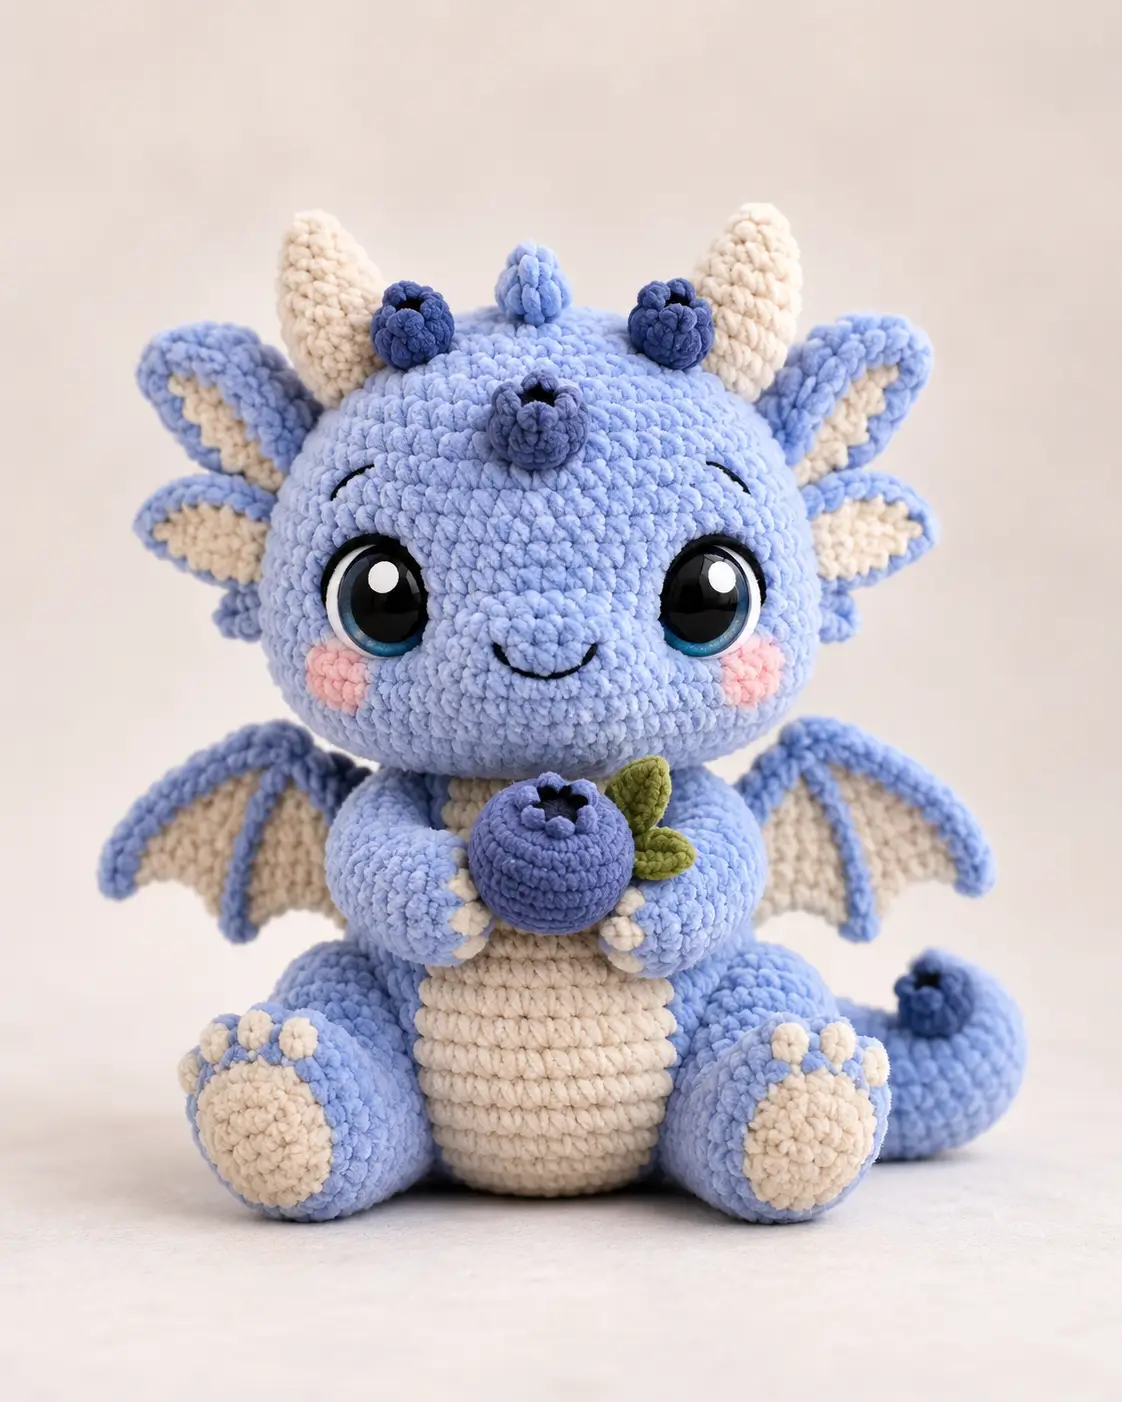
A blueberry-blue baby dragon with cream horns fails fast if the wings droop below the cheek fins in this dragon amigurumi crochet pattern. Work it with light-worsted velvet yarn, a 3.5 mm hook, 18 mm safety eyes, and firm stuffing. Finished size is about 18 cm. Skill level is intermediate because the build has wings, horns, face shaping, and a small berry prop.
The Design: What Makes This Blue Dragon Different
The head is oversized, but the body stays compact so the plush dragon amigurumi can sit without tipping. You build the cheek fins as folded circles instead of thin triangles; that gives the blue baby dragon crochet pattern a round side profile and keeps the face soft next to the large eyes. Wing membranes are worked flat, then edged in blue, because a stuffed wing would pull the shoulders backward. The maker adds cream horns last so the crown line can be pinned against the forehead spike before sewing. One common mistake with winged dragons is placing the wings too high on the head-neck seam. That makes the silhouette read as ears. Here the wings sit on the upper back, with the side fins and horns doing the face work.
Project Info at a Glance
| Skill Level | Time | Finished Size | Hook | Best For |
|---|---|---|---|---|
| Intermediate | 4–5 hours | 18 cm | 3.5 mm | Shelf plush, nursery photo prop, fantasy market table |
Materials and Tools
Yarn
- Periwinkle blue — light worsted velvet/acrylic — 80 g — Stylecraft Special DK or velvet-touch equivalent.
- Cream — light worsted — 25 g — belly, horns, inner wings, paw pads.
- Deep blue — light worsted — 8–10 g — crown bumps, brow dots, tail tip, berry crown.
- Pink — light worsted — 3 g — cheek patches.
- Olive green — light worsted — 5–10 g — berry leaves.
Tools
- Hook 3.5 mm
- Safety eyes 18 mm
- Polyester stuffing
- Tapestry needle
- Locking stitch markers
- Pins
- Embroidery thread in black
Use embroidered eyes instead of plastic eyes for toys made for babies or rough play.
Abbreviations
MR = magic ring; sc = single crochet; inc = 2 sc in one stitch; dec = invisible decrease; sl st = slip stitch; ch = chain; BLO = back loop only; FLO = front loop only; hdc = half double crochet.
Invisible decrease works through front loops of the next two stitches so the closing rounds stay flat in velvet yarn.
Pattern — Step by Step
Continuous spiral unless noted. Count every round before moving to the next part.
Head Make 1
Yarn: periwinkle blue.
R1: 6 sc in MR (6)
R2: inc ×6 (12)
R3: (sc, inc) ×6 (18)
R4: (2 sc, inc) ×6 (24)
R5: (3 sc, inc) ×6 (30)
R6: (4 sc, inc) ×6 (36)
R7: (5 sc, inc) ×6 (42)
R8–R16: sc around (42)
R17: (5 sc, dec) ×6 (36)
R18: sc around (36)
R19: (4 sc, dec) ×6 (30)
R20: (3 sc, dec) ×6 (24)
R21: (2 sc, dec) ×6 (18)
R22: (sc, dec) ×6 (12)
R23: dec ×6 (6)
Insert safety eyes between R12 and R13, 9 sts apart. Place the snout over R14–R17 before closing. Stuff firmly from R18 onward.
Fasten off. Leave 30 cm tail.
Body Make 1
Yarn: periwinkle blue.
R1: 6 sc in MR (6)
R2: inc ×6 (12)
R3: (sc, inc) ×6 (18)
R4: (2 sc, inc) ×6 (24)
R5: (3 sc, inc) ×6 (30)
R6: (4 sc, inc) ×6 (36)
R7–R12: sc around (36)
R13: (4 sc, dec) ×6 (30)
R14–R15: sc around (30)
R16: (3 sc, dec) ×6 (24)
R17: sc around (24)
R18: (2 sc, dec) ×6 (18)
R19: (sc, dec) ×6 (12)
R20: dec ×6 (6)
Stuff firmly through the base. Keep the neck area packed so the large head does not tilt forward.
Fasten off. Leave 35 cm tail.
Belly Patch Make 1
Yarn: cream.
R1: 6 sc in MR (6)
R2: inc ×6 (12)
R3: (sc, inc) ×6 (18)
R4: (2 sc, inc) ×6 (24)
R5: (3 sc, inc) ×6 (30)
R6: sc around (30)
Do not stuff. Stretch vertically while pinning to form an oval belly.
Fasten off. Leave 40 cm tail.
Snout Make 1
Yarn: periwinkle blue.
R1: 6 sc in MR (6)
R2: inc ×6 (12)
R3–R4: sc around (12)
Stuff lightly. Embroider two nostrils across R3 and a shallow smile below the snout.
Fasten off. Leave 25 cm tail.
Front Arms Make 2
Yarn: cream, then periwinkle blue.
R1: with cream, 6 sc in MR (6)
R2: inc ×6 (12)
R3: sc around (12)
R4: change to periwinkle blue, sc around (12)
R5–R6: sc around (12)
R7: dec ×6 (6)
Stuff only the cream paw end. Flatten the blue upper edge before sewing.
Fasten off. Leave 25 cm tail.
Back Legs Make 2
Yarn: cream, then periwinkle blue.
R1: with cream, 6 sc in MR (6)
R2: inc ×6 (12)
R3: (sc, inc) ×6 (18)
R4: change to periwinkle blue, BLO sc around (18)
R5–R7: sc around (18)
R8: (sc, dec) ×6 (12)
R9: dec ×6 (6)
Stuff firmly at the paw, then lightly at the upper leg.
Fasten off. Leave 30 cm tail.
Toe Pads Make 6
Yarn: cream.
R1: 6 sc in MR (6)
R2: sl st into first st (6)
Make three pads per back foot. Sew them above the main cream paw circle.
Fasten off. Leave 12 cm tail on each pad.
Wings Make 2
Yarn: cream and periwinkle blue.
With cream, ch 8.
Row 1: sc in 2nd ch from hook and across (7)
Row 2: ch 1, turn, sc across (7)
Row 3: ch 1, turn, dec, 3 sc, dec (5)
Row 4: ch 1, turn, sc across (5)
Row 5: ch 1, turn, dec, sc, dec (3)
Row 6: ch 1, turn, sc across (3)
Blue edging:
R1: attach periwinkle blue at bottom corner; sc 18 evenly around, placing 3 sc at the top point (18)
R2: sc around (18)
Do not stuff. The cream panel should stay flat inside the blue rim.
Fasten off. Leave 35 cm tail.
Side Ears / Cheek Fins Make 2
Yarn: cream and periwinkle blue.
R1: with cream, 6 sc in MR (6)
R2: inc ×6 (12)
R3: change to periwinkle blue, BLO (sc, inc) ×6 (18)
R4: fold in half, sc through both layers across the open edge (9)
The cream side faces forward. Pin each fin level with the safety eyes.
Fasten off. Leave 25 cm tail.
Cream Horns Make 2
Yarn: cream.
R1: 6 sc in MR (6)
R2: sc around (6)
R3: inc ×6 (12)
R4–R6: sc around (12)
Stuff lightly. Pin each horn behind the crown bumps, not directly above the eyes.
Fasten off. Leave 25 cm tail.
Crown Bumps Make 3
Yarn: 1 periwinkle blue and 2 deep blue.
R1: 6 sc in MR (6)
R2: inc ×6 (12)
R3: sc around (12)
R4: dec ×6 (6)
Make one center bump in periwinkle blue and two side bumps in deep blue.
Fasten off. Leave 18 cm tail on each bump.
Tail Make 1
Yarn: deep blue, then periwinkle blue.
R1: with deep blue, 6 sc in MR (6)
R2: sc around (6)
R3: change to periwinkle blue, inc ×6 (12)
R4–R6: sc around (12)
R7: (sc, inc) ×6 (18)
R8–R10: sc around (18)
R11: (sc, dec) ×6 (12)
R12: sc around (12)
Stuff the tip and middle. Leave the base open for sewing to the lower back.
Fasten off. Leave 35 cm tail.
Cheek Patches Make 2
Yarn: pink.
R1: 6 sc in MR (6)
R2: inc ×6 (12)
R3: sl st into first st (12)
Do not stuff. Sew one patch under each eye, slightly behind the snout line.
Fasten off. Leave 15 cm tail.
Berry Make 1
Yarn: periwinkle blue, deep blue, olive green.
Berry body:
R1: with periwinkle blue, 6 sc in MR (6)
R2: inc ×6 (12)
R3: (sc, inc) ×6 (18)
R4–R6: sc around (18)
R7: (sc, dec) ×6 (12)
R8: dec ×6 (6)
Stuff before R8. Close the opening tightly.
Fasten off. Weave in the end.
Berry crown:
R1: with deep blue, 6 sc in MR (6)
R2: (sl st in next st, ch 3, sl st in 2nd ch, sc in next ch) ×6 (6 points)
Fasten off. Sew to the top of the berry.
Leaves, make 3:
Ch 5.
Row 1: sl st in 2nd ch from hook, sc, hdc, sc (4)
Fasten off. Sew leaves to one side of the berry.
Assembly
- Pin the head to the body with the head centered over the body’s R1–R6 crown line.
- Sew the head to the body using the long body tail, then pass once more around the back neck for support.
- Sew the snout to the face, centered between the eyes, with the lower edge sitting below the eye line.
- Attach the cheek patches under the eyes and behind the snout curve.
- Sew the belly patch to the body from R5 to R15, stretching it vertically as pinned.
- Attach the front arms to the upper body so the paws meet over the berry.
- Sew the back legs to the lower body at a sitting angle, then add three toe pads to each foot.
- Attach side ears, horns, and crown bumps to the head after checking symmetry from the front.
- Sew wings to the upper back and tail to the lower back, leaving a 2-st gap between the tail and body base.
- Place the berry between the front arms and tack it to both paws with two hidden stitches.
The blue dragon is complete at this stage.
7 Technical Tips
- Stitch marker drift: a shifted marker by 3 sts will move the snout off center. Reset the marker at the back of the head after R7 and again after R16.
- Stuffing firmness: a head packed below medium firmness will crease around the safety eyes. Add stuffing in pea-sized pieces until the forehead resists light thumb pressure.
- Invisible decrease gaps: velvet yarn can show holes when the hook grabs full stitches. Work every decrease through FLO only and pull the working loop tight before the next sc.
- Eye placement timing: eyes installed after R16 cannot be seated cleanly because the opening is already shrinking. Fit both 18 mm eyes between R12 and R13 before the first head decrease round.
- Velvet tension: loose tension creates tall, leaning stitches on the snout. Keep the hook shaft close to the fabric and pull each loop to the same height as the previous sc.
- Pinning failure: unpinned wings often land at two different shoulder heights. Pin both wings first, measure 4 cm from the neck seam to each wing top, then sew.
- Tail weaving: short tails can pop out of velvet yarn after handling. Leave at least 25 cm for structural parts and pass the tail through three different stitch paths before trimming.
Conclusion
Block the wings before final photos and check that both cream panels show from the front. Share the finished piece on Pinterest and Instagram with #BlueberryDragon. When posting, note hook size and yarn brand so readers can compare gauge. This dragon amigurumi crochet pattern is built around a specific blue plush with cream horns, blush patches, a rounded tail, and a berry held at the belly. The concrete next step is to make one wing first and test its height against the head before crocheting the second. Should the side cheek fins sit level with the eyes, or slightly behind them on this blueberry dragon?









