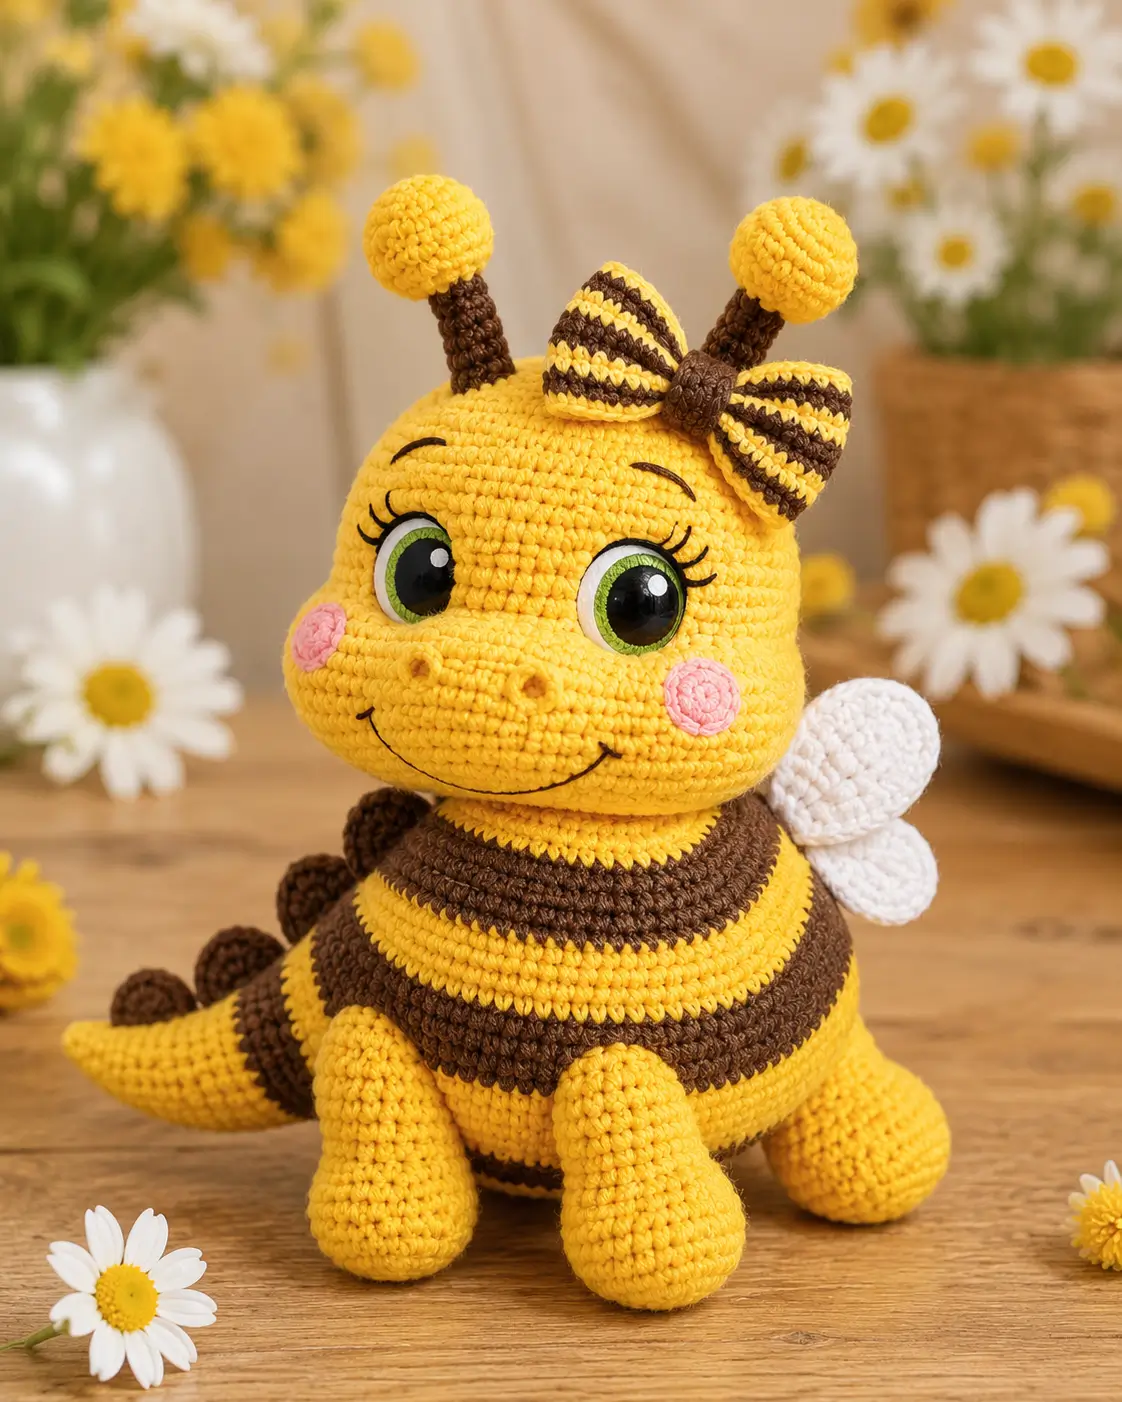
A bee without antennae and striped abdominal bands reads as a yellow grub with wings, so this bee amigurumi crochet pattern starts by locking those cues into the silhouette. Use chenille yarn, a 5.0mm hook, and 12mm eyes for an advanced-beginner plush that sits about 21cm tall. The separated head and body make it practical for shelf display because the weight stays low.
The Design: What Makes This Bee Different
The head is larger than a standard oval bee, so the muzzle, cheeks, lashes, and brows carry the face instead of the body doing all the work. Separate head construction also gives the plush bee amigurumi a cleaner neck seam beneath the brown stripe. A 36-stitch body plateau keeps the sitting shape medium, not oversized, while the flat cheek patches stop the face from becoming too deep. Place the wings behind the shoulder stripe rather than on the top centerline; real bee wings read from the back, and this crochet bee with wings needs that side profile. Most maker errors happen at the forehead. Antennae, bow, and eyes compete for the same small zone, so the bow must be pinned last and shifted slightly off center.
Project Info at a Glance
| Skill Level | Time | Finished Size | Hook | Best For |
|---|---|---|---|---|
| Advanced beginner | 3.5–5 hours | 18–21 cm | 5.0 mm | Plush display, market table sample, nursery shelf with embroidered eyes |
Finished-size, hook, and yarn choices are based on chenille bee references using 5.0mm hooks and larger plush sizing. Simpler bee listings provide a lower time reference, but this photo-style version adds limbs, bow, muzzle, cheeks, and spikes. Source: DIY Fluffies bee crochet pattern.
Materials and Tools
Yarn
- Golden yellow — chenille / super bulky — 35–50 g — Himalaya Dolphin Baby, Premier Parfait Chunky, or Bernat Blanket-style yarn
- Dark brown — chenille / super bulky — 25–35 g — for stripes, bow, arms, antenna stems, and spikes
- White — chenille / super bulky — 15–25 g — for wings
- Pink — chenille / super bulky — 3–5 g — for cheek patches
- Black embroidery yarn — small amount — for smile, brows, lashes, and nostrils
Tools
- Hook 5.0 mm
- 12 mm safety eyes, or embroidered eyes for a child-safe plush
- Polyester stuffing
- Yarn needle
- Stitch markers
- Pins
- Scissors
Chenille bee sources support 4.5–5.0mm hooks, super bulky yarn, and separate color quantities for dark, yellow, and white yarn. Source: Yarnandy Mumble Bee pattern.
Abbreviations
MR = magic ring; sc = single crochet; inc = increase; dec = decrease; sl st = slip stitch; ch = chain; BLO = back loop only; FO = fasten off.
Invisible decrease means working through the front loops of the next two stitches before completing one single crochet, reducing bulk on the outside face.
Pattern — Step by Step
Continuous spiral unless noted. This is an editor-drafted pattern based on the visible bee structure and verified material data, not a line-by-line transcription of the image.
Head
Yarn: golden yellow — Source: Standard amigurumi math; material scale checked against chenille bee references.
R1: 6 sc in MR (6)
R2: inc ×6 (12)
R3: (sc, inc) ×6 (18)
R4: (2 sc, inc) ×6 (24)
R5: (3 sc, inc) ×6 (30)
R6: (4 sc, inc) ×6 (36)
R7–R13: sc around (36)
R14: (4 sc, dec) ×6 (30)
R15: (3 sc, dec) ×6 (24)
Insert 12mm eyes between R8 and R9, about 7 stitches apart. Pin muzzle first, then check cheek placement.
R16: (2 sc, dec) ×6 (18)
R17: (sc, dec) ×6 (12)
Stuff firmly, especially under the forehead and cheeks.
R18: dec ×6 (6)
Fasten off. Leave 20cm tail and close the remaining hole.
Body
Yarn: golden yellow and dark brown — Source: Standard amigurumi math; stripe use checked against bee pattern references.
Start in golden yellow.
R1: 6 sc in MR (6)
R2: inc ×6 (12)
R3: (sc, inc) ×6 (18)
R4: (2 sc, inc) ×6 (24)
R5: (3 sc, inc) ×6 (30)
R6: (4 sc, inc) ×6 (36)
R7–R8: sc around in yellow (36)
R9–R10: sc around in dark brown (36)
R11: sc around in yellow (36)
R12–R13: sc around in dark brown (36)
R14: sc around in yellow (36)
R15: (4 sc, dec) ×6 in yellow (30)
R16: (3 sc, dec) ×6 in dark brown (24)
R17: (2 sc, dec) ×6 in yellow (18)
Stuff the lower body firmly so the bee sits without rolling forward.
R18: (sc, dec) ×6 (12)
R19: dec ×6 (6)
Fasten off. Leave 30cm tail for sewing head to body.
Front Legs / Arms
Yarn: golden yellow — Source: Standard amigurumi math.
Make 2.
R1: 6 sc in MR (6)
R2: inc ×6 (12)
R3: (sc, inc) ×6 (18)
R4–R6: sc around (18)
R7: (sc, dec) ×6 (12)
R8–R10: sc around (12)
Stuff the foot only. Leave the top soft for sewing.
R11: dec ×6 (6)
Fasten off. Leave 25cm tail.
Back Legs
Yarn: golden yellow — Source: Standard amigurumi math.
Make 2.
R1: 6 sc in MR (6)
R2: inc ×6 (12)
R3–R5: sc around (12)
Stuff lightly. These legs should brace the body, not lift it.
R6: dec ×6 (6)
Fasten off. Leave 25cm tail.
Antennae
Yarn: golden yellow and dark brown — Source: Standard amigurumi math.
Make 2. Start with golden yellow.
R1: 6 sc in MR (6)
R2: inc ×6 (12)
R3–R4: sc around (12)
R5: dec ×6 (6)
Change to dark brown.
R6–R10: sc around (6)
Do not overstuff the stem; only the yellow tip needs shape.
Fasten off. Leave 20cm tail.
Wings
Yarn: white — Source: Standard amigurumi math; wing scale compared with published bee wing references. Source: DIY Fluffies bee crochet pattern.
Make 2.
R1: 6 sc in MR (6)
R2: inc ×6 (12)
R3: (sc, inc) ×6 (18)
R4–R5: sc around (18)
R6: (sc, dec) ×6 (12)
R7: dec ×6 (6)
Do not stuff. Flatten each wing and shape the bottom into a soft oval.
Fasten off. Leave 30cm tail.
Muzzle
Yarn: golden yellow — Source: Standard amigurumi math.
R1: 6 sc in MR (6)
R2: inc ×6 (12)
R3: (sc, inc) ×6 (18)
Sl st to next stitch (18)
Fasten off. Leave 25cm tail. Embroider two nostrils with dark brown yarn before sewing to the face.
Cheek Patches
Yarn: pink — Source: Standard amigurumi math.
Make 2.
R1: 6 sc in MR (6)
R2: inc ×6 (12)
Sl st to next stitch (12)
Fasten off. Leave 20cm tail. Keep these flat.
Tail / Stinger
Yarn: golden yellow — Source: Standard amigurumi math.
R1: 6 sc in MR (6)
R2: sc around (6)
R3: inc ×6 (12)
R4: sc around (12)
R5: (sc, inc) ×6 (18)
R6: sc around (18)
R7: (sc, dec) ×6 (12)
R8: dec ×6 (6)
Stuff lightly and pinch the final point before closing.
Fasten off. Leave 30cm tail.
Back Spikes
Yarn: dark brown — Source: Standard amigurumi math.
Make 5.
R1: 6 sc in MR (6)
R2: sc around (6)
Fasten off. Leave 15cm tail on each spike. Flatten slightly before sewing along the back centerline.
Striped Bow
Yarn: golden yellow and dark brown — Source: row-based accessory drafting.
Make 2 bow loops. Start with golden yellow.
Ch 7.
Row 1: sc in 2nd ch from hook and across (6)
Row 2: ch 1, turn, sc across in dark brown (6)
Row 3: ch 1, turn, sc across in golden yellow (6)
Row 4: ch 1, turn, sc across in dark brown (6)
Row 5: ch 1, turn, sc across in golden yellow (6)
Row 6: ch 1, turn, sc across in dark brown (6)
Fasten off. Leave 20cm tail.
Bow center.
Ch 5.
Row 1: sc in 2nd ch from hook and across (4)
Rows 2–3: ch 1, turn, sc across (4)
Fasten off. Wrap the center strip around both loops and stitch at the back. Leave 30cm tail for sewing to head.
Facial Embroidery
Yarn: black and dark brown — Source: photo-based placement.
Work after the muzzle is pinned but before final sewing. Place brows above the eyes with shallow curved stitches. Add three lashes at the outer edge of each eye. Stitch the smile under the muzzle with black yarn, then secure the yarn inside the head.
Assembly
- Sew the head to the body with the body stripe centered under the chin.
- Attach the muzzle between the eyes, with the lower edge sitting above the smile line.
- Sew cheek patches level with the lower third of the eyes.
- Embroider nostrils, smile, brows, and lashes.
- Sew front legs to the lower front of the body at equal height.
- Sew back legs to the lower side/back area so the body sits flat.
- Attach wings to the upper back, behind the first brown stripe.
- Sew the tail/stinger to the rear centerline.
- Attach back spikes in a vertical row from upper back toward tail.
- Sew antennae to the top of the head, then pin and sew the bow beside one antenna.
The finished bee should sit without hand support when the lower body and back legs are stuffed evenly.
7 Technical Tips
- Stitch marker drift: In chenille yarn, the start point can shift 1–2 stitches per stripe. Move the marker only at the end of a round, never halfway through a color change.
- Stuffing firmness: A soft lower body causes the bee to tip forward. Pack the bottom third to a firm oval before closing R18 of the body.
- Invisible decrease gaps: Standard decreases leave brown or yellow stuffing shadows between stitches. Use invisible decreases on every head and body decrease round.
- Eye placement timing: Safety eyes must go in before R16 of the head closes the opening. Test the muzzle width first; 7 stitches between eyes suits 12mm eyes on a 36-stitch head.
- Velvet tension: Chenille stretches when pulled too tightly through small stitches. Keep loops tall enough to slide the hook through, but small enough that stuffing does not show.
- Pinning order: The bow will crowd the antennae if sewn first. Pin antennae, check the front view, then place the bow 1–2 rounds lower on one side.
- Tail weaving: Short tails work loose in plush yarn. Leave at least 20–30cm on legs, wings, bow, and tail so each seam can pass through the body twice.
Conclusion
This bee amigurumi crochet pattern is strongest when the face, antennae, wings, and bow are treated as structural parts rather than decoration. Keep the head round, set the eyes before closing, and pin the bow only after the antennae are fixed; that order prevents a crowded forehead. The next step is to crochet one test head in scrap chenille and check eye distance against the muzzle before making the full body. Share the finished bee on Pinterest and Instagram with a clear side-view photo showing the wings and bow. Use #BowWingBee. For this bee, should the bow sit beside the right antenna or centered between both antennae?









