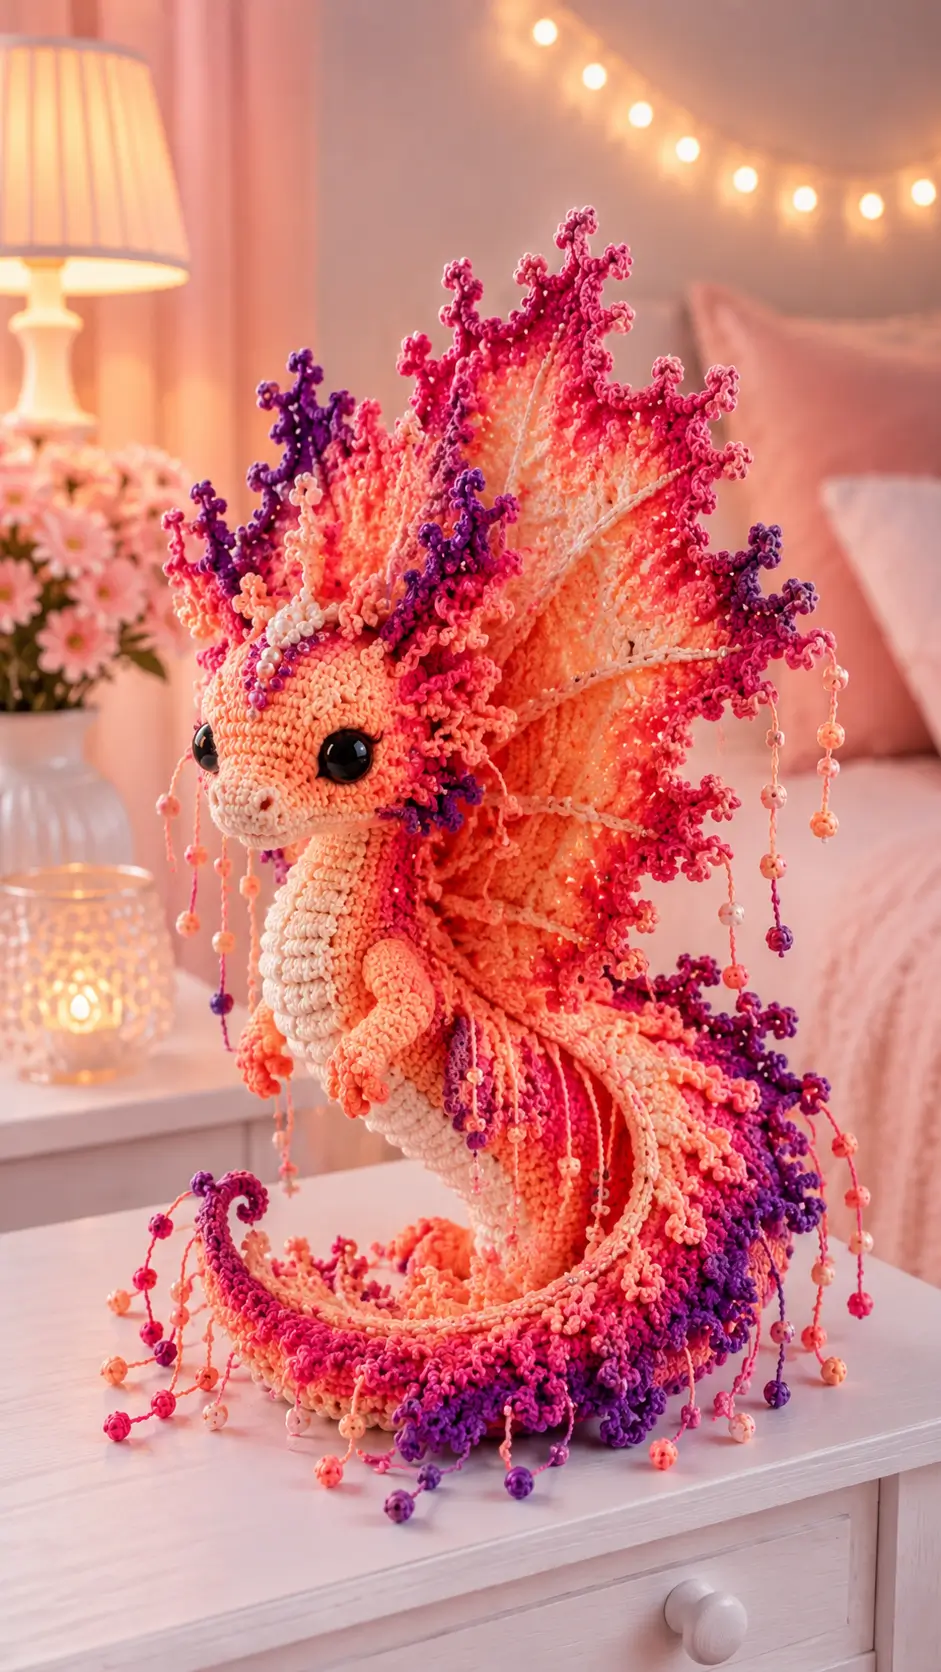
Leafy sea dragons hide by moving like drifting seaweed, so a leafy sea dragon amigurumi crochet pattern has to solve motion before shape. This build uses worsted yarn, a 3.75–4 mm hook, 10–14 mm eyes, and a large 50 cm nose-to-tail target for an intermediate display toy. Make it when you need a sculptural ocean pattern with visible construction logic.
The Design: What Makes This Leafy Sea Dragon Different
You are not building a standard dragon with fins attached afterward. The body needs a long curve first, because the silhouette reads as seahorse, pipefish, and leaf at the same time. The large side wings are worked as flat leaf panels so they can sit behind the head without pulling the body backward.
The maker then adds chain fronds over the spine and tail, using short picot branches to imitate the floating appendages that help real leafy sea dragons blend into seaweed. The common mistake in a crochet sea dragon pattern is making every frond the same length. That flattens the outline. A better leafy seadragon crochet pattern alternates short, medium, and long branches around the head, back, and tail so the edge breaks into irregular coral shapes.
Project Info at a Glance
| Skill Level | Time | Finished Size | Hook | Best For |
|---|---|---|---|---|
| Intermediate | 9–12 hours | 50 cm nose-to-tail | 3.75–4 mm | Display shelf, ocean nursery decor, photo prop |
Materials and Tools
Yarn
- Peach-coral — Worsted / Aran — 70 g — Red Heart Super Saver, Paintbox Simply Aran, or similar firm acrylic
- Cream — Worsted / Aran — 25 g — belly ridge, snout, cheek patches
- Hot pink — Worsted / Aran — 20 g — outer fronds and wing edging
- Purple — Worsted / Aran — 15 g — tail fronds and contrast tips
- White embroidery thread — small amount — wing ribs and bead strands
- Pink embroidery thread — small amount — hanging garlands
Tools
- Hook 3.75 mm or 4.00 mm
- 10–14 mm safety eyes
- Polyfill stuffing
- Tapestry needle
- Stitch markers
- Embroidery needle
- Optional display beads, 3–5 mm
- Pins for assembly
Do not add beads or plastic eyes to a toy for children under 3. This draft uses sewn and pinned shaping instead of wire support.
Abbreviations
MR = magic ring; sc = single crochet; inc = 2 sc in one stitch; dec = single crochet decrease; sl st = slip stitch; ch = chain; BLO = back loop only; FLO = front loop only; sk = skip; FO = fasten off.
Invisible decrease means working through the front loops of the next two stitches before finishing one sc, which reduces holes on the peach body fabric.
Pattern — Step by Step
Continuous spiral unless noted. Use the large 42-st plateau for the head and body because the photo reads as a large display sea dragon.
Head — Make 1
Yarn: peach-coral
R1: 6 sc in MR (6)
R2: inc ×6 (12)
R3: (sc 1, inc) ×6 (18)
R4: (sc 2, inc) ×6 (24)
R5: (sc 3, inc) ×6 (30)
R6: (sc 4, inc) ×6 (36)
R7: (sc 5, inc) ×6 (42)
R8–R13: sc around (42)
R14: (sc 5, dec) ×6 (36)
R15: sc around (36)
R16: (sc 4, dec) ×6 (30)
R17: (sc 3, dec) ×6 (24)
Place eyes between R10 and R11, about 11 stitches apart. Stuff the cheeks firmly before closing.
R18: (sc 2, dec) ×6 (18)
R19: (sc 1, dec) ×6 (12)
R20: dec ×6 (6)
Fasten off. Leave a 20 cm tail and close the final hole.
Snout — Make 1
Yarn: cream
R1: 6 sc in MR (6)
R2: inc ×6 (12)
R3: (sc 1, inc) ×6 (18)
R4–R5: sc around (18)
R6: (sc 1, dec) ×6 (12)
Fasten off. Leave a 25 cm tail. Sew to the lower front of the head and embroider two tiny nostrils with peach or brown thread.
Curved Body and Tail — Make 1
Yarn: peach-coral
R1: 6 sc in MR (6)
R2: sc around (6)
R3: inc ×6 (12)
R4: sc around (12)
R5: (sc 1, inc) ×6 (18)
R6: sc around (18)
R7: (sc 2, inc) ×6 (24)
R8–R10: sc around (24)
R11: (sc 3, inc) ×6 (30)
R12–R14: sc around (30)
R15: (sc 4, inc) ×6 (36)
R16–R20: sc around (36)
R21: (sc 5, inc) ×6 (42)
R22–R30: sc around (42)
R31: (sc 5, dec) ×6 (36)
R32–R34: sc around (36)
R35: (sc 4, dec) ×6 (30)
R36–R39: sc around (30)
R40: (sc 3, dec) ×6 (24)
R41–R44: sc around (24)
R45: (sc 2, dec) ×6 (18)
R46: sc around (18)
R47: (sc 1, dec) ×6 (12)
Stuff as you work. Pack the 42-st belly section firmly and leave the tail end lighter so it can curl.
R48: dec ×6 (6)
Fasten off. Leave a 30 cm tail. Curve the tail upward and tack it to itself with hidden stitches.
Belly Ridge — Make 1
Yarn: cream
Ch 31.
Row 1: sc in 2nd ch from hook and across (30)
Row 2: ch 1, turn, BLO sc across (30)
Row 3: ch 1, turn, BLO sc across (30)
Row 4: ch 1, turn, sc across (30)
Fasten off. Leave a 35 cm tail. Sew from the lower neck down the front curve of the body.
Front Flippers / Arms — Make 2
Yarn: peach-coral
R1: 6 sc in MR (6)
R2: inc ×6 (12)
R3: (sc 1, inc) ×6 (18)
R4–R5: sc around (18)
R6: (sc 1, dec) ×6 (12)
R7–R8: sc around (12)
R9: dec ×6 (6)
Fasten off. Leave a 20 cm tail. Flatten slightly and sew to each side of the upper body below the head.
Rear Stabilizing Fins — Make 2
Yarn: hot pink
Ch 10.
Row 1: sc in 2nd ch from hook and across (9)
Row 2: ch 1, turn, sc across (9)
Row 3: ch 1, turn, sk 1, sc 7, sl st 1 (8)
Row 4: ch 1, turn, sk 1, sc 6, sl st 1 (7)
Row 5: ch 1, turn, sk 1, sc 5, sl st 1 (6)
Fasten off. Leave a 20 cm tail. Sew these fins low on the body where back legs would sit on a standard dragon.
Side Leaf Wings — Make 2
Yarn: cream center with hot pink edge
With cream, ch 23.
Row 1: sc in 2nd ch from hook and across (22)
Row 2: ch 1, turn, sc across (22)
Row 3: ch 1, turn, sc 18, leave 4 unworked (18)
Row 4: ch 1, turn, sc across (18)
Row 5: ch 1, turn, sc 14, leave 4 unworked (14)
Row 6: ch 1, turn, sc across (14)
Row 7: ch 1, turn, sc 10, leave 4 unworked (10)
Row 8: ch 1, turn, sc across (10)
Switch to hot pink. Work 1 round of sc around the whole wing, placing 3 sc at the outer corners. Sl st to join.
Fasten off. Leave a 40 cm tail. Embroider 5 white rib lines from the inner base to the outer edge.
Dorsal Fronds — Make 14
Yarn: hot pink, peach, and purple
For each frond, ch 9–15.
Sl st in 2nd ch from hook.
Work back toward the base as follows: (ch 3, sl st in same ch, sl st in next ch) repeated until the base.
For longer head fronds, start with ch 15. For tail fronds, start with ch 9 or ch 11.
Fasten off. Leave a 15 cm tail on each frond. Make at least 5 hot pink, 5 peach, and 4 purple.
Cheek Patches — Make 2
Yarn: pale blush
R1: 6 sc in MR (6)
R2: inc ×6 (12)
R3: (sc 1, inc) ×6 (18)
Sl st to join.
Fasten off. Leave a 20 cm tail. Sew one patch below each eye, slightly behind the snout.
Tail Tip Crest — Make 1
Yarn: purple
Ch 19.
Row 1: sl st in 2nd ch from hook, sl st 3, sc 10, sl st 4 (18)
Row 2: ch 1, turn, sl st 4, sc 10, sl st 4 (18)
Add three picot branches along one long edge: ch 4, sl st back into same edge stitch. Repeat twice more.
Fasten off. Leave a 25 cm tail. Sew along the outer curl of the tail.
Bead-Drop Garlands — Make 8
Yarn/thread: pink or white embroidery thread
Thread 3–5 beads onto the thread before crocheting.
Ch 24.
Slide 1 bead close to the hook, ch 1 around the bead.
Ch 5. Slide another bead, ch 1 around it.
Repeat until the strand has 3 beads, then ch 5 and fasten off.
Leave 10 cm tails at both ends. Tie strands to the wing edges and tail fronds for display only.
Assembly
- Pin the body into an S curve with the 42-st belly section upright.
- Sew the head to the upper body, placing it slightly forward of center.
- Attach the snout to the lower face and secure the nostril stitches.
- Sew cheek patches below the eyes with the upper edge tucked under the snout curve.
- Attach front flippers at R31–R34 of the body, angled forward.
- Sew rear stabilizing fins low on the body so the piece can sit without rolling.
- Place side leaf wings behind the head and stitch only along the inner 6 cm edge.
- Sew dorsal fronds from the crown, down the spine, and around the tail curl.
- Add the purple tail tip crest to the outside of the curl.
- Tie bead-drop garlands to wing tips, cheek fronds, and tail fronds.
The finished leafy sea dragon measures about 50 cm nose-to-tail when worked near the listed benchmark gauge.
7 Technical Tips
- Marker drift causes the snout to twist off center after R12 of the head. Move the stitch marker at the end of each round rather than counting from the previous visible seam.
- Under-stuffing makes the 42-st belly collapse after the wings are sewn on. Pack the body until it resists light finger pressure but still bends at the tail.
- Eye placement fails when the eyes go in before the snout is pinned. Test the snout first, then place the eyes 11 stitches apart between R10 and R11.
- Invisible decrease holes show fastest on cream yarn. Work all head and body decrease rounds through front loops only, especially R17–R20.
- Wing drag pulls the sea dragon backward if the entire wing edge is sewn down. Stitch only the inner 6 cm, then tack one upper point to a dorsal frond.
- Frond spacing looks striped when every color repeats in the same order. Place purple fronds in uneven groups of 1, 2, and 1 along the tail.
- Bead strands tangle when they are longer than the wing height. Keep each finished garland under 11 cm and tie it with two knots before weaving the thread tail.
Conclusion
This pattern works because the structure is planned in layers: a firm 42-st body, a forward head, flat leaf wings, then irregular chain fronds. The next step is to crochet the head and body first, pin them together, and check the curve before making any decorative pieces. Share the pinned progress photo on Pinterest and the finished side profile on Instagram, since this character depends on outline more than front view. Use #LeafySeaDragon. For the next version of this leafy sea dragon amigurumi crochet pattern, would you make the fronds mostly coral, or shift the tail edge toward deeper purple?