Ginnie the Giraffe
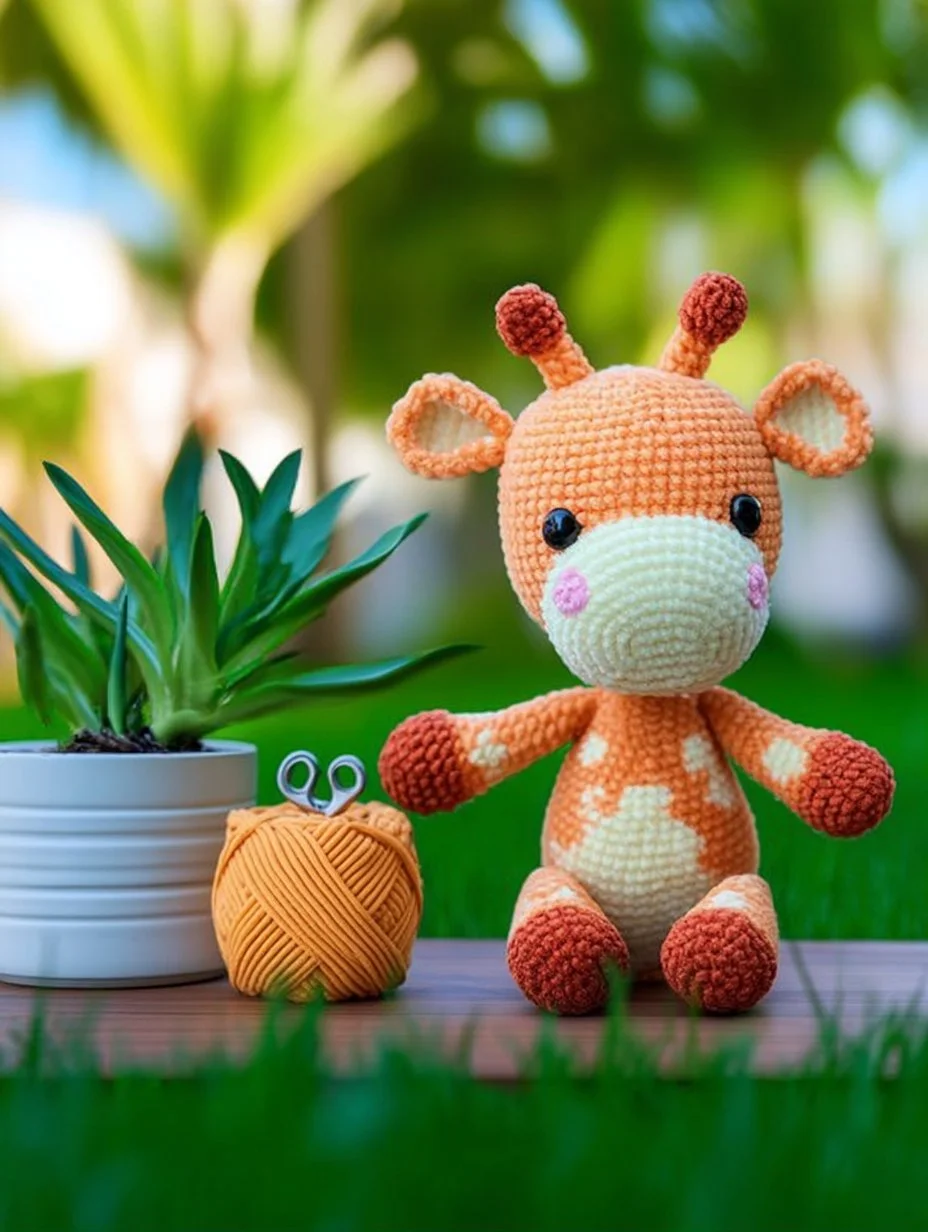
A giraffe pattern features a long neck that is proportionately slim and a distinctive spot pattern on its body. This project uses amigurumi construction techniques to create Ginnie, a charming giraffe that stands approximately 25 cm tall. Designed to be crafted with super bulky yarn, Ginnie is a plush crochet animal suited for more advanced beginners, offering a rewarding project that can be completed in about 5 to 6 hours. The finished plush is not only an eye-catching decoration but also a delightful toy for children or a cherished gift.
The Design: What Makes Ginnie the Giraffe Different
Ginnie the Giraffe has a unique body shape characterized by a tall, slender neck and a rounded body that balances well for standing. The head is proportionally large, allowing plenty of space for the signature giraffe features such as the long ears and prominent ossicones, which are the horn-like structures unique to giraffes. Limb placement is critical; the front legs should be slightly further apart to support the weight of the plush head on the elevated neck.
The stability in the design comes from using super bulky yarn, which results in a plush toy that is firm yet cuddly. This type of yarn helps to maintain the character’s shape, while crocheted stitches remain visible enough to highlight the spot patterns without compromising the overall look. A common mistake when creating characters with long necks is not adjusting the crocheting tension, leading to a floppy neck that cannot support the head. To avoid this mistake, work firmly with your yarn and regularly check that the neck can hold its shape. The design works well as a handmade amigurumi toy because it embodies the whimsical proportions that define a giraffe while remaining structurally sound.
Project Info at a Glance
| Skill Level | Time | Finished Size | Hook | Yarn |
|——————|————|—————|——–|————-|
| Beginner Plus | 5–6 hours | 25 cm | 4.5 mm | Super Bulky |
Materials and Tools
Using the right materials enhances Ginnie’s playful character and helps highlight her unique features. This pattern requires super bulky yarn to achieve the necessary plushness, while the contrasting and accent colors will define Ginnie’s distinctive spots and features.
Yarn
- Golden yellow super bulky yarn — 150 g for head, body, and limbs
- Chocolate brown super bulky yarn — 80 g for spot details and hooves
- Cream super bulky yarn — 30 g for cheeks and horn tips
Your color choices can affect the overall mood of the giraffe. If you prefer a more playful look, consider vibrant yarns with bright tones, or tone it down with pastel shades to create a softer appearance.
Tools
- 4.5 mm crochet hook
- 18 mm safety eyes
- Polyester fiberfill
- Yarn needle
- Locking stitch marker
- Pins
- Scissors
- Embroidery thread
Using pins and stitch markers during construction is crucial for this pattern. They help secure limb placements before stitching them down, ensuring proper alignment. Additionally, placing safety eyes before finishing the head guarantees accurate positioning, as they add to Ginnie’s character expression.
Abbreviations
MR = magic ring
sc = single crochet
inc = increase
dec = invisible decrease
sl st = slip stitch
ch = chain
BLO = back loop only
FO = fasten off
Invisible decrease means working through the front loops of the next two stitches before completing one single crochet.
Pattern Notes
This pattern will be worked in a continuous spiral unless stated otherwise. Remember to use a stitch marker to mark the beginning of each round, as it assists in keeping track of your progress. Stuff the plush firmly, but take care not to stretch the stitches too tight, especially in areas like the neck, where flexibility is needed.
The safety eyes should be placed before closing off the head to confirm their position. It’s recommended to pin all limbs and any special features in place before sewing them onto the body, allowing for adjustments to achieve the desired positioning. Working with plush yarn can change the visibility of your stitches, so be mindful of your tension to maintain your intended shape. The final size might vary based on individual tension, so always check for balance as you progress—particularly for Ginnie with her long neck.
Pattern — Step by Step
Head Make 1
R1: 6 sc in MR (6)
R2: inc ×6 (12)
R3: [sc, inc] ×6 (18)
R4: [2 sc, inc] ×6 (24)
R5: [3 sc, inc] ×6 (30)
R6: [4 sc, inc] ×6 (36)
R7: [5 sc, inc] ×6 (42)
R8: [6 sc, inc] ×6 (48)
R9: 48 sc (48)
R10: [6 sc, dec] ×6 (42)
R11: [5 sc, dec] ×6 (36)
R12: [4 sc, dec] ×6 (30)
R13: [3 sc, dec] ×6 (24)
R14: [2 sc, dec] ×6 (18)
R15: [sc, dec] ×6 (12)
Stuff firmly but shape around the top to keep a rounded head shape. Place safety eyes between rounds 8 and 9, spaced about 10 stitches apart. Proceed with crocheting until the neck section is firmly set.
Body Make 1
R1: 6 sc in MR (6)
R2: inc ×6 (12)
R3: [sc, inc] ×6 (18)
R4: [2 sc, inc] ×6 (24)
R5: [3 sc, inc] ×6 (30)
R6: [4 sc, inc] ×6 (36)
R7: [5 sc, inc] ×6 (42)
R8: 42 sc (42)
R9: [5 sc, dec] ×6 (36)
R10: [4 sc, dec] ×6 (30)
R11: [3 sc, dec] ×6 (24)
R12: [2 sc, dec] ×6 (18)
R13: [sc, dec] ×6 (12)
Be certain to keep a solid body while maintaining a comfortable plushness. When attaching to the neck, it must fit snugly to ensure Ginnie stands upright without tipping.
Front Legs Make 2
R1: 6 sc in MR (6)
R2: inc ×6 (12)
R3: 12 sc (12)
R4: [sc, dec] ×4 (8)
R5: [sc, dec] ×2 (6)
Stuff each leg lightly and adjust until they look proportional. Place them about 8 stitches apart when attaching them to the body.
Back Legs Make 2
R1: 6 sc in MR (6)
R2: inc ×6 (12)
R3: 12 sc (12)
R4: [sc, dec] ×4 (8)
R5: [sc, dec] ×2 (6)
Lightly stuff the back legs, ensuring they are positioned to support the body securely. Attach them toward the lower section of the body.
Spots Make 2
R1: 6 sc in MR (6)
R2: inc ×6 (12)
sl st to close.
FO, leaving a tail for sewing.
Sew the spots onto the body with an overlapping position for a natural look.
Horns Make 2
R1: 6 sc in MR (6)
R2: inc ×6 (12)
R3: 12 sc (12)
Shaping these horns will give Ginnie her signature look. Attach them securely on top of the head.
Cheek Patches Make 2
R1: 6 sc in MR (6)
R2: inc ×6 (12)
sl st to close.
FO, leaving a tail for sewing.
These should be positioned near the bottom of the head, adding to Ginnie’s expression.
Tail Make 1
R1: 6 sc in MR (6)
R2: inc ×6 (12)
R3: inc, 2 sc ×4 (16)
R4: 16 sc (16)
Lightly stuff and attach the tail at the back of the body, ensuring Ginnie remains balanced.
Face Embroidery
For the face embroidery: start by marking the positions for the eyes based on your previous placements. The mouth should be stitched about 2-3 rounds below the eyes to maintain a proportional smile. Use a simple stitch to achieve this, keeping it tight but not overly so that it obscures the plush yarn.
Position the nose one round above the mouth, centered between the eyes to help secure that friendly expression. To avoid a crooked look, carefully keep your tension consistent throughout the embroidery process. Finally, remember to tuck in any tail ends from the embroidery to keep them hidden inside the plush.
Assembly
- Attach the head to the body. Adjust until the neck is visibly lifted and well-positioned to support the head.
- Attach the largest back feature: the horns should be firmly attached to the head for stability.
- Attach the front legs, ensuring they are evenly spaced and securely stitched to avoid wobbling.
- Attach the back legs, fitting them snugly against the body to provide reliable support.
- Add the smaller special features like spots, ensuring they are distributed evenly across the body.
- Add safety eyes if not already secured, checking their placement from all angles.
- Embroider the nose and mouth, confirming the expression is gentle and inviting.
- Sew the cheek patches on either side of the mouth, connecting them carefully to the head so they blend seamlessly.
- Check balance from the front, side, and back ensuring Ginnie stands upright.
- Weave in ends and shape the plush to your liking, accentuating the giraffe’s playful character.
The assembly should leave you with a firm yet soft Ginnie who stands proudly.
7 Technical Tips
- Stitch Marker Drift: As you crochet, stitch markers can shift from their original position. This can lead to uneven rounds that affect body shape. Always double-check your markers after a few rounds to ensure consistency.
- Stuffing Firmness: Using too little stuffing can lead to a droopy design, especially in key areas like the neck. Aim for a firm, but not overly stretched stuffing that maintains plush softness while supporting the form.
- Invisible Decrease Gaps: Failing to hide the gaps in invisible decreases can create noticeable holes. Keep your tension consistent and check periodically as you work down the project.
- Eye Placement Timing: If you forget to place the eyes before closing off the head, it could lead to awkward repositioning. Always ensure that they are in place before you begin the final rounds.
- Plush Yarn Tension: Working with thicker yarn can result in losing track of your grip. Regularly verify your tension while crocheting to avoid uneven stitches.
- Pinning Before Sewing: Adequately pinning limbs and features ensures they are aligned correctly before stitching. This prevents mistakes that could lead to disproportionate placements once sewn.
- Tail Weaving: When finishing with tails, ensure that they are securely woven in, as loose ends can cause fraying and detract from the character. A good rule of thumb is to weave at least twice through the existing stitches for security.
Related Patterns
- Melanie the Monkey — This playful monkey features long arms and a cheerful expression, making it a great companion for Ginnie. The similar limb structure allows for collaboration while crafting.
- Ellie the Elephant — Known for her floppy ears and stout body, this pattern shares the whimsical theme of wildlife while presenting different challenges for makers. Both patterns can encourage similar color experimentation.
- Polly the Plush Penguin — The rounded body shape of this penguin contrasts well with Ginnie’s tall structure, allowing for creative combinations when displayed together. A fun project that showcases different techniques.
- Benny the Bear — This pattern emphasizes a cuddly, rounded body style, offering a contrasting design challenge compared to Ginnie. Both plush animals can bring smiles at playtime or as gifts.
Conclusion
Ginnie the Giraffe represents a delightful challenge for crocheters, combining playful design with technical artistry. This amigurumi pattern encourages creating unique stuffed toys that can bring joy to the maker and recipient. Taking the next step involves diving into your yarn stash to pick the perfect colors for your giraffe, and remember to save this pattern on Pinterest. Share your finished creation on Instagram using #GinnieTheGiraffe! What color combinations are you considering to make your version stand out?