Introduction
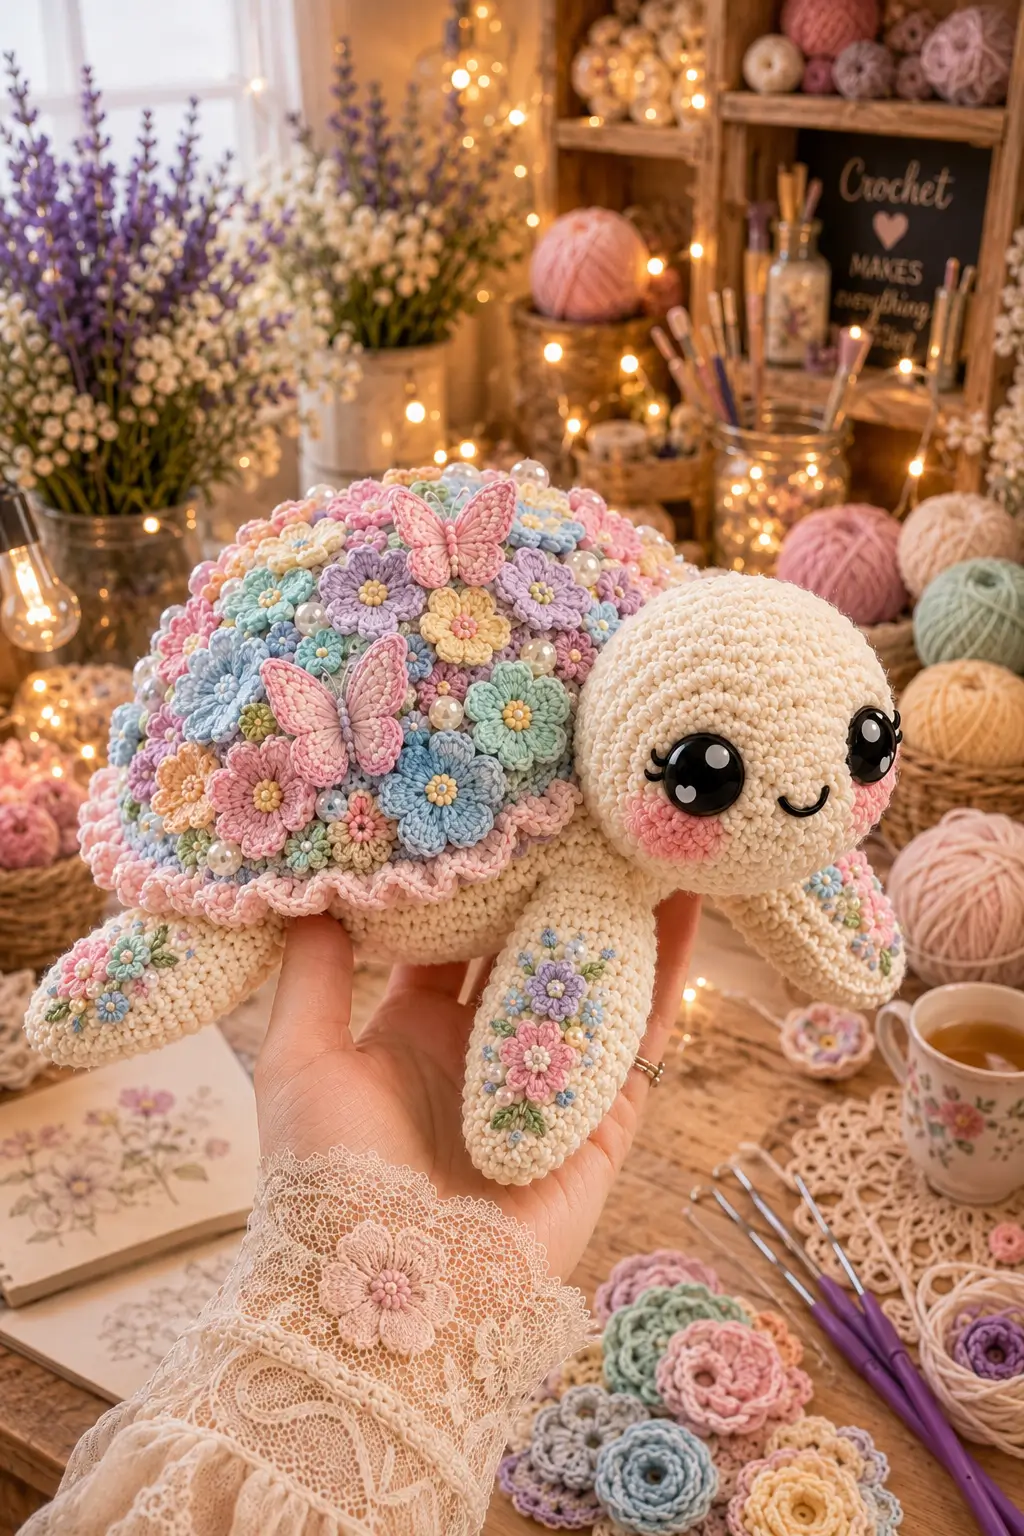
A turtle cannot hide inside a bouquet unless the shell still reads as a shell. This turtle amigurumi crochet pattern builds a 25 cm floral plush with chenille yarn, a 5 mm hook, 20 mm safety eyes, layered appliqué flowers, and a stitched butterfly. You will work at an intermediate skill level. Make it when a plain turtle shape needs a display shell, not a flat patch of decoration.
The Design: What Makes This Floral Turtle Different
This turtle amigurumi crochet pattern starts with a high dome, because the flowers need height without hiding the animal’s outline. The shell is built as a separate cap, then weighted visually with a scalloped rim so the bouquet layer stays framed. Front flippers are longer than back flippers; that choice keeps the crochet turtle plush readable from the front, where the eyes and cheeks carry most of the scale. The head uses a 42-stitch plateau, while the body uses a flatter 42-stitch oval to keep the shell from tipping backward. A common mistake with floral turtle amigurumi is placing every flower in a grid. Real balance comes from clusters: large flowers on the crown, mini flowers near the rim, and open cream space near the face. This turns a chunky turtle crochet pattern into a structured display piece.
Project Info at a Glance
| Skill Level | Time | Finished Size | Hook | Best For |
|---|---|---|---|---|
| Intermediate | 6–8 hours | Approx. 25 cm long | 5.0 mm main; 3.5 mm flowers | Decorative plush, nursery shelf, market display |
Materials and Tools
Yarn
- Ivory cream — super bulky chenille #6 — 130 g — Bernat Blanket, Premier Parfait Chunky, or similar.
- Pastel shell base — super bulky chenille #6 — 40 g — pale pink, blush, or cream-pink blend.
- Pastel flowers — DK cotton or velvet scraps — 5 g each — pink, lavender, blue, mint, yellow, peach.
- Green leaves — DK cotton scrap — 3–5 g.
- Black embroidery floss — small amount — smile and lashes.
- White embroidery floss — small amount — eye highlights if not molded into the eye.
The main yarn and contrast-yardage target follows verified chenille turtle references that list 130 g for the main color and 40 g for contrast color.
Tools
- Hook 5.0 mm for chenille body pieces.
- Hook 3.5 mm for flowers, leaves, and butterfly pieces.
- 20 mm safety eyes, two pieces.
- Fiberfill, firm grade.
- Yarn needle, long doll needle, stitch markers, pins, scissors.
- Pearl beads, 12–16 pieces, only for display items.
Safety eyes are not suitable for toys made for babies, pets, or heavy mouthing use. Use embroidered eyes for that audience.
Abbreviations
MR = magic ring; sc = single crochet; inc = 2 sc in one stitch; dec = invisible decrease; sl st = slip stitch; ch = chain; BLO = back loop only; FLO = front loop only; hdc = half double crochet; st = stitch; R = round. Invisible decrease means working through the front loops of the next two stitches before finishing one sc; it reduces holes on the cream head.
Pattern — Step by Step
Continuous spiral unless noted. The stitch plan below is original and uses standard 6-stitch amigurumi shaping with a large 42-stitch plateau.
Head Make 1
Yarn: ivory cream — Source: Standard amigurumi math; size and eye scale checked against chenille turtle references.
R1: 6 sc in MR (6)
R2: inc ×6 (12)
R3: [sc, inc] ×6 (18)
R4: [2 sc, inc] ×6 (24)
R5: [3 sc, inc] ×6 (30)
R6: [4 sc, inc] ×6 (36)
R7: [5 sc, inc] ×6 (42)
R8–R15: sc around (42)
R16: [5 sc, dec] ×6 (36)
R17: [4 sc, dec] ×6 (30)
R18: [3 sc, dec] ×6 (24)
Insert 20 mm eyes between R11 and R12, 12 stitches apart. Add a marker at the lower center of the face.
R19: [2 sc, dec] ×6 (18)
R20: [sc, dec] ×6 (12)
Stuff firmly, especially under the eyes and lower jaw.
R21: dec ×6 (6)
Fasten off. Leave 20 cm tail and close through the front loops.
Body / Belly Make 1
Yarn: ivory cream — Source: Standard amigurumi math.
R1: 6 sc in MR (6)
R2: inc ×6 (12)
R3: [sc, inc] ×6 (18)
R4: [2 sc, inc] ×6 (24)
R5: [3 sc, inc] ×6 (30)
R6: [4 sc, inc] ×6 (36)
R7: [5 sc, inc] ×6 (42)
R8–R13: sc around (42)
R14: [5 sc, dec] ×6 (36)
R15: [4 sc, dec] ×6 (30)
R16: [3 sc, dec] ×6 (24)
Stuff the outer rim first. Keep the underside flatter than the head.
R17: [2 sc, dec] ×6 (18)
R18: [sc, dec] ×6 (12)
R19: dec ×6 (6)
Fasten off. Leave 25 cm tail and close.
Domed Shell Make 1
Yarn: pastel shell base — Source: Standard amigurumi math; 42-st shell cap selected for large plush scale.
R1: 6 sc in MR (6)
R2: inc ×6 (12)
R3: [sc, inc] ×6 (18)
R4: [2 sc, inc] ×6 (24)
R5: [3 sc, inc] ×6 (30)
R6: [4 sc, inc] ×6 (36)
R7: [5 sc, inc] ×6 (42)
R8–R11: sc around (42)
R12: BLO sc around (42)
R13: sl st around (42)
Fasten off. Leave 50 cm tail for sewing the shell to the body.
Scalloped Shell Rim Make 1
Yarn: pastel pink or shell accent — Source: Standard decorative edging.
Join yarn in the unworked FLO from Shell R12.
R1: [sl st in next st, ch 3, sl st in next st] repeat around (42 base sts)
Fasten off. Leave 15 cm tail.
Front Flippers Make 2
Yarn: ivory cream — Source: Standard amigurumi math; flipper fold benchmark checked against turtle pattern references.
R1: 6 sc in MR (6)
R2: inc ×6 (12)
R3: [sc, inc] ×6 (18)
R4: [2 sc, inc] ×6 (24)
R5: [3 sc, inc] ×6 (30)
R6–R8: sc around (30)
R9: [3 sc, dec] ×6 (24)
Do not stuff. Flatten with the final stitch at one side edge.
R10: sc through both layers across (12)
Fasten off. Leave 35 cm tail.
Back Flippers Make 2
Yarn: ivory cream — Source: Standard amigurumi math.
R1: 6 sc in MR (6)
R2: inc ×6 (12)
R3: [sc, inc] ×6 (18)
R4: [2 sc, inc] ×6 (24)
R5–R6: sc around (24)
R7: [2 sc, dec] ×6 (18)
Do not stuff. Flatten with the wider edge toward the shell.
R8: sc through both layers across (9)
Fasten off. Leave 30 cm tail.
Tail Make 1
Yarn: ivory cream — Source: Standard small tube; turtle tail references confirm short flattened tails.
R1: 6 sc in MR (6)
R2–R4: sc around (6)
Do not stuff.
R5: sc through both layers across (3)
Fasten off. Leave 25 cm tail.
Cheek Patches Make 2
Yarn: blush pink — Source: Standard flat circle.
R1: 6 sc in MR (6)
R2: inc ×6 (12)
R3: sl st around (12)
Fasten off. Leave 20 cm tail.
Large Shell Flowers Make 10
Yarn: pastel flower colors — Source: Standard appliqué flower.
R1: 6 sc in MR (6)
R2: [sl st, ch 3, 2 hdc in same st, ch 3, sl st in same st] ×6 (6 petals)
Fasten off. Leave 18 cm tail. Make at least two each in pink, lavender, blue, yellow, and mint.
Mini Shell Flowers Make 18
Yarn: pastel flower colors — Source: Standard appliqué flower.
R1: 6 sc in MR (6)
R2: [sl st, ch 2, hdc in same st, ch 2, sl st in same st] ×6 (6 petals)
Fasten off. Leave 14 cm tail. These fill the rim and flipper clusters.
Leaves Make 16
Yarn: soft green — Source: Standard chain leaf.
R1: ch 6 (6 ch)
R2: sl st in second ch from hook, sc, hdc, sc, sl st (5 worked sts)
Fasten off. Leave 12 cm tail.
Butterfly Wings Make 8 Total
Yarn: pastel pink — Source: Standard flat wing panel.
For each butterfly, make 2 upper wings and 2 lower wings.
Upper wing, make 4:
R1: 6 sc in MR (6)
R2: inc ×6 (12)
R3: [sc, inc] ×6 (18)
R4: sc around (18)
Flatten. Fasten off with 18 cm tail.
Lower wing, make 4:
R1: 6 sc in MR (6)
R2: inc ×6 (12)
R3: sc around (12)
Flatten. Fasten off with 16 cm tail.
Butterfly Body and Antennae Make 2
Yarn: ivory or pale beige — Source: Standard small tube.
R1: 6 sc in MR (6)
R2–R5: sc around (6)
Fasten off. Leave 20 cm tail. Wrap the body around the center of four wings and stitch through all layers. For antennae, tie two 5 cm strands of embroidery floss at the top and knot each end.
Flipper Flower Sprays Make 4 Sets
Yarn: mini flowers, leaves, and pearls — Source: Standard appliqué placement.
Use 2 mini flowers, 2 leaves, and 1 pearl per front flipper. Use 1 mini flower and 1 leaf per back flipper. Keep every spray within 4 cm of the flipper base so the tips stay flexible.
Pearl Accents
Material: pearl beads — Source: decorative placement.
Sew 12–16 pearls across the shell after all flowers are pinned. Place pearls in gaps between flowers, not at the shell edge. Knot each pearl twice on the underside of the shell layer.
Assembly
- Pin the head to the front of the body across Body R8–R13, with the eye line sitting slightly above the shell rim.
- Sew the head in a wide oval, catching at least 18 body stitches so the neck does not wobble.
- Place the body belly-down and center the shell cap over the back, leaving 1.5 cm of cream body visible at the front.
- Sew the shell to the body through Shell R13, then tack four extra points under the dome for weight control.
- Stitch the cheek patches below the eyes, then embroider a curved mouth between them with black floss.
- Attach the front flippers at the front lower sides, angled 30 degrees forward from the shell edge.
- Attach the back flippers behind them, angled 20 degrees backward so the turtle rests flat.
- Sew the tail at the back center under the shell rim, then secure the scalloped rim where it lifts.
- Pin the large flowers first, add mini flowers second, sew leaves under flower edges, then attach pearls.
- Stitch two butterflies on the crown of the shell and weave every yarn tail through at least 5 cm of fabric.
The floral turtle is complete when the shell sits level and all four flippers touch the table.
7 Technical Tips
- Stitch-marker drift: If the marker shifts more than 3 stitches by Head R15, recount the 42-stitch plateau before decreasing. A twisted head will pull the smile off-center.
- Stuffing firmness: The head needs firm stuffing, but the belly needs a flatter fill. Overstuffing Body R8–R13 creates a rocking base.
- Invisible-decrease ridge: If the decrease line becomes visible on the face, rotate the first decrease of each round by 1 stitch. This spreads the shaping line instead of stacking it.
- Eye placement timing: Add 20 mm eyes between Head R11 and R12 before R19 closes the opening. Moving them later usually stretches the chenille and leaves a permanent hole.
- Velvet tension gaps: If white stuffing shows through with a 5 mm hook, switch the cream parts to 4.5 mm. Do not change hook size halfway through the same head.
- Pinning density: Use at least 20 pins before sewing the floral shell. Four pins are not enough; the shell will skew once flowers and pearls add weight.
- Tail weaving: Weave each flower tail through the shell for 5 cm, then reverse direction for 2 cm. Single-pass tails loosen fastest around pearls.
Conclusion
Block the shell shape with pins before the last pearl is sewn down. That one step keeps the bouquet layer from drifting toward the head. Your next concrete step is to crochet the head and shell only, pin them together, and check whether the 42-stitch plateau gives the dome height you want. Post a square shell close-up to Pinterest and an angled head-and-flipper shot to Instagram so the butterfly and cheek placement are visible. Use #FloralTurtleAmigurumi when sharing the finished turtle amigurumi crochet pattern. Which shell layout fits this turtle better: one butterfly centered over the crown, or two butterflies offset between the flowers?









