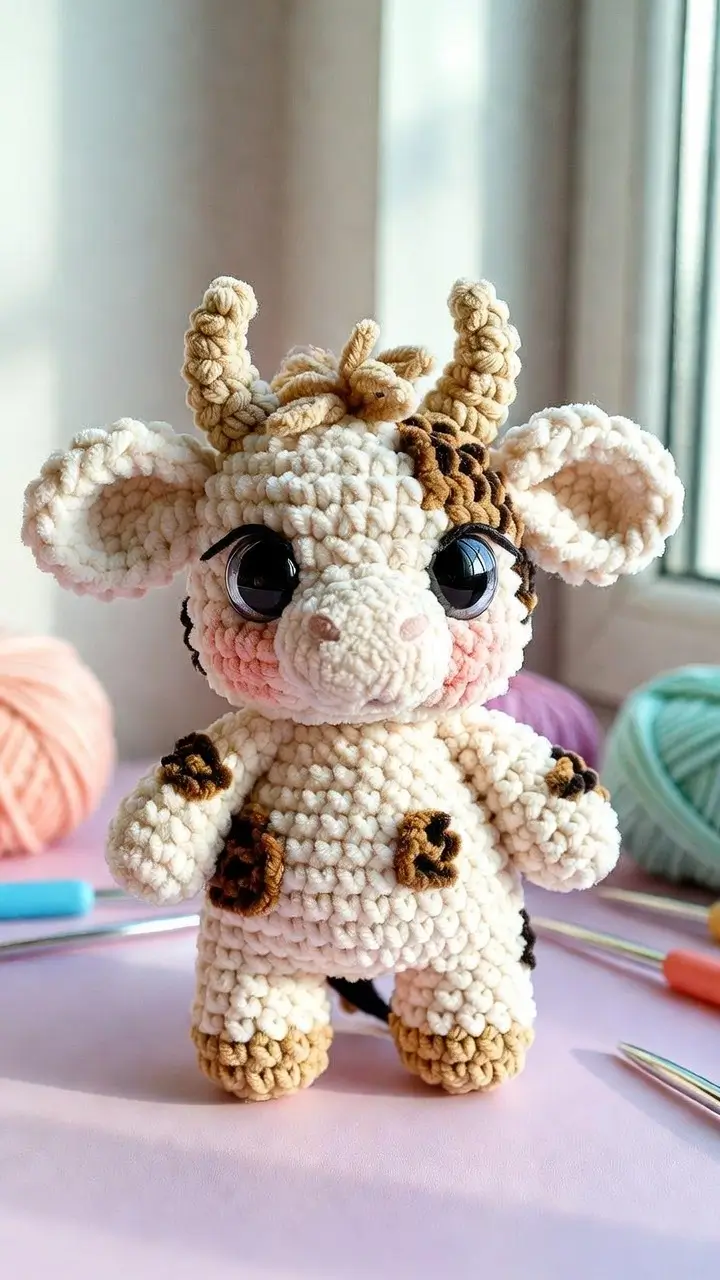
Highland cows carry their horns wide, but their fringe drops forward across the eyes. This Highland cow amigurumi crochet pattern builds that conflict with a cream face, tan horns, broad ears, and a stitched muzzle. Materials are chunky chenille, a 4.0 mm hook, 14 mm safety eyes, and polyester stuffing; finished size is about 20 cm, suited to an intermediate maker. It works well as a desk-size farm animal sample.
The Design: What Makes This Highland Cow Different
Highland cattle read as cows only after three details land: horn width, ear span, and the heavy forelock. This pattern keeps the head at a 36-stitch plateau so the snout can sit forward without pulling the cheeks flat. The horns are made as narrow tan tubes and attached inside the ears because published Highland cow patterns place horns close to the ear line rather than high on the crown. A separate fringe panel is sewn between the horns instead of adding single strands across the whole forehead; that keeps a chunky Highland cow plush crochet pattern from becoming top-heavy. The common mistake is setting the eyes too high. When the eyes sit above the snout line, a crochet Highland cow free pattern starts reading like a deer or goat, not a cattle breed.
Project Info at a Glance
| Skill Level | Time | Finished Size | Hook | Best For |
|---|---|---|---|---|
| Intermediate | About 11 hours | 20 cm sitting | 4.0 mm | Plush farm animal, shelf display, pattern sample |
Materials and Tools
Yarn
- Cream / off-white — #5 bulky chenille — 90–100 g — Premier Parfait Chunky, Big Twist Baby Bear, or similar.
- Tan — #5 bulky chenille — 15 g — horns and hooves.
- Dark brown — #5 bulky chenille — 20 g — head patch, body spots, fringe, tail tip.
- Pale beige — #5 bulky chenille — 10 g — muzzle.
- Soft pink — #5 bulky chenille or DK held double — scraps — cheek patches.
Tools
- Hook 4.0 mm
- Safety eyes 14 mm
- Polyester stuffing
- Tapestry needle
- Stitch markers
- Sewing pins
- Scissors
- Black or brown embroidery thread for nostrils and mouth
Abbreviations
MR = magic ring; sc = single crochet; inc = 2 sc in next stitch; dec = invisible decrease over next 2 stitches; sl st = slip stitch; ch = chain; BLO = back loop only; R = round or row.
Invisible decrease means working through the front loops of the next two stitches before finishing one single crochet, which reduces bulk on the visible surface.
Pattern — Step by Step
Continuous spiral unless noted. Counts are written at the end of every round. This is an original 36-stitch medium pattern based on standard amigurumi math and the visible photo parts.
Head
Yarn: cream
R1: 6 sc in MR (6)
R2: inc ×6 (12)
R3: (sc, inc) ×6 (18)
R4: (2 sc, inc) ×6 (24)
R5: (3 sc, inc) ×6 (30)
R6: (4 sc, inc) ×6 (36)
R7–R13: sc around (36)
R14: (4 sc, dec) ×6 (30)
R15: sc around (30)
R16: (3 sc, dec) ×6 (24)
R17: sc around (24)
R18: (2 sc, dec) ×6 (18)
Insert safety eyes between R10 and R11, 8 stitches apart. Begin firm stuffing after R18.
R19: (sc, dec) ×6 (12)
R20: dec ×6 (6)
R21: sc around (6)
R22: sl st in next stitch (6)
Fasten off. Leave 25 cm tail for closing and sewing.
Body
Yarn: cream
R1: 6 sc in MR (6)
R2: inc ×6 (12)
R3: (sc, inc) ×6 (18)
R4: (2 sc, inc) ×6 (24)
R5: (3 sc, inc) ×6 (30)
R6: (4 sc, inc) ×6 (36)
R7–R12: sc around (36)
R13: (4 sc, dec) ×6 (30)
R14–R15: sc around (30)
R16: (3 sc, dec) ×6 (24)
R17: sc around (24)
R18: (2 sc, dec) ×6 (18)
Stuff the base firmly and keep the neck area dense enough to hold the head upright.
R19: (sc, dec) ×6 (12)
R20: dec ×6 (6)
R21: sl st in next stitch (6)
Fasten off. Leave 30 cm tail.
Arms / Front Legs
Yarn: tan for hoof, then cream. Make 2.
R1: 6 sc in MR with tan (6)
R2: inc ×6 (12)
R3: sc around in BLO (12)
R4: sc around (12)
R5: change to cream, sc around (12)
R6–R11: sc around (12)
R12: (2 sc, dec) ×3 (9)
R13: sc around (9)
Stuff lower half only. Flatten the top opening.
R14: 4 sc through both layers, leave 1 stitch unworked (4)
Fasten off. Leave 20 cm tail on each arm.
Back Legs
Yarn: tan for hoof, then cream. Make 2.
R1: 6 sc in MR with tan (6)
R2: inc ×6 (12)
R3: (sc, inc) ×6 (18)
R4: sc around in BLO (18)
R5: sc around (18)
R6: change to cream, sc around (18)
R7: (sc, dec) ×6 (12)
R8–R11: sc around (12)
Stuff each leg firmly enough for the cow to sit without rolling backward.
R12: dec ×6 (6)
R13: sl st in next stitch (6)
Fasten off. Leave 25 cm tail.
Ears
Yarn: cream. Make 2.
R1: 6 sc in MR (6)
R2: inc ×6 (12)
R3: (sc, inc) ×6 (18)
R4: (2 sc, inc) ×6 (24)
R5: sc around (24)
Fold each circle in half with wrong sides together. Pinch the base to cup the ear.
Fasten off. Leave 30 cm tail for sewing.
Horns
Yarn: tan. Make 2.
R1: 6 sc in MR (6)
R2–R4: sc around (6)
R5: inc ×6 (12)
R6–R8: sc around (12)
Stuff lightly. Bend each horn outward while sewing, not while crocheting.
Fasten off. Leave 25 cm tail.
Snout
Yarn: pale beige
R1: 6 sc in MR (6)
R2: inc ×6 (12)
R3: (sc, inc) ×6 (18)
R4–R5: sc around (18)
R6: (sc, dec) ×6 (12)
R7: sc around (12)
Stuff very lightly. Overstuffing makes the snout look like a ball instead of a short oval.
Fasten off. Leave 35 cm tail. Embroider two small nostrils over R3–R4 after sewing the snout to the face.
Cheek Patches
Yarn: soft pink. Make 2.
R1: 6 sc in MR (6)
R2: inc ×6 (12)
R3: sl st in next stitch (12)
Fasten off. Leave 18 cm tail. Do not stuff.
Brown Head Patch
Yarn: dark brown. Make 1.
R1: 6 sc in MR (6)
R2: inc ×6 (12)
R3: (sc, inc) ×6 (18)
R4: sc around (18)
Fasten off. Leave 25 cm tail. Sew it above one eye and partly under the fringe.
Body Spots
Yarn: dark brown. Make 3.
Small spot:
R1: 6 sc in MR (6)
R2: inc ×6 (12)
Fasten off. Leave 18 cm tail.
Medium spots, make 2:
R1: 6 sc in MR (6)
R2: inc ×6 (12)
R3: (sc, inc) ×6 (18)
Fasten off. Leave 20 cm tail.
Sew one medium spot to the front belly edge, one to the side body, and the small spot to one shoulder.
Forehead Fringe
Yarn: dark brown and tan mixed
R1: ch 7, turn, sc in second ch from hook and across (6)
R2: ch 9, turn, sc in second ch from hook and across (8)
R3: ch 7, turn, sc in second ch from hook and across (6)
R4: ch 5, turn, sc in second ch from hook and across (4)
R5: ch 9, turn, sc in second ch from hook and across (8)
R6: ch 7, turn, sc in second ch from hook and across (6)
R7: ch 5, turn, sc in second ch from hook and across (4)
Fasten off. Leave 30 cm tail. Sew the chain bases as a strip between the horns.
Tail
Yarn: cream shaft, dark brown tip
R1: ch 8 in cream, turn, sc in second ch from hook and across (7)
R2: change to dark brown, ch 6, sl st into same end stitch to form loop (6 ch)
R3: ch 6, sl st into same end stitch to form second loop (6 ch)
R4: ch 6, sl st into same end stitch to form third loop (6 ch)
Fasten off. Leave 20 cm cream tail for sewing.
Assembly
- Sew the head to the body with the head centered over the body opening; add extra stuffing at the neck before the final stitches close.
- Pin the snout across head R12–R15, centered under the eyes, then sew around the snout edge.
- Embroider nostrils on the snout and a short vertical mouth line under the center.
- Sew cheek patches to either side of the snout, with each patch touching the lower eye line.
- Sew ears to the sides of the head across R9–R12, with the cupped openings facing forward.
- Attach horns inside the ears across R5–R7, angled outward and slightly forward.
- Sew the brown head patch above one eye, then stitch the fringe strip between the horns so it drops over the forehead.
- Attach arms to the upper body across R15–R17, angled slightly downward.
- Sew back legs to the lower front body across R5–R8, checking that both hooves touch the surface evenly.
- Sew body spots and tail last, then weave all yarn tails through the stuffed form.
The finished Highland cow stands or sits as a compact 20 cm farm animal plush.
7 Technical Tips
- Stitch marker drift: If the marker shifts more than 3 stitches from center back by R10 of the head, the snout will sit crooked. Move the marker only at the end of a round, never mid-round.
- Stuffing firmness: A soft neck causes the 36-stitch head to tilt forward under the horns. Pack the body neck opening until it resists light thumb pressure.
- Invisible decrease gaps: Chenille exposes holes when decreases are loose. Pull the working yarn tight after every dec on R16–R20 of the head.
- Eye placement timing: Install the 14 mm eyes before closing past 18 stitches. After R19, the opening is too small for safe washer pressure.
- Velvet tension loss: Chenille stitches stretch if pulled hard during sewing. Use a separate sewing strand when a tail has lost more than 25% of its fuzz.
- Pinning error: Unpinned horns often end up at two heights. Place four pins first: left horn, right horn, left ear base, right ear base.
- Tail weaving failure: A short tail can pull out through plush yarn. Weave each finishing tail through at least 5 cm of stuffed fabric before trimming.
Conclusion
This Highland cow amigurumi crochet pattern depends on proportion control more than stitch variety. Keep the head wide, place the eyes low, and let the snout and fringe do the character work. The next practical step is to pin all facial pieces before sewing, then photograph the face from the front to catch uneven horn height. Share the finished cow on Pinterest and Instagram with #HighlandCowAmigurumi. For pattern testing notes, record the eye spacing, horn angle, and yarn brand used. Which detail changed the cow most in your version: the fringe length, the tan horn curve, or the brown patch over one eye?









