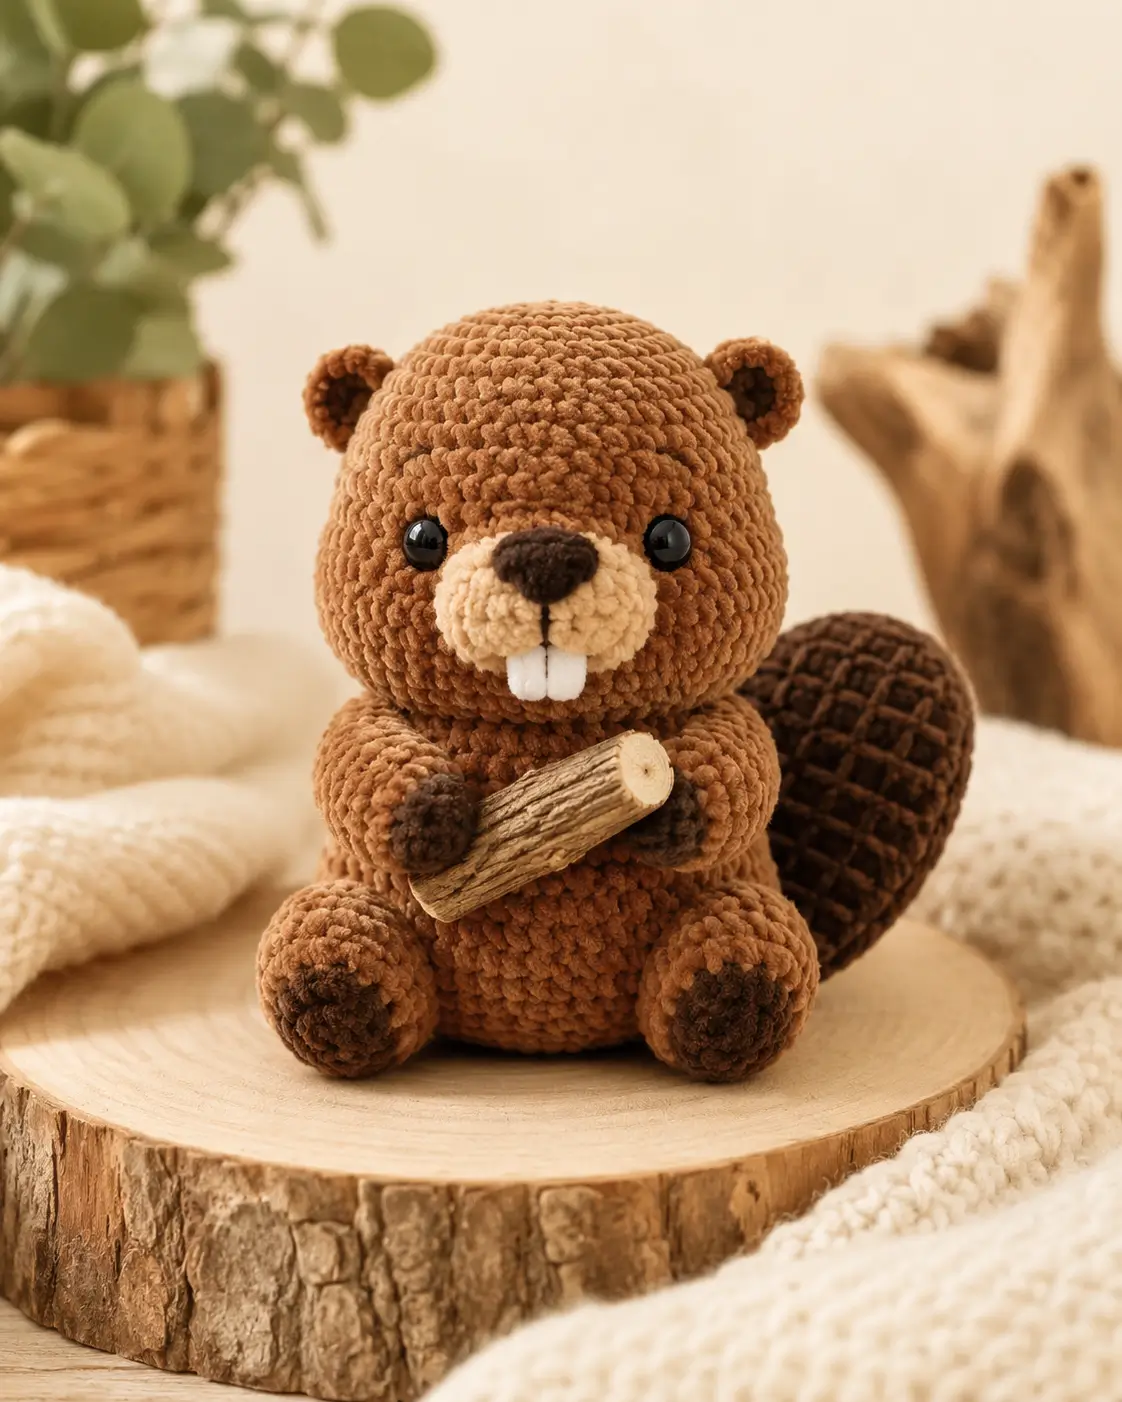
A beaver amigurumi crochet pattern fails when the paddle tail is treated like a round animal tail. This plush version uses chenille yarn, a 4 mm hook, 16 mm safety eyes, and a log accessory, with comparable log-beaver listings finishing near 28 cm. The skill level is easy-intermediate because the shaping is simple but the face needs exact placement. Make it as a woodland shelf toy with visible beaver details.
The Design: What Makes This Beaver Different
The beaver reads correctly when three shapes stay separate: round head, compact belly, and flat oval tail. A crochet beaver pattern loses the species quickly when the tail becomes a squirrel tail or the muzzle sits too low. Keep the muzzle wide, because the teeth need a center line below the nose rather than a smile alone. Place the ears slightly behind the eye line; beavers do not need tall bear ears. For this woodland animal amigurumi, the log accessory also sets the pose: arms angle forward and cover the lower chest. The common mistake is overstuffing the tail. A padded tail becomes a club, while a flat tail balances the seated body and gives the beaver crochet pattern with log its silhouette.
Project Info at a Glance
| Skill Level | Time | Finished Size | Hook | Best For |
|---|---|---|---|---|
| Easy-intermediate | Time not stated in comparable sources | Approx. 28 cm plush scale | 4 mm | Woodland display, nursery shelf, handmade animal set |
The size, hook, yarn weight, and eye scale are matched to chenille plush examples and a plush beaver-with-log listing.
Materials and Tools
Yarn
- Chestnut brown — weight 6 chenille/velvet — 130–170 g — Premier Parfait Chunky, Himalaya Dolphin Baby, or similar.
- Dark brown — weight 6 chenille/velvet — 50–60 g — for tail, ears, paws, and nose.
- Cream — weight 6 chenille/velvet — 20–30 g — for muzzle and cheek patches.
- White — chenille scrap or DK cotton held double — 5–15 g — for teeth.
- Tan and bark brown — chenille or worsted held double — 20–30 g — for the log.
Published yarn amounts for larger beaver patterns include 170 g main brown, 60 g brown, and 15 g white; treat those as upper planning amounts for this plush scale.
Tools
- Hook 4 mm
- 16 mm black safety eyes
- Polyester stuffing
- Tapestry needle
- Locking stitch markers
- Pins
- Black embroidery thread
- Scissors
Chenille beaver sources list a 4 mm hook, weight 6 yarn, fiberfill, tapestry needle, and 16 mm safety eyes.
Abbreviations
MR = magic ring / sc = single crochet / inc = increase / dec = invisible decrease / sl st = slip stitch / ch = chain / BLO = back loop only / FLO = front loop only / R = round / st = stitch
Invisible decrease means inserting the hook through the front loops of the next two stitches, pulling through both front loops, then finishing one sc; this reduces chenille gaps.
Pattern — Step by Step
Continuous spiral unless noted. Use a stitch marker in the first stitch of every round.
Head
Yarn: chestnut brown — Source: standard amigurumi math checked against published 6-stitch head/body shaping.
R1: 6 sc in MR (6)
R2: inc ×6 (12)
R3: (1 sc, inc) ×6 (18)
R4: (2 sc, inc) ×6 (24)
R5: (3 sc, inc) ×6 (30)
R6: (4 sc, inc) ×6 (36)
R7: (5 sc, inc) ×6 (42)
R8–R13: sc around (42)
Insert safety eyes between R10 and R11, 8 sts apart. The muzzle will cover the lower center.
R14: (5 sc, dec) ×6 (36)
R15: (4 sc, dec) ×6 (30)
R16: (3 sc, dec) ×6 (24)
Stuff firmly at the crown and lightly around the lower face.
R17: (2 sc, dec) ×6 (18)
R18: (1 sc, dec) ×6 (12)
R19: dec ×6 (6)
Fasten off. Leave a 25 cm tail and close through front loops.
Body
Yarn: chestnut brown — Source: standard amigurumi math, 42-stitch medium plateau.
R1: 6 sc in MR (6)
R2: inc ×6 (12)
R3: (1 sc, inc) ×6 (18)
R4: (2 sc, inc) ×6 (24)
R5: (3 sc, inc) ×6 (30)
R6: (4 sc, inc) ×6 (36)
R7: (5 sc, inc) ×6 (42)
R8–R15: sc around (42)
R16: (5 sc, dec) ×6 (36)
R17: (4 sc, dec) ×6 (30)
R18: (3 sc, dec) ×6 (24)
Stuff the lower body more firmly than the neck area so the seated pose holds.
R19: (2 sc, dec) ×6 (18)
R20: (1 sc, dec) ×6 (12)
R21: dec ×6 (6)
Fasten off. Leave a 30 cm tail.
Arms / Front Legs — Make 2
Yarn: dark brown paw, then chestnut brown arm — Source: standard amigurumi math.
Start in dark brown.
R1: 6 sc in MR (6)
R2: inc ×6 (12)
R3: sc around (12)
R4: dec ×6 (6)
Change to chestnut brown.
R5–R9: sc around (6)
Stuff only the paw section. Leave the upper arm flat for sewing around the log.
Fasten off. Leave a 25 cm tail.
Back Legs — Make 2
Yarn: chestnut brown with dark brown toe end — Source: standard amigurumi math.
Start in dark brown.
R1: 6 sc in MR (6)
R2: inc ×6 (12)
Change to chestnut brown.
R3: (1 sc, inc) ×6 (18)
R4–R5: sc around (18)
R6: (1 sc, dec) ×6 (12)
Stuff firmly at the front of the foot, then press the top slightly flat.
R7: dec ×6 (6)
Fasten off. Leave a 25 cm tail.
Ears — Make 2
Yarn: chestnut brown outside, dark brown center optional — Source: standard amigurumi math and beaver ear placement references.
R1: 6 sc in MR (6)
R2: inc ×6 (12)
R3: (1 sc, inc) ×6 (18)
R4: sc around (18)
Do not stuff. Fold the circle into a shallow cup with the wrong side inside.
Fasten off. Leave a 25 cm tail.
Muzzle
Yarn: cream — Source: standard amigurumi math.
R1: 6 sc in MR (6)
R2: inc ×6 (12)
R3: (1 sc, inc) ×6 (18)
R4: sc around (18)
R5: (1 sc, dec) ×6 (12)
Stuff lightly. The muzzle must stay oval, not spherical.
Fasten off. Leave a 30 cm tail.
Nose
Yarn: dark brown — Source: standard amigurumi math.
R1: 6 sc in MR (6)
R2: sc around (6)
Flatten into a small oval. Sew across the top center of the muzzle.
Fasten off. Leave a 20 cm tail.
Teeth
Yarn: white — Source: standard flat crochet construction.
Ch 3.
Row 1: sc in 2nd ch from hook, sc in next ch (2)
Row 2: ch 1, turn, sc across (2)
Row 3: ch 1, turn, sc across (2)
Add one vertical stitch down the center to split the two front teeth.
Fasten off. Leave a 20 cm tail.
Cheek Patches — Make 2
Yarn: cream — Source: standard amigurumi flat circle.
R1: 6 sc in MR (6)
R2: inc ×6 (12)
Sl st to close.
Keep these flat. They sit beside the muzzle, not under the eyes.
Fasten off. Leave a 20 cm tail.
Tail
Yarn: dark brown — Source: beaver patterns use flat tail shaping as a species marker.
R1: 6 sc in MR (6)
R2: inc ×6 (12)
R3: (1 sc, inc) ×6 (18)
R4: (2 sc, inc) ×6 (24)
R5–R9: sc around (24)
R10: (2 sc, dec) ×6 (18)
R11: (1 sc, dec) ×6 (12)
R12: sc around (12)
Do not stuff. Flatten the tail so the seam runs across the top edge.
R13: sc through both layers to close (6)
Fasten off. Leave a 35 cm tail. Embroider diagonal lines in chestnut or black thread.
Log Accessory
Yarn: tan ends and bark brown side — Source: photo accessory plus comparable plush log-beaver listing.
Start in tan.
R1: 6 sc in MR (6)
R2: inc ×6 (12)
R3: (1 sc, inc) ×6 (18)
Change to bark brown.
R4: BLO sc around (18)
R5–R18: sc around (18)
Change to tan.
R19: BLO (1 sc, dec) ×6 (12)
Stuff the log firmly enough that the arms do not crush it.
R20: dec ×6 (6)
Fasten off. Leave a 20 cm tail and close. Embroider rings on both tan ends and long bark lines across the side.
Assembly
- Sew the head to the body with the lower head centered over the narrowed body opening.
- Pin the muzzle between the eyes, with the top edge sitting one round below the eye line.
- Sew the nose to the upper center of the muzzle, then add a vertical black line below it.
- Attach the teeth under the muzzle center so two white rectangles show evenly.
- Sew the cheek patches to the left and right sides of the muzzle, touching but not covering it.
- Pin the ears behind the eye line, about 4 rounds down from the crown, then sew the lower half only.
- Attach back legs to the lower front body, angled outward so the beaver sits without tipping.
- Sew the tail to the lower back across 2 body rounds; keep it flat against the surface.
- Place the log across the chest, then sew the arms over the log at a slight downward angle.
- Weave every tail through at least 3 cm of stuffing before trimming.
The finished beaver has a round head, flat paddle tail, visible teeth, and a held log.
7 Technical Tips
- Eye placement failure mode: eyes too low. Place 16 mm safety eyes between R10 and R11 of the head, 8 stitches apart, before closing the head.
- Tail failure mode: overstuffed paddle. Leave the tail unstuffed and close it through both layers on R13 so it stays flat.
- Stuffing firmness failure mode: falling backward. Pack the lower body firmly from R8 to R15, then use lighter stuffing near the neck.
- Invisible decrease failure mode: chenille gaps. Work every decrease through front loops only, especially on R14–R19 of the head.
- Pinning failure mode: crooked log. Pin the log first, then pin both arms over it; the log should sit about 2 rounds above the belly midpoint.
- Ear placement failure mode: bear-like head. Keep ears low and round, with their lower edge near R9–R11 of the head.
- Tail weaving failure mode: loose seam. After sewing the tail, pass the yarn tail through the body twice across a 3 cm path before trimming.
Conclusion
This beaver amigurumi crochet pattern depends on proportion control more than stitch variety. The head is a medium 42-stitch sphere, the body is compact, the tail stays flat, and the log fixes the front-leg angle. Your next step is to crochet the head and muzzle first, then pin the face before making the body; that order gives the eye spacing a clear reference point. Share the finished beaver on Pinterest and Instagram with #BeaverWithLogAmigurumi. When you post it, note the yarn brand, hook size, and finished height. Did your paddle tail sit flat against the back, or did it need a second seam line?









