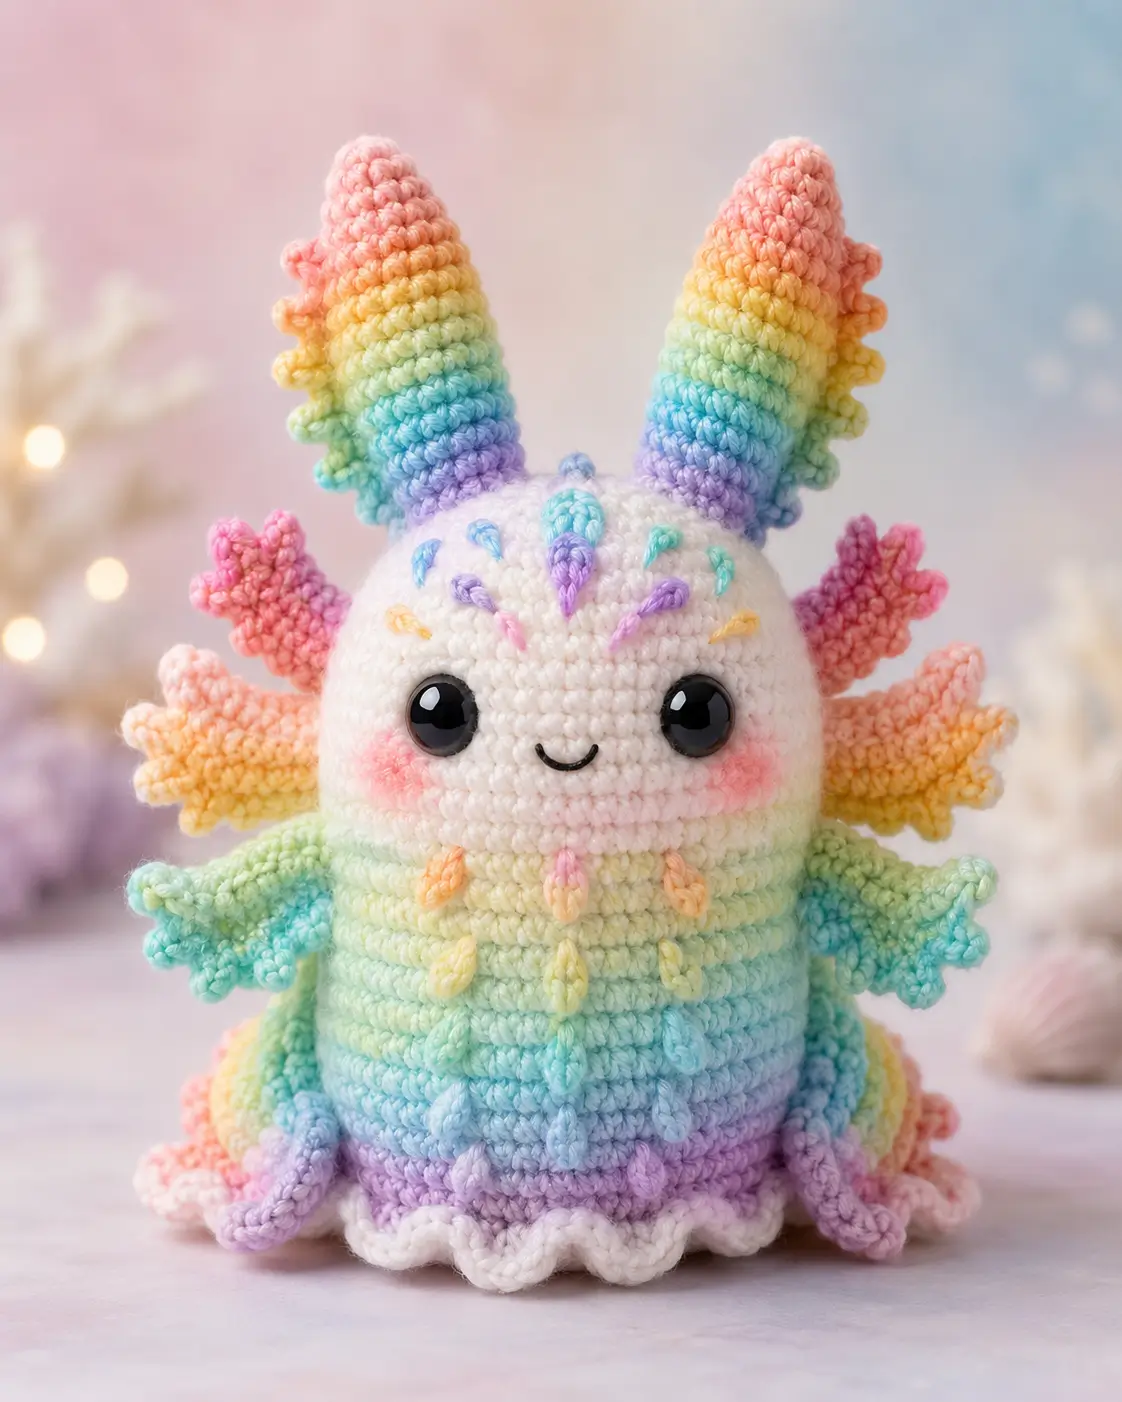
Axolotls keep their gills outside the head, and this rainbow axolotl amigurumi crochet pattern turns those feathery stalks into two tall striped frills. You will use light worsted or sport cotton-acrylic yarn, a 3.0 mm hook, 12 mm safety eyes, stuffing, and embroidery yarn to make a 17–23 cm advanced-beginner desk figure with stable sitting weight.
The Design: What Makes This Rainbow Axolotl Different
Tall head frills replace the usual short gill stalks, so the silhouette reads as fantasy axolotl before the face is added. The base of each frill stays open at 36 stitches because a narrow attachment would pull the head inward. Side gills are made separately, then flattened, because external gills need visible spacing; a single ruffle strip often looks like hair. A wide body plateau keeps the crochet axolotl plush upright after the oversized frills are sewn on.
Most makers place the eyes too high on this animal type. That turns the face into a rabbit shape. For this free axolotl crochet pattern, the eyes sit below the widest head round, while the forehead embroidery fills the empty upper curve.
Project Info at a Glance
| Skill Level | Time | Finished Size | Hook | Best For |
|---|---|---|---|---|
| Advanced beginner | 4–6 hours | 17 cm with sport; up to 23 cm with bulky yarn | 3.0 mm | Desk plush, shelf toy, rainbow gift, pattern practice |
Materials and Tools
Yarn
- Cream white — sport/light worsted — one 50 g skein — YarnArt Jeans, Paintbox Cotton DK, or similar cotton-acrylic
- Pastel rainbow set — sport/light worsted — 30 g combined — coral, peach, yellow, mint, aqua, blue, lavender
- Blush pink — sport/light worsted — 3 g — cheek patches and face tint
- Black embroidery thread — small amount — mouth
- White accent yarn — 5 g — scalloped base trim
Sport-weight rainbow axolotl patterns commonly use 3.0 mm hooks, 12 mm eyes, and 100–140 m yardage; larger versions use heavier blanket yarn and larger eyes.
Tools
- Hook 3.0 mm
- 12 mm safety eyes
- Polyester stuffing
- Yarn needle
- Stitch markers
- Pins
- Scissors
- Embroidery needle
Abbreviations
- MR = magic ring
- sc = single crochet
- inc = 2 sc in same stitch
- dec = invisible decrease over next 2 stitches
- sl st = slip stitch
- ch = chain
- BLO = back loop only
- FLO = front loop only
- hdc = half double crochet
An invisible decrease should be worked through the front loops of the next two stitches so the closing rounds stay dense and do not show stuffing.
Pattern — Step by Step
Work in a continuous spiral unless noted. Move the stitch marker at the end of every round.
Head
Yarn: cream white
R1: 6 sc in MR (6)
R2: inc ×6 (12)
R3: (sc, inc) ×6 (18)
R4: (2 sc, inc) ×6 (24)
R5: (3 sc, inc) ×6 (30)
R6: (4 sc, inc) ×6 (36)
R7: (5 sc, inc) ×6 (42)
R8: sc around (42)
R9: sc around (42)
R10: sc around (42)
R11: sc around (42)
R12: sc around (42)
R13: sc around (42)
R14: sc around (42)
R15: sc around (42)
R16: sc around (42)
Insert 12 mm safety eyes between R13 and R14, 9 stitches apart. The eye line should sit below the center of the head, not at the forehead.
R17: (5 sc, dec) ×6 (36)
R18: (4 sc, dec) ×6 (30)
R19: (3 sc, dec) ×6 (24)
R20: (2 sc, dec) ×6 (18)
Stuff firmly at the cheeks and lightly at the crown so the frills have a flat sewing area.
R21: (sc, dec) ×6 (12)
R22: dec ×6 (6)
Fasten off. Close the hole. Leave a 20 cm tail for securing the head to the body.
Body
Yarn: pastel rainbow stripes
R1: 6 sc in MR with pale yellow (6)
R2: inc ×6 (12)
R3: (sc, inc) ×6 (18)
R4: (2 sc, inc) ×6 (24)
R5: (3 sc, inc) ×6 (30)
R6: (4 sc, inc) ×6 (36)
R7: (5 sc, inc) ×6 (42)
R8: sc around in pale yellow (42)
R9: sc around in pale yellow (42)
R10: sc around in mint (42)
R11: sc around in mint (42)
R12: sc around in aqua (42)
R13: sc around in aqua (42)
R14: sc around in sky blue (42)
R15: sc around in sky blue (42)
R16: sc around in lavender (42)
R17: sc around in lavender (42)
R18: sc around in lavender (42)
R19: (5 sc, dec) ×6 (36)
R20: sc around (36)
R21: (4 sc, dec) ×6 (30)
R22: sc around (30)
R23: (3 sc, dec) ×6 (24)
Stuff the lower body heavily. A sitting axolotl needs weight under the center line.
R24: (2 sc, dec) ×6 (18)
R25: (sc, dec) ×6 (12)
R26: dec ×6 (6)
Fasten off. Close the bottom. Leave a 25 cm tail.
Front Legs
Make 2. Yarn: aqua for one, mint for one.
R1: 6 sc in MR (6)
R2: inc ×6 (12)
R3: sc around (12)
R4: sc around (12)
R5: (2 sc, dec) ×3 (9)
R6: sc around (9)
R7: sc around (9)
R8: sc around (9)
Flatten the opening. Work through both layers: ch 3, sl st in 2nd ch from hook, sl st in next ch, sl st into next body stitch; repeat twice more for 3 small toes.
Fasten off. Leave a 20 cm tail.
Back Legs
Make 2. Yarn: lavender for one, pale blue for one.
R1: 6 sc in MR (6)
R2: inc ×6 (12)
R3: sc around (12)
R4: sc around (12)
R5: (sc, dec) ×4 (8)
R6: sc around (8)
R7: sc around (8)
Flatten the opening. Work through both layers: ch 3, sl st in 2nd ch from hook, sl st in next ch, sl st into next body stitch; repeat twice more for 3 toes.
Fasten off. Leave a 20 cm tail.
Tall Rainbow Head Frills
Make 2. Yarn: coral tip, peach, yellow, mint, aqua, blue, lavender base.
R1: 6 sc in MR with coral (6)
R2: sc around (6)
R3: inc ×6 (12)
R4: sc around (12)
R5: sc around with peach (12)
R6: (sc, inc) ×6 (18)
R7: sc around (18)
R8: sc around with yellow (18)
R9: (2 sc, inc) ×6 (24)
R10: sc around (24)
R11: sc around with mint (24)
R12: (3 sc, inc) ×6 (30)
R13: sc around (30)
R14: sc around with aqua (30)
R15: (4 sc, inc) ×6 (36)
R16: sc around (36)
R17: sc around with sky blue (36)
R18: sc around (36)
R19: sc around with lavender (36)
R20: sc around (36)
R21: sc around (36)
Do not close. Stuff lightly from the tip downward, leaving the last 2 rounds mostly flat.
Fasten off. Leave a 35 cm tail for sewing.
Side Gill Fronds
Make 6, three per side. Yarn: coral, peach, yellow, mint, aqua, lavender.
R1: 6 sc in MR (6)
R2: inc ×6 (12)
R3: sc around (12)
R4: sc around (12)
R5: sc around (12)
R6: dec ×6 (6)
Flatten each gill. Along one side edge, work ch 3, sl st in 2nd ch from hook, sl st in next ch, sl st into the next edge stitch; repeat 3 times for feather points.
Fasten off. Leave a 25 cm tail.
Tail
Yarn: rainbow stripes or aqua-to-lavender fade.
R1: 6 sc in MR with aqua (6)
R2: inc ×6 (12)
R3: sc around (12)
R4: sc around (12)
R5: (sc, inc) ×6 (18)
R6: sc around (18)
R7: sc around with blue (18)
R8: sc around (18)
R9: (2 sc, inc) ×6 (24)
R10: sc around (24)
R11: sc around with lavender (24)
R12: sc around (24)
R13: (2 sc, dec) ×6 (18)
R14: (sc, dec) ×6 (12)
R15: dec ×6 (6)
Stuff lightly. Flatten the base before sewing so the tail curves behind the body rather than pushing the toy forward.
Fasten off. Leave a 30 cm tail.
Forehead Crest
Yarn: aqua and lavender.
R1: 6 sc in MR with lavender (6)
R2: sc around (6)
R3: inc ×6 with aqua (12)
R4: sc around (12)
R5: dec ×6 (6)
Stuff with only a pinch of fiberfill. Fasten off and leave a 20 cm tail.
Cheek Patches
Make 2 flat circles. Yarn: blush pink.
R1: 6 sc in MR (6)
R2: inc ×6 (12)
Sl st to finish. Fasten off and leave a 15 cm tail. Do not stuff.
Scalloped Base Trim
Yarn: cream white.
Join yarn to a front-loop strand near Body R23.
R1: (sl st in next st, 3 hdc in next st, sl st in next st) ×10 around the front curve (30 anchor sts)
Fasten off. Weave the beginning tail into the inside curve and the ending tail into the last scallop.
Belly Drops and Forehead Sprinkles
Yarn: rainbow scraps.
Make 8–10 straight teardrop stitches on the upper body, each 1.0–1.5 cm long. Place them in two staggered rows below the head seam. For the forehead, make 9 short straight stitches radiating from the crest: two aqua, two lavender, two yellow, two blue, and one pink. Keep every stitch under 1 cm so the face does not flatten.
Mouth
Yarn: black embroidery thread.
Place the mouth centered 2 rounds below the safety eyes. Use one shallow U-shaped stitch, about 1.2 cm wide. Catch the center of the curve with one tiny anchoring stitch to hold the smile against the head.
Assembly
- Pin the head to the top of the body with the body color change centered under the face.
- Sew the head on using the 20 cm head tail, catching one full round from the head and one full round from the body.
- Position the safety-eye face forward, then sew the blush cheek patches one round below and slightly outside each eye.
- Attach the mouth after the cheeks so the curve stays centered between the patches.
- Pin the tall rainbow head frills to the top of the head, 6–7 stitches apart at the base.
- Sew each frill around its full 36-stitch opening, then add a second pass across the back edge for tilt control.
- Place three side gill fronds on each side of the head, starting beside R10 and ending beside R16.
- Sew the front legs to the upper body at R12–R15 and the back legs to R20–R23.
- Attach the tail behind the body, low enough to touch the table and act as a rear support.
- Add the forehead crest, belly drops, forehead sprinkles, and scalloped base trim last.
The finished axolotl should sit upright without a hand under the head.
7 Technical Tips
- Stitch marker drift: If the marker leans more than 3 stitches after the body stripes, move it back at the end of a plain sc round. Stripe drift will make the belly drops look off-center.
- Stuffing firmness: Pack the lower body to about 90% firmness and the head to about 75%. A softer head keeps the tall frills from pulling the eye line upward.
- Invisible decrease gaps: White yarn shows holes faster than rainbow yarn. Work every head decrease through front loops only, then pull the working yarn tight before the next sc.
- Eye placement timing: Install the safety eyes before R17 of the head. After the 42-stitch plateau starts decreasing, the washers become hard to press flat.
- Frill balance: Each tall frill base must cover about 36 stitches. A smaller base creates rabbit-ear tension instead of axolotl-gill spread.
- Pinning sequence: Pin the side gills before sewing the tall frills permanently. The maker needs to see the full head width before locking the upper silhouette.
- Tail weaving: Weave limb tails through at least 3 cm of body fabric before trimming. Short tails can work loose because the legs sit at the handling points.
Conclusion
This build works because the largest visual parts are also the stabilizing parts: a 42-stitch head, a 42-stitch body, broad frill bases, and a low tail. The next step is to crochet the head first, install the eyes, then test both tall frills with pins before sewing. That single check controls the animal’s identity. Save this rainbow axolotl amigurumi crochet pattern to Pinterest, then post the finished side-gill layout on Instagram with #RainbowAxolotlAmigurumi. Which detail changes the character more on your version: the tall rainbow frills or the six side gills?









