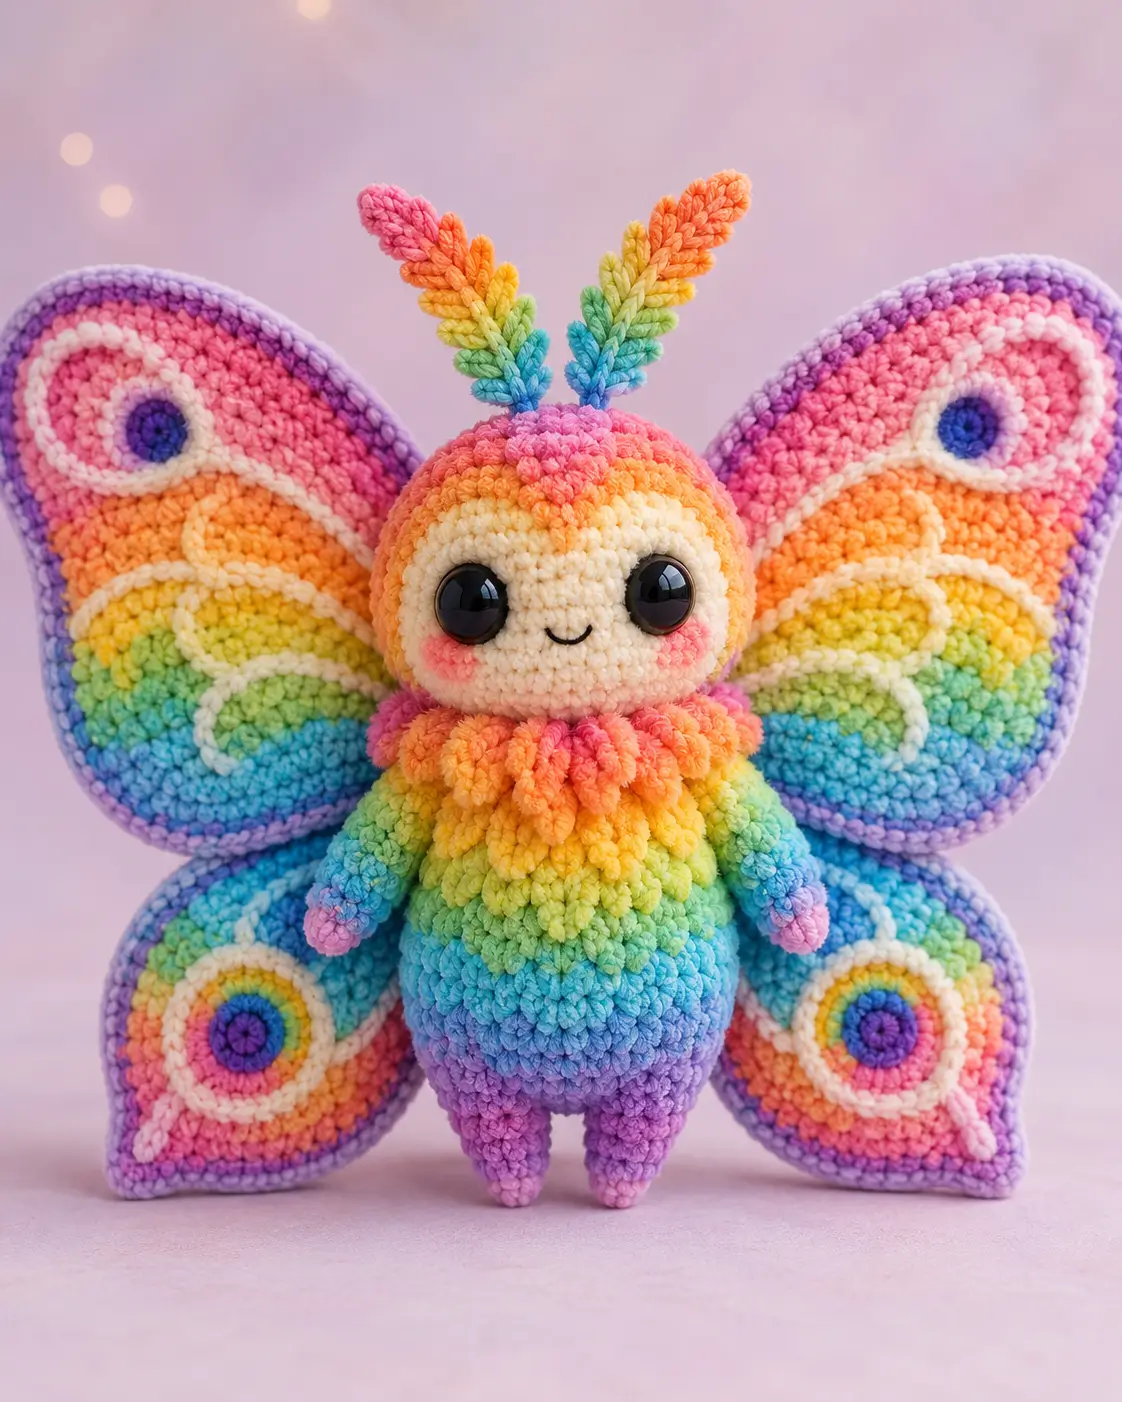
Butterfly wings are four separate panels, and this rainbow butterfly amigurumi crochet pattern must keep all four visible from the front. Use super bulky chenille, a 4.5 mm hook, 18 mm safety eyes, and firm stuffing for a 22–23 cm plush at intermediate level. The ruffled chest, antennae, and layered wing spots give you a display piece that stands without a wire frame.
The Design: What Makes This Butterfly Different
This butterfly amigurumi pattern is built around symmetry first. The upper wings are taller than the body, so their bases must sit behind the neck instead of behind the belly. That keeps the top pair open and stops the lower wings from disappearing. The body uses a 42-stitch plateau, not a long cylinder, because the plush has to balance under a wide wing load. The face stays cream while the crown and body carry the rainbow, which prevents the safety eyes from being lost in color changes. Many makers push butterfly wings too far to the side. A crochet butterfly plush needs rear-mounted wings angled outward, not flat side fins. For the rainbow crochet butterfly effect, surface spots and cream veins are sewn after assembly so the markings land evenly.
Project Info at a Glance
| Skill Level | Time | Finished Size | Hook | Best For |
|---|---|---|---|---|
| Intermediate | 6–8 hrs | 22–23 cm tall | 4.5 mm | Shelf plush, supervised display toy, photo prop |
Materials and Tools
Yarn
- Cream — super bulky chenille — 40–50 g — Himalaya Dolphin Baby or similar
- Pink — super bulky chenille — 15 g — crown, ruffle, antennae tips, cheeks
- Orange — super bulky chenille — 15 g — body band, ruffle, wings
- Yellow — super bulky chenille — 15 g — body band, ruffle, wings
- Green — super bulky chenille — 15 g — body band, wings, antennae
- Blue — super bulky chenille — 15 g — body band, wings, lower accents
- Purple — super bulky chenille — 20 g — wing border, feet, lower body, eyespot centers
- White or ivory — worsted cotton or chenille scraps — 8 g — wing veins and eye rings
- Black embroidery thread — small amount — smile
Tools
- Hook 4.5 mm
- 18 mm black safety eyes
- Polyester stuffing
- Tapestry needle
- Locking stitch markers
- Straight pins
- Scissors
- Long doll needle for eye tightening
Abbreviations
MR = magic ring / sc = single crochet / inc = increase / dec = invisible decrease / sl st = slip stitch / ch = chain / BLO = back loop only / FLO = front loop only / hdc = half double crochet.
Work invisible decrease through the front loops of the next two stitches to reduce bulk on chenille closing rounds.
Pattern — Step by Step
Continuous spiral unless noted. Color changes are placed at the start of the round; move the stitch marker each round.
Head
Yarn: pink, orange, yellow, cream.
R1: With pink, 6 sc in MR (6)
R2: inc ×6 (12)
R3: (1 sc, inc) ×6 (18)
R4: With orange, (2 sc, inc) ×6 (24)
R5: With yellow, (3 sc, inc) ×6 (30)
R6: With cream, (4 sc, inc) ×6 (36)
R7: (5 sc, inc) ×6 (42)
R8–R13: sc around (42)
Insert eyes between R10 and R11, 8 sts apart. Tighten slightly with cream yarn before washers are locked.
R14: (5 sc, dec) ×6 (36)
R15: (4 sc, dec) ×6 (30)
R16: (3 sc, dec) ×6 (24)
R17: (2 sc, dec) ×6 (18)
Stuff firmly. Shape the cheeks by adding small stuffing pieces under each eye.
R18: (1 sc, dec) ×6 (12)
R19: dec ×6 (6)
Fasten off. Leave 20 cm tail, close the hole, and bury the tail through the lower back of the head.
Body
Yarn: purple, blue, green, yellow, orange, pink.
R1: With purple, 6 sc in MR (6)
R2: inc ×6 (12)
R3: (1 sc, inc) ×6 (18)
R4: With blue, (2 sc, inc) ×6 (24)
R5: (3 sc, inc) ×6 (30)
R6: With green, (4 sc, inc) ×6 (36)
R7: (5 sc, inc) ×6 (42)
R8–R9: sc around (42)
R10–R11: With yellow, sc around (42)
R12: With orange, sc around (42)
R13: (5 sc, dec) ×6 (36)
R14: With pink-orange blend or pink, (4 sc, dec) ×6 (30)
R15: (3 sc, dec) ×6 (24)
R16: (2 sc, dec) ×6 (18)
Stuff the lower body firmly enough that it can stand under the wing weight.
R17: (1 sc, dec) ×6 (12)
R18: dec ×6 (6)
Fasten off. Leave 30 cm tail for sewing to the head.
Arms / Front Legs — Make 2
Yarn: green, blue, purple, pink.
R1: With pink, 6 sc in MR (6)
R2: inc ×6 (12)
R3: With purple, sc around (12)
R4–R5: With blue, sc around (12)
R6–R7: With green, sc around (12)
Stuff only the hand end. Leave the top flat.
R8: dec ×6 (6)
Fasten off. Leave 18 cm tail.
Back Legs — Make 2
Yarn: purple, pink.
R1: With pink, 6 sc in MR (6)
R2: inc ×6 (12)
R3: With purple, sc around (12)
R4–R5: sc around (12)
Stuff lightly. The legs should be short support points, not long tubes.
R6: dec ×6 (6)
Fasten off. Leave 20 cm tail.
Upper Wings — Make 2
Yarn: rainbow colors, purple border.
R1: With pink, 6 sc in MR (6)
R2: inc ×6 (12)
R3: With orange, (1 sc, inc) ×6 (18)
R4: With yellow, (2 sc, inc) ×6 (24)
R5: With green, (3 sc, inc) ×6 (30)
R6: With blue, (4 sc, inc) ×6 (36)
R7: With purple, (5 sc, inc) ×6 (42)
R8–R10: Work rainbow stripes as desired, sc around (42)
R11–R14: With pink/orange/yellow sectioning, sc around (42)
R15: (5 sc, dec) ×6 (36)
R16: (4 sc, dec) ×6 (30)
R17: (3 sc, dec) ×6 (24)
R18: (2 sc, dec) ×6 (18)
R19: (1 sc, dec) ×6 (12)
R20: dec ×6 (6)
Do not overstuff. Flatten into a teardrop with the narrow end at the body.
Fasten off. Leave 45 cm tail for sewing.
Lower Wings — Make 2
Yarn: blue, green, yellow, orange, pink, purple.
R1: With purple, 6 sc in MR (6)
R2: inc ×6 (12)
R3: With pink, (1 sc, inc) ×6 (18)
R4: With orange, (2 sc, inc) ×6 (24)
R5: With yellow, (3 sc, inc) ×6 (30)
R6: With green, (4 sc, inc) ×6 (36)
R7–R10: With blue/green striping, sc around (36)
R11: With purple, sc around (36)
R12: (4 sc, dec) ×6 (30)
R13: sc around (30)
R14: (3 sc, dec) ×6 (24)
R15: (2 sc, dec) ×6 (18)
R16: sc around (18)
R17: (1 sc, dec) ×6 (12)
R18: dec ×6 (6)
Flatten with the narrow point downward and the rounded edge outward.
Fasten off. Leave 45 cm tail.
Antennae — Make 2
Yarn: blue, green, yellow, orange, pink.
R1: With blue, ch 10 (10 ch)
R2: Starting in 2nd ch from hook, sl st 2, with green sl st 2, with yellow sl st 2, with orange sl st 2, with pink sl st 1 (9 sl st)
R3: Ch 2, sl st into same end st to make a small tip loop (1 loop)
R4: Working back down the side, ch 2 and sl st into every second side space 4 times (4 side loops)
R5: Repeat side loops on opposite edge, spacing them between the first side loops (4 side loops)
Fasten off. Leave 25 cm tail. Make the second antenna in mirrored color order.
Ruffle Collar
Yarn: pink, orange, yellow.
R1: With pink, ch 43, sl st to first ch to form a ring (42 ch)
R2: (sc, ch 3, sc) in each ch around (84 sc, 42 ch-3 loops)
R3: With orange/yellow, sl st into each sc and ch across every loop (126 sl st)
Fasten off. Leave 35 cm tail.
Cheek Patches — Make 2
Yarn: soft pink.
R1: 6 sc in MR (6)
R2: inc ×6 (12)
Sl st to finish the circle (12)
Fasten off. Leave 18 cm tail. Do not stuff.
Wing Eye Spots and Veins
Yarn: purple, blue, pink, yellow, cream.
Large upper eyespots, make 2:
R1: With blue, 6 sc in MR (6)
R2: inc ×6 (12)
R3: With cream, (1 sc, inc) ×6 (18)
Fasten off. Leave 20 cm tail.
Lower rainbow eyespots, make 2:
R1: With purple, 6 sc in MR (6)
R2: With pink, inc ×6 (12)
R3: With yellow, (1 sc, inc) ×6 (18)
R4: With cream, (2 sc, inc) ×6 (24)
Fasten off. Leave 25 cm tail.
Cream veins:
Make 4 chains of 18–24 ch each. Sew one curved vein across each wing, keeping the chain loose enough to follow the wing curve.
Forehead Patch
Yarn: pink.
R1: 6 sc in MR (6)
R2: inc ×6 (12)
R3: (1 sc, inc) ×6 (18)
Fasten off. Leave 20 cm tail. Sew flat over the top center color change if the chenille transition looks uneven.
Assembly
- Sew the head to the body through 24 anchor stitches, keeping the cream face centered over the yellow-orange body band.
- Pin the ruffle collar around the neck seam and stitch through the underside of every sixth loop so it stays lifted.
- Sew the cheek patches one round below the eyes, with the inner edges 2 stitches away from the mouth line.
- Embroider a 3-stitch-wide smile centered between the eyes, starting one round below the cheek patches.
- Attach the arms at the upper body, angled down at 35–45 degrees so the front silhouette stays narrow.
- Sew the back legs to the bottom front of the body, spacing them 4 stitches apart for a stable sitting base.
- Pin the upper wings to the back of the neck seam first, with the rounded tops rising above the head.
- Pin the lower wings below the upper wings, then sew all four wing bases through at least three stacked passes.
- Attach the antennae between head R2 and R4, spacing them 5 stitches apart and leaning them outward.
- Sew on wing eye spots, cream veins, and the forehead patch, then weave every tail through stuffed areas before trimming.
The finished butterfly has four visible wings, a centered cream face, and a balanced sitting base.
7 Technical Tips
- Stitch marker drift: Chenille hides the first stitch of the round. Move the marker every round, or the color bands will spiral off-center by R8.
- Stuffing firmness: Under-stuffed wings fold backward after assembly. Fill each wing to about 60% capacity, then flatten it before sewing.
- Invisible decrease gaps: Velvet yarn can ladder at decrease rounds. Pull the working loop short after every dec, especially on head R16–R19.
- Eye placement timing: Safety eyes must go in before head R14 closes the working space. Test the 8-stitch gap with pins first because 18 mm eyes dominate the face.
- Velvet tension: A loose 4.5 mm gauge will show white stuffing on the 42-stitch plateau. Drop to 4.0 mm if a 1 cm stretch opens holes between stitches.
- Wing pinning error: Sewing one upper wing 1 round lower than the other makes the butterfly lean. Pin all four wings at once, stand the plush up, then stitch.
- Tail weaving failure: Short chenille tails slip out of seams. Leave at least 35–45 cm on wings and weave each tail through three separate stuffed zones.
Conclusion
Use the blocking stage to check wing height before the final tails are hidden. The rainbow butterfly amigurumi crochet pattern relies on symmetry, not extra sewing, so the finished plush reads correctly from the front. Photograph the four wings before final weaving; small rotations are easier to correct then than after the ruffle collar is secured. Pin the finished toy to Pinterest with a front view and one back-view assembly shot, then post the same angle on Instagram so makers can compare wing height. Tag it #RainbowButterflyAmigurumi. For the next sample, test a narrower cream spiral on the upper wings: does the butterfly read more like a swallowtail or a moth?









