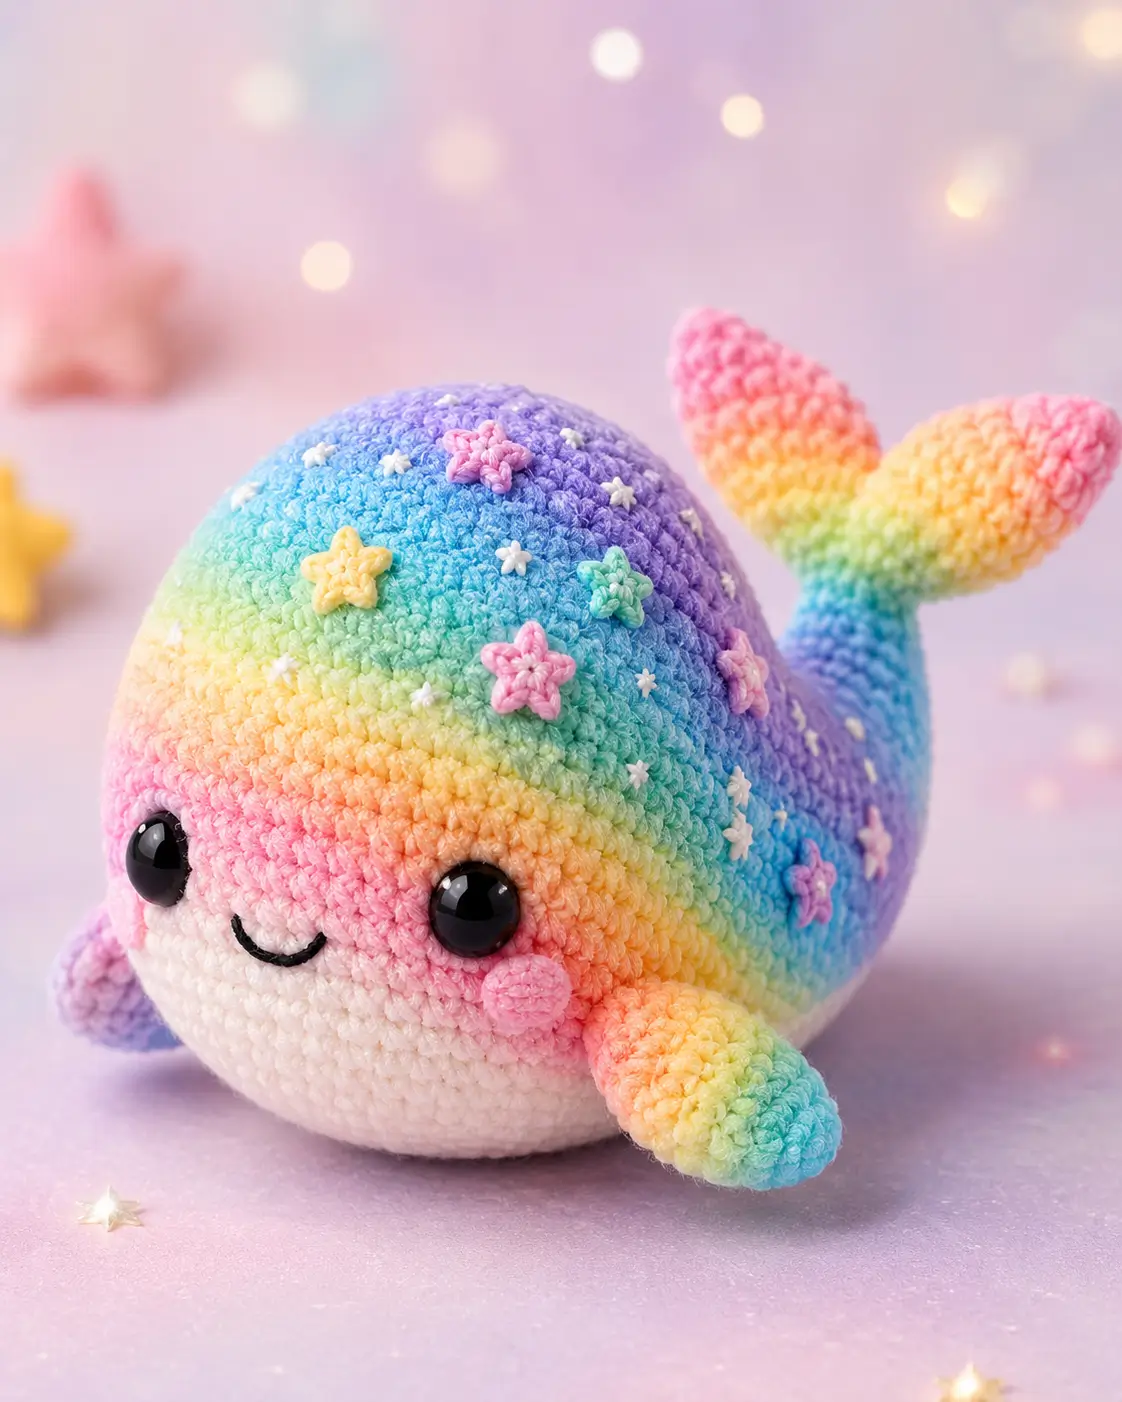
Whales show no visible neck, so this whale amigurumi crochet pattern has to make one continuous dome read as both head and body. You will build it with worsted rainbow yarn, white belly yarn, 12 mm eyes, and a 3.5 mm hook for a 15 cm shelf-size toy. The skill level is advanced beginner because the shaping is simple, but the color placement needs planning. It works well for nursery decor or an ocean display.
The Design: What Makes This Rainbow Whale Different
Rainbow whales fail when the maker treats the body like a plain ball. This design separates the front dome from the rear taper so the face stays round while the tail lifts behind it. The white belly is a sewn flat circle, not a colorwork strip, because a patch lets the lower face sit cleanly under the eyes. Star appliqués are kept shallow; raised stars on a curved head can pull the fabric into dents if they are sewn too tightly. For a rainbow whale amigurumi, the side fins need to angle forward, not out flat, or the toy starts to read as a fish. Many crochet whale pattern tutorials also under-size the tail stalk. The maker should leave enough length for the flukes to clear the body.
Project Info at a Glance
| Skill Level | Time | Finished Size | Hook | Best For |
|---|---|---|---|---|
| Advanced beginner | 3–4 hours | 15 cm long × 10 cm tall | 3.5 mm | Shelf display, nursery decor, ocean set |
Materials and Tools
Yarn
- Rainbow upper body yarn — Worsted / Aran — 23 g — brand suggestion: Caron Simply Soft Brites or similar smooth worsted yarn
- White belly and lower face yarn — Worsted / Aran — 5–10 g — brand suggestion: Caron Simply Soft white or similar
- Pink cheek yarn — Worsted / Aran — 2 g — small scrap
- Pastel star yarns — Worsted / Aran — 1 g each in pink, yellow, mint, and lavender
- Black embroidery thread — for the smile
Tools
- Hook 3.5 mm
- 12 mm safety eyes
- Polyester stuffing
- Yarn needle
- Locking stitch markers
- Pins
- Small scissors
Use embroidered eyes instead of plastic safety eyes for toys intended for children under three, pets, or heavy chewing.
Abbreviations
- MR = magic ring
- sc = single crochet
- inc = 2 sc in one stitch
- dec = single crochet 2 together
- sl st = slip stitch
- ch = chain
- BLO = back loop only
- FLO = front loop only
- FO = fasten off
Use invisible decrease through front loops only; it keeps the whale’s rounded face from showing six-point gaps.
Gauge and Size Control
The target shape uses a 42-stitch plateau, which fits a large amigurumi whale in worsted yarn without turning the head into a sphere that is too tall. Make R1–R5 of the head first. If that circle measures over 5 cm across, drop the hook by 0.25–0.5 mm. When the same circle measures under 4 cm, the finished whale will be smaller than 15 cm unless you add one more plateau round to the body.
Color Placement Map
Use rainbow variegated yarn when possible. It removes extra joins and keeps the whale’s upper dome smooth. If you are using separate colors, place pink at the lower front face, yellow and mint across the middle, aqua and blue through the upper body, and purple toward the rear. Small shifts are acceptable. Large shifts are not. Keep the white belly patch separate so the lower face remains round after stuffing. Place the largest star appliqué above the right eye area, then scatter smaller stars toward the back so the face remains readable.
Pattern — Step by Step
Continuous spiral unless noted. Mark the first stitch of every round.
Head / Front Dome
Make 1 with rainbow upper body yarn.
R1: 6 sc in MR (6)
R2: inc ×6 (12)
R3: (1 sc, inc) ×6 (18)
R4: (2 sc, inc) ×6 (24)
R5: (3 sc, inc) ×6 (30)
R6: (4 sc, inc) ×6 (36)
R7: (5 sc, inc) ×6 (42)
R8–R13: sc around (42)
R14: (5 sc, dec) ×6 (36)
R15: (4 sc, dec) ×6 (30)
R16: (3 sc, dec) ×6 (24)
Insert 12 mm safety eyes between R10 and R11, 11–12 stitches apart. Check that the lower half has room for the white face patch.
R17: (2 sc, dec) ×6 (18)
R18: (1 sc, dec) ×6 (12)
R19: dec ×6 (6)
Fasten off. Leave a 20 cm tail and close the final opening.
Body / Rear Taper
Make 1 with rainbow upper body yarn.
R1: 6 sc in MR (6)
R2: inc ×6 (12)
R3: (1 sc, inc) ×6 (18)
R4: (2 sc, inc) ×6 (24)
R5: (3 sc, inc) ×6 (30)
R6: (4 sc, inc) ×6 (36)
R7: (5 sc, inc) ×6 (42)
R8–R15: sc around (42)
R16: (5 sc, dec) ×6 (36)
R17: (4 sc, dec) ×6 (30)
R18: (3 sc, dec) ×6 (24)
Stuff firmly through the middle. Keep the rear taper lighter so the tail stalk does not sag.
R19: (2 sc, dec) ×6 (18)
R20: (1 sc, dec) ×6 (12)
R21: dec ×6 (6)
Fasten off. Leave a 25 cm tail and close.
White Belly / Lower Face Patch
Make 1 with white yarn.
R1: 6 sc in MR (6)
R2: inc ×6 (12)
R3: (1 sc, inc) ×6 (18)
R4: (2 sc, inc) ×6 (24)
R5: (3 sc, inc) ×6 (30)
R6: (4 sc, inc) ×6 (36)
R7: sc around (36)
Fasten off. Leave a 35 cm tail. Stretch the circle into a soft oval during sewing.
Pectoral Fins
Make 2 with rainbow upper body yarn.
R1: 6 sc in MR (6)
R2: inc ×6 (12)
R3: (1 sc, inc) ×6 (18)
R4–R7: sc around (18)
R8: (1 sc, dec) ×6 (12)
R9: sc around (12)
Do not stuff. Flatten each fin and fasten off with a 25 cm sewing tail.
Tail Stalk
Make 1 with rainbow upper body yarn.
R1: 6 sc in MR (6)
R2: inc ×6 (12)
R3–R8: sc around (12)
Stuff lightly. Fasten off with a 30 cm tail and leave the tube open at the base.
Tail Flukes
Make 2 with rainbow upper body yarn.
R1: 6 sc in MR (6)
R2: inc ×6 (12)
R3: (1 sc, inc) ×6 (18)
R4–R5: sc around (18)
R6: (1 sc, dec) ×6 (12)
R7: dec ×6 (6)
Fasten off. Flatten each fluke. Leave a 25 cm tail for sewing to the tail stalk.
Cheek Patches
Make 2 with pink yarn.
R1: 6 sc in MR (6)
R2: inc ×6 (12)
R3: sl st around loosely (12)
Fasten off. Leave a 20 cm tail.
Six-Point Star Appliqués
Make 6–9 with pastel scrap yarn.
R1: 6 sc in MR (6)
R2: [sl st in next st, ch 3, sc in 2nd ch from hook, hdc in next ch, sl st in same base st] ×6 (6 points)
Fasten off. Leave a 15 cm tail on each star.
White Spark Specks and Smile
Use white scraps and black embroidery thread.
For each white spark, make one small cross stitch over one crochet stitch, then a second shorter stitch across it. Place 12–18 specks across the rainbow dome and body. Embroider the smile with black thread between the eyes, starting two rounds below the left eye and ending two rounds below the right eye.
Assembly
- Close the head first, then check that both eyes sit on the same horizontal round.
- Pin the head to the widest front area of the body with the head seam facing down.
- Sew head to body using a ladder stitch around a 24–30 stitch contact area.
- Pin the white belly patch across the lower face and underside, then sew around R7 of the patch.
- Embroider the smile after the belly patch is fixed so the mouth follows the white curve.
- Sew the pectoral fins to the body between R11 and R14, angled forward about 20 degrees.
- Attach the tail stalk to the rear point of the body, centered on the body’s final closure.
- Sew one fluke to each side of the tail stalk tip, then tack the inner edges together for a lifted V shape.
- Sew cheek patches below the eyes, keeping each patch one round above the smile ends.
- Add star appliqués and white spark specks last, then weave every tail through at least three stitch paths.
The finished whale measures about 15 cm long when the gauge matches the listed hook and yarn.
7 Technical Tips
- Stitch marker drift: If the marker shifts more than 2 stitches by R12, the rainbow bands will spiral unevenly across the face. Move the marker up every round, not every few rounds.
- Stuffing firmness: Under-stuffing makes the front dome collapse under the eyes. Fill the head until a thumb press sinks no more than 5 mm.
- Invisible decrease gaps: A standard back-loop decrease can leave six small holes around R17–R19. Use FLO invisible decreases on every head and body decrease round.
- Eye placement timing: Installing eyes after R17 is too late because the opening is already narrow. Place eyes after R16, between R10 and R11, with 11–12 stitches between posts.
- Velvet tension change: If you switch to velvet yarn, the fin seam may worm outward after stuffing. Drop the hook by 0.5 mm and sew through full stitches, not surface bars.
- Pinning angle failure: Flat fins make the whale look like a fish from the front. Pin each fin at a 20-degree forward angle before the first sewing stitch.
- Tail weaving length: Short tails can pull out when the tail flukes are lifted. Leave at least 25–30 cm on the stalk and flukes, then weave through three separate paths.
Conclusion
Finish the project by checking the silhouette from the front, side, and tail end before trimming the final yarn tails. The body should read as one round-headed whale, not a ball with fins attached. Make the star appliqués in odd numbers, then keep the white specks smaller than the cheek patches so the face stays clear. For the next build, crochet one test fluke with the same hook and adjust only the tail stalk length. Save this whale amigurumi crochet pattern to Pinterest, then post the finished rainbow whale on Instagram with #RainbowWhaleAmigurumi. Which color band should sit highest on the tail flukes: pink, yellow, or blue?









