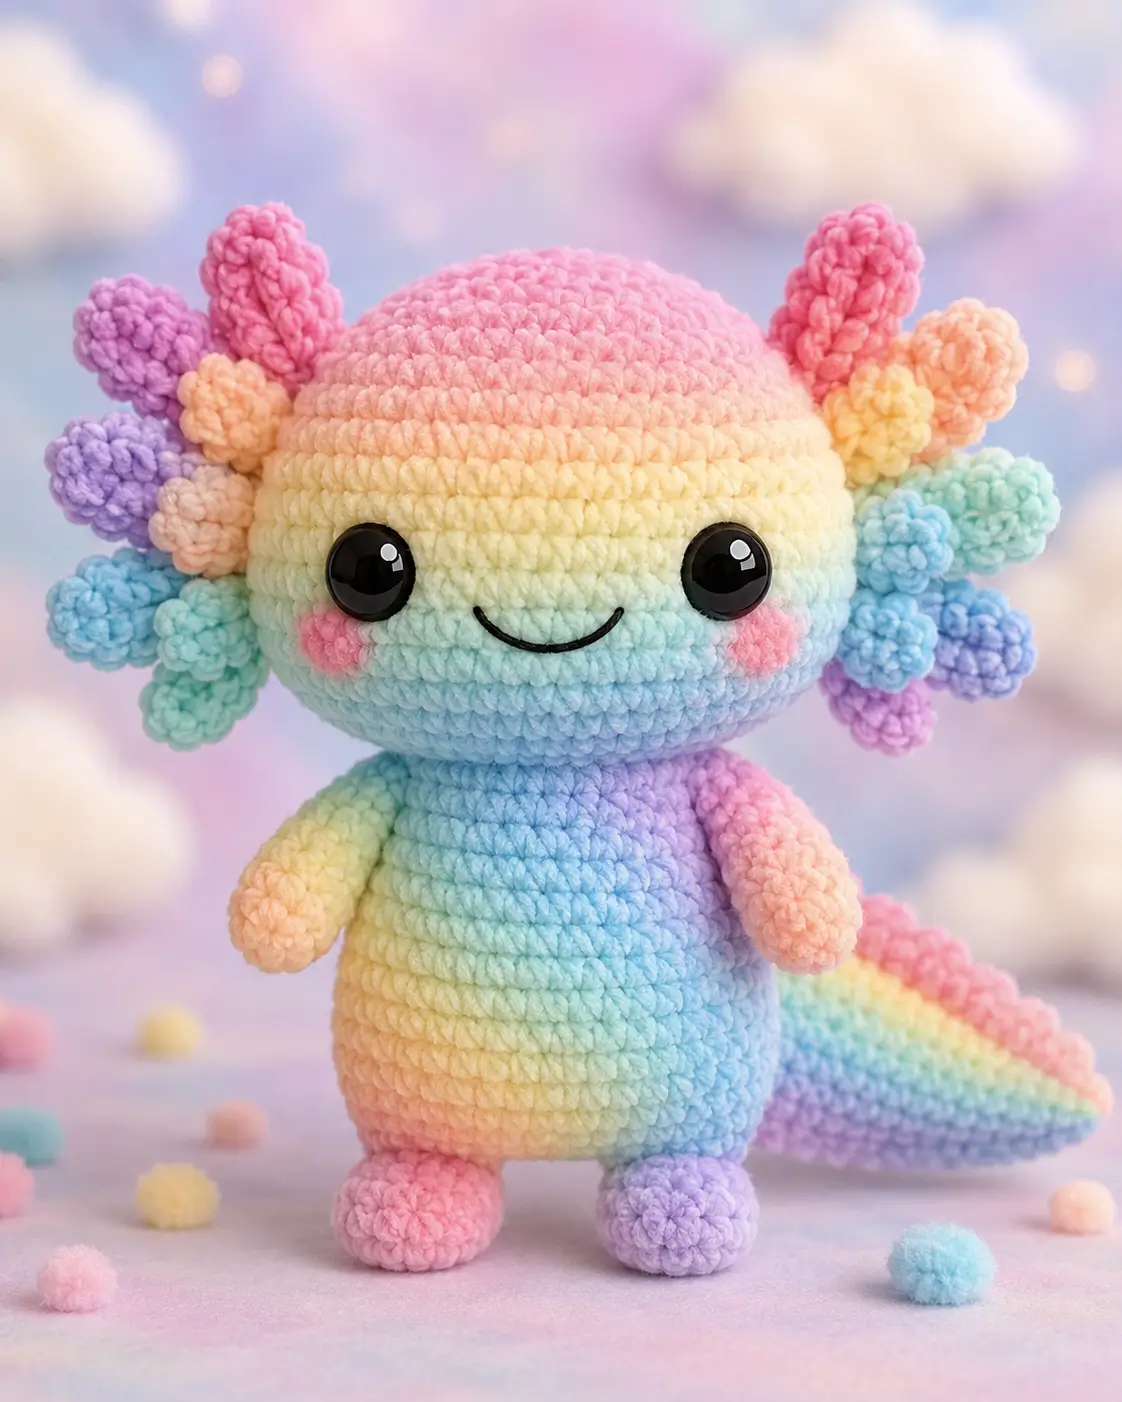
Axolotls wear their gills like six soft antennae, and this rainbow version makes each one carry color. This axolotl amigurumi crochet pattern uses velvet-weight worsted yarn, 12 mm safety eyes, and a 4 mm hook to make a 20 cm familiar-beginner plush. Make it for color placement practice, because the rounded head, side fronds, and tapered tail show mistakes fast.
The Design: What Makes This Rainbow Axolotl Different
Axolotl anatomy is front-loaded: the head carries the eyes, cheeks, smile, and three gill points on each side. For this rainbow axolotl amigurumi, the head uses a 42-stitch plateau while the body drops to 36 stitches, so the toy sits without the face tipping forward. The tail is worked as a flattened cone rather than a stuffed cylinder; that keeps the back edge visible beside the body instead of turning into a second leg. Gill pods are short tubes, not flat chains, because the photo shows rounded, bead-like fronds. A common maker mistake is placing all six fronds on the widest head round. Pin them slightly forward. That single shift makes a crochet axolotl toy look alert, not like a flower crown. The color plan also answers a gap in many free axolotl crochet pattern posts: they explain pink gills but rarely map rainbow gradients.
Project Info at a Glance
| Skill Level | Time | Finished Size | Hook | Best For |
|---|---|---|---|---|
| Familiar beginner to intermediate | 3–4 hours | 20 cm / 8 in | 4 mm | Desk plush, shelf display, gift-market sample |
The size, yarn weight, hook, and 12 mm eye choices follow a verified plush axolotl benchmark using #4 worsted yarn and a 4 mm hook.
Materials and Tools
Yarn
- Pastel rainbow main yarn — #4 worsted / velvet chenille — 49 g — Lion Brand A Star Is Born: Naptime or similar 306 yd / 100 g medium chenille.
- Gill accent colors — #4 worsted / velvet chenille — 8 g total — coral, peach, yellow, mint, sky blue, and lavender from the same yarn family.
- Cheek yarn — #4 pink velvet chenille — 2 g — same yarn family for matched stitch height.
- Mouth yarn — black embroidery floss or thin cotton — under 1 g.
Tools
- Hook 4 mm
- 12 mm black safety eyes
- Polyester stuffing
- Blunt yarn needle
- Locking stitch markers
- Straight pins
- Scissors
Abbreviations
- MR = magic ring
- sc = single crochet
- inc = increase
- dec = decrease
- sl st = slip stitch
- ch = chain
- BLO = back loop only
- FLO = front loop only
- st / sts = stitch / stitches
For an invisible decrease, work through the front loops of the next two stitches before completing one single crochet; this reduces the visible gap on velvet yarn.
Pattern — Step by Step
Continuous spiral unless noted. Change colors wherever the rainbow should shift; for the photo match, move from pink at the top of the head to yellow, mint, blue, and lavender toward the lower body and tail.
Head
Make 1. Yarn: pastel rainbow main yarn.
R1: 6 sc in MR (6)
R2: inc ×6 (12)
R3: (1 sc, inc) ×6 (18)
R4: (2 sc, inc) ×6 (24)
R5: (3 sc, inc) ×6 (30)
R6: (4 sc, inc) ×6 (36)
R7: (5 sc, inc) ×6 (42)
R8–R15: sc around (42)
R16: (5 sc, dec) ×6 (36)
R17: (4 sc, dec) ×6 (30)
R18: (3 sc, dec) ×6 (24)
R19: (2 sc, dec) ×6 (18)
R20: (1 sc, dec) ×6 (12)
R21: dec ×6 (6)
Insert safety eyes between R11 and R12, about 9 stitches apart. Stuff firmly before R20, then close the final opening.
Fasten off. Leave a 20 cm tail.
Body
Make 1. Yarn: pastel rainbow main yarn.
R1: 6 sc in MR (6)
R2: inc ×6 (12)
R3: (1 sc, inc) ×6 (18)
R4: (2 sc, inc) ×6 (24)
R5: (3 sc, inc) ×6 (30)
R6: (4 sc, inc) ×6 (36)
R7–R13: sc around (36)
R14: (4 sc, dec) ×6 (30)
R15: (3 sc, dec) ×6 (24)
R16: (2 sc, dec) ×6 (18)
R17: (1 sc, dec) ×6 (12)
R18: dec ×6 (6)
Stuff the body to a rounded base, not a hard ball. The bottom should sit flat after light pressing.
Fasten off. Leave a 35 cm tail for sewing to the head.
Arms / Front Legs
Make 2. Yarn: pastel rainbow main yarn or peach-pink accent.
R1: 6 sc in MR (6)
R2: inc ×6 (12)
R3–R7: sc around (12)
R8: dec ×6 (6)
Stuff the hand end only. Leave the shoulder end soft so it sits against the body.
Fasten off. Leave a 20 cm tail.
Back Legs / Feet
Make 2. Yarn: pastel rainbow main yarn, using pink and lavender placements from the photo.
R1: 6 sc in MR (6)
R2: inc ×6 (12)
R3: (1 sc, inc) ×6 (18)
R4–R5: sc around (18)
R6: (1 sc, dec) ×6 (12)
R7: dec ×6 (6)
Stuff lightly. Flatten the last round so the feet angle forward.
Fasten off. Leave a 20 cm tail.
External Gill Pods / Side Fronds
Make 12. Yarn: coral, peach, yellow, mint, blue, lavender.
Long Pods
Make 6.
R1: 6 sc in MR (6)
R2: inc ×6 (12)
R3–R5: sc around (12)
R6: dec ×6 (6)
Fasten off. Leave a 15 cm tail.
Short Pods
Make 6.
R1: 6 sc in MR (6)
R2: inc ×6 (12)
R3–R4: sc around (12)
R5: dec ×6 (6)
Do not overstuff. Roll each pod between fingers so it becomes oval rather than spherical.
Fasten off. Leave a 15 cm tail.
Tail
Make 1. Yarn: pastel rainbow main yarn.
R1: 6 sc in MR (6)
R2: sc around (6)
R3: inc ×6 (12)
R4–R5: sc around (12)
R6: (1 sc, inc) ×6 (18)
R7–R8: sc around (18)
R9: (2 sc, inc) ×6 (24)
R10–R14: sc around (24)
Stuff only the first half of the tail. Press the open end flat so it creates the wide, fin-like base visible behind the body.
Fasten off. Leave a 30 cm tail.
Cheek Patches
Make 2. Yarn: soft pink cheek yarn.
R1: 6 sc in MR (6)
R2: inc ×6 (12)
sl st to the first stitch (12)
Do not stuff. Pull the center tight so the patch stays flat.
Fasten off. Leave a 15 cm tail.
Smile Embroidery
Make 1. Yarn: black embroidery floss.
Place two pins between the eyes, spanning 8–10 stitches across R14 of the head. Embroider one shallow curve with backstitch, then wrap the stitches once from right to left for a smooth raised line. Knot inside the head and trim the end.
Assembly
- Sew the body to the bottom center of the head, placing the body seam at the back.
- Pin the head forward by 3–5 mm before stitching so the axolotl looks upright.
- Sew the cheek patches two rounds below the eyes, each one starting one stitch outside the eye edge.
- Embroider the smile after the cheeks, not before, so the curve lands between them.
- Arrange three gill pods on each side of the head: one high, one middle, one low.
- Add the remaining short gill pods between the long pods to build the rounded side clusters.
- Sew the arms to the upper body between R8 and R10 of the body, angled downward.
- Sew the back legs to the lower front body between R15 and R17, keeping both feet level.
- Attach the tail to the back of the body across a 7–9 stitch width, then curve it slightly to one side.
- Weave all tails through stuffed sections, then trim only after checking the toy from front, side, and top.
The finished axolotl measures about 20 cm when the listed yarn and hook are used.
7 Technical Tips
- Stitch marker drift: Velvet yarn can hide the first stitch, causing a 1-stitch spiral shift by R10. Move the marker every round and count 42 stitches on the head plateau before adding eyes.
- Stuffing firmness: A soft head collapses under 12 mm eyes and makes the cheeks tilt inward. Fill until the head springs back within 2 seconds after a thumb press.
- Invisible decrease gaps: Standard decreases can leave six visible holes on R19 and R20 of the head. Use front-loop invisible decreases on all closing rounds after the 24-stitch round.
- Eye placement timing: Installing eyes after the head is closed can crack the inner washer or distort the face. Set them between R11 and R12 while the inside is still reachable.
- Velvet tension: Pulling chenille too hard strips the core and makes pale colors look thin. Keep each stitch loop about 1 mm taller than the hook shaft.
- Gill pinning: Side fronds placed directly on the widest side point will flare like ears. Pin the middle pod 2 stitches forward of the side midpoint, then stack the upper and lower pods around it.
- Tail weaving: A tail sewn through only one layer can rotate after stuffing settles. Stitch through both flattened tail layers and 7–9 body stitches before hiding the yarn end.
Conclusion
Check the gill spacing before finishing the yarn tails; that is the most visible construction point on this design. The next concrete step is to crochet the head first, install the 12 mm eyes, and pin all side pods before sewing any limb. Save the finished front-view photo for Pinterest, then post the side-view tail angle on Instagram so the rainbow placement is visible. Use #RainbowAxolotlAmigurumi with the final photo. This axolotl amigurumi crochet pattern depends on balance between head width and gill volume. Which gill color should sit closest to the eyes: yellow, mint, or blue?









