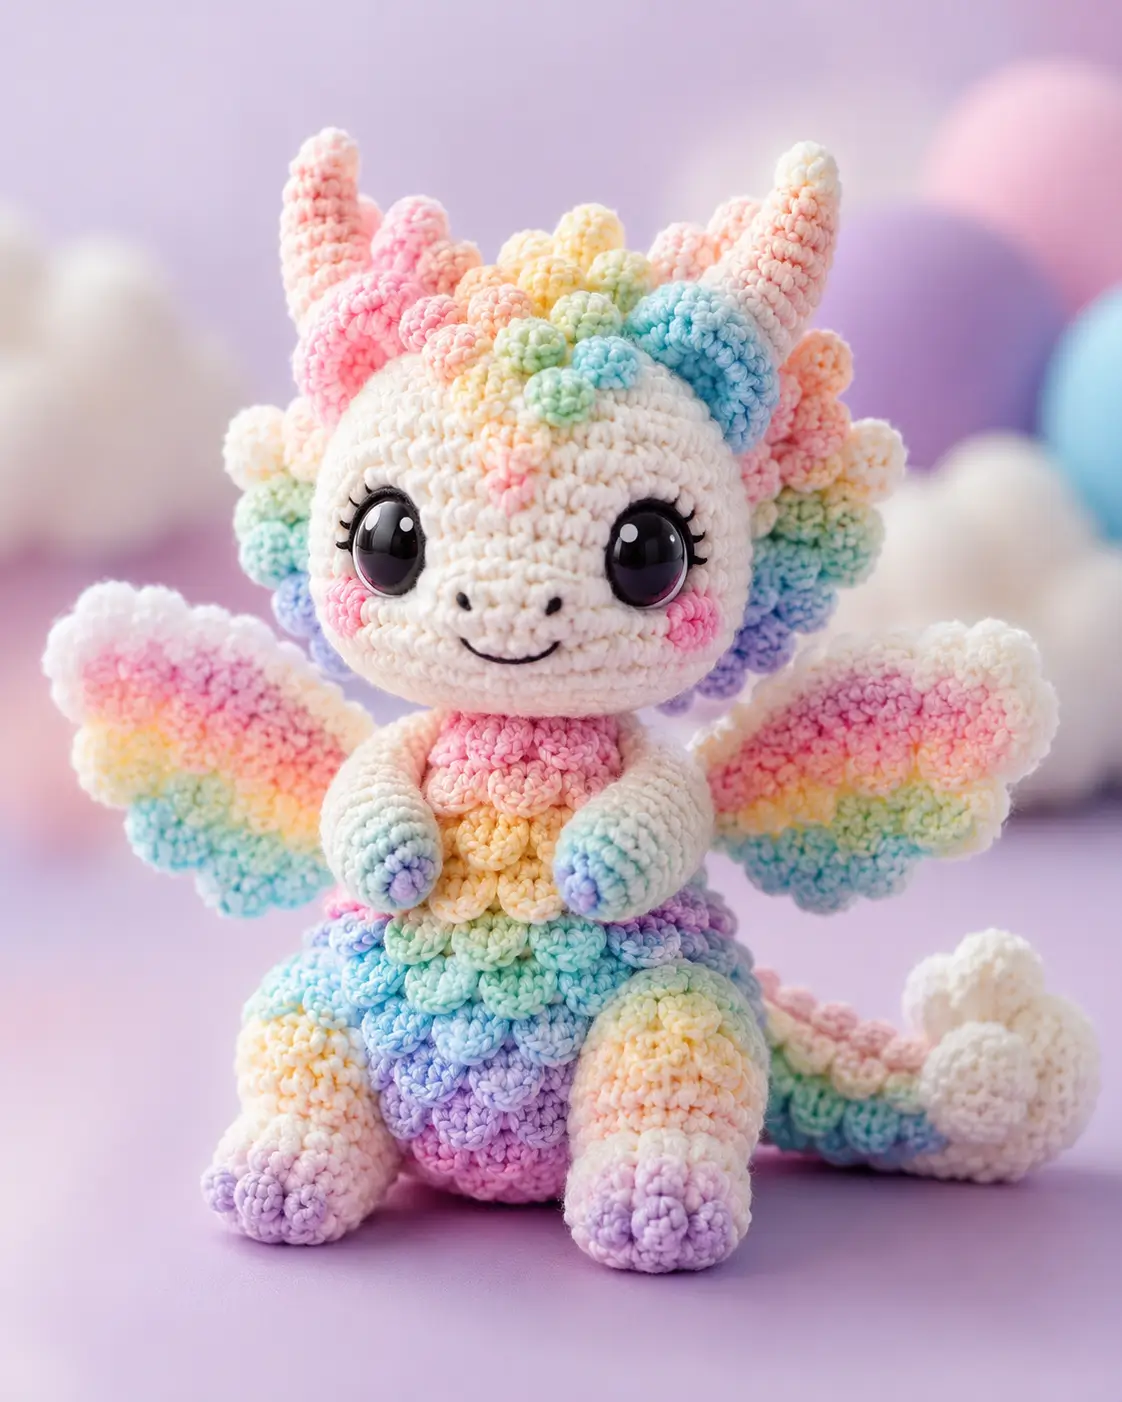
Two horns, six gill frills, and scalloped wings all compete for the same head space; this dragon needs attachment logic before cuteness. This rainbow dragon amigurumi crochet pattern uses worsted/aran yarn, a 3.0 mm hook, 16–20 mm eyes, and finishes near 20–23 cm. The skill level is intermediate because shaping, color changes, and layered parts must line up. Make it as a shelf-scale fantasy toy with stable seated balance.
The Design: What Makes This Pastel Dragon Different
The photo reads as a pastel dragon, but the side silhouette borrows from axolotl gills. The head stays large and round, then the snout is applied as a shallow oval so the eyes remain dominant. A 42-stitch plateau gives enough surface for 16–20 mm eyes without flattening the face. The wings are built as flattened circles with surface rows, not thin chains, because the toy sits forward and needs rear weight. Scale bobbles are separate pieces; that keeps the color changes off the body and makes the pastel dragon amigurumi cleaner to assemble. The most common mistake in a crochet dragon with wings is placing the wings too high. They tilt the head back and hide the gill frills. Set the wing root on the upper body, not the neck.
Project Info at a Glance
| Skill Level | Time | Finished Size | Hook | Best For |
|---|---|---|---|---|
| Intermediate | 5–7 hours | 20–23 cm | 3.0 mm | Shelf display, fantasy nursery decor, photo prop |
Materials and Tools
Yarn
- Cream / ivory — Worsted/Aran — 60 g — Rico Creative Cotton Aran, Paintbox Cotton Aran, or similar smooth Aran
- Pastel pink — Worsted/Aran — 10 g — cheeks, horns, wing stripe, scale bobbles
- Pastel peach — Worsted/Aran — 8 g — gill frills and scale bobbles
- Pastel yellow — Worsted/Aran — 8 g — belly scales and wing stripe
- Pastel mint — Worsted/Aran — 8 g — gill frills, wing stripe, head bobbles
- Pastel aqua — Worsted/Aran — 10 g — arm tips, wings, body scales
- Pastel lavender — Worsted/Aran — 8 g — foot tips, tail accents, lower body scales
- Black embroidery thread — less than 1 g — nostrils, smile, eyelashes
Tools
- Hook 3.0 mm
- Safety eyes 16–20 mm
- Polyfill stuffing
- Yarn needle
- Locking stitch markers
- Sewing pins
- Small scissors
- Black embroidery needle
Abbreviations
- MR — magic ring
- sc — single crochet
- inc — increase, 2 sc in same stitch
- dec — invisible decrease
- sl st — slip stitch
- ch — chain
- BLO — back loop only
- bobble — 4 unfinished dc worked into one stitch, closed together
Invisible decrease means working through the front loops of the next two stitches before completing one sc, which reduces holes on stuffed parts.
Pattern — Step by Step
Continuous spiral unless noted. Use a stitch marker at the first stitch of every round.
Head
Yarn: cream / ivory.
R1: 6 sc in MR (6)
R2: inc ×6 (12)
R3: (sc, inc) ×6 (18)
R4: (2 sc, inc) ×6 (24)
R5: (3 sc, inc) ×6 (30)
R6: (4 sc, inc) ×6 (36)
R7: (5 sc, inc) ×6 (42)
R8–R15: sc around (42)
R16: (5 sc, dec) ×6 (36)
R17: (4 sc, dec) ×6 (30)
R18: (3 sc, dec) ×6 (24)
Insert safety eyes between R10 and R11, about 9–10 stitches apart. Add extra stuffing behind the eye backs before closing.
R19: (2 sc, dec) ×6 (18)
R20: (sc, dec) ×6 (12)
R21: dec ×6 (6)
Fasten off. Leave a 30 cm tail and close the last 6 front loops.
Snout
Yarn: cream / ivory.
R1: 6 sc in MR (6)
R2: inc ×6 (12)
R3: (sc, inc) ×6 (18)
R4: (2 sc, inc) ×6 (24)
R5–R6: sc around (24)
Stuff lightly. Flatten the back edge before sewing so the snout becomes an oval pad, not a ball.
Fasten off. Leave a 35 cm tail.
Body
Yarn: cream / ivory.
R1: 6 sc in MR (6)
R2: inc ×6 (12)
R3: (sc, inc) ×6 (18)
R4: (2 sc, inc) ×6 (24)
R5: (3 sc, inc) ×6 (30)
R6: (4 sc, inc) ×6 (36)
R7: (5 sc, inc) ×6 (42)
R8–R15: sc around (42)
R16: (5 sc, dec) ×6 (36)
R17: (4 sc, dec) ×6 (30)
R18: (3 sc, dec) ×6 (24)
R19: (2 sc, dec) ×6 (18)
Stuff firmly at the base, softer at the neck. A hard neck will push the head backward.
R20: (sc, dec) ×6 (12)
R21: dec ×6 (6)
Fasten off. Leave a 40 cm tail for head attachment.
Arms / Front Legs
Make 2. Yarn: aqua for hand tips, then cream.
R1: 6 sc in MR with aqua (6)
R2: inc ×6 (12)
R3: (sc, inc) ×6 (18)
R4–R5: sc around (18)
R6: change to cream, (sc, dec) ×6 (12)
R7–R11: sc around (12)
Stuff only the aqua hand and the first cream round. Leave the upper arm flat for cleaner sewing.
R12: dec ×6 (6)
Fasten off. Leave a 25 cm tail.
Back Legs
Make 2. Yarn: lavender for toe end, cream for upper leg.
R1: 6 sc in MR with lavender (6)
R2: inc ×6 (12)
R3: (sc, inc) ×6 (18)
R4: (2 sc, inc) ×6 (24)
R5–R7: sc around (24)
R8: change to cream, (2 sc, dec) ×6 (18)
R9–R10: sc around (18)
R11: (sc, dec) ×6 (12)
R12: dec ×6 (6)
Stuff the foot firmly and the thigh lightly. The back legs should support the seated pose.
Fasten off. Leave a 30 cm tail.
Toe Bobbles
Make 12: 3 per foot and 3 per hand if desired. Yarn: lavender, aqua, or pink.
R1: 6 sc in MR (6)
R2: sc around (6)
Fasten off. Leave a 15 cm tail. Sew to the front edge of each limb.
Wings
Make 2. Yarn: cream base with pastel surface rows.
R1: 6 sc in MR with cream (6)
R2: inc ×6 (12)
R3: (sc, inc) ×6 (18)
R4: (2 sc, inc) ×6 (24)
R5: (3 sc, inc) ×6 (30)
R6: (4 sc, inc) ×6 (36)
R7: sc around in BLO (36)
Flatten the circle into a half-disc. Whipstitch the top edge closed, leaving the lower edge rounded.
Surface row 1: with pink, sl st across the lower third, about 18 sts
Surface row 2: with yellow, sl st across the middle third, about 16 sts
Surface row 3: with mint, sl st across the upper third, about 14 sts
Surface row 4: with aqua, sl st across the wing root edge, about 10 sts
Fasten off. Leave a 35 cm cream tail at the wing root.
Horns
Make 2. Yarn: cream tip, pastel pink tube.
R1: 6 sc in MR with cream (6)
R2: sc around (6)
R3: change to pink, inc ×6 (12)
R4–R12: sc around (12)
Stuff very lightly. Curve the horn while sewing by catching the inner curve with two hidden stitches.
Fasten off. Leave a 35 cm tail.
Gill Frills
Make 6. Yarn: pink, peach, yellow, mint, aqua, lavender.
R1: 6 sc in MR (6)
R2: inc ×6 (12)
R3–R5: sc around (12)
R6: dec ×6 (6)
Fasten off. Leave a 25 cm tail. Make three frills for each side of the head.
Tail
Yarn: cream tip, then pastel stripes.
R1: 6 sc in MR with cream (6)
R2: inc ×6 (12)
R3–R5: sc around (12)
R6: change to lavender, (sc, inc) ×6 (18)
R7–R9: sc around (18)
R10: change to aqua, (2 sc, inc) ×6 (24)
R11–R12: sc around (24)
R13–R14: change to mint, sc around (24)
R15–R16: change to yellow, sc around (24)
R17–R18: change to pink, sc around (24)
Stuff lightly. Curl the cream tip upward with two hidden stitches after sewing the tail to the body.
Fasten off. Leave a 45 cm tail. Do not close the base.
Cheek Patches
Make 2. Yarn: pastel pink.
R1: 6 sc in MR (6)
R2: inc ×6 (12)
sl st into first stitch.
Fasten off. Leave a 20 cm tail. Do not stuff.
Scale Bobbles
Make 24. Yarn: mixed pastels.
R1: 6 sc in MR (6)
R2: inc ×6 (12)
R3: sc around (12)
R4: dec ×6 (6)
Fasten off. Leave a 20 cm tail. Make 5 for the head line, 11 for the chest and belly, and 8 for the tail ridge.
Face Embroidery
Yarn: black embroidery thread.
Work two short vertical nostrils on the snout, each 1 stitch tall and 3 stitches apart. Embroider the smile with one shallow curve across 7–8 stitches. Add three lashes at the outer edge of each eye, each lash about 1 stitch long. Knot inside the head or bury ends under the snout seam.
Accessory
No separate prop or removable accessory is visible in the photo. The decorative build is carried by the horns, gill frills, wings, cheek patches, and bobble scales.
Assembly
- Pin the head to the body with the snout angled slightly downward; sew around the neck twice for support.
- Attach the snout across R12–R17 of the head, centered between the eyes.
- Sew cheek patches to both sides of the snout, one round below the eye line.
- Embroider nostrils, smile, and lashes before adding side parts.
- Sew horns to the top of the head, spaced 5–6 stitches apart.
- Attach three gill frills to each side of the head, starting behind the cheek and rising toward the horn base.
- Sew arms to the upper front body, angled inward so the hands sit over the belly scales.
- Attach back legs to the lower body at a seated angle, then add toe bobbles.
- Sew wings to the upper back body, below the neck seam, and test that they clear the gill frills.
- Attach the tail to the back lower body, curl the tip upward, then sew scale bobbles down the head, belly, and tail ridge.
The finished dragon should sit without leaning when the tail and back legs touch the surface at three points.
7 Technical Tips
- Stitch marker drift: If the marker has moved more than 3 stitches off center by R10 of the head, mark the true face center with a second pin. Eye placement follows the face center, not the spiral marker.
- Stuffing firmness: The head needs firm stuffing behind the safety eye washers and medium stuffing at the lower jaw. Overstuffing the snout makes it protrude like a muzzle instead of the soft dragon face shown in the photo.
- Invisible dec gaps: A visible hole at R18–R21 of the head means the hook is too large or the decrease was worked through both loops. Redo those rounds with front-loop invisible decreases before closing.
- Eye placement timing: Insert the eyes after R18, not at the end of the head. Waiting until R21 blocks access to the washers and can force the eyes too far apart.
- Velvet or plush tension: If using velvet yarn, drop to a 2.75 mm hook and shorten every bobble tail to 15 cm before sewing. Velvet tails shed when pulled repeatedly through tight stitches.
- Wing pinning: Pin each wing root 2 rounds below the neck seam and 4–5 stitches behind the arm line. A wing placed on the neck hides the side gill frills and changes the profile.
- Tail weaving: The tail base needs a double sewing path: one pass through the body, one pass around the tail opening. A single pass lets the curled tail twist and pull the dragon backward.
Conclusion
Treat the final toy as a shaped build, not a color exercise. The work order matters: head first, body second, then face, limbs, gill frills, wings, and tail after pinning. That sequence keeps the horns visible and stops the side frills from being buried under the wing roots. Save this rainbow dragon amigurumi crochet pattern to Pinterest, then post the finished toy on Instagram with #PastelRainbowDragon. For the next make, choose one palette limit before winding yarn: candy pastels, full rainbow, or two-color cream plus teal. Which part should stay largest on your version: the horns, the gill frills, or the scalloped wings?









