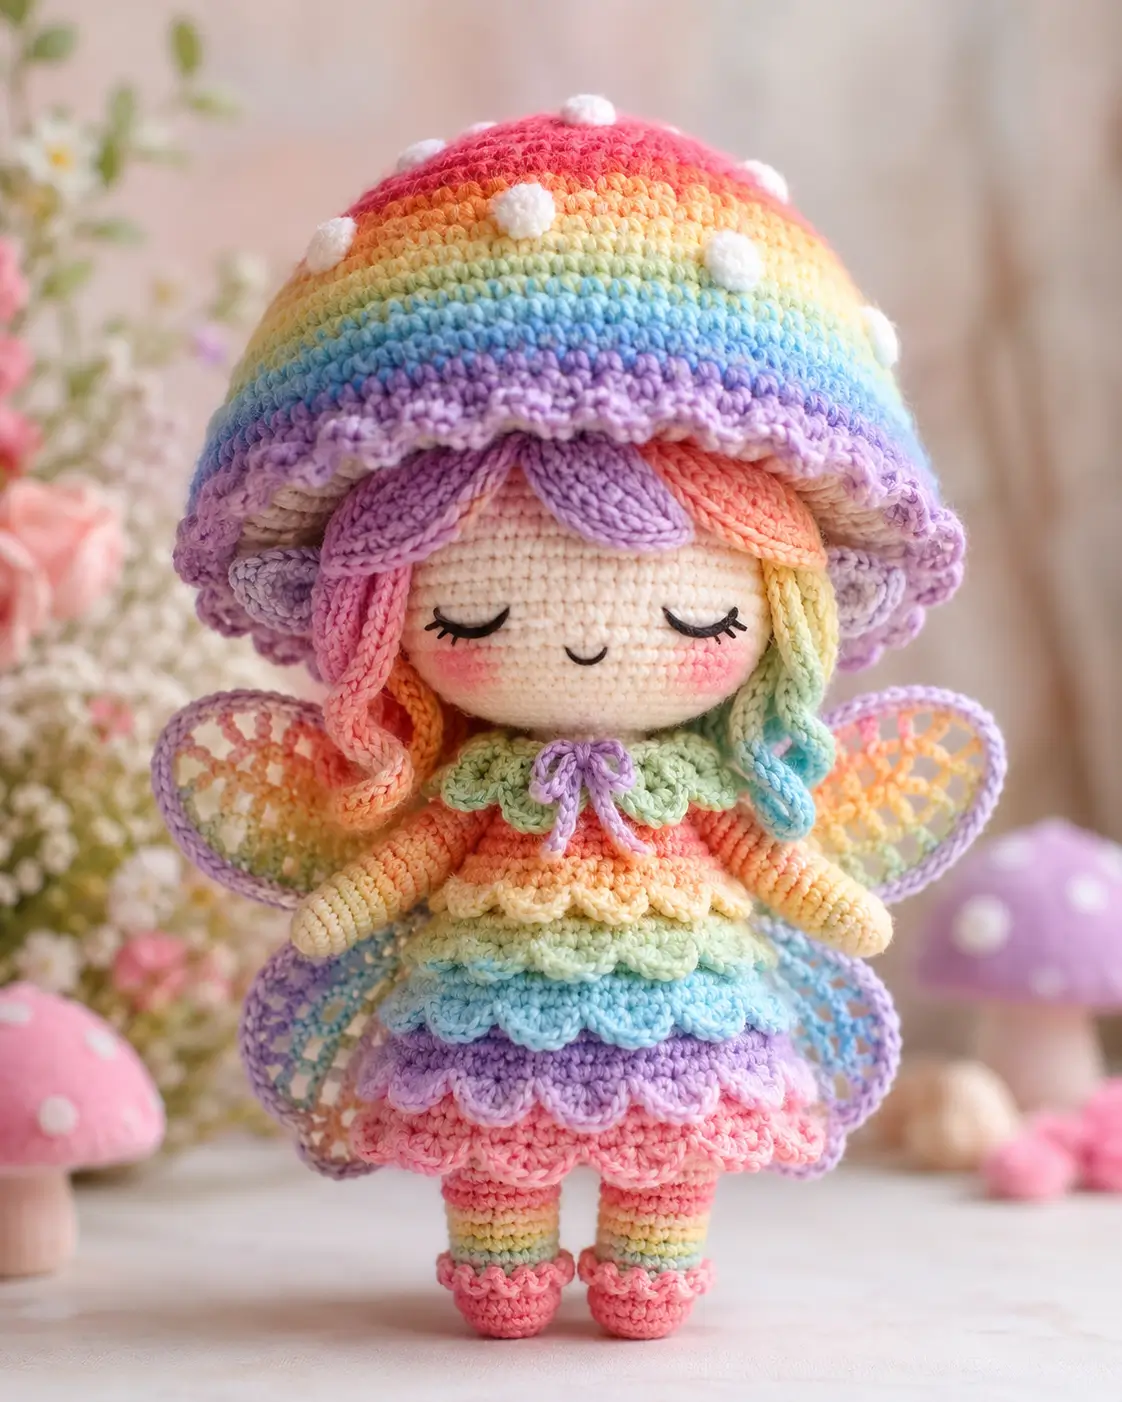
A mushroom cap this wide will tilt a fairy unless the neck and wings are planned as counterweights. This rainbow mushroom fairy doll amigurumi pattern uses cotton DK yarn, a 2.5 mm hook, embroidered eyes, and an 18 cm finished scale for an intermediate build. Make it when you need a photo-ready shelf doll with a stable base, visible color bands, and low-risk facial parts.
The Design: What Makes This Fairy Different
You are building three silhouettes at once: a doll head, a mushroom dome, and a fairy wing span. The cap must be wider than the 36-stitch head, so it climbs to 42 stitches before the underside contracts; that keeps the photographed umbrella shape without swallowing the face. The hair is worked as flat color panels, not loose strands, because the mushroom brim needs a clean edge to sit over it. A layered scallop skirt adds width lower on the body, balancing the top-heavy cap. Makers often miss this and set the wings too high; the result is a backward lean. In a rainbow fairy crochet pattern, the wing seam should sit at upper-body rounds, not on the neck. This mushroom fairy amigurumi also needs embroidered eyes so the closed-face expression stays flat under the brim.
Project Info at a Glance
| Skill Level | Time | Finished Size | Hook | Best For |
|---|---|---|---|---|
| Intermediate | 7–9 hours | 18 cm | 2.5 mm | Display doll, shelf styling, photo prop |
Materials and Tools
Yarn
- Cream skin — DK cotton — 18 g — YarnArt Jeans, Ricorumi DK, or Paintbox Cotton DK
- Rainbow cap and dress colors — DK cotton — 8–12 g each in red, orange, yellow, green, blue, lavender, and pink
- White cap spots — DK cotton — 4 g
- Lavender wing border and brim — DK cotton — 10 g
- Blush pink cheeks — DK cotton or embroidery floss — 2 g
- Black embroidery thread — under 1 g for closed eyes and smile
Tools
- Hook 2.5 mm
- Optional 6 mm safety eyes for an open-eye version; the photo uses embroidery
- Polyfill stuffing
- Yarn needle
- Stitch markers
- Pins
- Scissors
- Black embroidery needle
- Blocking mat for wings
Abbreviations
MR = magic ring; sc = single crochet; inc = 2 sc in one stitch; dec = single crochet two stitches together; sl st = slip stitch; ch = chain; BLO = back loop only; FLO = front loop only; hdc = half double crochet; dc = double crochet.
Invisible decrease catches the front loops of two stitches before completing one sc; it reduces gaps on face, body, and cap decrease rounds.
Pattern — Step by Step
Continuous spiral unless noted. Joined rows, mesh, and scallop layers are marked inside their part.
Head
Make 1. Yarn: cream.
R1: 6 sc in MR (6)
R2: inc ×6 (12)
R3: (sc, inc) ×6 (18)
R4: (2 sc, inc) ×6 (24)
R5: (3 sc, inc) ×6 (30)
R6: (4 sc, inc) ×6 (36)
R7–R15: sc around (36)
R16: (4 sc, dec) ×6 (30)
R17: (3 sc, dec) ×6 (24)
R18: (2 sc, dec) ×6 (18)
Stuff firmly. Mark the eye embroidery line between R10 and R11, 7 stitches apart.
R19: (sc, dec) ×6 (12)
R20: dec ×6 (6)
Fasten off. Close the hole and leave a 25 cm tail.
Body
Make 1. Yarn: coral-to-rainbow dress base or cream underbody.
R1: 6 sc in MR (6)
R2: inc ×6 (12)
R3: (sc, inc) ×6 (18)
R4: (2 sc, inc) ×6 (24)
R5: (3 sc, inc) ×6 (30)
R6: (4 sc, inc) ×6 (36)
R7–R10: sc around (36)
R11: (4 sc, dec) ×6 (30)
R12: sc around (30)
R13: (3 sc, dec) ×6 (24)
R14: sc around (24)
R15: (2 sc, dec) ×6 (18)
R16: (sc, dec) ×6 (12)
Stuff the lower body more firmly than the waist.
R17: dec ×6 (6)
Fasten off. Leave a 30 cm tail for sewing.
Legs and Shoes
Make 2. Yarn: pink for shoes, then rainbow stripe colors.
R1: 6 sc in MR with pink (6)
R2: inc ×6 (12)
R3: BLO sc around (12)
R4: sc around with pink (12)
R5: change to yellow, sc around (12)
R6: change to mint, sc around (12)
R7: change to blue, sc around (12)
R8: change to pink, sc around (12)
R9: sc around (12)
Stuff only the shoe and lower leg.
Flatten the top and work 6 sc through both layers (6). Fasten off with a 20 cm tail.
Arms
Make 2. Yarn: cream hand, then orange sleeve.
R1: 6 sc in MR with cream (6)
R2–R3: sc around (6)
R4: change to pale yellow, sc around (6)
R5: change to orange, sc around (6)
R6–R8: sc around with orange (6)
Do not overstuff; the arm should stay narrow.
Flatten the top and work 3 sc through both layers (3). Fasten off with an 18 cm tail.
Mushroom Cap
Make 1. Yarn: red, orange, yellow, green, blue, lavender.
R1: 6 sc in MR with red (6)
R2: inc ×6 (12)
R3: (sc, inc) ×6 (18)
R4: change to orange, (2 sc, inc) ×6 (24)
R5: change to yellow, (3 sc, inc) ×6 (30)
R6: change to mint, (4 sc, inc) ×6 (36)
R7: change to blue, (5 sc, inc) ×6 (42)
R8: sc around with blue (42)
R9: change to lavender, sc around (42)
R10: sc around with lavender (42)
R11: sc around with lavender (42)
R12: (5 sc, dec) ×6 (36)
R13: (4 sc, dec) ×6 (30)
Lightly stuff only the dome edge after pinning it to the head.
Fasten off. Leave a 45 cm sewing tail.
Cap Underside and Gills
Make 1. Yarn: pale cream with lavender edge.
R1: 6 sc in MR (6)
R2: inc ×6 (12)
R3: (sc, inc) ×6 (18)
R4: (2 sc, inc) ×6 (24)
R5: (3 sc, inc) ×6 (30)
R6: BLO sc around with lavender (30)
Fasten off. Leave a 35 cm tail and sew inside the cap opening after the cap is pinned.
Scalloped Cap Brim
Make 1. Yarn: lavender.
Attach yarn to any front loop of Cap R13.
R1: (sc, hdc, dc, hdc, sc, sl st) ×5 (30)
R2: sl st around the outer edge, placing 1 sl st in each visible stitch (30)
Fasten off. Weave the short tail into the underside.
White Cap Spots
Make 8. Yarn: white.
Make 5 small spots:
R1: 6 sc in MR (6)
Fasten off. Leave a 12 cm tail.
Make 3 medium spots:
R1: 6 sc in MR (6)
R2: inc ×6 (12)
Fasten off. Leave a 15 cm tail.
Hair Panels
Make 7. Yarn: pink, orange, yellow, mint, blue, lavender.
Ch 18.
R1: starting in second ch from hook, 17 hdc (17)
R2: ch 1, turn, BLO 17 sc (17)
Fasten off. Leave 20 cm tails for sewing to the head under the brim.
Side Hair Curls
Make 2. Yarn: pink and blue.
Ch 22.
R1: starting in second ch from hook, 3 sc in each ch across (63)
Fasten off. Leave 18 cm tail.
Wings
Make 2. Yarn: lavender border with variegated rainbow center.
Ch 8.
R1: starting in second ch from hook, 6 sc, 3 sc in last ch, work along opposite side, 5 sc, inc (16)
R2: inc, 3 hdc, 2 dc, inc ×3, 2 dc, 3 hdc, inc ×2 (22)
R3: (ch 3, skip 1 st, sl st in next st) ×11 (11 loops)
R4: 3 sc in each ch-3 loop (33)
Fasten off. Leave a 35 cm tail. Pin flat and block before sewing.
Collar
Make 1. Yarn: mint.
Ch 19 and join with sl st, taking care not to twist.
R1: ch 1, 18 sc around (18)
R2: (sc, hdc, dc, hdc, sc, sl st) ×3 (18)
Fasten off. Leave a 20 cm tail.
Bow
Make 1. Yarn: lavender.
Ch 16.
R1: starting in second ch from hook, 15 sc (15)
R2: ch 1, turn, 15 sc (15)
Wrap yarn 6 times around the center to pinch the strip into a bow. Fasten off. Leave a 20 cm tail.
Layered Scallop Skirt
Make 3 layers. Yarn: orange, yellow, mint, blue, lavender, pink.
Layer 1
Attach orange around Body R8.
R1: 36 sc evenly around (36)
R2: (sl st, sc, hdc, 3 dc in next st, hdc, sc) ×6 (48)
Fasten off.
Layer 2
Attach mint around Body R10.
R1: 36 sc evenly around (36)
R2: (sl st, sc, hdc, 3 dc in next st, hdc, sc) ×6 (48)
Fasten off.
Layer 3
Attach blue around Body R12.
R1: 30 sc evenly around (30)
R2: (sl st, hdc, 3 dc in next st, hdc, sl st) ×6 (42)
Fasten off.
Cheek Patches
Make 2. Yarn: blush pink.
R1: 6 sc in MR (6)
R2: inc ×6 (12)
Fasten off. Leave a 15 cm tail or use sewing thread for a flatter finish.
Assembly
- Sew the head to the body with the head opening centered over the body top.
- Check the face line and embroider closed eyes between Head R10 and R11, 7 stitches apart.
- Embroider the smile 2 rounds below the eyes, centered between them.
- Sew cheek patches under the outer thirds of the eyes.
- Sew legs to the lower body with 4 stitches between inner feet.
- Sew arms to Body R13–R14, angled slightly downward.
- Sew hair panels to the head crown, then add side curls at the temples.
- Pin wings to the upper back across Body R10–R13, then sew around the wing bases.
- Pin the mushroom cap over the hair, sew the underside to the head, then add white spots across the dome.
- Add collar and bow, weave every tail for at least 4 cm, and steam-block only the wings and scallop edges.
The finished doll stands about 18 cm when worked with the stated yarn, hook, and firm amigurumi tension.
7 Technical Tips
- Marker drift: If the start marker moves more than 2 stitches by Head R10, the embroidered eyes will slant. Move the marker back to the rear center after each decrease round.
- Stuffing firmness: A loose head collapses under the cap and creates a neck crease. Pack the head until it rebounds about 2 mm when pressed with a fingertip.
- Invisible decrease gaps: Standard decreases show small holes on cream yarn by R16. Use invisible decreases on Head R16–R20 and Body R13–R17.
- Eye placement timing: Embroider the eyes before sewing on the cap, not after. The brim hides the upper face and leaves poor needle access.
- Velvet tension: Do not swap to velvet yarn without resizing the cap. Velvet can widen the 42-stitch dome by 20–30%, making the brim cover the eyes.
- Pinning: Use at least 8 pins around the mushroom cap before sewing. Two front pins should sit above the outer corners of the embroidered eyes.
- Tail weaving: Short tails work loose under layered skirts. Leave 20–45 cm tails on structural parts and weave each one through at least 4 cm of fabric.
Conclusion
Block the wings before final photos; the open mesh looks uneven until the border dries flat. This rainbow mushroom fairy doll amigurumi pattern is built from repeatable parts, so the next step is testing cap balance before adding every white spot. Pin the cap, wings, and skirt layers first, then take a front photo and check tilt against a vertical table leg or door frame. Share the finished doll on Pinterest and Instagram with #RainbowMushroomFairyDoll. For the next sample, record one change: should the violet brim sit lower over the forehead, or should the blue wing row be widened by two mesh spaces?









