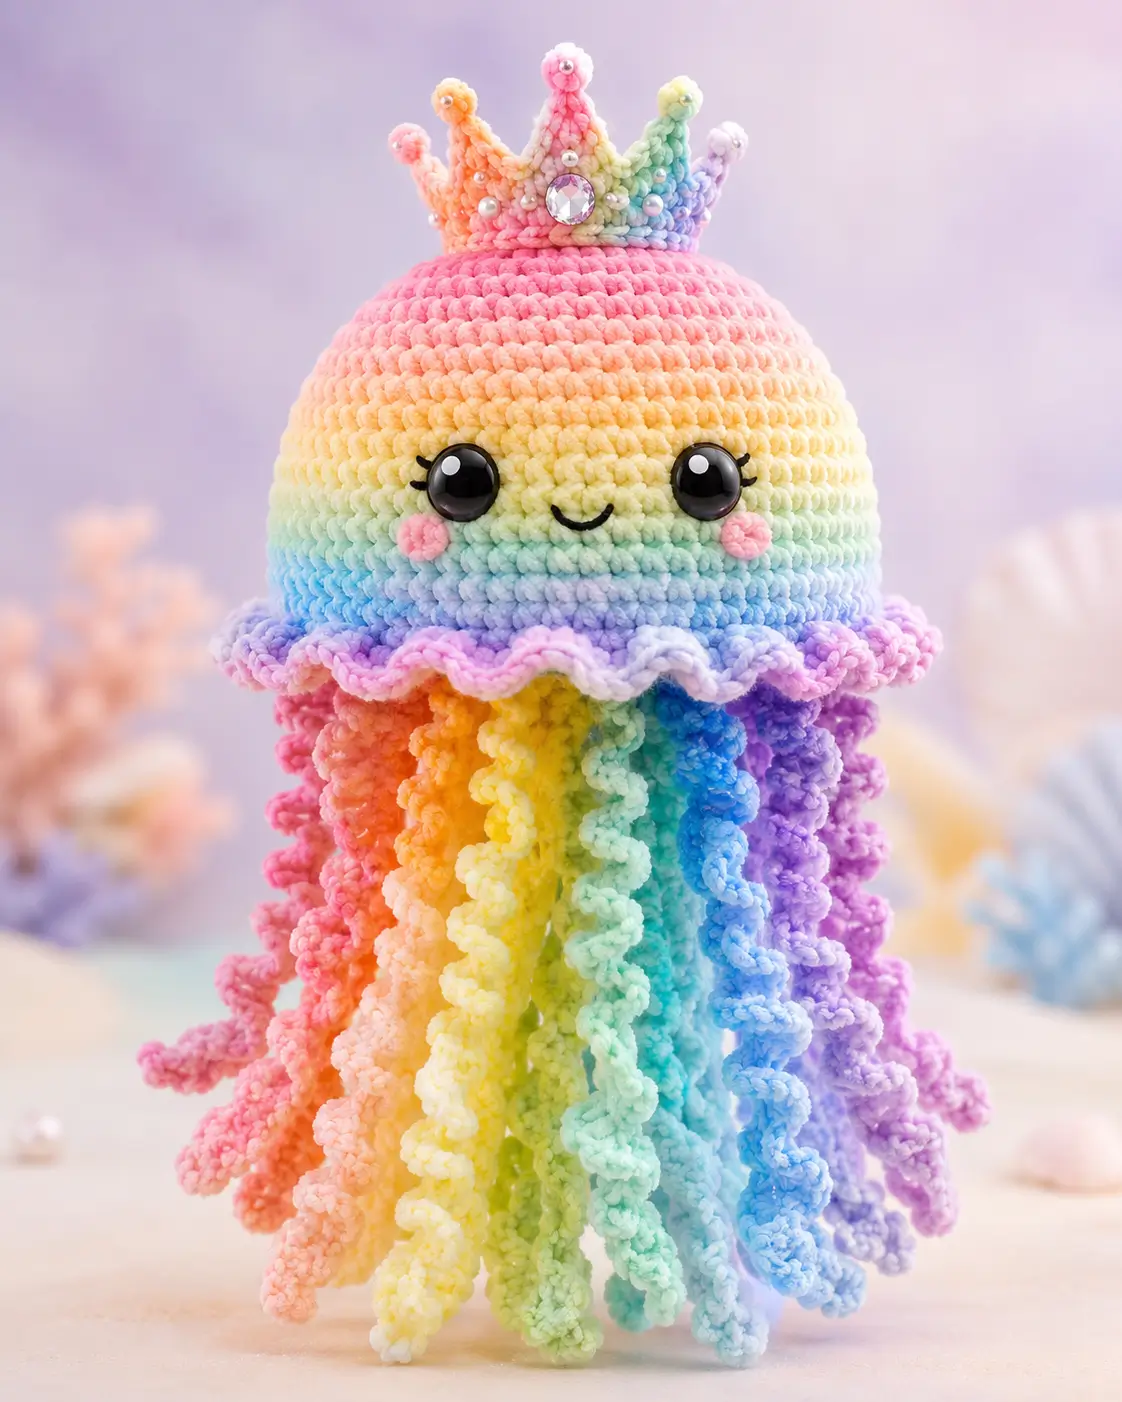
Jellyfish do not have cheeks, so the pink circles on this rainbow jellyfish amigurumi crochet pattern must read as graphic face marks, not anatomy. This project uses chunky velvet yarn, a 4.5 mm hook, and a large 42-stitch dome for an advanced-beginner build. Make it when you need a vertical nursery mobile piece with controlled curls and a crown that stays upright.
The Design: What Makes This Jellyfish Different
This jellyfish is built around three visual jobs: a smooth bell, a moving tentacle curtain, and a crown that does not collapse into the dome. The 42-stitch head plateau gives enough width for oversized eyes, cheeks, and an embroidered smile without flattening the face. The underside body is made as a separate closed pad because loose tentacles need an anchor layer; if they are tied into stuffing only, they pull out under handling. The ruffled skirt hides the seam and mimics the scalloped edge seen in the photo. For the rainbow amigurumi jellyfish look, place tentacles in warm-to-cool order instead of scattering colors. A common mistake in a plush jellyfish crochet build is using one tentacle length throughout. That creates a tube shape. Mixed chain lengths make the lower edge irregular, closer to the reference image.
Project Info at a Glance
| Skill Level | Time | Finished Size | Hook | Best For |
|---|---|---|---|---|
| Advanced beginner | Weekend build | 40 cm plush reference | 4.5–5 mm | Nursery mobile, display plush, rainbow decor |
Materials and Tools
Yarn
- Pastel rainbow chenille — chunky / velvet — 75–100 g — Premier Parfait Chunky, Himalaya Dolphin Baby, or similar
- Pink chenille — chunky / velvet — 10 g — cheeks and crown point
- Yellow chenille — chunky / velvet — 10 g — crown point and tentacle
- Mint chenille — chunky / velvet — 10 g — crown point and tentacle
- Blue chenille — chunky / velvet — 10 g — crown point and tentacle
- Lavender chenille — chunky / velvet — 10 g — crown point and tentacle
- Black cotton or embroidery floss — small amount — smile and eyelashes
- White cotton thread — small amount — eye highlights if embroidered
Tools
- Hook 4.5 mm for plush chenille
- 10–12 mm safety eyes for verified plush sizing, or 18–22 mm for the oversized photo look
- Polyester stuffing
- Yarn needle
- Locking stitch markers
- Pins with large heads
- Five pearl beads and one acrylic rhinestone for the crown, optional
Abbreviations
MR = magic ring / sc = single crochet / inc = increase / dec = decrease / inv dec = invisible decrease / sl st = slip stitch / ch = chain / BLO = back loop only / FLO = front loop only / hdc = half double crochet / dc = double crochet / st = stitch
An invisible decrease is worked through the front loops of the next two stitches before completing one single crochet, which reduces bulk on the visible face of the dome.
Pattern — Step by Step
Continuous spiral unless noted. Use a stitch marker in the first stitch of every round.
Head Dome
Yarn: pastel rainbow chenille
R1: 6 sc in MR (6)
R2: inc ×6 (12)
R3: (sc, inc) ×6 (18)
R4: (2 sc, inc) ×6 (24)
R5: (3 sc, inc) ×6 (30)
R6: (4 sc, inc) ×6 (36)
R7: (5 sc, inc) ×6 (42)
R8: sc around (42)
R9: sc around (42)
R10: sc around (42)
R11: sc around (42)
R12: sc around (42)
R13: sc around (42)
R14: sc around (42)
R15: sc around (42)
R16: (5 sc, dec) ×6 (36)
R17: sc around (36)
R18: (4 sc, dec) ×6 (30)
R19: (3 sc, dec) ×6 (24)
R20: (2 sc, dec) ×6 (18)
Place safety eyes between R12 and R13, 9–10 stitches apart for 10–12 mm eyes. For 18–22 mm photo-style eyes, test placement between R11 and R12 before locking backs.
R21: (sc, dec) ×6 (12)
R22: dec ×6 (6)
Stuff firmly before closing. Keep the bottom slightly flat so the underside pad can sit cleanly.
Fasten off. Leave a 20 cm tail and close through front loops.
Body / Underside Pad
Yarn: pastel rainbow or light mint chenille
R1: 6 sc in MR (6)
R2: inc ×6 (12)
R3: (sc, inc) ×6 (18)
R4: (2 sc, inc) ×6 (24)
R5: (3 sc, inc) ×6 (30)
R6: (4 sc, inc) ×6 (36)
R7: (5 sc, inc) ×6 (42)
R8: BLO sc around (42)
R9: sc around (42)
R10: (5 sc, dec) ×6 (36)
R11: (4 sc, dec) ×6 (30)
R12: (3 sc, dec) ×6 (24)
R13: (2 sc, dec) ×6 (18)
R14: (sc, dec) ×6 (12)
R15: dec ×6 (6)
Stuff lightly. This pad should hold tentacles, not bulge below the skirt.
Fasten off. Leave a 45 cm sewing tail.
Ruffled Skirt
Yarn: lavender, pink, or pastel rainbow chenille
Work around the front loops left from Body R8.
R1: Join yarn in any FLO, ch 1, sc in same loop, sc around remaining FLO (42)
R2: (sl st, skip 1 st, 5 hdc in next st, skip 1 st, sl st in next st, sl st in next st) ×7 (49 visible ruffle stitches)
Do not over-tighten the slip stitches. A tight skirt pulls the underside pad inward.
Fasten off. Leave a 15 cm tail.
Front Oral Arms — Make 2
Yarn: pink and peach chenille
R1: ch 43 (43)
R2: Starting in 2nd ch from hook, 3 sc in each ch across (126)
These two arms sit at the front center under the smile.
Fasten off. Leave a 25 cm tail on each.
Back Oral Arms — Make 2
Yarn: blue and lavender chenille
R1: ch 37 (37)
R2: Starting in 2nd ch from hook, 3 sc in each ch across (108)
These sit toward the back underside. They are the jellyfish substitute for back limbs; no back legs are used on this animal.
Fasten off. Leave a 25 cm tail on each.
Rainbow Curly Tentacles — Make 10
Yarn: pink, coral, peach, yellow, mint, aqua, blue, lavender, violet, and pale pink chenille
Make each color once.
Short tentacle:
R1: ch 31 (31)
R2: Starting in 2nd ch from hook, 2 sc in each ch across (60)
Medium tentacle:
R1: ch 37 (37)
R2: Starting in 2nd ch from hook, 2 sc in each ch across (72)
Long tentacle:
R1: ch 43 (43)
R2: Starting in 2nd ch from hook, 2 sc in each ch across (84)
Color map: make 3 short, 4 medium, and 3 long. Place warm colors on the viewer’s left, greens in the middle, and blues/purples on the right.
Fasten off each tentacle with a 25 cm tail.
Cheek Patches — Make 2
Yarn: pink chenille
R1: 6 sc in MR (6)
R2: inc ×6 (12)
R3: (sc, inc) ×6 (18)
Stop at 18 stitches for plush yarn. Larger cheeks compete with the eyes.
Fasten off. Leave a 20 cm sewing tail.
Crown Band
Yarn: pastel rainbow, yellow, or pink chenille
R1: ch 43, join with sl st to form a ring, sc in each ch around (42)
R2: sc around (42)
R3: BLO sc around (42)
The band should sit on Head R3–R5. Adjust by one or two stitches only after testing the stuffed dome.
Fasten off. Leave a 30 cm tail.
Crown Points — Make 5
Yarn: pink, peach, yellow, mint, and lavender chenille
For each point:
R1: ch 9, starting in 2nd ch from hook, sc across (8)
R2: dec, 4 sc, dec (6)
R3: sc across (6)
R4: dec, 2 sc, dec (4)
R5: dec ×2 (2)
R6: dec (1)
Fasten off. Leave a 20 cm tail. Sew the five points evenly to the crown band, with the tallest-looking color at center front.
Crown Flower and Jewel
Yarn: white or pale pink chenille
R1: 6 sc in MR (6)
R2: (sl st, ch 2, 2 hdc in same st, ch 2, sl st in next st) ×3 (3 petals)
Fasten off. Leave a 15 cm tail. Sew to the center crown point. Add one rhinestone to the crown band center and one small pearl near each crown point tip.
Face Details
Yarn: black cotton or embroidery floss
Mouth: embroider a shallow U shape between R14 and R15, centered under the eyes.
Eyelashes: add three short stitches at the outer edge of each eye.
Eye shine: add one white stitch at upper left of each eye only if safety eyes do not already have a molded highlight.
Fasten off inside the head or bury thread through the underside seam.
Assembly
- Pin the crown band to the top of the head across R3–R5, then sew through every fourth stitch of the band.
- Sew the five crown points to the band, placing the pink or yellow point at center front.
- Attach pearls and the center jewel after the crown is sewn down so bead weight does not twist the band.
- Pin the underside body pad to the bottom of the head, matching the 42-stitch edge to the head’s lower curve.
- Sew the body pad to the head with a ladder stitch, stopping halfway to check stuffing density.
- Attach the ruffled skirt over the seam, with scallops pointing downward.
- Sew the two front oral arms under the face, 2 stitches apart.
- Sew the remaining oral arms and curly tentacles around the underside in rainbow order.
- Sew cheek patches beside the smile, placing each patch one round below the eye center.
- Weave every tail through the body pad twice, then trim only after tug-testing each tentacle.
The finished jellyfish has a crowned dome, flat underside anchor, ruffled skirt, cheek patches, and a full rainbow tentacle curtain.
7 Technical Tips
- Stitch marker drift: If the marker leans more than 3 stitches left or right by R15, the face will not center over the tentacles. Move the marker only at the end of a completed round, not mid-round.
- Stuffing firmness: A soft dome collapses under the crown, while an overfilled dome pushes the eyes outward. Pack the head to medium-firm density, then press the base flat before closing R22.
- Invisible decrease ridges: Plush yarn shows bulky decrease ridges on the front of the head. Work all decreases through front loops only and keep the dec rounds on the underside half when possible.
- Eye placement timing: Safety eyes must be placed before the head closes past 12 stitches. For 18–22 mm eyes, test with pins first because moving large eyes leaves visible holes in chenille.
- Velvet tension loss: Chenille can worm out if the hook is too large. Drop from 5 mm to 4.5 mm if stuffing dots appear between stitches on R8–R15.
- Pinning tentacles: Ten tentacles plus four oral arms shift during sewing. Pin warm colors on the left, cool colors on the right, then sew front center first to lock the rainbow order.
- Tail weaving failure: A single knot can pull through plush yarn. Run each tentacle tail through the underside pad twice, cross it over one internal stitch, and bury the tail at least 5 cm.
Conclusion
This crowned jellyfish works because the structure is divided into load-bearing zones: dome, underside pad, ruffle, tentacles, and crown. Keep the 42-stitch head plateau, check eye spacing before closing, and sew the tentacles into the pad rather than the stuffing. Your next step is to crochet one test tentacle in scrap chenille and measure its curl before cutting all ten colors. Save this rainbow jellyfish amigurumi crochet pattern to Pinterest, then share the finished plush on Instagram with #RainbowJellyfishAmigurumi. Which crown detail will you keep closest to the photo: the center rhinestone, the pearl tips, or the five pastel points?









