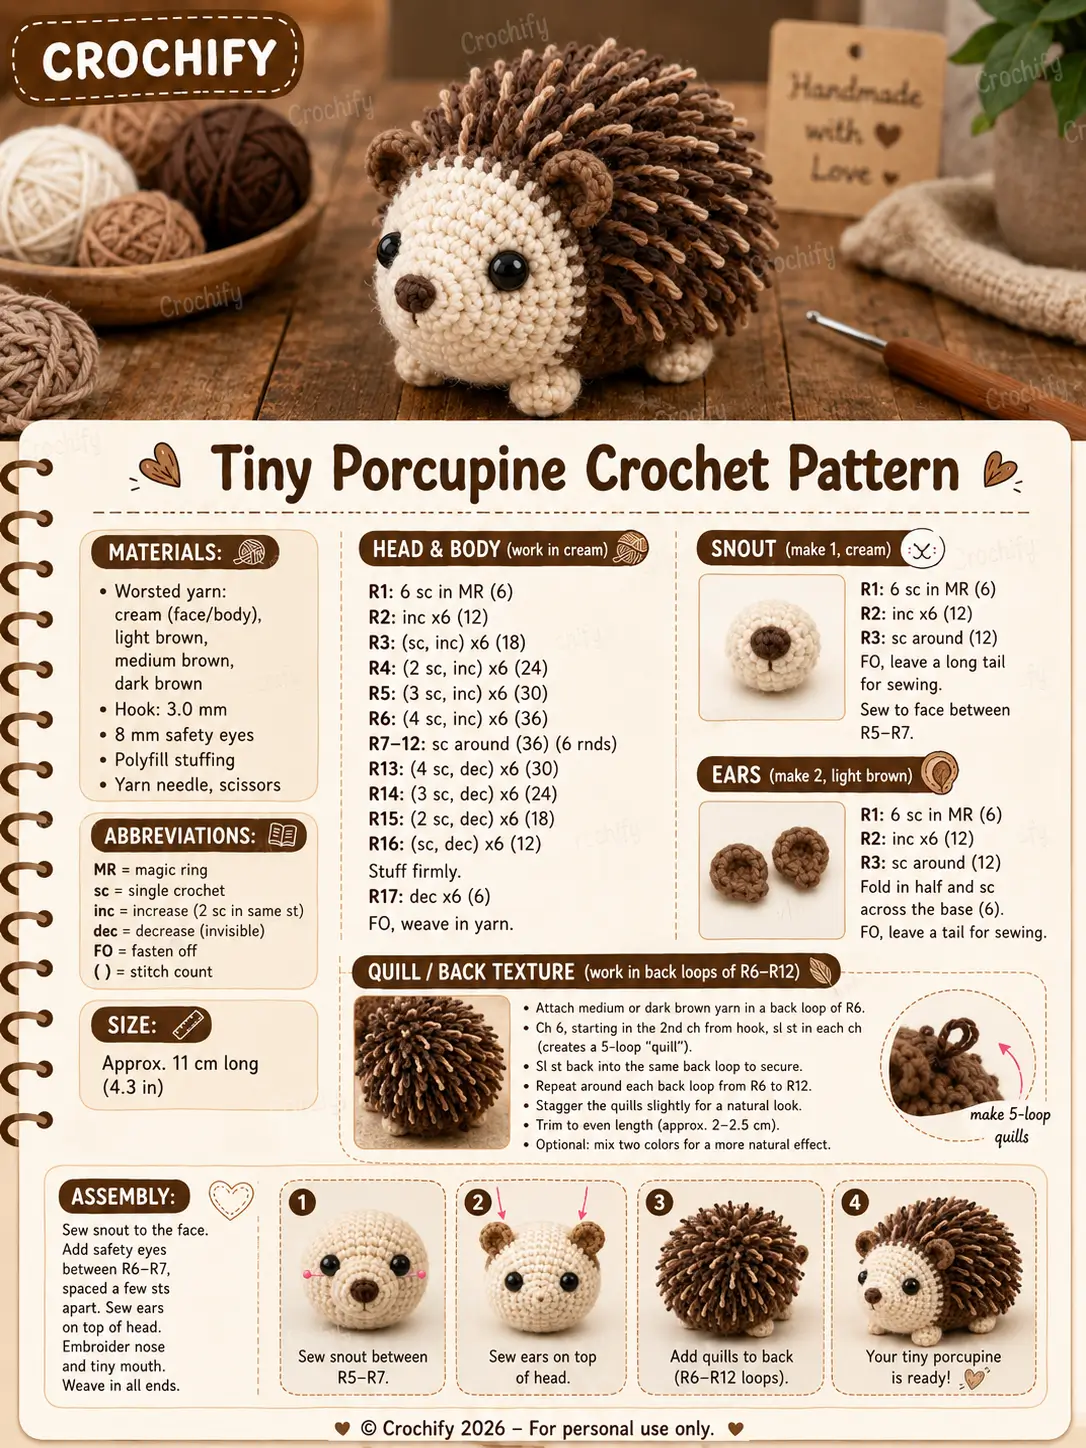
A porcupine is a blunt-nosed rodent that carries its warning system on the back, sides, and tail. This porcupine amigurumi crochet pattern turns that anatomy into cream shaping, brown loop quills, and compact legs. Work it with worsted yarn, a 3.5 mm hook, and 8 mm safety eyes for an intermediate, palm-size animal suited to craft tables, woodland sets, or photo props.
The Design: What Makes This Porcupine Different
The face is kept cream because the quill mass already carries the visual weight. Rounds build to a 36-stitch body plateau, then hold long enough to give the back a stable field for loop quills. Brown loops are attached only from the crown line toward the rear so the snout stays readable from the front. Small ears sit high and slightly back; placed too low, they read as cheeks instead of ears. Four legs are worked as short cylinders, not flat pads, because the animal needs to sit below the quill shell rather than on top of it. A common mistake in a tiny porcupine crochet pattern is covering the eye line with loops. For this crochet porcupine amigurumi, keep at least three clear rounds around the face before adding texture.
Project Info at a Glance
| Skill Level | Time | Finished Size | Hook | Best For |
|---|---|---|---|---|
| Intermediate | 3–4 hours | 12–13 cm | 3.5 mm | Woodland sets, market table samples, photo props |
Materials and Tools
Yarn
- Cream — worsted / Aran — 30 g — Paintbox Cotton Aran, YarnArt Jeans Plus, or Lion Brand Basic Stitch.
- Light brown — worsted / Aran — 10 g — ears, legs, optional snout shading.
- Medium brown — worsted / Aran — 20 g — main quill loops.
- Dark brown — worsted / Aran — 10 g — mixed quills, nose, tail.
- Soft pink — scrap — cheek patches.
Tools
- Hook 3.5 mm
- 8 mm black safety eyes
- Polyester stuffing
- Yarn needle
- Stitch markers
- Straight pins
- Scissors
Abbreviations
MR = magic ring
sc = single crochet
inc = 2 sc in same stitch
dec = invisible decrease unless stated
sl st = slip stitch
ch = chain
BLO = back loop only
FO = fasten off
For an invisible decrease, work through the front loops of the next two stitches before completing one single crochet.
Pattern — Step by Step
Work in a continuous spiral unless a row section states otherwise. Move the stitch marker at the start of every round.
Head
Make 1. Yarn: cream.
R1: 6 sc in MR (6)
R2: inc ×6 (12)
R3: (sc, inc) ×6 (18)
R4: (2 sc, inc) ×6 (24)
R5: (3 sc, inc) ×6 (30)
R6: sc around (30)
R7: sc around (30)
R8: sc around (30)
R9: sc around (30)
R10: sc around (30)
R11: (3 sc, dec) ×6 (24)
R12: (2 sc, dec) ×6 (18)
R13: (sc, dec) ×6 (12)
R14: dec ×6 (6)
Stuff firmly. Place safety eyes between R6 and R7, 7 stitches apart, before the opening becomes too small.
Fasten off. Leave a 20 cm tail, close through front loops, and bury the end.
Body
Make 1. Yarn: cream.
R1: 6 sc in MR (6)
R2: inc ×6 (12)
R3: (sc, inc) ×6 (18)
R4: (2 sc, inc) ×6 (24)
R5: (3 sc, inc) ×6 (30)
R6: (4 sc, inc) ×6 (36)
R7: sc around (36)
R8: sc around (36)
R9: sc around (36)
R10: sc around (36)
R11: sc around (36)
R12: sc around (36)
R13: sc around (36)
R14: (4 sc, dec) ×6 (30)
R15: (3 sc, dec) ×6 (24)
R16: (2 sc, dec) ×6 (18)
R17: (sc, dec) ×6 (12)
R18: dec ×6 (6)
Stuff until the body holds an oval shape without stretching the stitches.
Fasten off. Leave a 25 cm tail for sewing the head to the body.
Snout
Make 1. Yarn: cream.
R1: 6 sc in MR (6)
R2: inc ×6 (12)
R3: sc around (12)
Fasten off. Leave a 25 cm tail for sewing. Embroider a dark brown triangular nose over the center of R1.
Ears
Make 2. Yarn: light brown.
R1: 6 sc in MR (6)
R2: inc ×6 (12)
R3: sc around (12)
R4: sc through both layers across the base (6)
Flatten the ear with the wrong sides together.
Fasten off. Leave a 20 cm tail on each ear.
Front Legs
Make 2. Yarn: cream.
R1: 6 sc in MR (6)
R2: inc ×6 (12)
R3: sc around (12)
R4: dec ×6 (6)
Do not overstuff; one small pinch of fiber is enough.
Fasten off. Leave a 20 cm tail for sewing.
Back Legs
Make 2. Yarn: cream.
R1: 6 sc in MR (6)
R2: inc ×6 (12)
R3: sc around (12)
R4: sc around (12)
R5: dec ×6 (6)
Lightly stuff so the back legs stay round but not taller than the front legs.
Fasten off. Leave a 20 cm tail for sewing.
Tail
Make 1. Yarn: dark brown.
R1: 6 sc in MR (6)
R2: inc ×6 (12)
R3: sc around (12)
R4: dec ×6 (6)
Fasten off. Leave a 20 cm tail for sewing under the rear quills.
Cheek Patches
Make 2. Yarn: soft pink scrap.
R1: 6 sc in MR (6)
R2: inc ×6 (12)
Sl st to first stitch (12)
Fasten off. Leave a 15 cm tail for sewing, or use the yarn ends to tie the patch inside the head before final closure.
Loop Quills / Back Texture
Yarn: medium brown and dark brown.
Each quill: attach yarn to a back body stitch, ch 6, sl st in 2nd ch from hook, sl st in next 4 ch, sl st into the same base stitch. Each loop should measure about 2–2.5 cm.
Quill Row 1: Work across upper back body R6, making 8 quills (8)
Quill Row 2: Work across body R7, making 12 quills (12)
Quill Row 3: Work across body R8, making 16 quills (16)
Quill Row 4: Work across body R9, making 18 quills (18)
Quill Row 5: Work across body R10, making 18 quills (18)
Quill Row 6: Work across body R11, making 16 quills (16)
Quill Row 7: Work across body R12, making 12 quills (12)
Quill Row 8: Work across body R13, making 8 quills (8)
Alternate medium brown and dark brown every few loops. Keep the cream face, lower belly, and leg area free of quills.
Fasten off each color. Weave tails under at least three nearby quill bases.
Mini Hang Tag Photo Prop
Make 1. Yarn: tan or kraft-brown cotton.
R1: ch 8, sc in 2nd ch from hook and next 6 ch (7)
R2: ch 1, turn, sc across (7)
R3: ch 1, turn, sc across (7)
R4: ch 1, turn, sc across (7)
R5: ch 1, turn, sc across (7)
R6: ch 1, turn, sc 2, ch 3, skip 3, sc 2 (7)
Border: sc around the outside edge, placing 3 sc in each lower corner (24)
Fasten off. Leave a 15 cm tail, or attach a separate 10 cm hanging loop through the ch-3 space.
Assembly
- Sew the head to the narrow front of the body, joining across 12–14 stitches so the head does not wobble.
- Check that the body rests flat before tightening the head seam.
- Sew the snout to the center front of the head between R7 and R10.
- Attach the cheek patches two stitches outside the snout and one round below the eyes.
- Sew the ears high on the head between R4 and R6, angled slightly toward the back.
- Pin the front legs under the head seam, then sew each one through at least six body stitches.
- Pin the back legs near body R13, test the sitting angle, and sew them in place.
- Sew the tail to the rear underside before the lowest quill row covers the join.
- Add quills from the crown line toward the tail, trimming only loops longer than 2.5 cm.
- Attach the mini tag prop or set it beside the finished animal for photography.
The finished porcupine has a cream face, compact legs, and a raised brown quill field across the back.
7 Technical Tips
- Failure mode: drifting start line. Put one stitch marker in the first stitch of every round and a second marker on the body’s center back. Quill rows look crooked when the second marker shifts more than two stitches off center.
- Failure mode: soft body collapse. Add stuffing until the body springs back after a 5 mm thumb press. Loose stuffing makes the quills pull the body into a flattened oval.
- Failure mode: visible decrease holes. Use invisible decreases on head R11–R14 and body R14–R18. Standard decreases can leave pale gaps around the cream face.
- Failure mode: locked eyes in the wrong round. Place 8 mm eyes between R6 and R7 before closing the head. A one-round lower placement makes the snout look too long.
- Failure mode: velvet tension creep. When substituting velvet or chenille, raise the hook by 0.5 mm and reduce quill length to 2 cm. Velvet loops grow visually heavier than worsted loops.
- Failure mode: twisted leg angle. Pin all four legs before sewing any one leg fully. The front legs should sit about 2 rounds behind the head seam, while the back legs should align near body R13.
- Failure mode: brown tails showing through cream stitches. Weave quill yarn tails through three separate paths of at least 4 cm each. Cutting tails close to the surface can make dark ends poke through the belly.
Conclusion
This pattern solves the main porcupine problem by separating the smooth face from the textured back. The cream head gives the eyes and snout a clear read, while the looped brown quills create the species marker without fur yarn. Next, make a plain body test in scrap yarn and measure the quill loops before cutting into your final brown shades. Share the finished piece on Pinterest and Instagram with the tag #TinyPorcupine and note your hook size in the caption. This porcupine amigurumi crochet pattern works best when the quills stop before the eye line. How many quill rows did your porcupine need before the back looked full?









