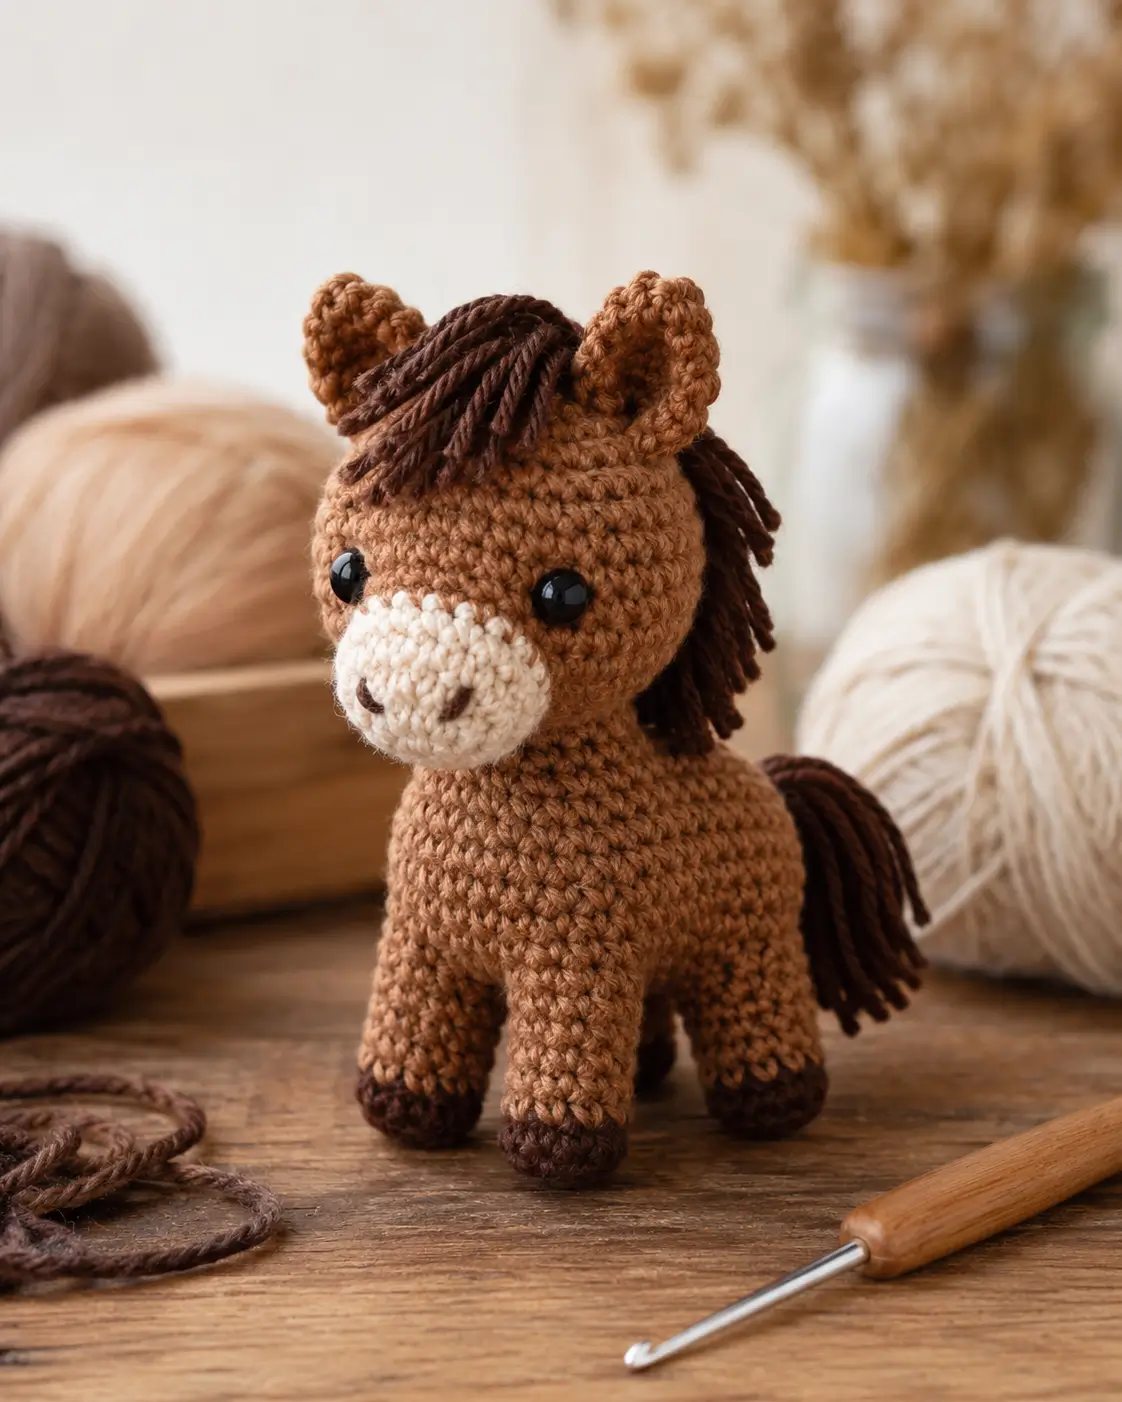
A horse’s muzzle is not a small nose; it is the front weight of the face. This horse amigurumi crochet pattern builds that shape with a raised cream snout, four firm legs, dark hooves, and a strand mane. Use worsted yarn, a 3.5 mm hook, and 10–12 mm eyes for an intermediate standing toy around 22–27 cm. It works well as a farm-animal display piece.
The Design: What Makes This Pony Different
The structure starts with a round head, then adds the muzzle as a separate padded oval. That choice prevents the face from collapsing flat, a common issue in crochet horse pattern work. Four sewn legs support the horizontal body, so the back legs are slightly wider than the front legs for balance. The ears stay narrow and upright because they are flattened after the final round rather than stuffed. This amigurumi horse pattern also separates the strand mane from the head construction. That keeps the forehead fringe adjustable after the eyes and muzzle are fixed. Many makers place the eyes first, then discover the muzzle eats the face space. Here, eye placement comes after the head is half stuffed and before the cream snout is sewn on.
Project Info at a Glance
| Skill Level | Time | Finished Size | Hook | Best For |
|---|---|---|---|---|
| Intermediate | 2–4 hours | About 22–27 cm | 3.5 mm | Standing farm-animal toy |
Ravelry lists a comparable horse at about 21.6 cm sitting and 26.7 cm standing with worsted yarn, while Jess Huff’s larger horse uses a 3.5 mm hook and weight 4 acrylic yarn.
Materials and Tools
Yarn
- Caramel brown — worsted / weight 4 — 70–110 g — acrylic such as Red Heart Super Saver, Big Twist, or Paintbox Simply Aran
- Cream — worsted / weight 4 — 10–25 g — for muzzle and cheek patches
- Dark brown — worsted / weight 4 — 25–35 g — for hooves, mane, tail, and nostrils
Jess Huff’s full-size horse lists 110 g beige, 9 g cream, and 31 g dark brown. Use those figures as the yarn-use range for this scaled design.
Tools
- Hook 3.5 mm
- 10–12 mm black safety eyes
- Polyester stuffing
- Yarn needle
- Locking stitch markers
- Straight pins
- Scissors
- Cardboard strip, 15 cm long, for mane and tail cutting
Abbreviations
MR = magic ring; sc = single crochet; inc = 2 sc in one stitch; dec = invisible decrease over 2 stitches; sl st = slip stitch; ch = chain; BLO = back loop only; FO = fasten off.
An invisible decrease should catch the front loops only of the next two stitches before pulling through, which reduces the visible bar at shaping points.
Pattern — Step by Step
Work in a continuous spiral unless a section states otherwise. This original pattern uses standard amigurumi math: MR starts at 6 sc, each increase round adds 6 stitches, and each decrease round removes 6 stitches.
Head
Yarn: caramel brown
R1: 6 sc in MR (6)
R2: inc ×6 (12)
R3: (sc, inc) ×6 (18)
R4: (2 sc, inc) ×6 (24)
R5: (3 sc, inc) ×6 (30)
R6: (4 sc, inc) ×6 (36)
R7: sc around (36)
R8: sc around (36)
R9: sc around (36)
R10: sc around (36)
R11: sc around (36)
R12: sc around (36)
R13: sc around (36)
R14: (4 sc, dec) ×6 (30)
R15: (3 sc, dec) ×6 (24)
R16: (2 sc, dec) ×6 (18)
R17: (sc, dec) ×6 (12)
R18: dec ×6 (6)
Insert safety eyes between R9 and R10, about 8 stitches apart. Do not add backings until the muzzle position is pinned. Stuff firmly around the cheeks. Add more stuffing behind the eye line, not in the muzzle area.
Fasten off. Weave through the front loops of R18 and pull closed. Leave a 20 cm tail.
Body
Yarn: caramel brown
R1: 6 sc in MR (6)
R2: inc ×6 (12)
R3: (sc, inc) ×6 (18)
R4: (2 sc, inc) ×6 (24)
R5: (3 sc, inc) ×6 (30)
R6: (4 sc, inc) ×6 (36)
R7: sc around (36)
R8: sc around (36)
R9: sc around (36)
R10: sc around (36)
R11: sc around (36)
R12: sc around (36)
R13: sc around (36)
R14: sc around (36)
R15: (4 sc, dec) ×6 (30)
R16: (3 sc, dec) ×6 (24)
R17: (2 sc, dec) ×6 (18)
R18: (sc, dec) ×6 (12)
R19: dec ×6 (6)
Begin stuffing at R15. Shape the body as an oval by packing the center more firmly than the two ends.
Fasten off. Close the hole. Leave a 30 cm tail for anchoring the head if needed.
Front Legs — Make 2
Yarn: dark brown for hoof, then caramel brown
R1: 6 sc in MR (6)
R2: inc ×6 (12)
R3: (sc, inc) ×6 (18)
R4: BLO sc around (18)
R5: sc around (18)
Change to caramel brown.
R6: sc around (18)
R7: sc around (18)
R8: sc around (18)
R9: sc around (18)
R10: sc around (18)
R11: (4 sc, dec) ×3 (15)
R12: sc around (15)
R13: (3 sc, dec) ×3 (12)
Stuff the hoof firmly and the upper leg lightly. A hard upper leg can push the body upward.
Fasten off. Leave a 25 cm tail.
Back Legs — Make 2
Yarn: dark brown for hoof, then caramel brown
R1: 6 sc in MR (6)
R2: inc ×6 (12)
R3: (sc, inc) ×6 (18)
R4: (2 sc, inc) ×6 (24)
R5: BLO sc around (24)
R6: sc around (24)
Change to caramel brown.
R7: (2 sc, dec) ×6 (18)
R8: sc around (18)
R9: sc around (18)
R10: sc around (18)
R11: sc around (18)
R12: sc around (18)
R13: (4 sc, dec) ×3 (15)
R14: (3 sc, dec) ×3 (12)
Stuff the wider hoof firmly. Keep the top 1 cm flatter so it sits cleanly against the body.
Fasten off. Leave a 25 cm tail.
Ears — Make 2
Yarn: caramel brown
R1: 6 sc in MR (6)
R2: (sc, inc) ×3 (9)
R3: sc around (9)
R4: (2 sc, inc) ×3 (12)
R5: sc around (12)
R6: sc around (12)
R7: (2 sc, dec) ×3 (9)
Do not stuff. Flatten the final round, pinch the base, and sew through both layers to form an upright ear.
Fasten off. Leave a 25 cm tail.
Muzzle
Yarn: cream
R1: 6 sc in MR (6)
R2: inc ×6 (12)
R3: (sc, inc) ×6 (18)
R4: (2 sc, inc) ×6 (24)
R5: sc around (24)
R6: sc around (24)
R7: (2 sc, dec) ×6 (18)
Stuff lightly. The muzzle should protrude, but it should not pull the eye line apart.
Fasten off. Leave a 35 cm tail for sewing.
Cheek Patches — Make 2
Yarn: cream
R1: 6 sc in MR (6)
R2: inc ×6 (12)
Sl st to first stitch (12)
Fasten off. Leave a 20 cm tail. These sit partly under the outer edges of the muzzle to widen the face without adding bulk.
Mane
Yarn: dark brown
Cut 36 strands, each 15 cm long. Mark a center line from between the ears down the back of the head and 3 cm onto the neck. Fold one strand in half, pull the loop under a stitch with the hook, pass the loose ends through the loop, and tighten. Place two strands between the ears for the forelock, then add strands down the marked line. Trim the forehead pieces to 4–5 cm.
Tail
Yarn: dark brown
Tail base:
R1: 6 sc in MR (6)
R2: sc around (6)
R3: sc around (6)
R4: sc around (6)
Fasten off. Leave a 25 cm tail.
Cut 14 dark brown strands, each 18 cm long. Pull them through the tail base and fold evenly. Wrap one strand around the base three times, knot, and hide the ends through the tail bundle. Trim to 6–7 cm after assembly.
Nostrils
Yarn: dark brown
Use two short vertical stitches on the cream muzzle, each about 6 mm long. Place them between muzzle R3 and R5, spaced 5–6 stitches apart. Knot inside the head or under the muzzle seam.
Assembly
- Pin the head to the front top third of the body, with the closed end of the head angled slightly downward.
- Sew the head to the body using a firm ladder stitch around a 3 cm contact area.
- Pin the muzzle to the lower front of the head, centered under the eyes.
- Sew the cheek patches under the left and right muzzle edges, then sew the muzzle over them.
- Fix the safety-eye backings after the muzzle sits level and the eyes remain evenly spaced.
- Sew the ears between head R5 and R7, aligned above the eyes and tilted slightly outward.
- Attach the front legs under the chest, 4–5 stitches apart.
- Attach the back legs under the rear body, wider than the front legs by about 1 cm.
- Add the mane from forehead to neck, then sew the tail to the rear body between R8 and R10.
- Embroider nostrils, weave all tails through stuffed sections, and trim the mane and tail evenly.
The finished pony stands with four visible dark hooves, a cream muzzle, upright ears, and a strand mane.
7 Technical Tips
- Failure mode: muzzle drift. Pin the muzzle through at least four points before sewing; a 3 mm shift to one side is very visible on a horse face.
- Failure mode: loose standing legs. Sew each leg through a rectangle of at least 8 body stitches, not one circular edge only; this keeps the toy from rocking.
- Failure mode: visible stuffing through decreases. Use invisible decreases on R14–R18 of the head and R15–R19 of the body; standard decreases can leave pale gaps on dark yarn.
- Failure mode: eyes placed too low. Place eyes before closing the head, between R9 and R10, then pin the muzzle; when the eyes touch the muzzle edge, move them up one round.
- Failure mode: top-heavy mane. Limit the forelock to two or three folded strands; more than six strands on the forehead can pull the head forward.
- Failure mode: uneven hoof height. Count dark brown rounds on every leg; front legs use 5 dark rounds, back legs use 6 dark rounds, so mark the last hoof round before changing color.
- Failure mode: tail yarn slipping out. Anchor the tail bundle through the crocheted tail base and wrap the base at least three times; a single knot can loosen during trimming.
Conclusion
This horse amigurumi crochet pattern is built around the parts that make a horse read correctly at small scale: a raised muzzle, upright ears, firm hooves, and a mane that starts at the forehead rather than only at the neck. Work the body and head to the 36-stitch medium plateau, then test the face placement with pins before locking the eyes. The next practical step is to crochet the head and muzzle first, because that sets the full character scale. Share the finished pony on Pinterest and Instagram with #StandingPonyAmigurumi. Which muzzle width looks more horse-like on your version: 18 stitches after decrease, or a fuller 24-stitch muzzle?









