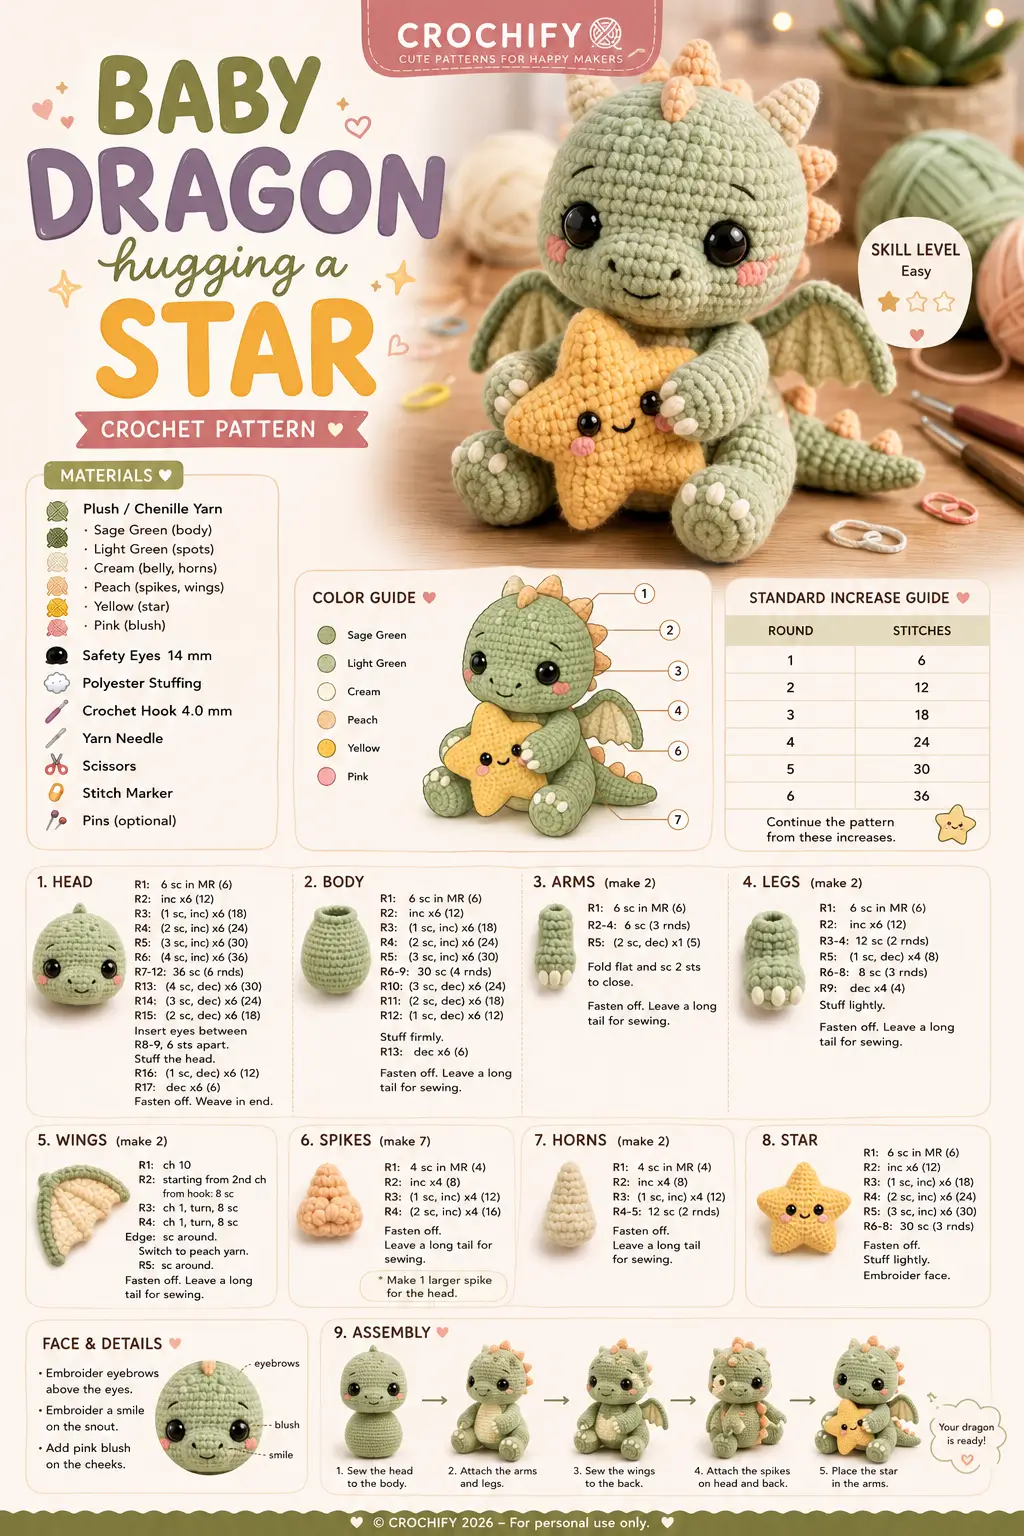
A baby dragon hugging a star needs claws that look gentle before they look sharp; this baby dragon amigurumi crochet pattern builds that grip with short arms, wide feet, and a stuffed star scaled to the chest. You will use plush yarn, a 4.0 mm hook, 14 mm eyes, and easy spiral shaping. The maker gets a 19–20 cm display plush with balanced sitting weight.
The Design: What Makes This Baby Dragon Different
This dragon is built as a seated plush, not a long flying dragon. The body needs a 36-stitch middle so the legs can sit forward while the tail pulls weight backward. That counterweight matters because the star sits in front and can make the toy fall onto its face. The wings are flat row pieces with a darker border, so they read as dragon wings without adding bulk behind the arms. A common error in an amigurumi dragon with wings is sewing the wings too low; that makes them look like side fins. Place them high on the shoulder line. The horns and peach spikes use small cone pieces, while the cheeks stay flat. That contrast keeps the crochet baby dragon pattern readable: round head, sharp ridge, soft star. Not muddy. Not oversized.
Project Info at a Glance
| Skill Level | Time | Finished Size | Hook | Best For |
|---|---|---|---|---|
| Easy / confident beginner | 5–7 hours | 19–20 cm | 4.0 mm | Plush display, nursery shelf, fantasy market table |
Materials and Tools
Yarn
- Sage green — plush / chenille bulky — 120–140 g — Premier Parfait Chunky, Himalaya Dolphin Baby, or Bernat Baby Velvet-style substitute
- Light green — plush / chenille bulky — 15–20 g — spots, optional shading, wing edging
- Cream — plush / chenille bulky — 10–15 g — belly patch, horns, claws
- Peach — plush / chenille bulky — 20–25 g — spikes and wing membrane
- Yellow — plush / chenille bulky — 35–45 g — star
- Pink — plush / chenille bulky or embroidery yarn — 2–4 g — cheek patches
Tools
- Hook 4.0 mm
- Safety eyes 14 mm
- Polyester stuffing
- Yarn needle
- Locking stitch markers
- Pins
- Scissors
- Black embroidery thread
Abbreviations
MR = magic ring; sc = single crochet; inc = increase; dec = decrease; sl st = slip stitch; ch = chain; BLO = back loop only; FLO = front loop only; st = stitch; R = round or row.
For invisible decrease, insert the hook through the front loops of the next two stitches, yarn over, pull through both front loops, then finish the single crochet.
Pattern — Step by Step
Work in a continuous spiral unless a part says “rows.” Use a stitch marker at the first stitch of every round.
Head
Yarn: sage green
R1: 6 sc in MR (6)
R2: inc ×6 (12)
R3: (1 sc, inc) ×6 (18)
R4: (2 sc, inc) ×6 (24)
R5: (3 sc, inc) ×6 (30)
R6: (4 sc, inc) ×6 (36)
R7–R13: sc around (36)
R14: (4 sc, dec) ×6 (30)
R15: (3 sc, dec) ×6 (24)
R16: (2 sc, dec) ×6 (18)
Insert 14 mm safety eyes between R9 and R10, 7 stitches apart. Stuff the head firmly before the opening becomes small.
R17: (1 sc, dec) ×6 (12)
R18: dec ×6 (6)
Fasten off. Close the opening and weave in the end.
Body
Yarn: sage green
R1: 6 sc in MR (6)
R2: inc ×6 (12)
R3: (1 sc, inc) ×6 (18)
R4: (2 sc, inc) ×6 (24)
R5: (3 sc, inc) ×6 (30)
R6: (4 sc, inc) ×6 (36)
R7–R11: sc around (36)
R12: (4 sc, dec) ×6 (30)
R13: (3 sc, dec) ×6 (24)
R14: (2 sc, dec) ×6 (18)
Stuff the lower body more firmly than the neck so the dragon sits upright.
R15: (1 sc, dec) ×6 (12)
R16: dec ×6 (6)
Fasten off. Leave a 25 cm tail for sewing to the head.
Arms / Front Legs Make 2
Yarn: sage green
R1: 6 sc in MR (6)
R2: inc ×6 (12)
R3–R6: sc around (12)
R7: dec ×6 (6)
Stuff only the lower half. Flatten the last round so the arms can wrap the star.
Fasten off. Leave a 25 cm tail.
Back Legs Make 2
Yarn: sage green
R1: 6 sc in MR (6)
R2: inc ×6 (12)
R3: (1 sc, inc) ×6 (18)
R4–R5: sc around (18)
R6: (1 sc, dec) ×6 (12)
R7: dec ×6 (6)
Stuff the front of each foot firmly and leave the ankle soft for a seated angle.
Fasten off. Leave a 30 cm tail.
Belly Patch
Yarn: cream
Ch 7.
R1: starting in 2nd ch from hook, inc, 4 sc, 4 sc in last ch; work along other side, 4 sc, inc (16)
R2: inc ×2, 4 sc, inc ×4, 4 sc, inc ×2 (24)
R3: sc around (24)
Fasten off. Leave a 35 cm tail for sewing flat to the body.
Wings Make 2
Yarn: peach for membrane, sage green for border
Ch 11 with peach.
Row 1: starting in 2nd ch from hook, 10 sc (10)
Row 2: ch 1, turn, 9 sc (9)
Row 3: ch 1, turn, 8 sc (8)
Row 4: ch 1, turn, 7 sc (7)
Row 5: ch 1, turn, 6 sc (6)
Row 6: ch 1, turn, 5 sc (5)
Change to sage green.
Border: sc evenly around the wing edge, placing 2 sc into each lower corner. Sl st to join.
Fasten off. Leave a 30 cm tail.
Horns Make 2
Yarn: cream
R1: 6 sc in MR (6)
R2–R3: sc around (6)
R4: inc ×6 (12)
R5–R6: sc around (12)
Do not overstuff. Pinch the top slightly while sewing so the horn reads as tapered.
Fasten off. Leave a 20 cm tail.
Back Spikes Make 7
Yarn: peach
R1: 6 sc in MR (6)
R2: sc around (6)
R3: inc ×6 (12)
R4: sc around (12)
Make one extra spike with R5 sc around (12) for the center of the head.
Fasten off. Leave a 20 cm tail on each spike.
Tail
Yarn: sage green
R1: 6 sc in MR (6)
R2–R4: sc around (6)
R5: inc ×6 (12)
R6–R8: sc around (12)
R9: (1 sc, inc) ×6 (18)
R10–R12: sc around (18)
Stuff the base only. Keep the tip flexible so it curves behind the body.
Fasten off. Leave a 35 cm tail.
Snout Pad
Yarn: sage green
R1: 6 sc in MR (6)
R2: inc ×6 (12)
R3: sc around (12)
Flatten into a shallow oval. Fasten off with a 20 cm tail. This sits below the eyes and carries the embroidered smile.
Cheek Patches Make 2
Yarn: pink
R1: 6 sc in MR (6)
R2: inc ×6 (12)
Sl st to close (12)
Fasten off. Leave a 15 cm tail for sewing.
Claw Stitches Make 10
Yarn: cream
For each claw, ch 3.
Row 1: starting in 2nd ch from hook, sc, sl st (2)
Fasten off with two short tails. Make 3 claws for each back foot and 2 claws for each hand.
Star Front Panel
Yarn: yellow
R1: 6 sc in MR (6)
R2: inc ×6 (12)
R3: (1 sc, inc) ×6 (18)
R4: (2 sc, inc) ×6 (24)
R5: (3 sc, inc) ×6 (30)
Point 1 over next 6 stitches:
Row 1: 6 sc (6)
Row 2: ch 1, turn, dec, 2 sc, dec (4)
Row 3: ch 1, turn, dec ×2 (2)
Row 4: ch 1, turn, dec (1)
Repeat Point 1 four more times around the 30-stitch circle. Fasten off.
Star Back Panel
Yarn: yellow
Repeat the Star Front Panel exactly. Do not embroider the face on this piece.
Star Assembly and Face
Yarn: yellow, black, pink
Hold both star panels wrong sides together. Join yellow yarn at the side of one point. Sc around the outside edge through both panels, placing 2 sc at each point tip. Stuff lightly before closing the final side. Sl st to join.
Embroider two small black eyes between the upper side points. Add a curved smile with black thread and two pink cheek stitches.
Assembly
- Sew the head to the body with the head centered over the 36-stitch body plateau; pass through both pieces twice around the neck line.
- Attach the cream belly patch to the front of the body from R5 to R12, keeping the lower edge above the leg line.
- Sew the snout pad below the eyes, then embroider two nostril dots and a shallow smile.
- Attach the cheek patches one round below the eyes and slightly outside the snout edges.
- Sew the back legs to the lower body at a forward angle, with 3 cream claws on each foot.
- Sew the arms to the upper body, angled inward so they can hold the star, then add 2 cream claws to each hand.
- Attach the horns to the top of the head between R3 and R5, spaced 4 stitches apart.
- Sew the peach spikes in a center line: one large head spike, two smaller head/back spikes, two body spikes, and two tail spikes.
- Attach wings to the upper back at shoulder height, one on each side of the spike line, with the peach membrane facing forward.
- Place the star between the arms and secure it with two hidden stitches through each hand.
The finished baby dragon sits with the star held against the belly and the tail acting as the rear support.
7 Technical Tips
- Stitch marker drift: Plush yarn hides the first stitch, so the marker can shift one stitch right every few rounds. Move the marker only after finishing the first stitch of the new round.
- Stuffing firmness: A loose body collapses under the star’s front weight. Pack the body firmly through R11, then soften the neck area so the head sits cleanly.
- Invisible decrease gaps: Chenille fibers can open holes on R14–R18 of the head. Work each decrease through front loops only and pull the yarn down, not sideways.
- Eye placement timing: Safety eye backs must go on before R17 of the head. Place 14 mm eyes between R9 and R10 with 7 stitches between posts.
- Velvet tension: Tight hands can strip chenille at the magic ring. Use one even pull to close the MR, then stop before the core thread shows.
- Pinning wings: Uneven wings make the dragon look twisted from the front. Pin both wing tops at the same body round before sewing either one.
- Tail weaving: A short tail knot can pop through plush stitches after handling. Weave every sewing end through at least 4 cm of nearby stitches before trimming.
Conclusion
This baby dragon amigurumi crochet pattern works because the design treats the star as part of the structure, not an afterthought. The arms are short, the legs are weighted forward, the tail supports the back, and the wings stay high enough to frame the head. Make one test head first to confirm the 14 mm eyes suit your chenille yarn. After assembly, photograph the dragon from a low front angle so the horns, cheeks, claws, and star all read clearly. Share the finished plush on Pinterest and Instagram with #BabyDragonStarAmigurumi. Which detail should dominate your version: taller peach spikes, larger cream horns, or a wider yellow star?









