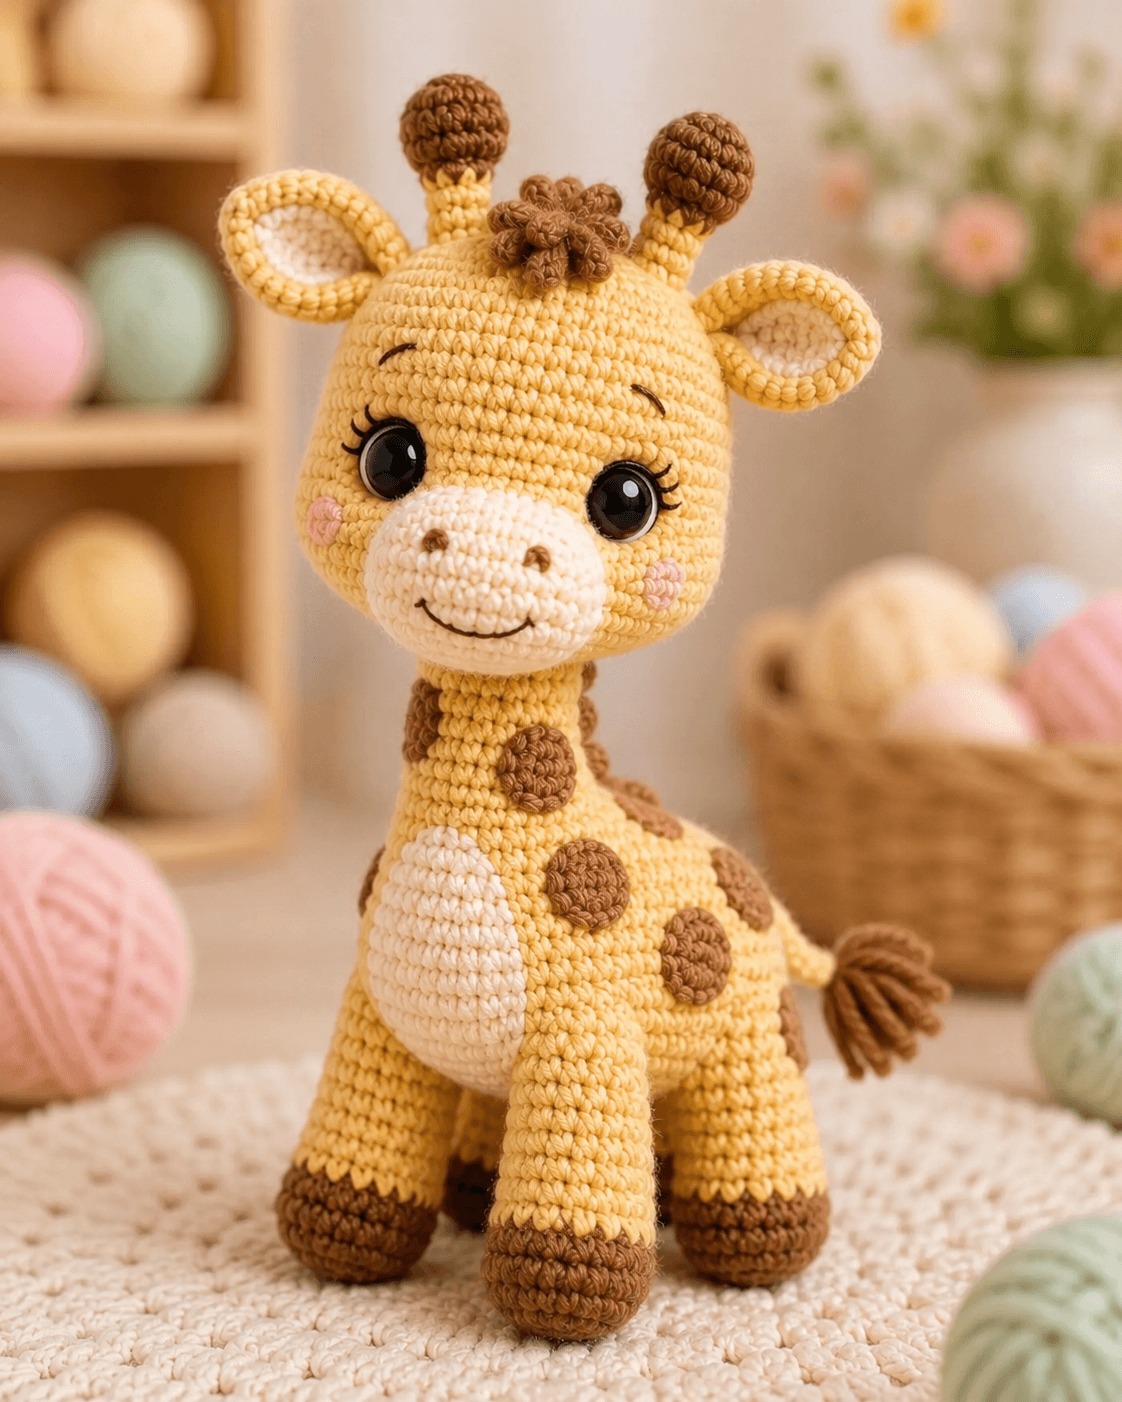
A giraffe’s ossicones are not ears; Gigi needs both. This giraffe amigurumi crochet pattern uses plush chenille yarn, a 4.0 mm hook, and 12 mm safety eyes to make a 24–25 cm sitting toy at intermediate level. You get a stable safari animal with flat spots, a cream snout, pink cheeks, and a tail that shows the back view clearly.
The Design: What Makes Gigi Different
Gigi is built as a sitting giraffe, not a long standing animal. The head uses a 36-stitch plateau so the 12 mm eyes stay large without forcing a 70-stitch sphere. The body stays pear-shaped: wider through the hips, narrowed at the top, and weighted by four small legs. That keeps the long-neck impression while the toy still sits on a shelf. The ears are flattened ovals with cream inserts because giraffe ears need width beside the ossicones. The horns stay narrow at 6 stitches after the bulb, which prevents a top-heavy crown. A common mistake in a crochet giraffe pattern is placing spots before assembly. The maker loses the side profile, then the giraffe crochet toy looks striped from the front and blank from the back.
Project Info at a Glance
| Skill Level | Time | Finished Size | Hook | Best For |
|---|---|---|---|---|
| Intermediate | 4–6 hours | 24–25 cm | 4.0 mm | Safari set, nursery shelf, plush display |
Materials and Tools
Yarn
- Yellow — plush chenille / chunky velvet — 80 g — Premier Parfait Chunky, Himalaya Dolphin Baby, or similar
- Cream — matching plush chenille — 12 g — same brand family, or Alize Softy for muzzle texture
- Brown — matching plush chenille — 20 g — same brand family
- Light pink — scrap yarn — 2 g — matching yarn or smooth DK cotton for cheeks
Tools
- Hook 4.0 mm
- Safety eyes 12 mm
- Polyester stuffing
- Yarn needle
- Stitch markers
- Pins
- Scissors
- Brown embroidery thread
For children under 3, embroider the eyes instead of using safety eyes.
Abbreviations
MR = magic ring; sc = single crochet; inc = increase; dec = decrease; sl st = slip stitch; ch = chain; BLO = back loop only; st = stitch; FO = fasten off. Invisible decrease is worked through front loops only; it removes the open ladder that appears when head and body decreases are visible.
Pattern — Step by Step
Continuous spiral unless noted. Counts appear at the end of every round.
Head
Yarn: yellow
R1: 6 sc in MR (6)
R2: inc ×6 (12)
R3: (sc, inc) ×6 (18)
R4: (2 sc, inc) ×6 (24)
R5: (3 sc, inc) ×6 (30)
R6: (4 sc, inc) ×6 (36)
R7–R13: sc around (36)
R14: (4 sc, dec) ×6 (30)
R15: (3 sc, dec) ×6 (24)
R16: (2 sc, dec) ×6 (18)
Place 12 mm eyes between R9 and R10, about 8–9 stitches apart. Begin stuffing firmly.
R17: (sc, dec) ×6 (12)
R18: dec ×6 (6)
Fasten off. Leave a 20 cm tail and close the final hole.
Snout
Yarn: cream
R1: 6 sc in MR (6)
R2: inc ×6 (12)
R3: (sc, inc) ×6 (18)
R4: sc around (18)
Stuff lightly so the snout stays flat against the face.
Fasten off. Leave a 30 cm tail for sewing.
Body
Yarn: yellow
R1: 6 sc in MR (6)
R2: inc ×6 (12)
R3: (sc, inc) ×6 (18)
R4: (2 sc, inc) ×6 (24)
R5: (3 sc, inc) ×6 (30)
R6: (4 sc, inc) ×6 (36)
R7–R11: sc around (36)
R12: (4 sc, dec) ×6 (30)
R13: sc around (30)
R14: (3 sc, dec) ×6 (24)
R15: (2 sc, dec) ×6 (18)
Stuff the lower body firmly, then add less stuffing near the neck opening.
R16: (sc, dec) ×6 (12)
R17: dec ×6 (6)
Fasten off. Leave a 40 cm tail for attaching the head.
Front Legs
Make 2. Yarn: brown, then yellow.
R1: With brown, 6 sc in MR (6)
R2: inc ×6 (12)
R3–R4: sc around (12)
R5: Change to yellow, sc around (12)
R6–R10: sc around (12)
R11: dec ×6 (6)
Stuff the hoof only; leave the upper leg slightly flat.
Fasten off. Leave a 25 cm tail.
Back Legs
Make 2. Yarn: brown, then yellow.
R1: With brown, 6 sc in MR (6)
R2: inc ×6 (12)
R3–R5: sc around (12)
R6: Change to yellow, sc around (12)
R7–R9: sc around (12)
R10: dec ×6 (6)
Stuff more firmly than the front legs so the toy can sit.
Fasten off. Leave a 30 cm tail.
Ears
Make 2. Yarn: yellow.
R1: 6 sc in MR (6)
R2: inc ×6 (12)
R3: (sc, inc) ×6 (18)
R4–R5: sc around (18)
R6: (sc, dec) ×6 (12)
R7: dec ×6 (6)
Do not stuff. Flatten each ear and pinch the base before sewing.
Fasten off. Leave a 30 cm tail.
Inner Ear Patches
Make 2. Yarn: cream.
R1: 6 sc in MR (6)
R2: inc ×6 (12)
Fasten off. Leave a 20 cm tail and sew one patch inside each ear.
Horns / Ossicones
Make 2. Yarn: brown, then yellow.
R1: With brown, 6 sc in MR (6)
R2: inc ×6 (12)
R3–R4: sc around (12)
R5: dec ×6 (6)
R6: Change to yellow, sc around (6)
R7–R9: sc around (6)
Stuff the brown bulb only. Keep the yellow base narrow.
Fasten off. Leave a 25 cm tail.
Hair Tuft
Yarn: brown.
Ch 3, sl st into the first ch to form a ring.
Loop 1: ch 5, sl st into ring.
Loop 2–Loop 6: repeat ch 5, sl st into ring.
Pull the center tight with the yarn tail.
Fasten off. Leave a 25 cm tail.
Belly Patch
Yarn: cream.
R1: 6 sc in MR (6)
R2: inc ×6 (12)
R3: (sc, inc) ×6 (18)
R4: (2 sc, inc) ×6 (24)
R5: (3 sc, inc) ×6 (30)
Fasten off. Leave a 35 cm tail. Shape it into an oval while pinning.
Spots
Make 6–8. Yarn: brown.
Small spot:
R1: 6 sc in MR (6)
R2: inc ×6 (12)
Fasten off. Leave a 20 cm tail.
Large spot:
R1: 6 sc in MR (6)
R2: inc ×6 (12)
R3: (sc, inc) ×6 (18)
Fasten off. Leave a 25 cm tail.
Cheek Patches
Make 2. Yarn: light pink.
R1: 6 sc in MR (6)
Sl st to the first stitch (6)
Fasten off. Leave a 15 cm tail.
Tail and Tail Tuft
Yarn: yellow and brown.
With yellow, ch 11.
From second ch from hook, sc across (10)
Fasten off. Leave a 25 cm tail.
Cut 5 brown strands, each 8 cm long. Knot them to the tail end and trim to 2 cm.
Face Embroidery
Yarn: brown embroidery thread.
Embroider two nostrils on the snout, each 2 stitches long.
Add a shallow smile under the nostrils.
Add one curved eyebrow above each eye.
Add three short eyelashes at the outer edge of each eye.
Sew the cheek patches beside the snout, below the eyes.
Assembly
- Sew the head to the body first, using the body tail and adding stuffing at the join as needed.
- Sew the snout to the lower front of the head, centered between the eyes.
- Attach the belly patch to the front of the body, with its top edge just below the neck join.
- Sew the ears to the sides of the head between R6 and R9, then fold each base forward.
- Sew the horns to the top of the head between the ears, spaced about 5 stitches apart.
- Attach the hair tuft between the horns, slightly forward of the crown.
- Sew the front legs to the lower front body, angled down and slightly outward.
- Sew the back legs to the base, testing the sitting balance before final stitches.
- Attach the tail at the back of the body between R8 and R10.
- Pin all spots, then sew them after checking the front, side, and back views.
Gigi is complete when the toy sits without tipping and all yarn tails are buried.
7 Technical Tips
- Marker drift: Put the marker in the first stitch of every round, not in the loop on the hook. If it moves more than 2 stitches from back center by R10, add one offset sc before the next round.
- Neck collapse: The failure mode is a head that tilts forward after assembly. Pack the upper body until a thumb press rebounds in 1–2 seconds.
- Eye skew: Insert both 12 mm eyes before closing the head. If one eye sits even 1 round higher, the snout will look crooked after sewing.
- Visible decrease holes: Use invisible decreases on R14–R18 of the head and R12–R17 of the body. Standard decreases leave larger gaps in chenille yarn.
- Chenille worming: Keep tails at least 20 cm long because plush fibers can slip during sewing. Knot only inside the piece, then bury the tail through 3 cm of stuffing.
- Horn lean: Pin the horns with 5 stitches between their bases before sewing. A 1-stitch shift at the base becomes a visible tilt at the brown bulb.
- Spot crowding: Leave at least 1.5 cm between brown spots on the body. If the spots touch, the side profile reads as one stripe instead of separate giraffe patches.
Conclusion
Use the finished sample as a fit check before writing the pattern card: head stable, ears level, horns upright, tail centered, and spots balanced on both sides. This giraffe amigurumi crochet pattern works best when the face is placed before final stuffing, because the snout and cheek patches set the scale for every other feature. Next, crochet one test spot in brown and pin all remaining spots before sewing any of them down. Share the finished Gigi on Pinterest and Instagram with #GigiTheGiraffe so the placement method stays visible. Which spot layout fits Gigi better: one large shoulder spot or three smaller spots down the hip?









