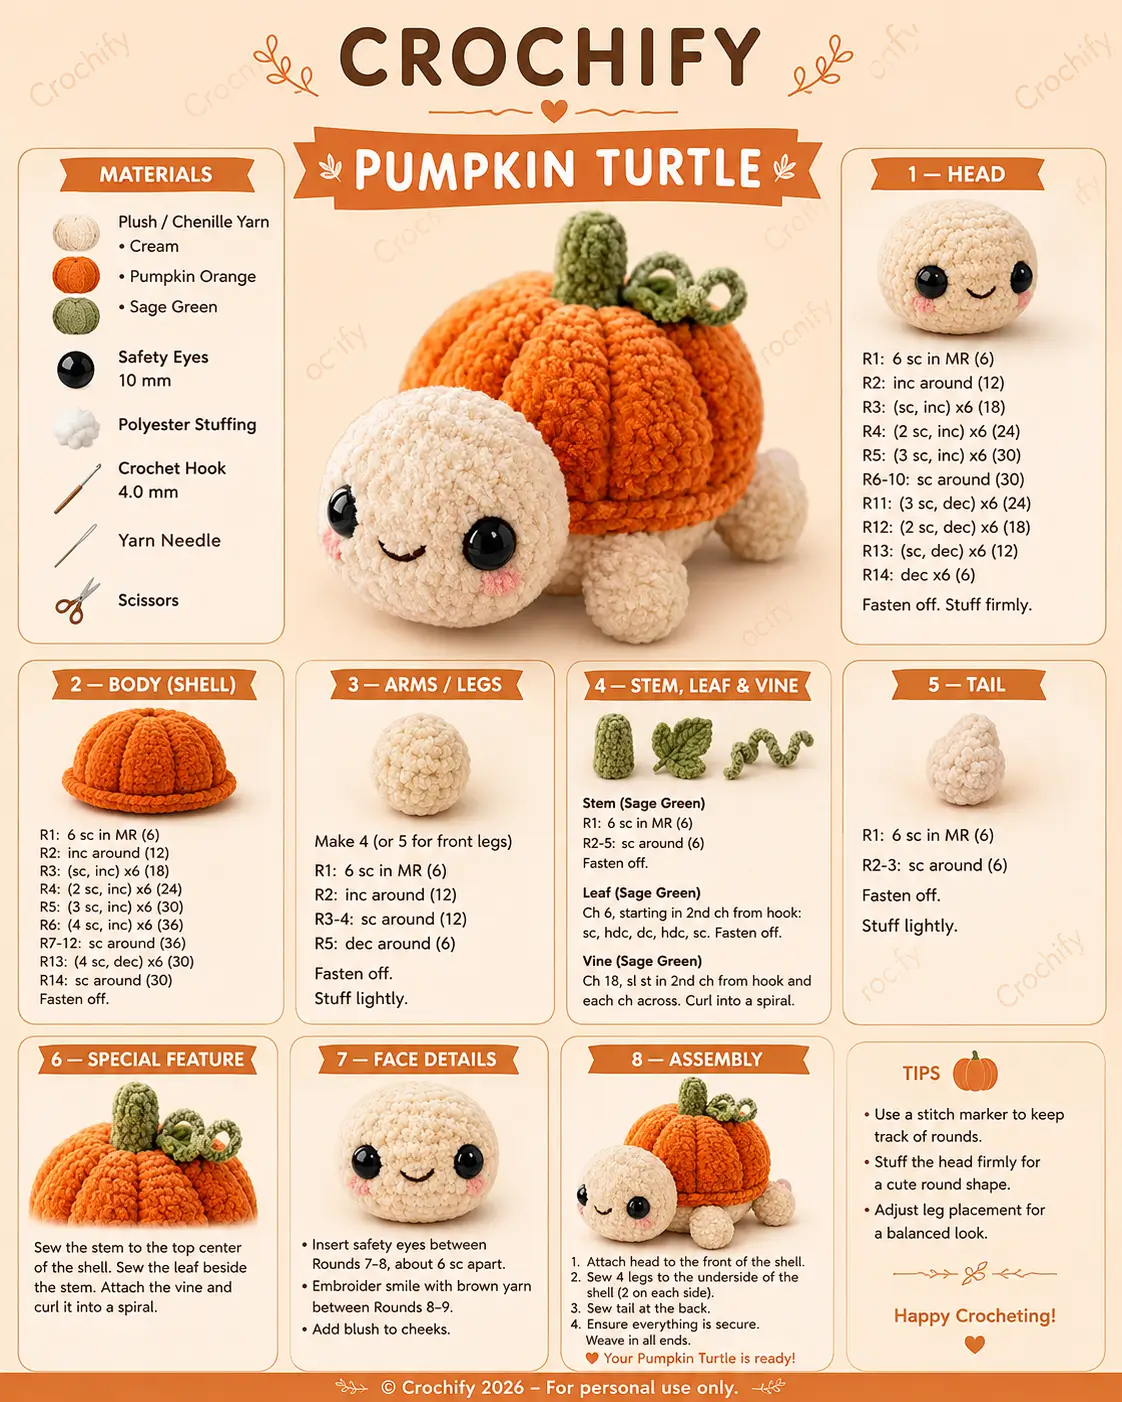
A turtle shell should be oval, but this pumpkin turtle has to carry eight squash ridges without tipping forward. This pumpkin turtle amigurumi uses plush chenille yarn, a 4.0 mm hook, 10 mm safety eyes, and a medium 36-stitch shell. You will make separate limbs, a rounded head, stem, leaf, vine, and cheeks at an advanced-beginner level. It works as a fall market sample because the silhouette reads instantly from the side.
The Design: What Makes This Pumpkin Turtle Different
This design puts the pumpkin mass behind the head instead of stacking it above the body. That choice keeps the turtle low, stable, and readable from a table display. The shell uses a 36-stitch plateau, not a large 42-stitch dome, because the head and legs are chunky enough to balance the visual weight. Smaller parts matter here. A normal turtle can use smooth flippers, but a pumpkin turtle crochet pattern needs contrast between round cream limbs and vertical orange ridges. The stem, leaf, and vine also pull the viewer’s eye upward, so they stay small. Oversized vines make the shell look like a pumpkin hat, not a shell. Many fall amigurumi pattern versions miss that proportion issue; the maker adds seasonal parts but loses the turtle stance.
Project Info at a Glance
| Skill Level | Time | Finished Size | Hook | Best For |
|---|---|---|---|---|
| Advanced beginner | 2 short sessions | 8–10 cm photo estimate | 4.0 mm | Fall decor, craft tables, pattern photography |
Materials and Tools
Yarn
- Pumpkin orange — super bulky chenille — buy 1 × 100 g skein; estimated use 30–40 g — Premier Parfait Chunky, Himalaya Dolphin Baby, or equivalent
- Cream — super bulky chenille — buy 1 × 100 g skein; estimated use 25–35 g — same brand family as orange
- Sage green — super bulky chenille — 10–15 g scrap allowance — matching plush yarn
- Soft pink — DK cotton or embroidery yarn — under 2 g — for cheek patches or stitched blush
- Brown or black embroidery thread — under 1 g — for the smile
Tools
- Hook 4.0 mm
- Safety eyes 10 mm
- Polyester stuffing
- Yarn needle
- Embroidery needle
- Locking stitch marker
- Pins
- Scissors
Abbreviations
MR = magic ring / sc = single crochet / inc = increase / dec = decrease / sl st = slip stitch / ch = chain / BLO = back loop only / hdc = half double crochet / dc = double crochet / FO = fasten off.
For an invisible decrease, insert the hook through the front loops of the next two stitches, yarn over, pull through both front loops, yarn over again, and pull through the remaining loops; this removes a visible lump from plush fabric.
Pattern — Step by Step
Continuous spiral unless noted. The photo reference uses a 30-stitch head and a 36-stitch shell; this written version keeps that proportion while closing both major pieces cleanly for sewing.
Head — Make 1
Yarn: cream
R1: 6 sc in MR (6)
R2: inc ×6 (12)
R3: (sc, inc) ×6 (18)
R4: (2 sc, inc) ×6 (24)
R5: (3 sc, inc) ×6 (30)
R6: sc around (30)
R7: sc around (30)
R8: sc around (30)
R9: sc around (30)
R10: (3 sc, dec) ×6 (24)
R11: (2 sc, dec) ×6 (18)
R12: (sc, dec) ×6 (12)
R13: dec ×6 (6)
Insert eyes between R7 and R8, about 7 stitches apart, before closing. Stuff firmly enough that the face stays round but not so firmly that stitches stretch open.
Fasten off. Leave a 25 cm tail for sewing.
Body / Pumpkin Shell — Make 1
Yarn: pumpkin orange
R1: 6 sc in MR (6)
R2: inc ×6 (12)
R3: (sc, inc) ×6 (18)
R4: (2 sc, inc) ×6 (24)
R5: (3 sc, inc) ×6 (30)
R6: (4 sc, inc) ×6 (36)
R7: sc around (36)
R8: sc around (36)
R9: sc around (36)
R10: sc around (36)
R11: sc around (36)
R12: (4 sc, dec) ×6 (30)
R13: sc around (30)
R14: (3 sc, dec) ×6 (24)
R15: (2 sc, dec) ×6 (18)
R16: (sc, dec) ×6 (12)
R17: dec ×6 (6)
Stuff the shell before R15. Keep the base flat by pressing the bottom against the table after each stuffing layer.
Fasten off. Leave a 20 cm tail and close the final opening.
Front Legs / Arms — Make 2
Yarn: cream
R1: 6 sc in MR (6)
R2: inc ×6 (12)
R3: sc around (12)
R4: sc around (12)
R5: dec ×6 (6)
Stuff lightly. The front legs should stay rounded, not spherical.
Fasten off. Leave a 20 cm tail for sewing.
Back Legs — Make 2
Yarn: cream
R1: 6 sc in MR (6)
R2: inc ×6 (12)
R3: sc around (12)
R4: dec ×6 (6)
Stuff only the front half of each back leg so the underside sits flat.
Fasten off. Leave a 20 cm tail for sewing.
Tail — Make 1
Yarn: cream
R1: 6 sc in MR (6)
R2: sc around (6)
R3: sc around (6)
Stuff with a pinch of fiberfill only. A heavy tail lifts the rear shell edge.
Fasten off. Leave a 15 cm tail.
Pumpkin Ridges — Make 6
Yarn: pumpkin orange
Ch 14.
Row 1: Starting in 2nd ch from hook, sl st in each ch across (13)
Fasten off with long tails on both ends. Pin each ridge from the shell top center down to the lower edge. Place three ridges on the left side and three on the right side, leaving a clear front gap for the head.
Stem — Make 1
Yarn: sage green
R1: 6 sc in MR (6)
R2: sc around (6)
R3: sc around (6)
R4: sc around (6)
R5: sc around (6)
Do not overstuff. A narrow stem should stand upright without widening the shell top.
Fasten off. Leave a 20 cm tail.
Leaf — Make 1
Yarn: sage green
Ch 7.
Row 1: Starting in 2nd ch from hook, sc, hdc, dc, dc, hdc, sc (6). Turn to work along the other side of the chain: sc, hdc, dc, dc, hdc, sc (12 total side stitches). Sl st into the base.
Fasten off. Leave a 15 cm tail. Pin beside the stem before sewing.
Curled Vines — Make 2
Yarn: sage green
Ch 18.
Row 1: Starting in 2nd ch from hook, 2 sc in each ch across (34)
The strip will curl as the stitches crowd the chain. Fasten off and leave a 15 cm tail on each vine.
Cheek Patches — Make 2
Yarn: soft pink
R1: 6 sc in MR (6)
Sl st to first sc.
Pull the center closed and flatten. Fasten off with a 12 cm tail. Sew one cheek under each eye between R8 and R9.
Face Details
Yarn/thread: brown or black embroidery thread
Place the smile between the eyes, centered over R9. Work one shallow U-shaped stitch across 3 stitches, then anchor each corner with one tiny vertical stitch. Keep the smile low enough that the cheeks do not crowd it.
Assembly
- Sew the head to the front of the shell across a 7-stitch-wide contact area, with the lower edge of the head touching the table line.
- Attach the front legs under the shell at the front-left and front-right positions, one round behind the head join.
- Sew the back legs under the shell at the rear-left and rear-right positions, angled outward by about 30 degrees.
- Add the tail at the center back, aligned with the lower third of the shell.
- Pin all six pumpkin ridges before sewing any ridge down.
- Sew the ridge cords from top center to lower shell edge, then bury both tails inside the body.
- Attach the stem at the top center of the pumpkin shell.
- Sew the leaf beside the stem, with the pointed end facing slightly forward.
- Stitch both curled vines at the stem base, one curling left and one curling right.
- Sew the cheek patches below the eyes, then check that the turtle sits without rolling backward.
The finished turtle should sit on four cream limbs with the pumpkin shell centered behind the head.
7 Technical Tips
- A skipped stitch-marker move creates a diagonal shell seam in plush yarn. Move the marker after every round and count the final stitch before starting the next round.
- Understuffing the head causes flat eye placement. Add stuffing until the head measures about 5 cm across before closing R13.
- Overstuffing the shell makes the ridges disappear. Fill the shell to medium firmness, then press each ridge path with your thumb before sewing.
- Late eye placement can split the face symmetry. Insert 10 mm safety eyes between R7 and R8 while the head opening still fits two fingers.
- Loose velvet tension creates holes around decreases. Work invisible decreases at the same height as normal sc stitches and pull the working yarn snug after each decrease.
- Unpinned legs cause a rocking base. Pin all four limbs first, then test the turtle on a flat surface before sewing through the final round of each leg.
- Short woven tails can slip out of chenille. Weave each tail through at least 4 cm of fabric, reverse direction once, then trim only after the tail disappears inside the plush.
Conclusion
The construction works because the turtle stays low while the shell carries the seasonal shape. Keep the head round, the shell medium-firm, and the vine pieces small. That balance prevents the pumpkin top from overpowering the animal form. For the next sample, make one version with 8 mm eyes and one with 10 mm eyes, then photograph both from the side to compare expression and scale. Save the finished pumpkin turtle amigurumi to Pinterest and post the side-view assembly shot on Instagram with #PumpkinTurtleAmigurumi. Which shell detail matters more for this turtle: deeper orange ridges or a taller sage stem?









