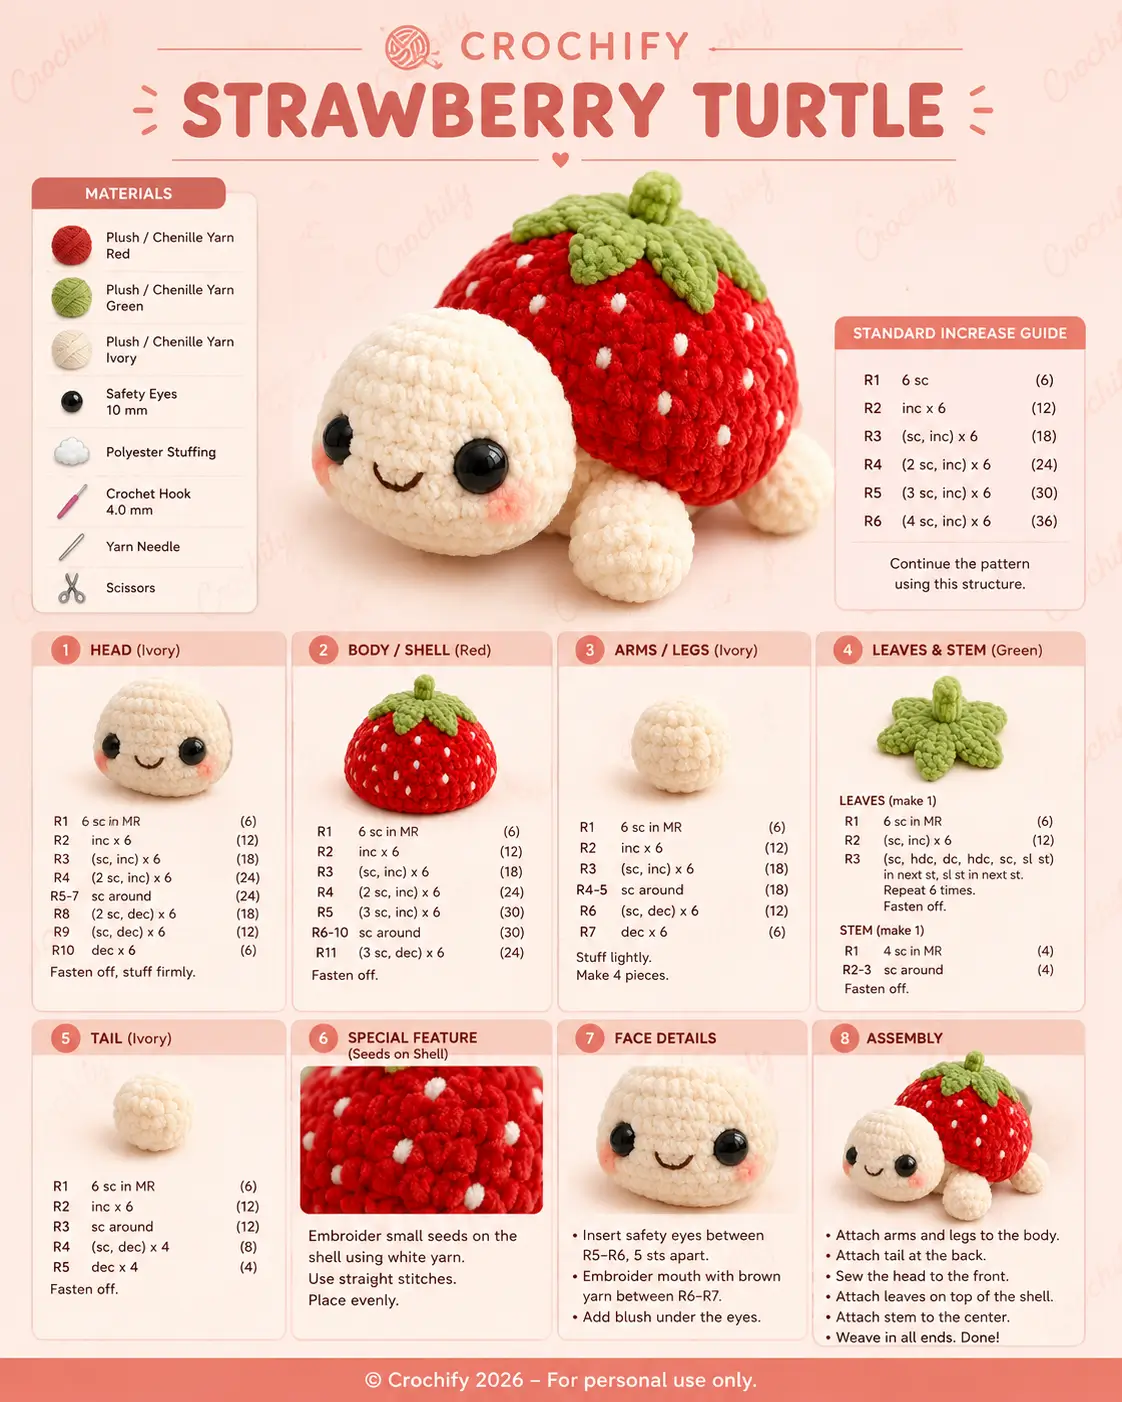
A strawberry turtle has a shell that must read as fruit before it reads as armor. This strawberry turtle amigurumi crochet pattern uses chenille yarn, a 4 mm hook, and 10 mm eyes to make a 6 cm tall advanced-beginner plush. Build it when you need a market-table design with a clear silhouette and small, repeatable parts.
The Design: What Makes Strawberry Turtle Different
You are making a turtle whose shell has to carry two jobs: body structure and strawberry identity. The red dome is worked to a 30-stitch plateau because a small plush needs width before height; a taller dome turns into a mushroom shape. Leaf points sit on top instead of being sewn as flat felt, so the silhouette stays readable from above. A maker who treats the four legs as equal balls often creates a rolling plush, so the back legs need slightly more depth than the front pair. Many strawberry turtle crochet pattern posts show the berry shell but miss cheek placement and tail scale. This version keeps the no-wobble base, the crochet fruit turtle signal, and the face proportions in one repeatable draft.
Project Info at a Glance
| Skill Level | Time | Finished Size | Hook | Best For |
|---|---|---|---|---|
| Advanced beginner | 90–120 minutes | About 6 cm tall | 4 mm | Market samples, desk plush, fruit-turtle sets |
Materials and Tools
Yarn
- Red plush / chenille yarn — bulky or plush — 12 g — Himalaya Dolphin Baby, Premier Parfait Chunky, or similar
- Ivory plush / chenille yarn — bulky or plush — 12 g — same brand family as red
- Green plush / chenille yarn — bulky or plush — 5 g — same brand family as red
- White yarn scrap — DK, worsted, or split chenille strand — under 1 g — for seeds
- Brown embroidery yarn — cotton or acrylic scrap — under 1 g — for mouth
- Pink yarn or embroidery floss — scrap — for cheek patches or blush
Tools
- Hook 4 mm
- Safety eyes 10 mm
- Polyester stuffing
- Yarn needle
- Stitch markers
- Scissors
- Pins for assembly
Abbreviations
MR = magic ring; sc = single crochet; inc = increase; dec = decrease; sl st = slip stitch; ch = chain; BLO = back loop only; FLO = front loop only; hdc = half double crochet; dc = double crochet. Invisible decrease means working the decrease through the front loops only so the surface does not show a hard gap.
Pattern — Step by Step
Continuous spiral unless a round says otherwise. The shell, head, and body math uses a small 30-stitch plateau, matching the scale rule for this photo-style plush.
Head — Make 1
Yarn: ivory
R1: 6 sc in MR (6)
R2: inc ×6 (12)
R3: (sc, inc) ×6 (18)
R4: (2 sc, inc) ×6 (24)
R5: (3 sc, inc) ×6 (30)
R6–R8: sc around (30)
R9: (3 sc, dec) ×6 (24)
R10: (2 sc, dec) ×6 (18)
R11: (sc, dec) ×6 (12)
R12: dec ×6 (6)
Insert 10 mm eyes between R6 and R7, 5 visible stitches apart, before closing. Stuff firmly enough for a smooth oval front.
Fasten off. Leave 30 cm tail.
Body / Strawberry Shell Dome — Make 1
Yarn: red
R1: 6 sc in MR (6)
R2: inc ×6 (12)
R3: (sc, inc) ×6 (18)
R4: (2 sc, inc) ×6 (24)
R5: (3 sc, inc) ×6 (30)
R6–R9: sc around (30)
R10: BLO (3 sc, dec) ×6 (24)
R11: (2 sc, dec) ×6 (18)
R12: (sc, dec) ×6 (12)
R13: dec ×6 (6)
Stuff after R10. Keep the bottom broad and flat; overstuffing makes the turtle rock backward.
Fasten off. Leave 40 cm tail.
Arms / Front Legs — Make 2
Yarn: ivory
R1: 6 sc in MR (6)
R2: inc ×6 (12)
R3: (sc, inc) ×6 (18)
R4: sc around (18)
R5: (sc, dec) ×6 (12)
R6: dec ×6 (6)
Stuff lightly only through R4. A hard front leg lifts the head away from the table.
Fasten off. Leave 20 cm tail on each leg.
Back Legs — Make 2
Yarn: ivory
R1: 6 sc in MR (6)
R2: inc ×6 (12)
R3: (sc, inc) ×6 (18)
R4–R5: sc around (18)
R6: (sc, dec) ×6 (12)
R7: dec ×6 (6)
Stuff lightly. The extra plain round makes the back legs a little longer than the front pair for balance.
Fasten off. Leave 20 cm tail on each leg.
Tail — Make 1
Yarn: ivory
R1: 6 sc in MR (6)
R2: inc ×6 (12)
R3: sc around (12)
R4: dec ×6 (6)
Do not overstuff. The tail should be a small rear bead, not a fifth leg.
Fasten off. Leave 18 cm tail.
Leaf Crown — Make 1
Yarn: green
R1: 6 sc in MR (6)
R2: inc ×6 (12)
R3: (sc, inc) ×6 (18)
R4: [sl st in next st, ch 4, sc in 2nd ch from hook, hdc, dc, skip 1 base st, sl st in next st] ×6 (18 base sts; 6 leaf points)
Pull the magic ring tight so the stem can sit in the center without a hole.
Fasten off. Leave 30 cm tail.
Stem — Make 1
Yarn: green
R1: 6 sc in MR (6)
R2–R4: sc around (6)
Do not stuff. Roll the tube between your fingers before sewing so it stands upright.
Fasten off. Leave 15 cm tail.
Cheek Patches — Make 2
Yarn: pink
R1: 6 sc in MR (6)
Sl st to first sc (6)
Use yarn cheeks only when the plush is for display. For a softer face, replace the patches with dry textile blush.
Fasten off. Leave 12 cm tail on each patch.
White Strawberry Seeds
Yarn: white
Thread a yarn needle with white yarn. Work 18–22 short vertical seed stitches across the red shell, spacing them about 1.5 cm apart on chenille or 2 stitch columns apart on smaller yarn. Angle a few stitches slightly so the shell does not look like a grid. Secure each yarn end inside the shell.
Mouth Detail
Yarn: brown
Place the mouth between the eyes, centered one round below them. Make a shallow U shape with two small backstitches, each about 1 stitch wide. Secure the thread inside the head before assembly.
Assembly
- Pin the head to the front of the red body with the eye line horizontal.
- Sew the head to the body using the 30 cm ivory tail and catch both layers every 2 stitches.
- Check the body from the side; the head should project forward, not upward.
- Add the mouth if it was not embroidered before sewing the head in place.
- Sew or blush the cheek patches under the eyes, about 1 round below the eye centers.
- Attach the two front legs just behind the head seam.
- Attach the two back legs at the rear lower edge, spaced evenly from the tail position.
- Sew the tail at the center back, one round above the bottom closure.
- Sew the leaf crown to the top center of the red shell, then sew the stem into the crown center.
- Weave in all tails, trim hidden ends, and roll the shell gently on the table to test balance.
The strawberry turtle is complete when it sits level without hand support.
7 Technical Tips
- Stitch marker drift: A spiral can push the white seeds into a diagonal path after R6. Move the first-stitch marker at every round and embroider seeds after assembly.
- Stuffing firmness: A shell packed harder than the head makes the turtle tip backward. Stop stuffing when the shell compresses about 5 mm under thumb pressure.
- Invisible decrease gaps: Chenille can show holes on R10–R13 if standard decreases are pulled upward. Work every decrease through front loops only and tug the working yarn sideways, not straight up.
- Eye placement timing: A 10 mm washer is hard to move after R9. Test the eyes between R6 and R7 with 5 visible stitches between posts before locking the washers.
- Velvet tension shedding: Plush yarn can bald at the magic ring if the first round is pulled too sharply. Tighten the ring in two small pulls, then knot the starting tail inside the piece.
- Pinning failure: Legs sewn without pinning often land at four different heights. Pin all four legs first and check the belly from table level before stitching.
- Tail weaving length: A short tail can pop out through chenille after one squeeze. Weave each sewing tail through at least 4 cm of interior stitches before trimming.
Conclusion
Treat the finished turtle as a proportion test: the red dome should sit low, the ivory head should project forward, and the leaf crown should cover the shell center without hiding the seed field. Pin one sample beside a ruler, record the yarn brand, eye size, and final height, then make the next turtle from the same notes. Post the process photo to Pinterest and share the finished side view on Instagram with #StrawberryTurtle. For the strawberry turtle amigurumi crochet pattern, the next concrete step is to make one test shell before cutting all limb yarn. Does your leaf crown read as a strawberry top or as a flower?









