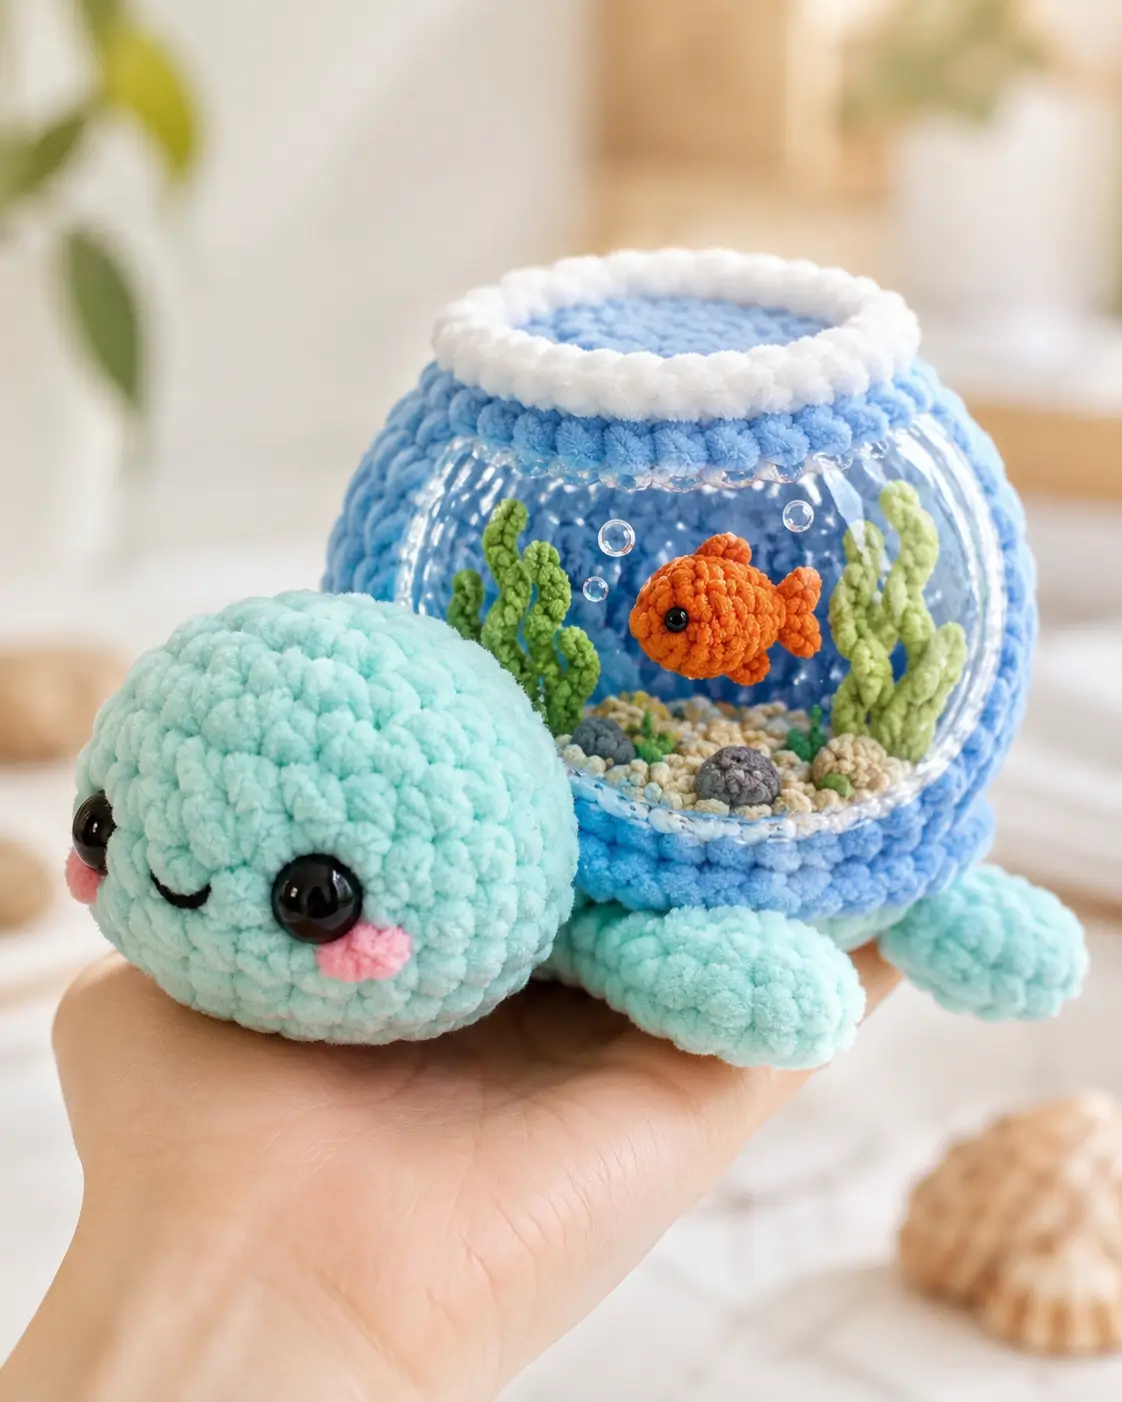
A whale with an aquarium for a body has to balance a round head against a hollow-looking bowl. This bubble whale amigurumi crochet pattern uses plush chenille yarn, a 4.0 mm hook, and 10 mm safety eyes to make a 10–12 cm advanced-beginner project. Make it when a standard whale shape needs more structure, display value, and small undersea parts.
The Design: What Makes Bubble Whale Different
You build the head as a compact 36-stitch dome, then set it low enough to touch the fishbowl body without tipping forward. The maker then shifts to the bowl: a round sky-blue body, a flat water disc, a white rim, and an optional clear front insert. That insert changes the normal crochet whale pattern into an amigurumi fish bowl, so the inside parts need flat backs and short tails. Small legs are not decorative filler. They create a four-point base so the bowl does not roll. The common mistake is placing the tail too high on the back curve; this pulls the viewer’s eye away from the fish and makes the whale look like a plain chenille whale amigurumi instead of a crochet aquarium toy.
Project Info at a Glance
| Skill Level | Time | Finished Size | Hook | Best For |
|---|---|---|---|---|
| Advanced beginner | 3–4 hours | 10–12 cm sitting | 4.0 mm | Display toy; embroider eyes for children under 3 |
Safety-eye use needs care because removable plastic eyes can be a choking risk for children under three.
Materials and Tools
Yarn
- Light aqua — chunky chenille — 45–55 g — Himalaya Dolphin Baby style or similar plush chenille
- Sky blue — chunky chenille — 40–50 g — same yarn family as main color
- White — chunky chenille — 6–8 g — rim and foam edge
- Orange — worsted or chenille scrap — 4–5 g — fish
- Green — worsted or chenille scrap — 5–6 g — seaweed
- Beige — worsted scrap — 3–4 g — sand dots
- Gray — worsted or chenille scrap — 3–5 g — rocks
- Pink — chenille scrap — 2 g — cheek patches
Tools
- Hook 4.0 mm
- Safety eyes 10 mm
- Polyester stuffing
- Yarn needle
- Stitch markers
- Scissors
- Straight pins
- Optional clear acetate or vinyl oval, approx. 6 cm wide × 4.5 cm high
Abbreviations
MR = magic ring
sc = single crochet
inc = increase, 2 sc in next stitch
dec = decrease
sl st = slip stitch
ch = chain
BLO = back loop only
FLO = front loop only
hdc = half double crochet
dc = double crochet
Invisible decrease is worked through front loops only so the chenille fabric closes without an exposed bar.
Pattern — Step by Step
Continuous spiral unless noted. All stitch counts are checked against 6-stitch amigurumi increase and decrease math.
Head
Yarn: light aqua.
R1: 6 sc in MR (6)
R2: inc ×6 (12)
R3: (sc, inc) ×6 (18)
R4: (2 sc, inc) ×6 (24)
R5: (3 sc, inc) ×6 (30)
R6: (4 sc, inc) ×6 (36)
R7–R12: sc around (36)
R13: (4 sc, dec) ×6 (30)
R14: (3 sc, dec) ×6 (24)
R15: (2 sc, dec) ×6 (18)
R16: (sc, dec) ×6 (12)
R17: dec ×6 (6)
Insert 10 mm safety eyes between R9 and R10, 8 stitches apart, before R13 closes the head. Stuff firmly from R13 onward.
Fasten off. Leave a 25 cm tail.
Body / Fishbowl
Yarn: sky blue.
R1: 6 sc in MR (6)
R2: inc ×6 (12)
R3: (sc, inc) ×6 (18)
R4: (2 sc, inc) ×6 (24)
R5: (3 sc, inc) ×6 (30)
R6: (4 sc, inc) ×6 (36)
R7–R11: sc around (36)
R12: (4 sc, dec) ×6 (30)
R13: (3 sc, dec) ×6 (24)
R14: (2 sc, dec) ×6 (18)
R15: (sc, dec) ×6 (12)
R16: dec ×6 (6)
Stuff the bottom and side wall firmly. Keep the front center slightly flatter if adding the clear window.
Fasten off. Leave a 25 cm tail.
Front Legs / Arms
Yarn: light aqua. Make 2.
R1: 6 sc in MR (6)
R2: inc ×6 (12)
R3–R5: sc around (12)
R6: dec ×6 (6)
Stuff lightly. Flatten the top edge before sewing.
Fasten off. Leave a 20 cm tail.
Back Legs
Yarn: light aqua. Make 2.
R1: 6 sc in MR (6)
R2: inc ×6 (12)
R3–R6: sc around (12)
R7: dec ×6 (6)
Use a little more stuffing than the front legs so the bowl sits level.
Fasten off. Leave a 20 cm tail.
Side Fins
Yarn: light aqua. Make 2.
R1: 6 sc in MR (6)
R2: inc ×6 (12)
R3: (sc, inc) ×6 (18)
R4–R5: sc around (18)
R6: (sc, dec) ×6 (12)
R7: dec ×6 (6)
Do not overstuff. Press each fin flat before attaching to the sides of the bowl.
Fasten off. Leave a 20 cm tail.
Tail Flukes
Yarn: light aqua.
Make the first lobe.
R1: 6 sc in MR (6)
R2: inc ×6 (12)
R3: sc around (12)
Fasten off the first lobe only.
Make the second lobe.
R1: 6 sc in MR (6)
R2: inc ×6 (12)
R3: sc around (12)
Do not fasten off the second lobe.
R4: sc around second lobe, then sc around first lobe (24)
R5: (2 sc, dec) ×6 (18)
R6: (sc, dec) ×6 (12)
R7: dec ×6 (6)
Shape the joined lobes into a shallow V before sewing.
Fasten off. Leave a 25 cm tail.
Cheek Patches
Yarn: pink. Make 2.
R1: 6 sc in MR (6)
R2: inc ×6 (12)
Sl st to first stitch (12)
Do not stuff. Sew each cheek one round below the eye line.
Fasten off. Leave a 15 cm tail.
Water Disc
Yarn: sky blue.
R1: 6 sc in MR (6)
R2: inc ×6 (12)
R3: (sc, inc) ×6 (18)
R4: (2 sc, inc) ×6 (24)
R5: (3 sc, inc) ×6 (30)
R6: (4 sc, inc) ×6 (36)
Sl st to first stitch (36)
This disc sits on top of the bowl and gives the rim a stable base.
Fasten off. Leave a 25 cm tail.
White Foam Rim
Yarn: white.
Ch 37. Join with sl st to form a ring, taking care not to twist.
R1: sc in each ch around (36)
R2: sl st in each stitch around (36)
Place the rim around the water disc, not around the body opening. This keeps the bowl top round.
Fasten off. Leave a 25 cm tail.
Clear Bowl Window
Material: clear acetate or soft vinyl.
Cut 1 oval, approx. 6 cm wide × 4.5 cm high.
Round the edges before sewing or tacking. Place it on the front of the bowl after the interior parts are pinned, so the fish and seaweed stay visible.
Leave no sharp corners.
Mini Fish
Yarn: orange.
R1: 6 sc in MR (6)
R2: inc ×6 (12)
R3: (sc, inc) ×6 (18)
R4: sc around (18)
R5: (sc, dec) ×6 (12)
R6: dec ×6 (6)
Tail fin: ch 4, starting in second ch from hook: sc, hdc, dc (3). Sl st to rear of fish. Ch 4 again, starting in second ch from hook: sc, hdc, dc (3). Sl st to rear of fish.
Embroider the fish eye, or use tiny safety eyes only for display pieces.
Fasten off. Leave a 20 cm tail.
Seaweed
Yarn: green. Make 3.
Ch 17.
Row 1: starting in second ch from hook: sl st, sc, hdc, dc, dc, hdc, sc, sl st, sc, hdc, dc, hdc, sc, sl st, sc, sl st (16)
The mixed stitch heights create the curl. Block with pins only if the seaweed twists into the fish area.
Fasten off. Leave a 15 cm tail.
Rocks and Sand Dots
Yarn: gray and beige.
Rocks: make 3 in gray.
R1: 6 sc in MR (6)
R2: inc ×6 (12)
R3: sc around (12)
R4: dec ×6 (6)
Stuff with a pinch of fiberfill.
Fasten off. Leave a 12 cm tail.
Sand dots: make 5 in beige.
R1: 6 sc in MR (6)
Sl st to first stitch (6)
Keep these flat and place them under the fish.
Fasten off. Leave a 10 cm tail.
Assembly
- Pin the head to the left side of the bowl with the lower head edge touching the bowl’s lower third.
- Sew the head to the body using the 25 cm head tail, passing through both layers every stitch.
- Sew the water disc to the top center of the bowl.
- Sew the white rim around the water disc, keeping the join at the back.
- Attach eyes, cheeks, and smile details before the head is fully closed if using safety eyes.
- Sew the front legs under the head-side front of the bowl.
- Sew the back legs under the rear curve, 1 round behind the front legs.
- Attach side fins at mid-height and sew the tail flukes to the back center.
- Pin seaweed, fish, rocks, and sand dots to the bowl front, then tack the clear window over them.
- Weave all tails through at least three stitch paths and trim only after the toy sits level.
The finished whale sits with the head slightly forward and the bowl centered behind it.
7 Technical Tips
- Stitch marker drift: If the marker shifts more than 2 stitches right by R12, the smile line may tilt. Move the marker only after completing the first stitch of each round.
- Stuffing firmness: An under-stuffed bowl collapses under the white rim when pressed. Fill until the body springs back within 2 seconds, but keep the clear-window area flatter.
- Invisible decrease bars: Visible decrease bars form vertical tracks around R13–R17. Work each dec through front loops only and pull the chenille once, not repeatedly.
- Eye placement timing: Installing eyes after R13 is too late because the head opening narrows fast. Lock 10 mm eyes between R9 and R10, 8 stitches apart.
- Velvet tension holes: Loose chenille tension creates holes larger than 2 mm near the final decreases. Change to a 3.5 mm hook if stuffing dots show between stitches.
- Pinning failure: Unpinned legs make the whale roll backward. Pin all four legs on a flat surface, with the front legs 1 round ahead of the back legs.
- Tail weaving length: Short sewing tails slip out of plush yarn. Leave 20–25 cm on limbs and tail, then weave through three different directions before trimming.
Conclusion
Treat the final sample as a structure test: the head, bowl, legs, and tail must share one level base before the clear window is fixed. Pin everything first. Then sew. The next concrete step is to make the water disc and rim, because those parts decide the bowl’s top shape. Share the finished whale on Pinterest with a top-view rim photo and on Instagram with a front-view fishbowl photo. Use #BubbleWhale for the post tag. This bubble whale amigurumi crochet pattern works best when the orange fish is visible at once, so place it before sewing the window. Will your fish face the seaweed or the whale’s head?









