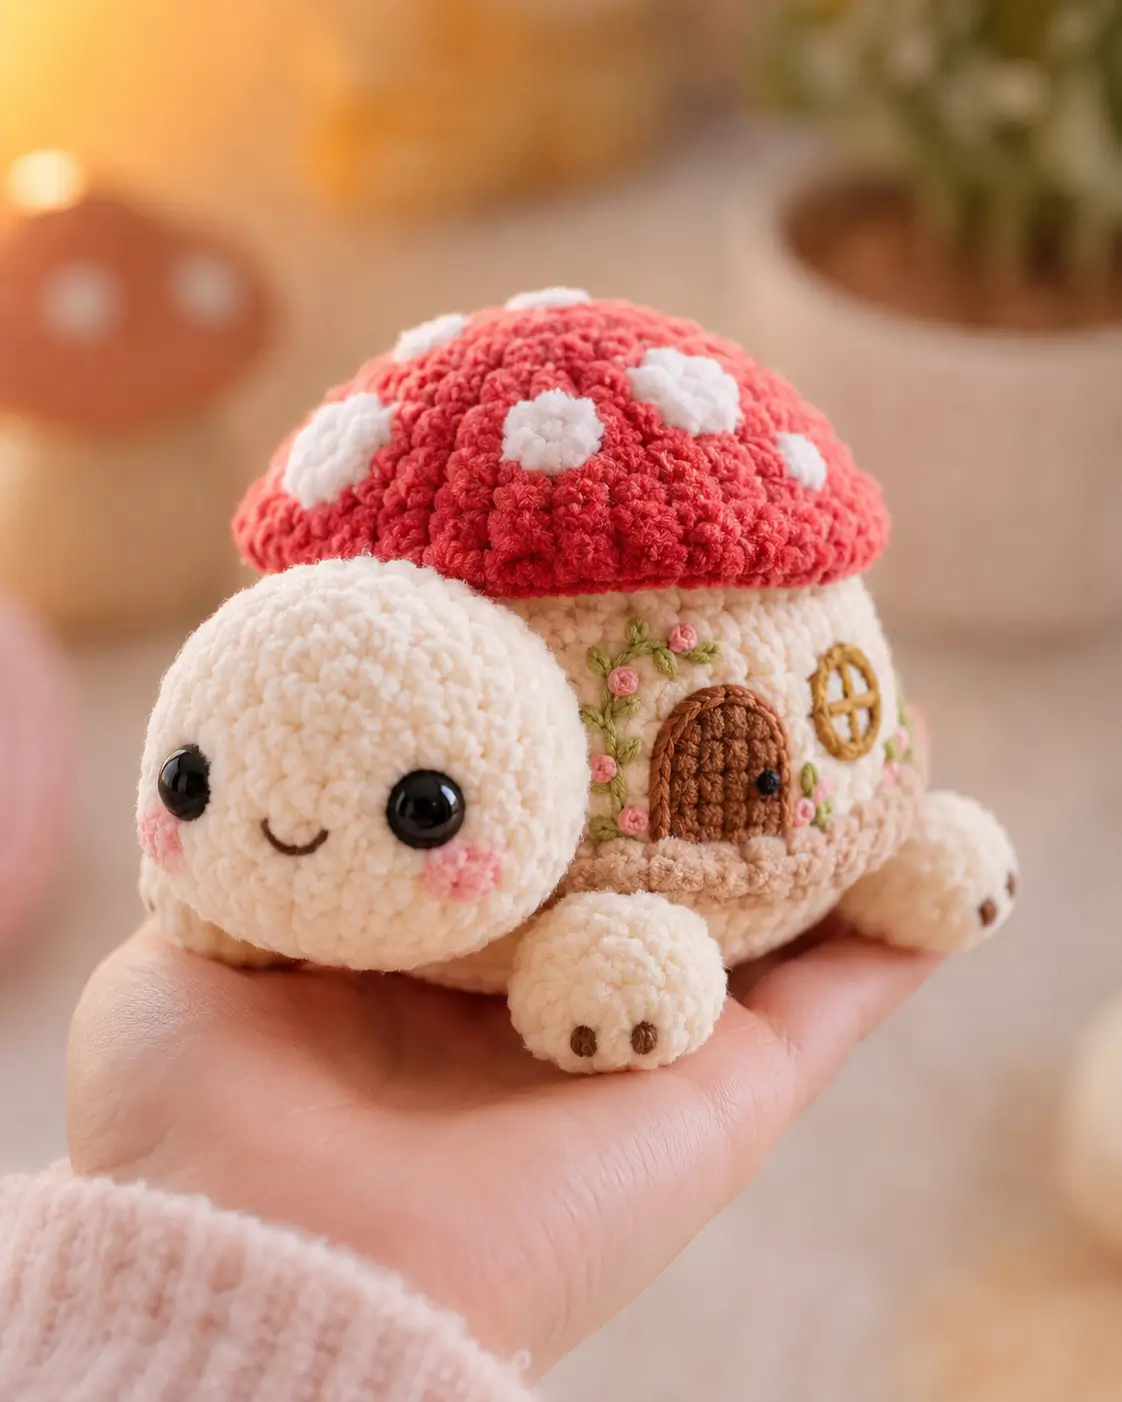
A turtle shell becomes a mushroom only if the cap overhangs the legs without crushing them. This mushroom turtle amigurumi crochet pattern uses plush chenille yarn, a 4.0 mm hook, 10 mm safety eyes, and intermediate shaping for an approx. 12 cm tall cottage turtle. Make it when a plain turtle needs a stronger silhouette: shell, house body, face, and decoration in one compact build.
The Design: What Makes This Mushroom Turtle Different
The body is not treated as a standard oval turtle shell. It becomes the cottage wall, so the beige section needs enough vertical rounds to carry a door, round window, vines, and flower knots without crowding the legs. The mushroom cap is worked separately with a 36-stitch plateau and a 30-stitch rim, giving the red shell a slight lip over the body. That overhang is the main visual cue in a crochet mushroom turtle.
The head stays larger than the limbs because the safety eyes and smile carry the character. A common mistake with a plush turtle crochet pattern is making the cap too flat; then it reads as a red blanket rather than a mushroom shell. Keep the cottagecore amigurumi turtle proportions low, round, and front-heavy.
Project Info at a Glance
| Skill Level | Time | Finished Size | Hook | Best For |
|---|---|---|---|---|
| Intermediate | 2.5–3.5 hours | Approx. 11–13 cm high / 14–15 cm long | 4.0 mm | Plush display, market table samples, woodland sets |
Published size references for similar mushroom turtle projects range around 14–15 cm long, while hook sizes vary with yarn thickness. This photo-match keeps the image’s 4.0 mm hook and 10 mm eyes, with a firm plush tension.
Materials and Tools
Yarn
- Cream — plush / chenille — 60–70 g — Bernat Blanket, Big Twist Plush, or similar
- Beige — plush / chenille — 30–35 g — Bernat Blanket or similar
- Red — plush / chenille — 30–40 g — Bernat Blanket Brights or similar
- White — plush / chenille — 6–8 g — for mushroom spots
- Brown — worsted or plush scrap — 3–5 g — for door, window, claws, and smile
- Green — cotton or acrylic scrap — under 2 g — for vines
- Pink — cotton, acrylic, or plush scrap — under 2 g — for cheeks and flowers
Tools
- Hook 4.0 mm
- 10 mm black safety eyes
- Polyester stuffing
- Yarn needle
- Stitch markers
- Scissors
- Pins
- Embroidery needle for vines and flowers
Abbreviations
- MR = magic ring
- sc = single crochet
- inc = increase
- dec = decrease
- sl st = slip stitch
- ch = chain
- BLO = back loop only
- FO = fasten off
Invisible decrease is worked through the front loops of the next 2 stitches to reduce holes in plush yarn.
Pattern — Step by Step
Work in a continuous spiral unless noted. Place a stitch marker in the first stitch of every round.
Head
Yarn: cream
R1: 6 sc in MR (6)
R2: inc ×6 (12)
R3: (sc, inc) ×6 (18)
R4: (2 sc, inc) ×6 (24)
R5: (3 sc, inc) ×6 (30)
R6: (4 sc, inc) ×6 (36)
R7–12: sc around (36)
R13: (4 sc, dec) ×6 (30)
R14: (3 sc, dec) ×6 (24)
R15: (2 sc, dec) ×6 (18)
R16: (sc, dec) ×6 (12)
Insert safety eyes between R10 and R11, about 6 stitches apart. Embroider the smile with brown yarn before final closing.
R17: dec ×6 (6)
Fasten off. Leave a 20 cm tail and close through front loops.
Body
Yarn: beige
R1: 6 sc in MR (6)
R2: inc ×6 (12)
R3: (sc, inc) ×6 (18)
R4: (2 sc, inc) ×6 (24)
R5: (3 sc, inc) ×6 (30)
R6: (4 sc, inc) ×6 (36)
R7–12: sc around (36)
R13: (4 sc, dec) ×6 (30)
R14: (3 sc, dec) ×6 (24)
R15: (2 sc, dec) ×6 (18)
R16: (sc, dec) ×6 (12)
Stuff firmly. Keep the base flat enough for sitting.
R17: dec ×6 (6)
Fasten off. Leave a 25 cm tail.
Mushroom Cap
Yarn: red
R1: 6 sc in MR (6)
R2: inc ×6 (12)
R3: (sc, inc) ×6 (18)
R4: (2 sc, inc) ×6 (24)
R5: (3 sc, inc) ×6 (30)
R6: (4 sc, inc) ×6 (36)
R7–9: sc around (36)
R10: (4 sc, dec) ×6 (30)
Do not close the cap. The 30-stitch rim should sit over the upper body like a low dome.
Fasten off. Leave a 35 cm tail for sewing.
White Mushroom Spots
Yarn: white
Make 4 small spots:
R1: 6 sc in MR (6)
Sl st to first sc.
Fasten off. Leave a 15 cm tail.
Make 2 large spots:
R1: 6 sc in MR (6)
R2: inc ×6 (12)
Sl st to first sc.
Fasten off. Leave a 15 cm tail.
Front Legs
Yarn: cream
Make 2.
R1: 6 sc in MR (6)
R2: inc ×6 (12)
R3: (sc, inc) ×6 (18)
R4–5: sc around (18)
R6: (sc, dec) ×6 (12)
R7–8: sc around (12)
Stuff lightly. Flatten the opening so the foot sits forward.
R9: dec ×6 (6)
Fasten off. Leave a 20 cm tail.
Back Legs
Yarn: cream
Make 2.
R1: 6 sc in MR (6)
R2: inc ×6 (12)
R3: (sc, inc) ×6 (18)
R4–5: sc around (18)
R6: (sc, dec) ×6 (12)
R7: sc around (12)
R8: dec ×6 (6)
Fasten off. Leave a 20 cm tail.
Tail
Yarn: cream
R1: 6 sc in MR (6)
R2: inc ×6 (12)
R3: (sc, inc) ×6 (18)
R4: sc around (18)
R5: (sc, dec) ×6 (12)
R6: dec ×6 (6)
Stuff very lightly so the tail stays small and round.
Fasten off. Leave a 20 cm tail.
Cheek Patches
Yarn: pink
Make 2.
R1: 6 sc in MR (6)
R2: inc ×6 (12)
Sl st to first sc.
Fasten off. Leave a 12 cm tail. Sew one cheek under each eye.
Door
Yarn: brown
Work in rows.
Ch 5.
Row 1: sc in 2nd ch from hook and across (4)
Row 2: ch 1, turn, inc, 2 sc, inc (6)
Row 3: ch 1, turn, inc, 4 sc, inc (8)
Rows 4–7: ch 1, turn, sc across (8)
Row 8: ch 1, turn, dec, 4 sc, dec (6)
Fasten off. Leave a 20 cm tail. Embroider vertical door lines and one small black knob.
Round Window
Yarn: brown
R1: 6 sc in MR (6)
R2: inc ×6 (12)
R3: BLO sc around (12)
Fasten off. Leave a 15 cm tail. Sew to the side of the body and stitch one vertical and one horizontal bar through the center.
Vines and Flowers
Yarn: green and pink
With green yarn, stitch curved vine lines around the door and toward the window. Use short diagonal stitches for leaves. With pink yarn, make 5–7 French knots along the vines. Keep knots small, about 3–4 mm wide, so they do not overpower the door.
Claws
Yarn: brown
Add three short stitches to the front edge of each front leg. Each stitch should be 4–5 mm long. Repeat with shorter 3 mm stitches on the back legs.
Assembly
- Pin the head to the front of the body between body R7 and R12.
- Sew the head on with the cream tail, passing through firm stitches rather than surface fluff.
- Position the body so the closure sits under the mushroom cap.
- Sew the front legs to the lower front body, angled slightly outward.
- Sew the back legs to the lower back body, keeping both sides level.
- Attach the tail at the back center under the cap line.
- Sew the mushroom cap over the upper body, catching the R10 rim to body R8–10.
- Sew the white spots across the mushroom cap after the cap is attached.
- Add the door, window, vines, flowers, cheeks, smile, and claws.
- Weave all tails inside the body and trim only after the plush surface is brushed flat.
The finished mushroom turtle should sit with the front legs visible and the cap rim covering the top body seam.
7 Technical Tips
- Mark the first stitch of every round with a locking marker, not a loose yarn loop. The failure mode is a shifted cap seam that drifts into the front face line by R8.
- Keep the head stuffing firmer than the leg stuffing. A soft head collapses around 10 mm safety eyes and makes the eye spacing look wider than 6 stitches.
- Work invisible decreases on R13–R17 of the head and body. Standard decreases leave holes in chenille, especially at the 12-stitch and 6-stitch closing rounds.
- Place safety eyes before R17 closes the head. Late placement forces the washer against dense stuffing and can distort the face by 5–8 mm.
- Pin the mushroom cap before sewing the first stitch. If the 30-stitch rim is not centered, one side will cover a back leg while the other exposes the beige body top.
- Keep cheek circles flat and thin. Overstuffed cheeks are a common failure mode on plush faces because they push the smile stitches into a tight curve.
- Weave yarn tails through at least 3 direction changes inside the body. A single straight weave can slip out of chenille after handling, especially under the cap seam.
Conclusion
This build works because the turtle structure stays low while the mushroom cap carries the height. After sewing, check three points: the head should face forward, the cap should hide the upper body seam, and the door should sit on the visible side rather than under the shell edge. Your next step is to make one test cap in scrap yarn and confirm the 30-stitch rim fits over the body before cutting red chenille. Share the finished turtle on Pinterest and Instagram with #MushroomTurtle. For a final check on this mushroom turtle amigurumi crochet pattern, would you make the cottage door rounder or taller?









