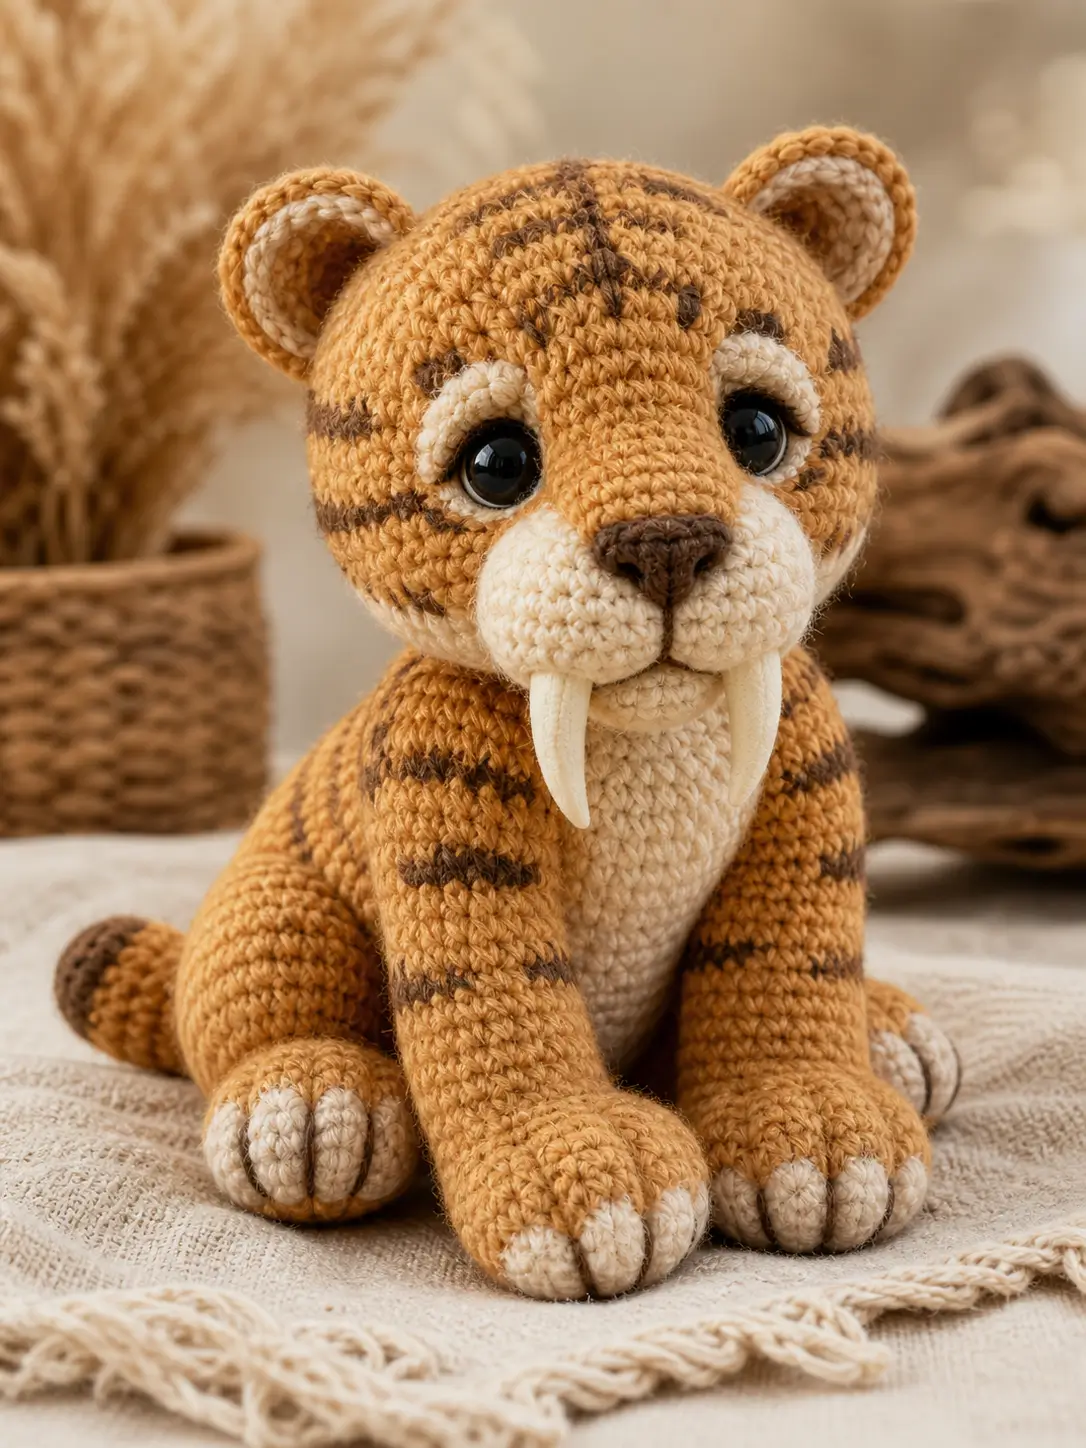
A saber-tooth tiger’s fangs have to hang below the muzzle without tipping the head forward. This saber tooth tiger amigurumi crochet pattern uses DK yarn, a 3.5 mm hook, 20 mm safety eyes, and a 20 cm seated build for an advanced-beginner to intermediate maker. Make it when a prehistoric animal display needs a stable, recognizable predator instead of another standard tiger.
The Design: What Makes This Saber-Tooth Tiger Different
The head carries the feature load, so the muzzle is split into two cheek discs rather than one long oval. That keeps the tusks vertical and gives the nose a flat bridge for stitching. A 42-stitch head plateau gives the sabertooth cat amigurumi enough width for large eyes and cream brow arcs without distorting the ears. Many tiger amigurumi patterns place stripes after assembly; this build places the side stripes after the limbs are pinned, because the forelegs cover part of the shoulder. The common mistake is adding heavy fangs before the head is fully stuffed. The maker sees a good front view, then the finished toy nods forward, especially when worsted yarn replaces DK. This crochet saber tooth tiger pattern keeps the body compact to counter that weight.
Project Info at a Glance
| Skill Level | Time | Finished Size | Hook | Best For |
|---|---|---|---|---|
| Intermediate | 5–10 hours | 20 cm sitting | 3.5 mm main, 2.5 mm details | Prehistoric animal displays, nursery shelf toys, Ice Age sets |
Time and sizing are benchmarked from DK saber-tooth listings and TOFT’s published 5–10 hour estimate.
Materials and Tools
Yarn
- Camel gold — DK — 60 g — King Cole Merino Blend DK Mustard, TOFT Camel, or similar
- Cream — DK — 30 g — King Cole Merino Blend DK White, TOFT Cream, or similar
- Dark brown — DK — 20 g — King Cole Merino Blend DK Chocolate or similar
- Black — DK — 10 g — King Cole Merino Blend DK Black or similar
- Ivory white — sport / 4-ply — 5 g — any firm cotton for tusks
The gram split follows Stanley’s public material list; TOFT’s kit confirms a comparable 100 g DK wool allocation for a larger saber-tooth tiger.
Tools
- Hook 3.5 mm for DK pieces
- Hook 2.5 mm for tusks and tight detail pieces
- 20 mm safety eyes for DK scale
- Toy stuffing
- Yarn needle
- Stitch markers
- Sewing pins
- Black embroidery thread for mouth, toe lines, and eye shaping
Abbreviations
- MR = magic ring
- sc = single crochet
- inc = increase, 2 sc in same stitch
- dec = invisible decrease unless noted
- sl st = slip stitch
- ch = chain
- BLO = back loop only
- FO = fasten off
Use the invisible decrease through front loops to reduce gaps around the cheeks, lower body, and paw shaping.
Pattern — Step by Step
Continuous spiral unless noted. This is an original stitch plan using standard amigurumi math; paid saber-tooth listings were used only for sizing, materials, and proportion checks.
Head
Yarn: camel gold — Source: Standard amigurumi math
R1: 6 sc in MR (6)
R2: inc ×6 (12)
R3: (sc, inc) ×6 (18)
R4: (2 sc, inc) ×6 (24)
R5: (3 sc, inc) ×6 (30)
R6: (4 sc, inc) ×6 (36)
R7: (5 sc, inc) ×6 (42)
R8–R15: sc around (42)
R16: (5 sc, dec) ×6 (36)
R17: sc around (36)
Insert 20 mm safety eyes between R11 and R12, 9 stitches apart. Do not add washers until the brow and cheek patches are pinned.
R18: (4 sc, dec) ×6 (30)
R19: (3 sc, dec) ×6 (24)
R20: (2 sc, dec) ×6 (18)
R21: (sc, dec) ×6 (12)
R22: dec ×6 (6)
Fasten off. Close the hole and leave a 20 cm tail for shaping.
Body
Yarn: camel gold, cream belly patch added later — Source: Standard amigurumi math
R1: 6 sc in MR (6)
R2: inc ×6 (12)
R3: (sc, inc) ×6 (18)
R4: (2 sc, inc) ×6 (24)
R5: (3 sc, inc) ×6 (30)
R6: (4 sc, inc) ×6 (36)
R7: (5 sc, inc) ×6 (42)
R8–R15: sc around (42)
R16: (5 sc, dec) ×6 (36)
R17–R18: sc around (36)
R19: (4 sc, dec) ×6 (30)
R20–R21: sc around (30)
R22: (3 sc, dec) ×6 (24)
R23: (2 sc, dec) ×6 (18)
R24: (sc, dec) ×6 (12)
R25: dec ×6 (6)
Stuff firmly at R15, then add small amounts through R24. A loose base makes the toy rock backward.
Fasten off. Close the hole and leave a 25 cm tail for sewing to the head.
Front Legs
Make 2. Yarn: cream for paw, camel gold for leg — Source: Standard amigurumi math
R1: cream, 6 sc in MR (6)
R2: inc ×6 (12)
R3: (sc, inc) ×6 (18)
R4–R5: sc around (18)
R6: change to camel gold in BLO, (sc, dec) ×6 (12)
R7–R15: sc around (12)
Stuff the lower paw only. Leave the upper half soft so the forelegs can sit flat against the body.
Fasten off. Leave a 30 cm tail.
Back Legs
Make 2. Yarn: cream for paw, camel gold for leg — Source: Standard amigurumi math
R1: cream, 6 sc in MR (6)
R2: inc ×6 (12)
R3: (sc, inc) ×6 (18)
R4: (2 sc, inc) ×6 (24)
R5–R6: sc around (24)
R7: change to camel gold in BLO, sc around (24)
R8: (2 sc, dec) ×6 (18)
R9: sc around (18)
R10: (sc, dec) ×6 (12)
R11–R15: sc around (12)
Stuff the foot firmly and the thigh lightly.
Fasten off. Leave a 30 cm tail.
Outer Ears
Make 2. Yarn: camel gold — Source: Standard amigurumi math
R1: 6 sc in MR (6)
R2: inc ×6 (12)
R3: (sc, inc) ×6 (18)
R4: (2 sc, inc) ×6 (24)
R5: sc around (24)
Fasten off. Leave a 25 cm tail.
Inner Ears
Make 2. Yarn: cream — Source: Standard amigurumi math
R1: 6 sc in MR (6)
R2: inc ×6 (12)
R3: (sc, inc) ×6 (18)
Fasten off. Sew one inner ear to each outer ear, fold the base slightly, and hold the curve with two stitches.
Cheek Patches
Make 2. Yarn: cream — Source: Standard amigurumi math
R1: 6 sc in MR (6)
R2: inc ×6 (12)
R3: (sc, inc) ×6 (18)
R4: (2 sc, inc) ×6 (24)
Fasten off. Leave a 25 cm tail. These two flat circles form the split muzzle.
Nose
Yarn: dark brown — Source: Standard amigurumi math
R1: 6 sc in MR (6)
R2: inc ×6 (12)
R3: sc around (12)
Fasten off. Flatten into a rounded triangle and sew across the upper join of the two cheek patches.
Tusks
Make 2. Yarn: ivory white, 2.5 mm hook — Source: Standard amigurumi math
R1: 6 sc in MR (6)
R2–R8: sc around (6)
Stuff only the upper 2 cm. Leave the lower half unstuffed and pinch it into a curved point with the sewing tail.
Fasten off. Leave a 20 cm tail for sewing under the muzzle.
Belly Patch
Yarn: cream — Source: Standard amigurumi math
R1: 6 sc in MR (6)
R2: inc ×6 (12)
R3: (sc, inc) ×6 (18)
R4: (2 sc, inc) ×6 (24)
R5: (3 sc, inc) ×6 (30)
Fasten off. Pull gently into a vertical oval while pinning.
Tail
Yarn: dark brown tip, camel gold base — Source: Standard amigurumi math
R1: dark brown, 6 sc in MR (6)
R2: inc ×6 (12)
R3: (sc, inc) ×6 (18)
R4–R5: sc around (18)
R6–R11: change to camel gold, sc around (18)
R12: (sc, dec) ×6 (12)
R13–R17: sc around (12)
Stuff gradually. Leave the last 2 rounds soft for sewing.
Fasten off. Leave a 25 cm tail.
Toe Pads
Make 12. Yarn: cream — Source: Standard amigurumi math
R1: 6 sc in MR (6)
R2: inc ×6 (12)
Fasten off. Sew three pads to each paw, then add one black vertical stitch between adjacent toes.
Brow Arcs and Stripes
Yarn: cream for brow arcs; dark brown for stripes — Source: Photo-matched embroidery
For each brow arc, work 12 surface slip stitches above the eye from the outer corner toward the center. Place the arc 1 round above the eye and stop before the cheek patch.
For the forehead, embroider one central dark stripe from R4 to R10, then add two shorter side stripes from R7 to R11. For the cheeks, add two horizontal dark bars per side, each 5–7 stitches long. For the body, add three dark side bars before attaching the forelegs; each bar should angle slightly downward toward the belly.
Assembly
- Pin the head to the body with the nose line centered over the belly patch area.
- Sew the head to the body through R20–R22 of the head and R22–R25 of the body.
- Pin both cheek patches between R12 and R18 of the head, touching at the center front.
- Sew the nose over the upper seam where the cheek patches meet.
- Attach the tusks under the cheek patches, 3 stitches apart at the top.
- Sew the ears between R6 and R11 of the head, angled slightly outward.
- Attach the front legs to the body between R11 and R17, 5 stitches apart at the chest.
- Attach the back legs between R5 and R11 of the body so the paws point forward.
- Sew the tail to the back of the body between R9 and R12.
- Add brow arcs, stripes, toe lines, and a vertical mouth stitch from the nose to the cheek split.
The finished saber-tooth tiger sits upright with the tusks clear of the front paws.
7 Technical Tips
- Mark the head start point with a running yarn marker from R1 to R22. A missed shift of 3 stitches will move the tusks off center.
- Stuff the head to firm resistance before locking the safety-eye washers. The failure mode is eye collapse after the cheeks are sewn on.
- Keep each tusk to 6 stitches around and 8 rounds long. A 12-stitch tusk becomes bulky at DK scale and pulls the muzzle open.
- Place the 20 mm eyes 9 stitches apart. Less than 7 stitches makes the brow arcs crowd the nose bridge.
- Pin the ears for a full front and side check before sewing. The common failure mode is ears placed too high, which makes the head look like a bear.
- Use 3 toe pads per paw, not 4. Four pads crowd a 24-stitch back paw and hide the cream foot shape.
- Weave tusk tails upward through the cheek patches, then into the head. A tail woven straight down can show as a ridge along the fang base.
Conclusion
Block the ears after sewing, then photograph the tiger from a low front angle so the tusks read as the main feature and not as loose white strips. Save the round counts before changing yarn weight; any switch from DK to worsted changes eye scale, tusk length, and leg angle. The next practical step is to crochet one head, attach temporary paper tusks, and test whether the nose still points forward. Pin this saber tooth tiger amigurumi crochet pattern to Pinterest, then post the finished build on Instagram with #SaberToothTigerAmigurumi. Which stripe layout will you choose for the forehead: one central flame, or two offset dark bars?









