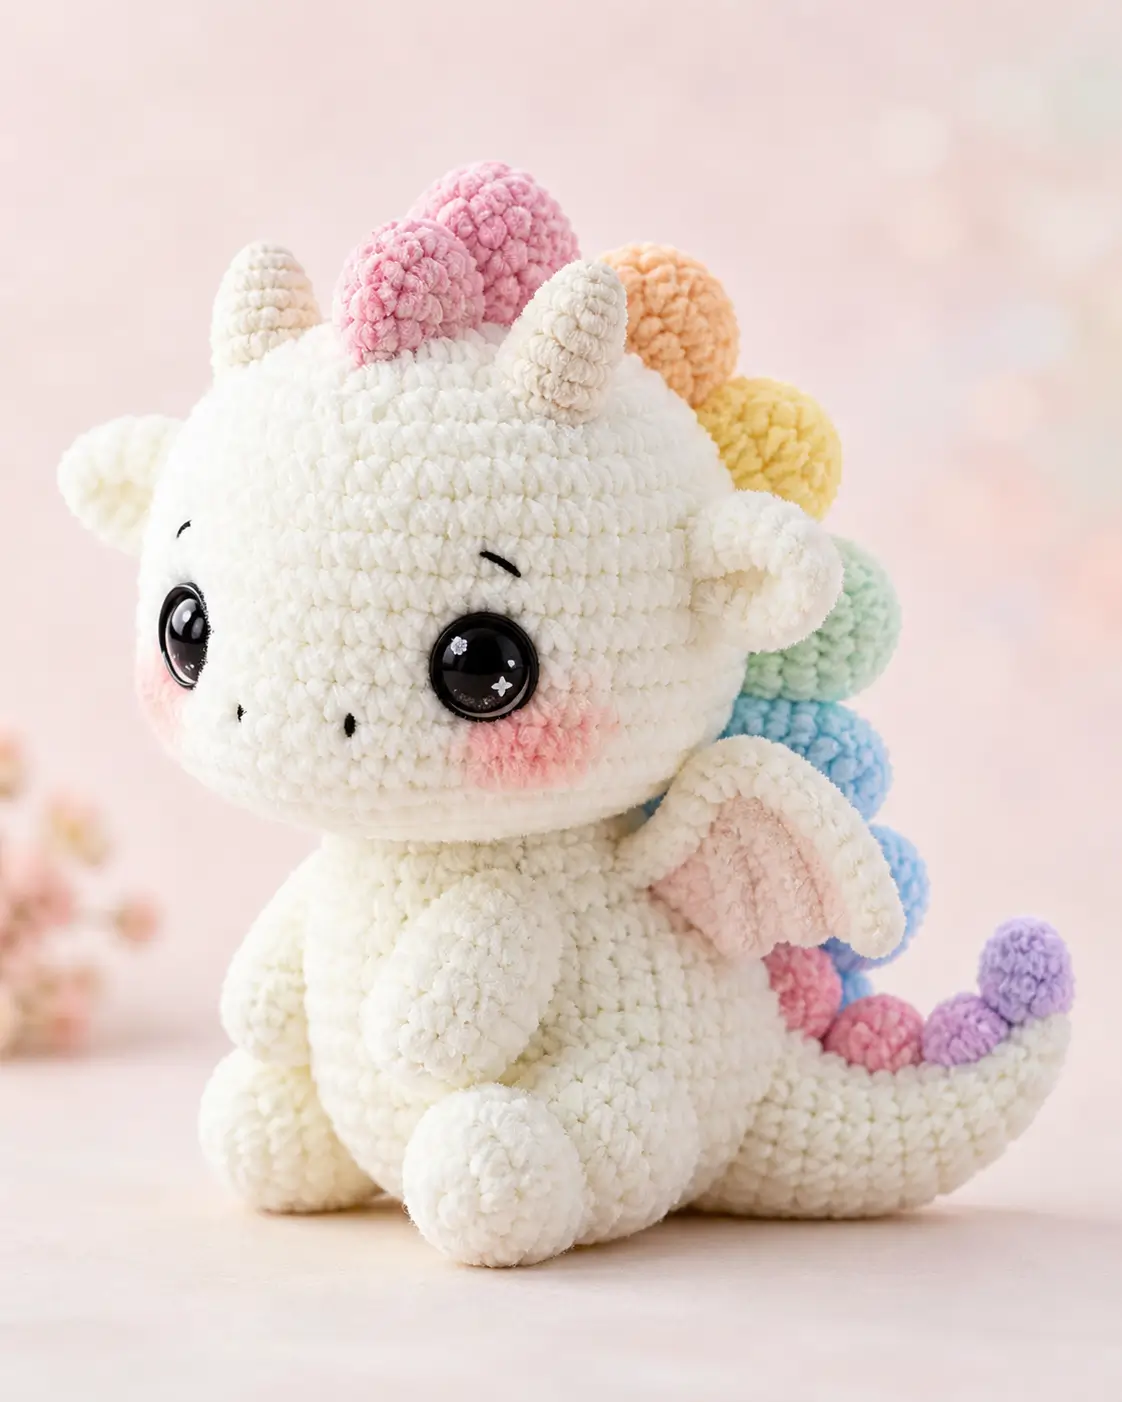
Baby dragons need three signals before the face reads dragon: horns, wings, and a tail. This dragon amigurumi crochet pattern builds a cream chenille body with pastel ridge spikes, side wings, and stitched nostrils. Plan for super-bulky velvet yarn, a 5 mm hook, 20 mm safety eyes, and an intermediate skill level. The finished toy sits about 20–23 cm, sized for nursery shelves or market tables.
The Design: What Makes This Baby Dragon Different
You are shaping a crochet dragon amigurumi with a large head, low body, and curved tail, so balance matters more than height. The 42-stitch head plateau gives enough surface for oversized eyes without forcing the snout too far forward. A 42-stitch body plateau keeps the toy seated after the back legs and tail are attached. The maker should place the pastel ridge last, not during body construction, because chenille hides center lines and makes spike spacing drift. The wings are small on purpose. Large wings pull the sides backward and make a plush dragon crochet pattern twist at the neck. The common mistake is treating the horns, spikes, and ears as one feature; this photo needs horns in front and rainbow spikes behind them.
Project Info at a Glance
| Skill Level | Time | Finished Size | Hook | Best For |
|---|---|---|---|---|
| Intermediate | 5–7 hours | 20–23 cm | 5 mm | Chenille display plush, pastel dragon gifts, market stock |
Time and size are based on comparable baby dragon crochet benchmarks and the 20 cm verified dragon size range.
Materials and Tools
Yarn
- Cream / ivory — super-bulky chenille — 150 g — Himalaya Dolphin Baby, Bernat Blanket, or Premier Parfait Chunky
- Pastel pink — super-bulky chenille — 10 g — head spikes, tail spike, blush patches
- Peach — super-bulky chenille — 5 g — back spike
- Yellow — super-bulky chenille — 5 g — back spike
- Mint — super-bulky chenille — 5 g — back spike
- Sky blue — super-bulky chenille — 10 g — back spikes
- Lilac — super-bulky chenille — 5 g — tail spike
- Soft pink — super-bulky chenille — 10 g — inner wings and cheek patches
Tools
- Hook 5 mm
- Safety eyes 20 mm
- Polyester stuffing
- Yarn needle
- Locking stitch markers
- Straight pins
- Black embroidery thread
- Pink powder blush or yarn patches
Abbreviations
MR = magic ring; sc = single crochet; inc = 2 sc in one stitch; dec = invisible decrease over 2 stitches; sl st = slip stitch; ch = chain; BLO = back loop only; FLO = front loop only.
Invisible decrease means working through the front loops of the next two stitches before completing one single crochet, which reduces chenille gaps at the closing rounds.
Pattern — Step by Step
Continuous spiral unless noted. Place a marker in the first stitch of every round.
Head
Yarn: cream
R1: 6 sc in MR (6)
R2: inc ×6 (12)
R3: (sc, inc) ×6 (18)
R4: (2 sc, inc) ×6 (24)
R5: (3 sc, inc) ×6 (30)
R6: (4 sc, inc) ×6 (36)
R7: (5 sc, inc) ×6 (42)
R8–R14: sc around (42)
R15: (5 sc, dec) ×6 (36)
R16: (4 sc, dec) ×6 (30)
R17: (3 sc, dec) ×6 (24)
R18: (2 sc, dec) ×6 (18)
R19: (sc, dec) ×6 (12)
R20: dec ×6 (6)
Insert safety eyes between R11 and R12, 8 stitches apart, before R16 blocks access. Stuff firmly through R18.
Fasten off. Close the final hole and weave in the tail.
Body
Yarn: cream
R1: 6 sc in MR (6)
R2: inc ×6 (12)
R3: (sc, inc) ×6 (18)
R4: (2 sc, inc) ×6 (24)
R5: (3 sc, inc) ×6 (30)
R6: (4 sc, inc) ×6 (36)
R7: (5 sc, inc) ×6 (42)
R8–R12: sc around (42)
R13: (5 sc, dec) ×6 (36)
R14–R15: sc around (36)
R16: (4 sc, dec) ×6 (30)
R17: (3 sc, dec) ×6 (24)
R18: (2 sc, dec) ×6 (18)
R19: (sc, dec) ×6 (12)
R20: dec ×6 (6)
Stuff the lower body more firmly than the neck edge so the toy sits without tipping.
Fasten off. Leave a 35 cm tail for sewing to the head.
Muzzle
Yarn: cream
R1: 6 sc in MR (6)
R2: inc ×6 (12)
R3: (sc, inc) ×6 (18)
R4: sc around (18)
Flatten the circle slightly into an oval before pinning it under the eyes.
Fasten off. Leave a 25 cm tail.
Arms / Front Legs
Yarn: cream — make 2
R1: 6 sc in MR (6)
R2: inc ×6 (12)
R3: (sc, inc) ×6 (18)
R4–R6: sc around (18)
R7: (sc, dec) ×6 (12)
R8–R11: sc around (12)
Stuff only the lower half so the arm rests against the belly.
Fasten off. Leave an 18 cm tail.
Back Legs / Feet
Yarn: cream — make 2
R1: 6 sc in MR (6)
R2: inc ×6 (12)
R3: (sc, inc) ×6 (18)
R4: (2 sc, inc) ×6 (24)
R5–R7: sc around (24)
R8: (2 sc, dec) ×6 (18)
R9: sc around (18)
R10: (sc, dec) ×6 (12)
R11: sc around (12)
Stuff the foot pad firmly and leave the top lightly filled.
Fasten off. Leave a 22 cm tail.
Horns
Yarn: cream — make 2
R1: 6 sc in MR (6)
R2–R3: sc around (6)
R4: inc ×6 (12)
R5: sc around (12)
Do not overstuff; pinch the tip upward before sewing.
Fasten off. Leave an 18 cm tail.
Wings
Yarn: cream frame, soft pink inner panel — make 2
Cream wing frame:
R1: 6 sc in MR (6)
R2: inc ×6 (12)
R3: (sc, inc) ×6 (18)
R4: (2 sc, inc) ×6 (24)
R5–R6: sc around (24)
R7: (2 sc, dec) ×6 (18)
R8: (sc, dec) ×6 (12)
Flatten without stuffing. Pin the outer edge into a soft triangle before sewing.
Soft pink inner panel:
R1: 6 sc in MR (6)
R2: inc ×6 (12)
R3: (sc, inc) ×6 (18)
Fasten off. Sew one pink panel to each cream wing, leaving the cream edge visible.
Cheek Patches
Yarn: blush pink — make 2
R1: 6 sc in MR (6)
R2: inc ×6 (12)
Sl st to first stitch.
Make the patches flat. Brushed blush can replace these circles for a softer photo match.
Fasten off. Leave a 12 cm tail.
Tail
Yarn: cream
R1: 6 sc in MR (6)
R2–R3: sc around (6)
R4: inc ×6 (12)
R5–R6: sc around (12)
R7: (sc, inc) ×6 (18)
R8–R10: sc around (18)
R11: (2 sc, inc) ×6 (24)
R12–R15: sc around (24)
R16: (2 sc, dec) ×6 (18)
R17: (sc, dec) ×6 (12)
Stuff lightly at the tip and firmly at the base. Curve the tail before sewing by pinning it in a C shape.
Fasten off. Leave a 30 cm tail.
Rainbow Back Spikes
Yarn: pastel pink, peach, yellow, mint, sky blue, lilac — make 8 total
Make 2 pink, 1 peach, 1 yellow, 1 mint, 2 sky blue, and 1 lilac.
R1: 6 sc in MR (6)
R2: sc around (6)
R3: inc ×6 (12)
R4: sc around (12)
Flatten each spike before sewing. Do not stuff; chenille bulk gives enough height.
Fasten off. Leave a 20 cm tail on each spike.
Brows and Nostrils
Yarn/thread: black embroidery thread
Stitch each nostril as one vertical bar on the muzzle, 4 stitches apart. Work each brow as one short curved stitch above the eye, angled toward the center.
No detachable accessory is shown in the photo, so no prop is added.
Assembly
- Sew the head to the body with the body opening centered under the head between R16 and R20.
- Pin the muzzle under the eyes, covering the lower third of the face, then sew around the edge.
- Add nostrils to the muzzle and brow stitches above the eyes.
- Sew cheek patches beside the muzzle, one round below the lower edge of each eye.
- Attach front legs to the upper body, angled inward toward the belly.
- Attach back legs at the lower front body so the feet sit flat on the surface.
- Sew horns on top of the head, 5 stitches apart, slightly forward of the crown.
- Attach wings to the side back of the body, two rounds below the neck seam.
- Sew the tail to the lower back and tack the underside once so it supports the sitting pose.
- Pin rainbow spikes from crown to tail tip, then sew each spike through both flattened layers.
The finished dragon has a seated cream body, pastel ridge, pink wing panels, stitched face, and curved tail.
7 Technical Tips
- Lost stitch marker: Move the marker after every round, not at the end of a section. One missed starting point shifts the muzzle and both eyes by 1–2 stitches.
- Neck collapse: Pack the lower head until it resists finger pressure by about 5 mm. A soft neck makes the oversized head tilt forward after the horns are added.
- Eye drift: Place the 20 mm safety eyes between R11 and R12 before closing below 30 stitches. Installing them after R16 forces uneven spacing because the opening is too narrow.
- Chenille hole gaps: Work every decrease as an invisible decrease through front loops only. Standard decreases leave pale stuffing visible at R17–R20.
- Wing roll-back: Pin each wing at three points: top corner, center edge, and lower corner. A single anchor stitch makes the wing rotate behind the body.
- Rainbow ridge wobble: Mark a center line from head crown to tail base with 8 pins before sewing spikes. Uneven spacing larger than 1.5 cm breaks the rainbow curve.
- Tail tipping: Sew the tail base across a 3-round-high oval, not one round. A narrow seam makes the dragon lean backward on smooth shelves.
Conclusion
This dragon amigurumi crochet pattern depends on proportion: a 42-stitch head, matching rounded body, compact wings, and a curved tail that acts as a rear support. Work the cream pieces first, then add the pastel ridge only after the head, body, and tail are sewn into their final line. That order gives cleaner spacing and fewer pulled stitches in chenille yarn. Pin the front view for Pinterest and post the side view on Instagram with #RainbowBabyDragon. For the next sample, test one change only: should the tallest pink spike sit between the horns or directly behind them?









