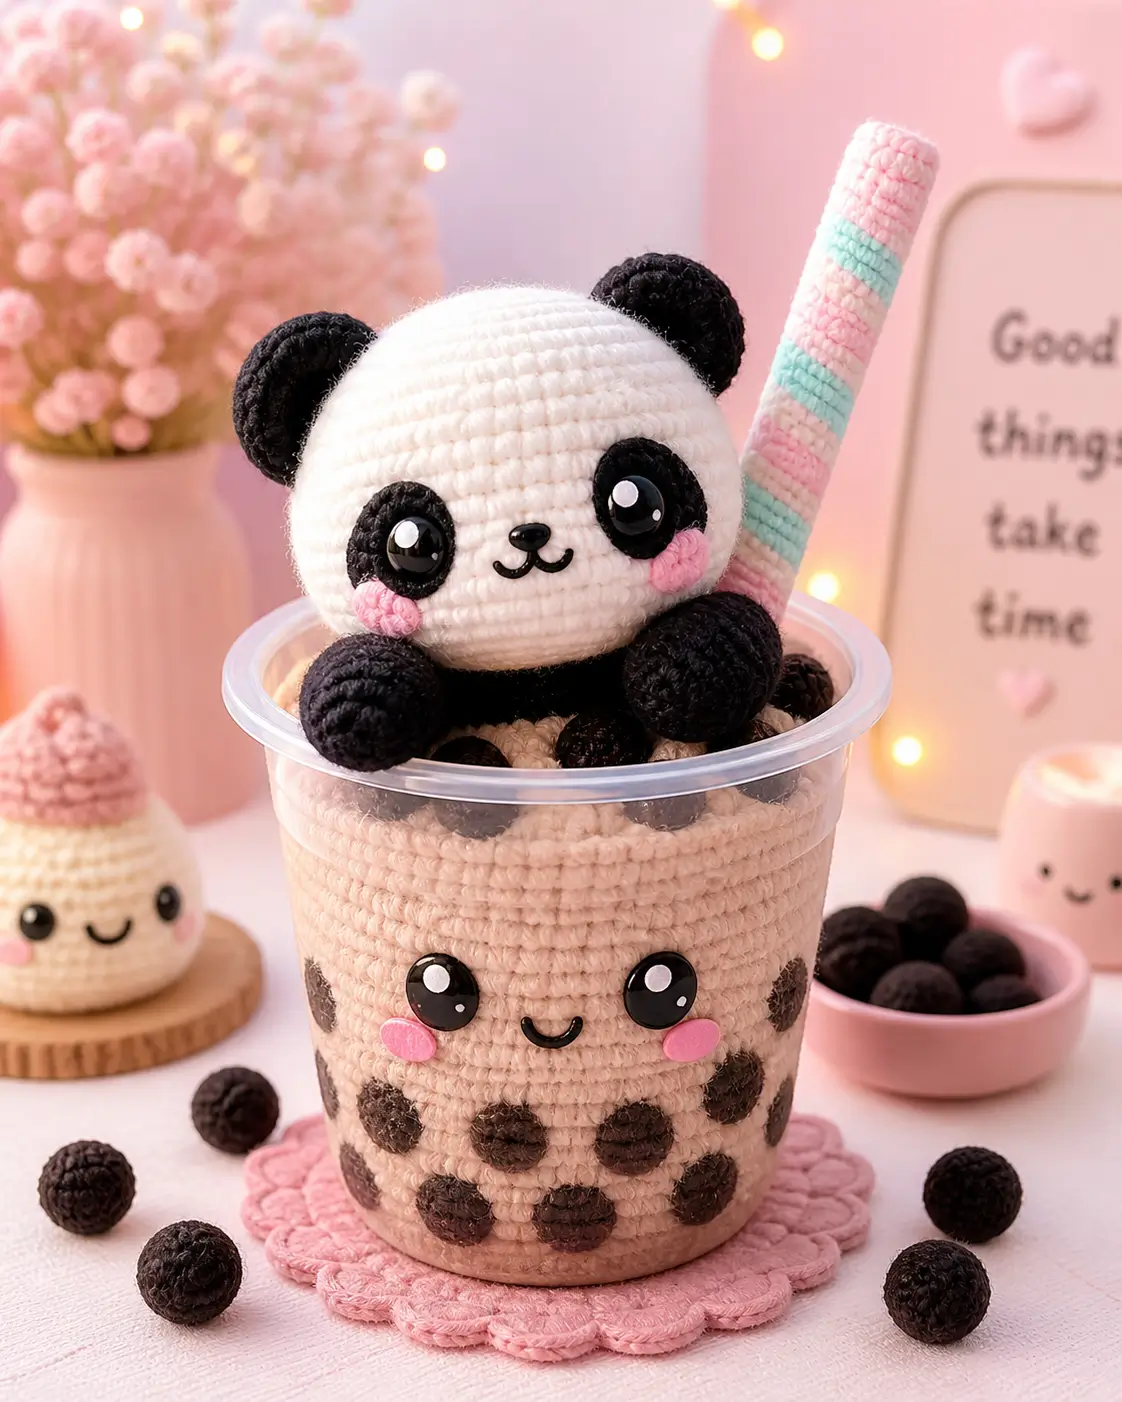
A panda face fails when the black eye patches drift above the nose line. This panda boba amigurumi crochet pattern builds a rounded panda emerging from a milk-tea cup, with pearls, straw, and cheek patches. Use worsted or plush yarn, size to 27.9 cm with straw, and work at intermediate level. The finished piece works as a desk display because the cup base keeps the panda upright.
The Design: What Makes Panda Boba Different
The panda head needs a wide sphere, not a tall bear head, because the eye patches must sit low enough to frame the nose. A 42-stitch head plateau gives that spread without making the cheeks collapse. The cup body uses a cylinder with a firm base; the panda amigurumi sits inside, so the cup carries both visual weight and real balance. A separate striped straw solves the scale problem found in many boba tea amigurumi patterns: thin straws disappear beside plush heads. The common mistake is placing the black patches after attaching the ears. That shifts the face outward and makes the panda look cross-eyed. Pin the patches first, then align the ears to the patch angle.
Project Info at a Glance
| Skill Level | Time | Finished Size | Hook | Best For |
|---|---|---|---|---|
| Beginner-intermediate to intermediate | 5–7 hours | 27.9 cm with straw | 6.5 mm for plush yarn; 4.0 mm for worsted/Aran option | Display plush, market table sample, boba-themed gift |
Materials and Tools
Yarn
- Milk tea beige — worsted or size 6 plush — 50–75 g — Bernat Baby Blanket, YarnArt Dolce, or Brava Worsted
- White — matching weight — 40–60 g — panda head and cup rim
- Black — matching weight — 30–45 g — ears, limbs, eye patches, pearls
- Dark brown — matching or one size lighter — 15–25 g — cup boba spots
- Pink — matching or one size lighter — 5–10 g — cheeks and straw stripe
- Mint — matching or one size lighter — 5–10 g — straw stripe
- Cream — matching weight — 10–15 g — straw stripe and optional lid ring
Tools
- Hook 4.0 mm for worsted/Aran or 6.5 mm for size 6 plush
- 14 mm safety eyes for panda head at plush scale; 10–12 mm for smaller yarn
- 10–12 mm safety eyes for cup face
- Black safety nose, 8–10 mm, or embroidered nose
- Fiberfill stuffing
- Yarn needle, stitch markers, scissors, pins
- Wooden skewer or pipe cleaner for straw support, only for display pieces
- Cardboard or plastic canvas circle, 8–10 cm, for cup base
Safety eyes and internal straw supports are not for toys made for young children or pets; embroider the eyes and skip rigid inserts for that use case.
Abbreviations
MR = magic ring; sc = single crochet; inc = 2 sc in same stitch; dec = invisible decrease over next 2 stitches; sl st = slip stitch; ch = chain; BLO = back loop only; FLO = front loop only; FO = fasten off.
Invisible decrease means inserting the hook through the front loops of the next two stitches before completing one sc, which reduces bulk on rounded panda and cup closures.
Pattern — Step by Step
Continuous spiral unless noted. Stitch counts appear in brackets.
Panda Head
Yarn: white
R1: 6 sc in MR (6)
R2: inc ×6 (12)
R3: (sc, inc) ×6 (18)
R4: (2 sc, inc) ×6 (24)
R5: (3 sc, inc) ×6 (30)
R6: (4 sc, inc) ×6 (36)
R7: (5 sc, inc) ×6 (42)
R8–R15: sc around (42)
R16: (5 sc, dec) ×6 (36)
R17: (4 sc, dec) ×6 (30)
R18: (3 sc, dec) ×6 (24)
R19: (2 sc, dec) ×6 (18)
Place panda safety eyes through the black patches before locking washers, between R12 and R13, about 8–9 stitches apart at plush scale.
R20: (sc, dec) ×6 (12)
Stuff firmly, especially under the cheeks.
R21: dec ×6 (6)
Fasten off. Leave a 20 cm tail and close the hole.
Panda Body
Yarn: black
R1: 6 sc in MR (6)
R2: inc ×6 (12)
R3: (sc, inc) ×6 (18)
R4: (2 sc, inc) ×6 (24)
R5: (3 sc, inc) ×6 (30)
R6: (4 sc, inc) ×6 (36)
R7–R12: sc around (36)
R13: (4 sc, dec) ×6 (30)
R14: (3 sc, dec) ×6 (24)
R15: (2 sc, dec) ×6 (18)
Stuff to a squat oval so the panda sits above the cup rim.
R16: (sc, dec) ×6 (12)
R17: dec ×6 (6)
Fasten off. Leave a 30 cm tail for attaching to the cup insert.
Front Arms / Front Paws
Make 2. Yarn: black
R1: 6 sc in MR (6)
R2: inc ×6 (12)
R3: (sc, inc) ×6 (18)
R4–R7: sc around (18)
R8: (sc, dec) ×6 (12)
R9–R10: sc around (12)
Stuff only the paw end. Leave the top flat for sewing over the cup rim.
Fasten off. Leave a 25 cm tail.
Back Legs / Lower Paws
Make 2. Yarn: black
R1: 6 sc in MR (6)
R2: inc ×6 (12)
R3: (sc, inc) ×6 (18)
R4–R6: sc around (18)
R7: (sc, dec) ×6 (12)
Stuff lightly. The back paws should not push the cup outward.
R8: dec ×6 (6)
Fasten off. Leave a 25 cm tail.
Ears
Make 2. Yarn: black
R1: 6 sc in MR (6)
R2: inc ×6 (12)
R3: (sc, inc) ×6 (18)
R4: sc around (18)
R5: (sc, dec) ×6 (12)
Do not overstuff. Flatten the open edge into a shallow cup.
Fasten off. Leave a 25 cm tail.
Eye Patches
Make 2. Yarn: black
R1: 6 sc in MR (6)
R2: inc ×6 (12)
R3: (sc, inc) ×6 (18)
R4: sc around (18)
Sl st to next stitch (18)
Flatten into a soft oval while sewing. The eye goes through the patch and head.
Fasten off. Leave a 25 cm tail.
Cheek Patches
Make 2. Yarn: pink
R1: 6 sc in MR (6)
R2: inc ×6 (12)
Sl st to next stitch (12)
Fasten off. Leave a 20 cm tail.
Nose and Mouth
Yarn: black embroidery thread or thin black yarn
Attach the safety nose between R14 and R15, centered between the eyes. Embroider a short vertical line 1 round downward, then two curved mouth arms across 2 stitches each. Keep the mouth below the patch line so the panda reads as panda, not bear.
Boba Cup Body
Yarn: milk tea beige
R1: 6 sc in MR (6)
R2: inc ×6 (12)
R3: (sc, inc) ×6 (18)
R4: (2 sc, inc) ×6 (24)
R5: (3 sc, inc) ×6 (30)
R6: (4 sc, inc) ×6 (36)
R7: (5 sc, inc) ×6 (42)
R8: BLO sc around (42)
R9–R23: sc around (42)
R24: sc around, sl st to first stitch (42)
Insert the base circle after R10. Stuff the lower cup before closing the top area around the panda body.
Fasten off. Leave a 40 cm tail if sewing the panda body inside the cup.
Cup Rim
Yarn: cream or clear-look pale yarn
Join yarn to any front loop of R24 on the cup.
R1: sc around the cup opening (42)
R2: FLO sc around (42)
R3: sl st around loosely (42)
Fasten off. Leave a 25 cm tail. Fold R2 outward to mimic the plastic lip in the photo.
Cup Face
Yarn: black for mouth; safety eyes 10–12 mm; pink for cheeks
Place cup safety eyes between cup R15 and R16, 8–10 stitches apart. Embroider a U-shaped smile between R17 and R18, about 4 stitches wide. Make two pink cheek patches using the same cheek pattern above, then sew them one round below the eyes.
Flat Boba Pearls for Cup Wall
Make 14–18. Yarn: dark brown
R1: 6 sc in MR (6)
R2: inc ×6 (12)
Sl st to first stitch (12)
Fasten off. Leave a 15 cm tail. Sew pearls unevenly across the lower cup, with the densest row near R20–R23.
Round Loose Pearls
Make 6–8. Yarn: black or dark brown
R1: 6 sc in MR (6)
R2: inc ×6 (12)
R3: sc around (12)
R4: dec ×6 (6)
Stuff with one pinch of fiberfill or yarn scrap.
Fasten off. Leave a 12 cm tail and close.
Striped Straw
Yarn: pink, mint, cream
Start with pink.
R1: 6 sc in MR (6)
R2–R4: sc around in pink (6)
Change to cream.
R5–R7: sc around in cream (6)
Change to mint.
R8–R10: sc around in mint (6)
Change to pink.
R11–R13: sc around in pink (6)
Change to cream.
R14–R16: sc around in cream (6)
Change to mint.
R17–R19: sc around in mint (6)
Change to pink.
R20–R22: sc around in pink (6)
Change to cream.
R23–R24: sc around in cream (6)
Fasten off. Leave a 25 cm tail. Insert pipe cleaner or skewer only for display.
Pink Scalloped Coaster
Yarn: pink
R1: 6 sc in MR (6)
R2: inc ×6 (12)
R3: (sc, inc) ×6 (18)
R4: (2 sc, inc) ×6 (24)
R5: (3 sc, inc) ×6 (30)
R6: (4 sc, inc) ×6 (36)
R7: (5 sc, inc) ×6 (42)
R8: (6 sc, inc) ×6 (48)
R9: sc around (48)
R10: (sl st, skip 1 st, 5 dc in next st, skip 1 st) ×12 scallops (48 base sts)
Fasten off. Weave in the tail.
Assembly
- Sew the panda body inside the cup, centered and slightly forward.
- Attach the panda head to the body, with the face angled over the cup front.
- Pin eye patches on the head between R10 and R15, then lock or sew the eyes through them.
- Sew the nose and mouth after the eye patches are fixed.
- Attach the ears between head R5 and R9, lined up with the outer edge of each patch.
- Sew front paws over the cup rim so they hang forward.
- Sew back paws just inside the rim, visible beside the body.
- Attach cup face, cup cheeks, and flat boba pearls to the cup wall.
- Sew the straw behind the panda shoulder at a slight right angle.
- Place loose pearls inside the cup and set the cup on the pink coaster.
The finished panda boba stands as a cup-based amigurumi with a separate display straw and pearl details.
7 Technical Tips
- Eye placement failure mode: high panda patches. Keep panda eyes between R12 and R13; moving them above R11 makes the head read as a generic bear.
- Cup lean failure mode: soft base. Add an 8–10 cm plastic canvas or cardboard circle after cup R10, then stuff below it before the upper wall grows tall.
- Straw collapse failure mode: unsupported tube. A 6-st tube over 24 rounds bends unless it has a pipe cleaner, skewer, or extra-firm stuffing every 3 rounds.
- Velvet or plush tension failure mode: hidden decreases. Mark every first stitch because black plush yarn can hide the R16–R21 head decreases.
- Patch symmetry failure mode: sewing by eye only. Pin both black patches and count 8–9 stitches between eye centers before locking the washers.
- Pearl crowding failure mode: even grid placement. Sew flat pearls in staggered rows across cup R17–R23, leaving at least 2 stitches between circles.
- Tail weaving failure mode: visible black knots on white head. Pull black patch tails into the head, exit through the back underside, and trim only after the yarn retracts.
Conclusion
This build works because the cup is not treated as a prop. It is the stabilizing body, the boba identifier, and the display base. Make the cup first, then size the panda head against the rim before sewing the face. That one check prevents oversized ears, hidden paws, and a straw that looks too thin. For the next step, pin the black eye patches and cup pearls before any final stitching. Share the finished panda boba amigurumi crochet pattern on Pinterest and Instagram with #PandaBobaAmigurumi. Which side should your straw sit on: behind the right ear like the photo, or angled behind the left paw?









