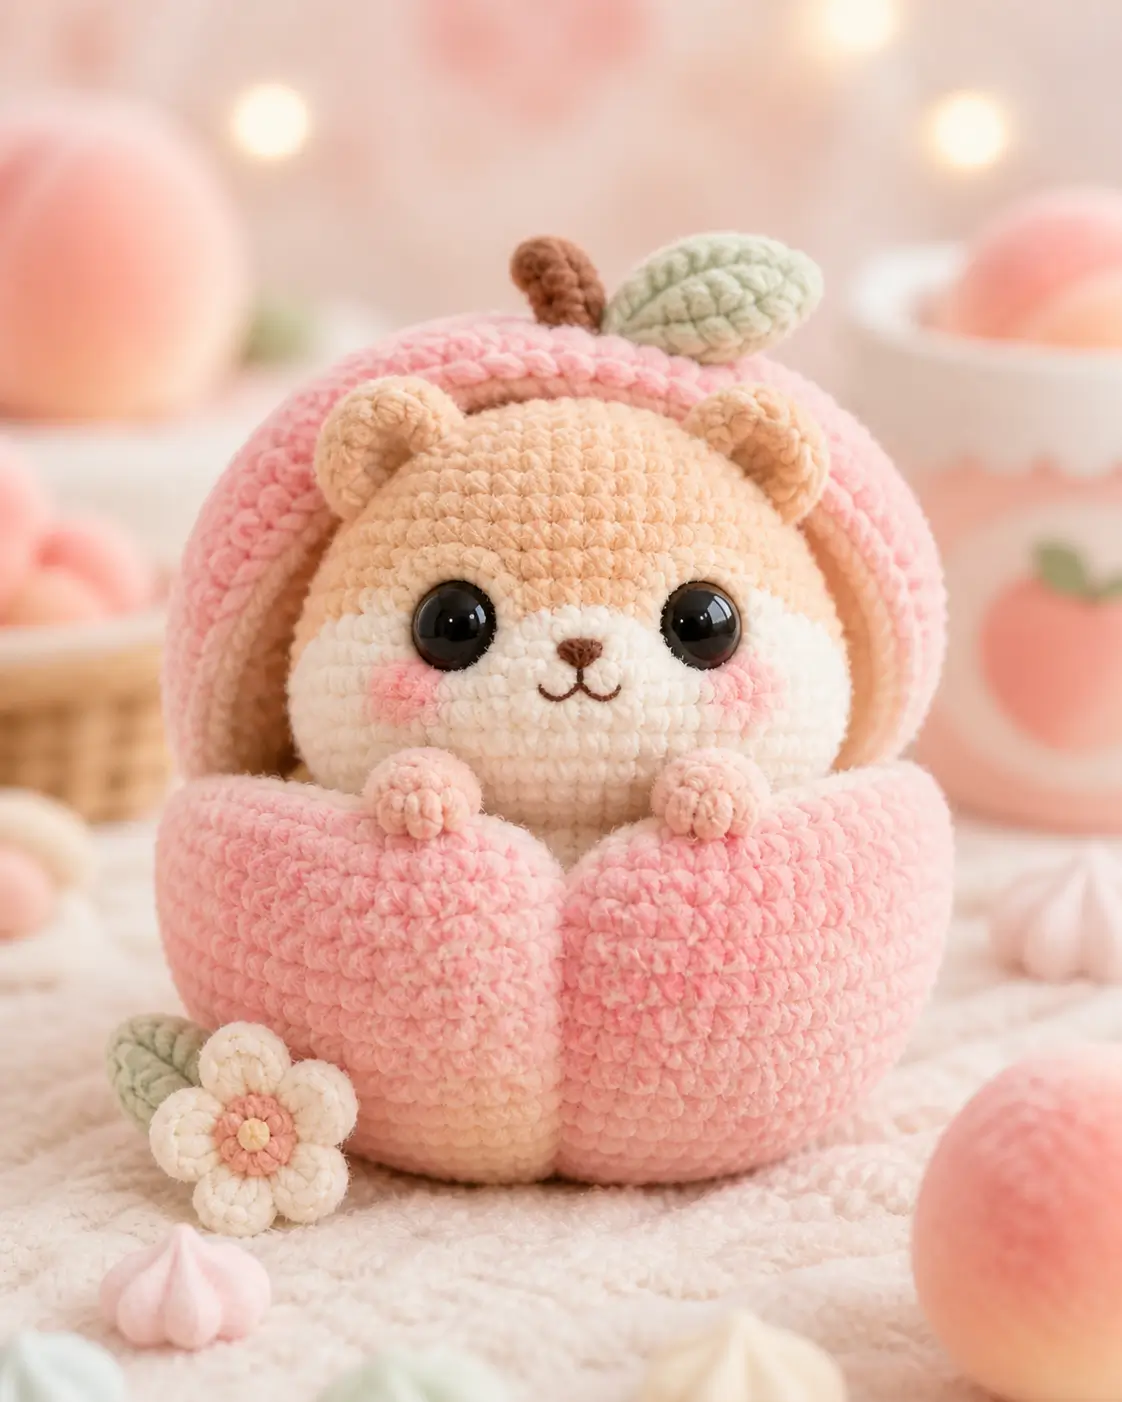
A peach bear has two silhouettes competing: round fruit and teddy face. This peach bear amigurumi crochet pattern builds both with chunky chenille, 20 mm safety eyes, a 28 cm head-to-toe scale, and an intermediate skill level. Use it when a display plush needs a clear fruit theme from the front, not only from the top.
The Design: What Makes Peach Bear Different
The peach shell must read as a fruit before the viewer notices the bear body. That means the hood is larger than a normal bear cap, the lower pod uses separate rounded lobes, and the leaf sits off-center near a short brown stem. You work the teddy head as a large 42-stitch sphere so the 20 mm eyes do not overpower the muzzle. Then the maker shifts scale: small paws, flat blush circles, and a compact flower.
The common mistake is building the peach pod as one plain bowl. It looks like a cushion. A better peach amigurumi bear uses lobes and a slight front split, so the crochet peach bear plush has weight at the base and height at the hood.
Project Info at a Glance
| Skill Level | Time | Finished Size | Hook | Best For |
|---|---|---|---|---|
| Advanced beginner / intermediate | Not stated by source | 28 cm head-to-toe | 5 mm bulky; 2 mm accents | Seated fruit-bear display plush |
Materials and Tools
Yarn
- Peach pink — size 6 super bulky chenille — 100 g skein — Hobbii Baby Snuggle Solid or similar.
- Cream — size 6 super bulky chenille — 100 g skein — use for head/body areas.
- Tan — size 6 super bulky chenille — 30–40 g — use for ears and paws.
- Blush pink — 8/4 cotton or small chenille scraps — under 10 g — use for cheeks and flower center.
- Mint green — 8/4 cotton or small chenille scraps — under 10 g — use for leaf.
- Brown — 8/4 cotton or embroidery yarn — under 5 g — use for stem, nose, and mouth.
- Ivory — 8/4 cotton or small chenille scraps — under 10 g — use for flower petals.
Tools
- Hook 5 mm for chenille sections.
- Hook 2 mm for cotton details.
- 20 mm black safety eyes with washers.
- Polyester stuffing, yarn needle, embroidery needle, sharp scissors, stitch markers, pins, and brown embroidery thread.
Abbreviations
MR = magic ring / sc = single crochet / inc = increase / dec = decrease / sl st = slip stitch / ch = chain / BLO = back loop only / hdc = half double crochet / dc = double crochet / FO = fasten off.
Invisible decrease: insert the hook through the front loops of the next two stitches, yarn over, pull through both loops, yarn over again, and finish one sc to reduce visible gaps.
Pattern — Step by Step
Continuous spiral unless noted. Counts use a large 42-stitch plateau for the head and peach hood, then smaller 36-stitch and 24-stitch plateaus for hidden or supporting pieces.
Head
Yarn: cream or tan chenille
R1: 6 sc in MR (6)
R2: inc ×6 (12)
R3: (sc, inc) ×6 (18)
R4: (2 sc, inc) ×6 (24)
R5: (3 sc, inc) ×6 (30)
R6: (4 sc, inc) ×6 (36)
R7: (5 sc, inc) ×6 (42)
R8–R15: sc around (42)
R16: (5 sc, dec) ×6 (36)
R17: (4 sc, dec) ×6 (30)
R18: (3 sc, dec) ×6 (24)
R19: (2 sc, dec) ×6 (18)
R20: (sc, dec) ×6 (12)
R21: dec ×6 (6)
Place safety eyes between R11 and R12, about 8 stitches apart. Stuff firmly before R18.
Fasten off. Weave tail through front loops and close.
Body
Yarn: cream chenille
R1: 6 sc in MR (6)
R2: inc ×6 (12)
R3: (sc, inc) ×6 (18)
R4: (2 sc, inc) ×6 (24)
R5: (3 sc, inc) ×6 (30)
R6: (4 sc, inc) ×6 (36)
R7–R11: sc around (36)
R12: (4 sc, dec) ×6 (30)
R13: sc around (30)
R14: (3 sc, dec) ×6 (24)
R15: sc around (24)
R16: (2 sc, dec) ×6 (18)
R17: (sc, dec) ×6 (12)
R18: dec ×6 (6)
Stuff firmly at the base and moderately near the neck so the pod can wrap around it.
Fasten off. Leave a 30 cm tail.
Peach Hood
Yarn: peach pink chenille
R1: 6 sc in MR (6)
R2: inc ×6 (12)
R3: (sc, inc) ×6 (18)
R4: (2 sc, inc) ×6 (24)
R5: (3 sc, inc) ×6 (30)
R6: (4 sc, inc) ×6 (36)
R7: (5 sc, inc) ×6 (42)
R8–R12: sc around (42)
R13: (5 sc, dec) ×6 (36)
R14: sc around (36)
R15: (4 sc, dec) ×6 (30)
Do not close. This piece becomes the rounded peach hood behind the bear head.
Fasten off. Leave a 45 cm tail.
Peach Pod Lobes
Yarn: peach pink chenille
Make 4.
R1: 6 sc in MR (6)
R2: inc ×6 (12)
R3: (sc, inc) ×6 (18)
R4: (2 sc, inc) ×6 (24)
R5–R8: sc around (24)
R9: (2 sc, dec) ×6 (18)
R10: (sc, dec) ×6 (12)
R11: dec ×6 (6)
Stuff each lobe lightly. Overstuffing removes the peach split.
Fasten off. Leave a 25 cm tail on each lobe.
Arms / Front Paws
Yarn: tan chenille
Make 2.
R1: 6 sc in MR (6)
R2: inc ×6 (12)
R3–R4: sc around (12)
R5: dec ×6 (6)
R6: sc around (6)
Stuff only the paw end. Keep the upper edge flat for sewing over the pod rim.
Fasten off. Leave a 20 cm tail.
Back Legs
Yarn: cream or tan chenille
Make 2.
R1: 6 sc in MR (6)
R2: inc ×6 (12)
R3: (sc, inc) ×6 (18)
R4–R5: sc around (18)
R6: (sc, dec) ×6 (12)
R7: dec ×6 (6)
Use these as hidden lower supports under the peach pod, not as long bear legs.
Fasten off. Leave a 25 cm tail.
Ears
Yarn: tan chenille
Make 2.
R1: 6 sc in MR (6)
R2: inc ×6 (12)
R3: (sc, inc) ×6 (18)
R4–R5: sc around (18)
Do not stuff. Flatten into half-circles.
Fasten off. Leave a 25 cm tail.
Muzzle Patch and Embroidered Snout
Yarn: cream chenille for patch; brown cotton for embroidery
R1: 6 sc in MR (6)
R2: inc ×6 (12)
R3: (sc, inc) ×6 (18)
R4: (2 sc, inc) ×6 (24)
Flatten the circle into a soft oval while sewing. Embroider a small brown triangle nose centered between the eyes, then add two short curved mouth stitches.
Fasten off. Leave a 25 cm tail.
Cheek Patches
Yarn: blush pink cotton or chenille scrap
Make 2.
R1: 6 sc in MR (6)
R2: inc ×6 (12)
Keep patches flat. Do not stuff.
Fasten off. Leave a 15 cm tail.
Stem
Yarn: brown cotton held double or brown chenille scrap
R1: 6 sc in MR (6)
R2–R5: sc around (6)
R6: dec ×3 (3)
Stuff with the yarn tail only. A rigid stuffed stem can pull the hood out of shape.
Fasten off. Leave a 20 cm tail.
Peach Leaf
Yarn: mint green cotton or chenille scrap
R1: 6 sc in MR (6)
R2: inc ×6 (12)
R3: (sc, inc) ×6 (18)
R4: (2 sc, inc) ×6 (24)
R5: sc around (24)
R6: (2 sc, dec) ×6 (18)
Flatten, pinch one end into a point, and stitch through both layers along the center vein.
Fasten off. Leave a 25 cm tail.
Five-Petal Flower Accessory
Yarn: ivory petals, blush pink center, yellow center dot
Petals, make 5.
R1: 6 sc in MR (6)
R2: inc ×6 (12)
R3: sc around (12)
R4: dec ×6 (6)
Do not overstuff. Flatten each petal slightly.
Center, make 1 in blush pink.
R1: 6 sc in MR (6)
R2: inc ×6 (12)
Yellow dot, make 1.
R1: 6 sc in MR (6)
Stack yellow dot over blush center, then sew five petals evenly around the back.
Fasten off. Leave tails for assembly.
Flower Leaf
Yarn: mint green cotton or chenille scrap
R1: 6 sc in MR (6)
R2: inc ×6 (12)
R3: (sc, inc) ×6 (18)
R4: (sc, dec) ×6 (12)
Flatten and sew behind one flower petal.
Fasten off. Leave a 15 cm tail.
Assembly
- Sew the body to the underside of the head, centered under the muzzle.
- Pin the peach hood around the back of the head, leaving the face fully open.
- Sew the hood edge from one cheek line, over the crown, and down to the opposite cheek line.
- Attach the ears through both the head and hood layers so they hold the fruit cap in place.
- Sew the muzzle patch between the eyes, then embroider the brown nose and mouth.
- Attach cheek patches one round below each eye, aligned with the mouth curve.
- Join the four peach pod lobes into a cup, with two lobes forming the front split.
- Place the body inside the pod and sew the pod rim to the lower torso.
- Attach front paws over the front pod rim, then sew hidden back legs under the base for sitting support.
- Sew the stem and leaf to the top of the hood, then attach the flower to the lower left pod edge.
The finished piece should sit without tipping when the pod lobes touch the table evenly.
7 Technical Tips
- Eye placement failure mode: eyes too low. Place 20 mm eyes between R11 and R12 before closing the head; lower placement makes the muzzle crowd the pod rim.
- Stitch marker failure mode: lost round start in chenille. Move the marker every round, and use a contrasting scrap marker at least 10 cm long so it does not sink into the pile.
- Stuffing failure mode: pear-shaped head. Add stuffing in three passes, with the firmest layer behind the eyes and a softer layer near R18–R21.
- Invisible decrease failure mode: visible gaps on pink pod lobes. Use front-loop invisible decreases on R9–R11 of each lobe because that area faces forward.
- Velvet tension failure mode: stretched holes beside safety eyes. Tighten the two stitches before and after each eye post, then check that the washer grips fabric, not only yarn pile.
- Pinning failure mode: crooked peach hood. Pin the hood at top center, both cheek edges, and the back neck before sewing; five pins minimum keeps the cap from drifting.
- Tail weaving failure mode: loose flower petals. Weave each petal tail through the flower center twice, then through the nearest pod lobe for at least 3 cm.
Conclusion
This peach bear is built around proportion control: 42 stitches for the head and hood, smaller paws, four pod lobes, and a leaf-stem unit that identifies the fruit from above. The next practical step is to crochet the head and one pod lobe first, then test the 20 mm eyes against the chenille before making every duplicate part. Save the peach bear amigurumi crochet pattern to Pinterest, and post the finished sitting angle on Instagram with #PeachBearPod. Which part should carry more visual weight on this character: the peach hood leaf or the front flower accessory?









