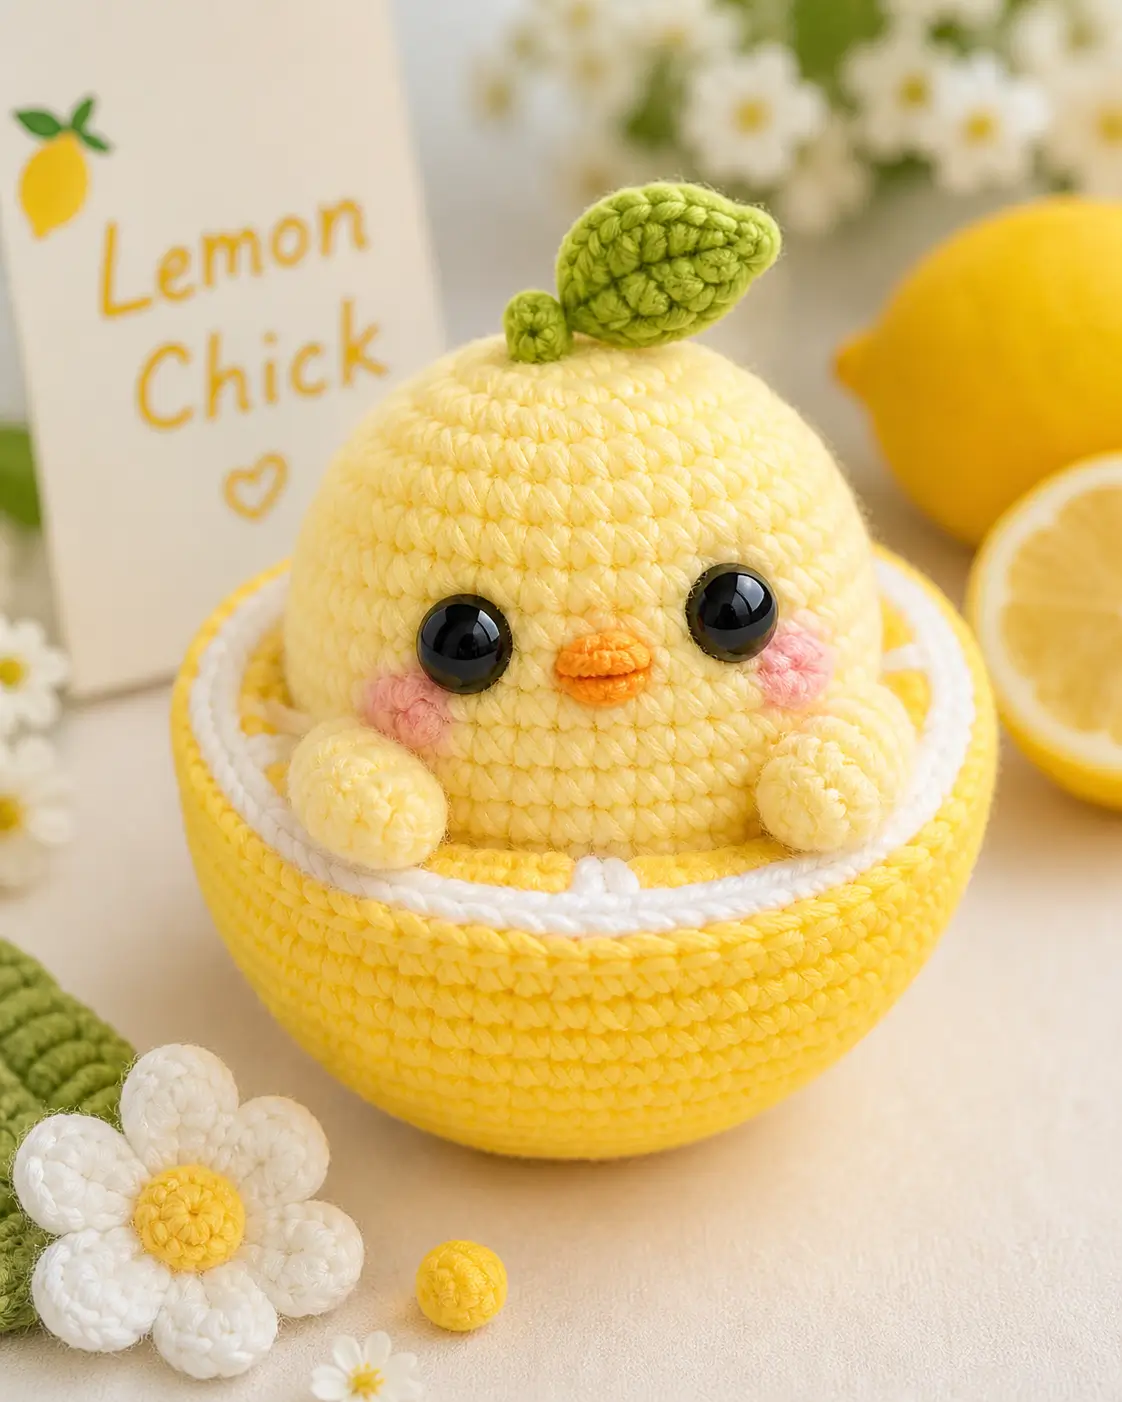
A lemon chick has no red comb; the leaf is the silhouette. This lemon chick amigurumi crochet pattern uses cotton DK or sport yarn, a 2.5 mm hook, 8 mm safety eyes, and a 9–10 cm seated display size. The skill level is intermediate because the bowl, face spacing, and small leaf need controlled shaping. Make it as a spring market sample or citrus-themed shelf piece.
The Design: What Makes Lemon Chick Different
This chick is built around a round yellow dome, not a realistic bird body. The head carries the expression, so the body stays smaller and partly hidden inside the lemon bowl. That proportion keeps the piece stable while matching the photo: large eyes, tiny beak, short wings, and a visible citrus crown.
The leaf replaces a chick comb. It must sit off-center and lean forward slightly; otherwise the toy reads as a plain amigurumi chick pattern with a green tab on top. The lemon bowl adds weight at the base, so the chick can sit without tipping. Many lemon chick crochet pattern versions skip the container, which removes the strongest citrus cue. The common mistake is making the bowl too shallow. A 42-stitch rim gives enough diameter for the body and leaves room for white segment lines.
Project Info at a Glance
| Skill Level | Time | Finished Size | Hook | Best For |
|---|---|---|---|---|
| Intermediate | 4–5 hours | 9–10 cm seated display | 2.5 mm | Spring decor, market table sample, citrus amigurumi set |
Materials and Tools
Yarn
- Pale lemon yellow — sport/DK cotton or 5-ply milk cotton — 18–20 g — YarnArt Jeans, Ricorumi, or Paintbox Cotton DK
- Bright yellow — same weight — 8–10 g — for lemon bowl shell and daisy center
- White — same weight — 4–5 g — for bowl rim, segment lines, and daisy petals
- Orange — same weight — 1.5–2 g — for beak and optional tucked feet
- Leaf green — same weight — 2–3 g — for top stem and leaf
- Soft pink — same weight — 1–2 g — for cheek patches
Tools
- Hook 2.5 mm
- 8 mm safety eyes, or 6 mm for a smaller face
- Fiberfill stuffing
- Tapestry needle
- Stitch markers
- Pins
- Scissors
- Black embroidery thread, optional for eye highlights
Abbreviations
MR = magic ring / sc = single crochet / inc = increase / dec = invisible decrease / sl st = slip stitch / ch = chain / BLO = back loop only / FLO = front loop only / FO = fasten off.
Invisible decrease means working through the front loops of the next 2 stitches before completing 1 sc, which reduces bulk on visible shaping rounds.
Pattern — Step by Step
Continuous spiral unless noted. Use the stitch marker at the first stitch of every round.
Head
Yarn: pale lemon yellow
R1: 6 sc in MR (6)
R2: inc ×6 (12)
R3: (sc, inc) ×6 (18)
R4: (2 sc, inc) ×6 (24)
R5: (3 sc, inc) ×6 (30)
R6: (4 sc, inc) ×6 (36)
R7: (5 sc, inc) ×6 (42)
R8–R15: sc around (42)
R16: (5 sc, dec) ×6 (36)
R17: (4 sc, dec) ×6 (30)
R18: (3 sc, dec) ×6 (24)
R19: (2 sc, dec) ×6 (18)
Place safety eyes between R11 and R12, 9 stitches apart. Start stuffing before the opening gets narrow.
R20: (sc, dec) ×6 (12)
R21: dec ×6 (6)
Fasten off. Close the final 6 stitches with a tapestry needle and weave in the tail.
Body
Yarn: pale lemon yellow
R1: 6 sc in MR (6)
R2: inc ×6 (12)
R3: (sc, inc) ×6 (18)
R4: (2 sc, inc) ×6 (24)
R5: (3 sc, inc) ×6 (30)
R6: (4 sc, inc) ×6 (36)
R7–R11: sc around (36)
R12: (4 sc, dec) ×6 (30)
R13: sc around (30)
R14: (3 sc, dec) ×6 (24)
R15: (2 sc, dec) ×6 (18)
Stuff firmly at the bottom and lightly at the neck edge so the head can sit flush.
R16: (sc, dec) ×6 (12)
R17: dec ×6 (6)
Fasten off. Leave a 30 cm tail for sewing the body to the head.
Wings / Front Arms
Yarn: pale lemon yellow
Make 2.
R1: 6 sc in MR (6)
R2: inc ×6 (12)
R3–R4: sc around (12)
R5: dec ×6 (6)
Do not overstuff. Flatten the opening. Fasten off and leave a 20 cm tail on each wing.
Tucked Feet / Back Legs
Yarn: orange
Make 2.
R1: 6 sc in MR (6)
R2: inc ×6 (12)
R3: sc around (12)
R4: dec ×6 (6)
Stuff with a pinch of fiberfill. Fasten off and leave a 15 cm tail. These sit under the body inside the bowl, so they are not visible from the front.
Beak
Yarn: orange
R1: 6 sc in MR (6)
R2: sc around (6)
R3: sc around (6)
Flatten the piece horizontally. Fasten off, leaving a 20 cm tail. Sew between the eyes over R13–R14.
Cheek Patches
Yarn: soft pink
Make 2.
R1: 6 sc in MR (6)
R2: inc ×6 (12)
Sl st to close.
Fasten off and leave a 15 cm tail on each patch. Sew one cheek below each eye, centered between R13 and R15.
Top Stem
Yarn: leaf green
R1: 6 sc in MR (6)
R2–R5: sc around (6)
Stuff with yarn scraps only if the stem collapses. Fasten off and leave a 20 cm tail.
Leaf
Yarn: leaf green
R1: 6 sc in MR (6)
R2: inc ×6 (12)
R3: (sc, inc) ×6 (18)
R4–R6: sc around (18)
R7: (sc, dec) ×6 (12)
R8: dec ×6 (6)
Do not stuff. Flatten, pinch one end to form the leaf point, and sew through both layers. Fasten off with a 25 cm tail.
Lemon Bowl
Yarn: bright yellow
R1: 6 sc in MR (6)
R2: inc ×6 (12)
R3: (sc, inc) ×6 (18)
R4: (2 sc, inc) ×6 (24)
R5: (3 sc, inc) ×6 (30)
R6: (4 sc, inc) ×6 (36)
R7: (5 sc, inc) ×6 (42)
R8–R12: sc around (42)
R13: BLO sc around (42)
R14–R15: sc around (42)
Fasten off and weave in the tail. The BLO round creates the inside ledge that helps the chick sit lower.
White Bowl Rim
Yarn: white
Join white yarn at the front center of R15 on the bowl.
R1: sc around the top edge (42)
R2: sc around (42)
Sl st to the first stitch. Fasten off and weave in the tail. For segment lines, make 6 white surface-crochet lines from the inner center of the bowl to the rim, spacing each line about 7 stitches apart.
Daisy Center
Yarn: bright yellow
R1: 6 sc in MR (6)
R2: inc ×6 (12)
R3: sc around (12)
R4: dec ×6 (6)
Stuff lightly. Fasten off and close.
Daisy Petals
Yarn: white
Make 6.
R1: 6 sc in MR (6)
R2: inc ×6 (12)
R3: sc around (12)
R4: dec ×6 (6)
Do not stuff. Flatten each petal and sew around the daisy center.
Mini Lemon Drop
Yarn: bright yellow
R1: 6 sc in MR (6)
R2: inc ×6 (12)
R3: sc around (12)
R4: dec ×6 (6)
Stuff lightly. Fasten off and close.
Assembly
- Sew the body to the underside of the head, centered under the eye line, with the body opening hidden against the head.
- Pin the chick inside the lemon bowl before sewing any limbs; the lower body should sit below the white rim.
- Attach the wings to the front sides of the body, angled upward, with their tops about 2 rounds below the head seam.
- Sew the hidden tucked feet to the base of the body so they press into the bowl and stop the chick from rotating.
- Stitch the beak between the eyes over R13–R14, keeping the flattened oval horizontal.
- Sew the cheek patches below the eyes, with the inner edge of each patch 1 stitch away from the beak.
- Attach the green stem at the top center of the head, then sew the leaf to the stem and head so it leans forward.
- Place the chick in the lemon bowl and stitch through the lower body into the bowl ledge at 4 anchor points.
- Sew or surface-crochet the white bowl segment lines after the chick is anchored, stopping each line before it reaches the body.
- Assemble the daisy and mini lemon drop separately, then place or stitch them beside the bowl as display props.
The finished display has a lemon chick seated in an open lemon half with a visible leaf crown and white rim.
7 Technical Tips
- Eye placement failure mode: cross-eyed face. Place 8 mm eyes between R11 and R12 with 9 stitches between posts; a 7-stitch gap makes the beak area too cramped.
- Bowl collapse failure mode: rim folding inward. Work R13 of the lemon bowl in BLO, then add 2 full rounds at 42 stitches so the wall has a vertical lip.
- Stuffing firmness measurement: head must rebound, not dent. Add fiberfill until the head measures about 6 cm wide with sport/DK yarn, then stop before the stitches stretch.
- Leaf angle failure mode: plain chick silhouette. Tack the leaf through both the stem and R2–R3 of the head so it leans 30–45 degrees forward.
- Wing placement failure mode: arms floating too high. Pin each wing with the top edge 2 rounds below the head seam and the lower edge touching the bowl rim.
- Invisible decrease failure mode: visible ridges on the face dome. Use front-loop invisible decreases on R16–R21 of the head, then rotate the final closure toward the bottom.
- Tail weaving measurement: short tails pull out of cotton. Leave at least 20 cm tails on wings, cheeks, beak, stem, and leaf, then weave each tail through 3 separate stitch paths.
Conclusion
This pattern uses a large round head, smaller seated body, and 42-stitch lemon bowl to keep the citrus identity visible from the front. The next practical step is to crochet the head first, test the eye spacing with pins, then make the bowl before attaching wings or cheeks. That order prevents the face from sitting too low behind the rim. Share the finished lemon chick amigurumi crochet pattern photo on Pinterest and Instagram with the bowl, leaf, and daisy visible in the first image. Use #LemonChick. Should the leaf angle forward over the beak, or sit sideways like a tiny citrus sprout?









