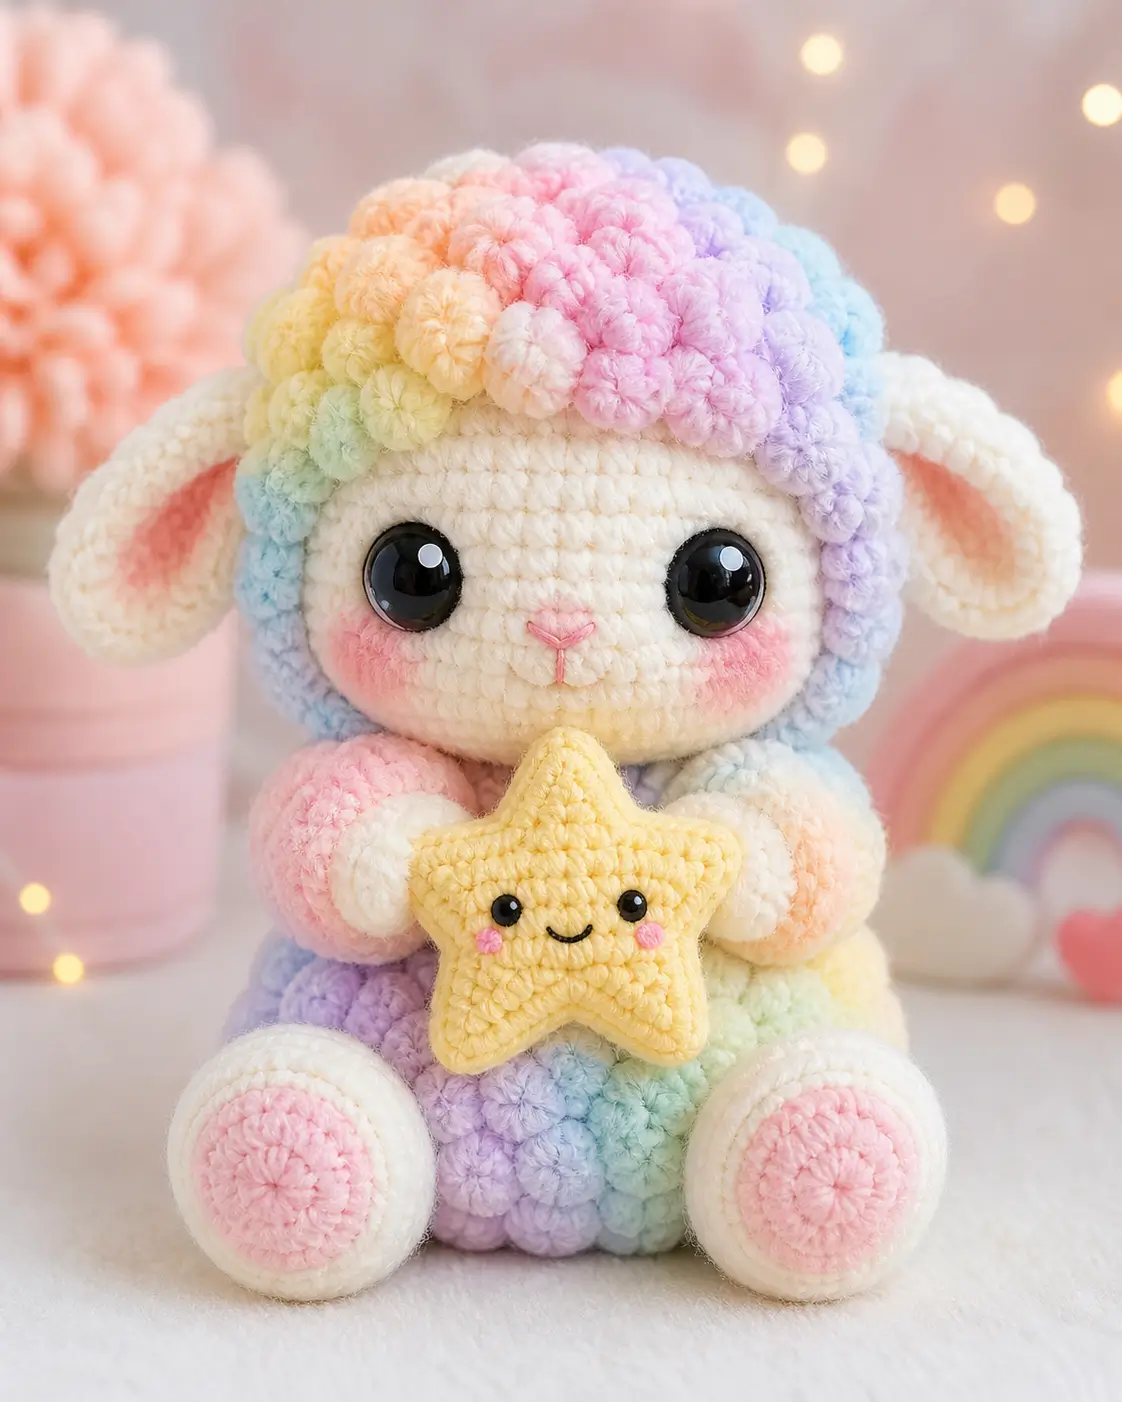
A lamb only reads correctly when the fleece sits proud of the face instead of swallowing it. This lamb amigurumi crochet pattern uses a smooth ivory head, bobble-textured rainbow fleece, a 4 mm hook, and 15 mm eyes to produce a seated toy about 19 cm tall. Plan on an intermediate build. The separate star gives the front view a fixed focal point, which makes this version useful for shelf display or nursery styling.
The Design: What Makes This Lamb Different
You build the face as a clean sphere first and add the fleece as a separate cap. That choice keeps the eye line readable, leaves room for blush placement, and stops textured stitches from crowding the nose. Next comes the seated torso. A medium 36-stitch body gives enough width for the rainbow fleece bands while still letting the toy sit behind the star without looking barrel-shaped. The ears matter just as much. Their width sits in the middle rather than at the base, so they fall outward like a lamb’s ear instead of lifting like a rabbit’s. In a pastel lamb crochet build, proportion does more than color. A common mistake in a sheep amigurumi pattern is spreading fleece texture across the whole head; the result loses forehead definition and drags the face downward.
Project Info at a Glance
| Skill Level | Time | Finished Size | Hook | Best For |
|---|---|---|---|---|
| Intermediate | 6–8 hrs | 19 cm | 4.0 mm | nursery shelf decor, display plush |
Comparable lamb patterns commonly land around 18–19 cm with DK yarn and a 4 mm hook, while larger bobble sheep builds push up in scale and eye size. This photo-inspired version keeps the 19 cm range and borrows the larger-face look.
Materials and Tools
Yarn
- Ivory / cream smooth yarn — DK or light worsted — about 60 g — Durable Cosy Fine or Paintbox Cotton DK
- Pastel yellow velvet/chenille — fleece accent — about 15 g — Durable Velvet or similar
- Mint velvet/chenille — fleece accent — about 15 g — Durable Velvet or similar
- Peach velvet/chenille — fleece accent — about 15 g — Durable Velvet or similar
- Pink velvet/chenille — fleece accent — about 15 g — Durable Velvet or similar
- Lavender velvet/chenille — fleece accent — about 15 g — Durable Velvet or similar
- Sky blue velvet/chenille — fleece accent — about 15 g — Durable Velvet or similar
- Blush pink cotton — inner ears, cheeks, nose detail — about 10 g — any smooth DK cotton
- Soft yellow cotton or smooth velvet — star accessory — about 20 g — any light worsted yarn
Tools
- Hook 4.0 mm
- 15 mm safety eyes
- Polyfill stuffing
- Tapestry needle
- Stitch markers
- Pins
- Black embroidery thread
- Pink embroidery thread
Rainbow sheep patterns currently published by Durable mix velvet with smoother support yarns, and current lamb results also show chenille-body plus DK-face combinations in free plush builds. Verified lamb references place the standard hook around 4 mm, with safety-eye size expanding from 9 mm on minis to 15 mm on larger bobble designs.
Abbreviations
MR / sc / inc / dec / sl st / ch / BLO / bs (berry stitch)
An invisible decrease works through the front loops of the next two stitches so the closing rounds stay compact and the stuffing does not show between decreases.
Pattern — Step by Step
Continuous spiral unless noted.
The instructions below are a photo-inspired original build shaped with standard amigurumi math. They are not a transcription of any published lamb pattern.
Head (Make 1)
Yarn: ivory smooth yarn — Source: Standard amigurumi math + photo adaptation
R1: 6 sc in MR (6)
R2: inc x6 (12)
R3: (sc 1, inc) x6 (18)
R4: (sc 2, inc) x6 (24)
R5: (sc 3, inc) x6 (30)
R6: (sc 4, inc) x6 (36)
R7: sc around (36)
R8: sc around (36)
R9: sc around (36)
R10: sc around (36)
R11: sc around (36)
Insert safety eyes between R9 and R10, 11 stitches apart.
R12: (sc 4, dec) x6 (30)
R13: (sc 3, dec) x6 (24)
R14: (sc 2, dec) x6 (18)
Stuff firmly. Embroider the pink nose as a narrow Y centered one round below the eyes.
R15: (sc 1, dec) x6 (12)
R16: dec x6 (6)
Fasten off. Leave 25 cm tail.
Fleece Cap (Make 1)
Yarn: pastel velvet/chenille — Source: Standard amigurumi math + photo adaptation
R1: 6 sc in MR with pastel yellow (6)
R2: inc x6 (12)
R3: (sc 1, inc) x6 with mint (18)
R4: (sc 2, inc) x6 with peach (24)
R5: (sc 3, inc) x6 with pink (30)
R6: (sc 4, inc) x6 with lavender (36)
R7: (bs 1, sc 1) x18 with yellow (36)
R8: (sc 1, bs 1) x18 with mint (36)
R9: (bs 1, sc 1) x18 with peach (36)
R10: (sc 1, bs 1) x18 with pink (36)
R11: (bs 1, sc 1) x18 with lavender (36)
R12: (sc 1, bs 1) x18 with sky blue (36)
Do not stuff. The cap should sit over the top third of the head and tip slightly to one side.
Fasten off. Leave 35 cm tail.
Ears and Inner Ear Liners (Make 2 of each)
Yarn: ivory for outer ears, blush pink for liners — Source: Standard amigurumi math + photo adaptation
Outer Ear
R1: 6 sc in MR (6)
R2: inc x6 (12)
R3: (sc 1, inc) x6 (18)
R4: sc around (18)
R5: sc around (18)
R6: sc around (18)
Fasten off. Leave 20 cm tail. Flatten without stuffing.
Inner Ear Liner
R1: 6 sc in MR (6)
R2: inc x6 (12)
R3: (sc 1, inc) x6 (18)
Fasten off. Leave 15 cm tail.
Sew one liner to the center of each outer ear, leaving a narrow ivory edge visible all around.
Body (Make 1)
Yarn: pastel velvet/chenille — Source: Standard amigurumi math + photo adaptation
R1: 6 sc in MR with lavender (6)
R2: inc x6 (12)
R3: (sc 1, inc) x6 with sky blue (18)
R4: (sc 2, inc) x6 with mint (24)
R5: (sc 3, inc) x6 with yellow (30)
R6: (sc 4, inc) x6 with peach (36)
R7: (bs 1, sc 1) x18 with pink (36)
R8: (sc 1, bs 1) x18 with lavender (36)
R9: (bs 1, sc 1) x18 with sky blue (36)
R10: (sc 1, bs 1) x18 with mint (36)
R11: (bs 1, sc 1) x18 with yellow (36)
R12: (sc 1, bs 1) x18 with peach (36)
R13: (sc 4, dec) x6 (30)
R14: (bs 1, sc 1) x15 with pink (30)
R15: (sc 3, dec) x6 (24)
R16: (sc 1, bs 1) x12 with lavender (24)
R17: (sc 2, dec) x6 (18)
Stuff from the lower half first. Keep the front flatter than the back so the star sits close to the belly.
R18: (sc 1, dec) x6 (12)
R19: dec x6 (6)
Fasten off. Leave 30 cm tail.
Front Arms (Make 2)
Yarn: ivory plus one pastel shade — Source: Standard amigurumi math + photo adaptation
R1: 6 sc in MR with ivory (6)
R2: inc x6 (12)
R3: sc around (12)
R4: sc around (12)
R5: sc around with pastel pink or peach (12)
R6: sc around (12)
R7: sc around (12)
Stuff lightly only at the paw end.
R8: dec x6 (6)
Fasten off. Leave 20 cm tail. Flatten the opening.
Back Legs (Make 2)
Yarn: ivory — Source: Standard amigurumi math + photo adaptation
R1: 6 sc in MR (6)
R2: inc x6 (12)
R3: (sc 1, inc) x6 (18)
R4: (sc 2, inc) x6 (24)
R5: sc around (24)
R6: sc around (24)
R7: sc around (24)
R8: (sc 2, dec) x6 (18)
Stuff firmly through the foot, but keep the top third softer so it can flatten against the body.
R9: (sc 1, dec) x6 (12)
Fasten off. Leave 25 cm tail.
Foot Pads (Make 2)
Yarn: blush pink — Source: Standard amigurumi math + photo adaptation
R1: 6 sc in MR (6)
R2: inc x6 (12)
R3: (sc 1, inc) x6 (18)
R4: (sc 2, inc) x6 (24)
Fasten off. Leave 18 cm tail.
Cheek Patches (Make 2)
Yarn: blush pink — Source: Standard amigurumi math + photo adaptation
R1: 6 sc in MR (6)
R2: inc x6 (12)
Fasten off. Leave 15 cm tail.
Star Accessory (Make 1)
Yarn: soft yellow — Source: Standard amigurumi math + photo adaptation
Center Discs (Make 2)
R1: 6 sc in MR (6)
R2: inc x6 (12)
R3: (sc 1, inc) x6 (18)
Fasten off on both discs. Leave a 20 cm tail on one disc and 35 cm on the second.
Star Points (Make 10)
R1: 6 sc in MR (6)
R2: sc around (6)
Fasten off. Leave 12 cm tail. Pull the tail through the 6 front loops and tighten to form a point.
Embroider two small black eyes and a curved smile on one center disc. Add two tiny pink cheek knots if desired.
Sew 5 points evenly around the edge of one center disc. Repeat for the second disc. Place the two star faces together, wrong sides inward, whipstitch around, stuff lightly, and close.
Fasten off. Leave 20 cm tail if you want to tack the star between the arms.
Assembly
- Sew the head to the top front of the body, not directly on the center crown. The head should lean forward by a few millimeters so the eyes face the viewer.
- Pin the fleece cap over the crown and sides of the head. Place yellow and pink toward the front and sky blue toward one side so the color flow stays visible from the front.
- Attach the ears between head rounds 6 and 11. Angle them outward and down so the lower edge sits just outside the eye line.
- Sew the cheek patches one round below the eyes and slightly toward the outer corners. Keep both circles low; high cheeks crowd the muzzle.
- Finish the facial embroidery if needed. The nose should sit on center and the vertical mouth split should stop after one stitch.
- Attach the arms at the upper third of the body. Let the paw ends meet over the front center.
- Sew the back legs low on the body with the pink pads facing forward. Test the seated balance before locking the second leg in place.
- Stitch each foot pad to a back leg with a narrow ivory border still visible. A centered pad reads cleaner than a full-edge flush join.
- Place the star between the arms and either tack it with two hidden stitches or add a tiny thread loop so it can be removed. Keep the smile centered below the lamb’s nose.
- Weave every tail through at least 4 cm of stitching, changing direction more than once. Steam only the smooth face yarn from a distance; leave the fleece texture dry.
The assembled lamb should sit upright with the star centered below the nose.
7 Technical Tips
- Marker drift on the fleece cap can twist the rainbow sequence by one full segment. Put the marker in the first plain sc of each round, not in a berry stitch, so the seam stays readable.
- Head stuffing density changes the face faster than color does. Stop when the cheeks stay round but the eye washers do not bulge; overfilling pushes the eyes outward and shortens the muzzle.
- Invisible decreases belong on the smooth face rounds. A regular decrease leaves six visible pits around the closing section and they show clearly on ivory yarn.
- Eye placement timing matters. Install the eyes between R9 and R10, 11 stitches apart; one round lower makes the forehead collapse and one stitch wider flattens the expression.
- Velvet tension must stay even through the berry rounds. Loose berry stitches on one side make the cap sit higher there, which throws the rainbow bands off level.
- Pin both back legs before sewing either permanently. A mismatch of even 3–5 mm in leg height is enough to tip the star and stop the toy from sitting square.
- Tail weaving is not optional on textured yarn. Run each tail through at least three direction changes and bury 4 cm or more, because a single straight pass can work loose inside bobble texture.
Conclusion
Build the head first, seat the body second, and keep the legs pinned until the toy can sit without the star falling forward. That order fixes more proportion problems than late reshaping. After finishing, take one straight-on photo and one three-quarter view so the fleece bands read clearly, then save those images before posting. Share the result on Pinterest and Instagram with #PastelRainbowLamb and note which yarn family you used for the fleece. This lamb amigurumi crochet pattern works best when the face stays open and the cap frames it cleanly. Did you leave the yellow section near the forehead, or did you center the pink over one eye?









