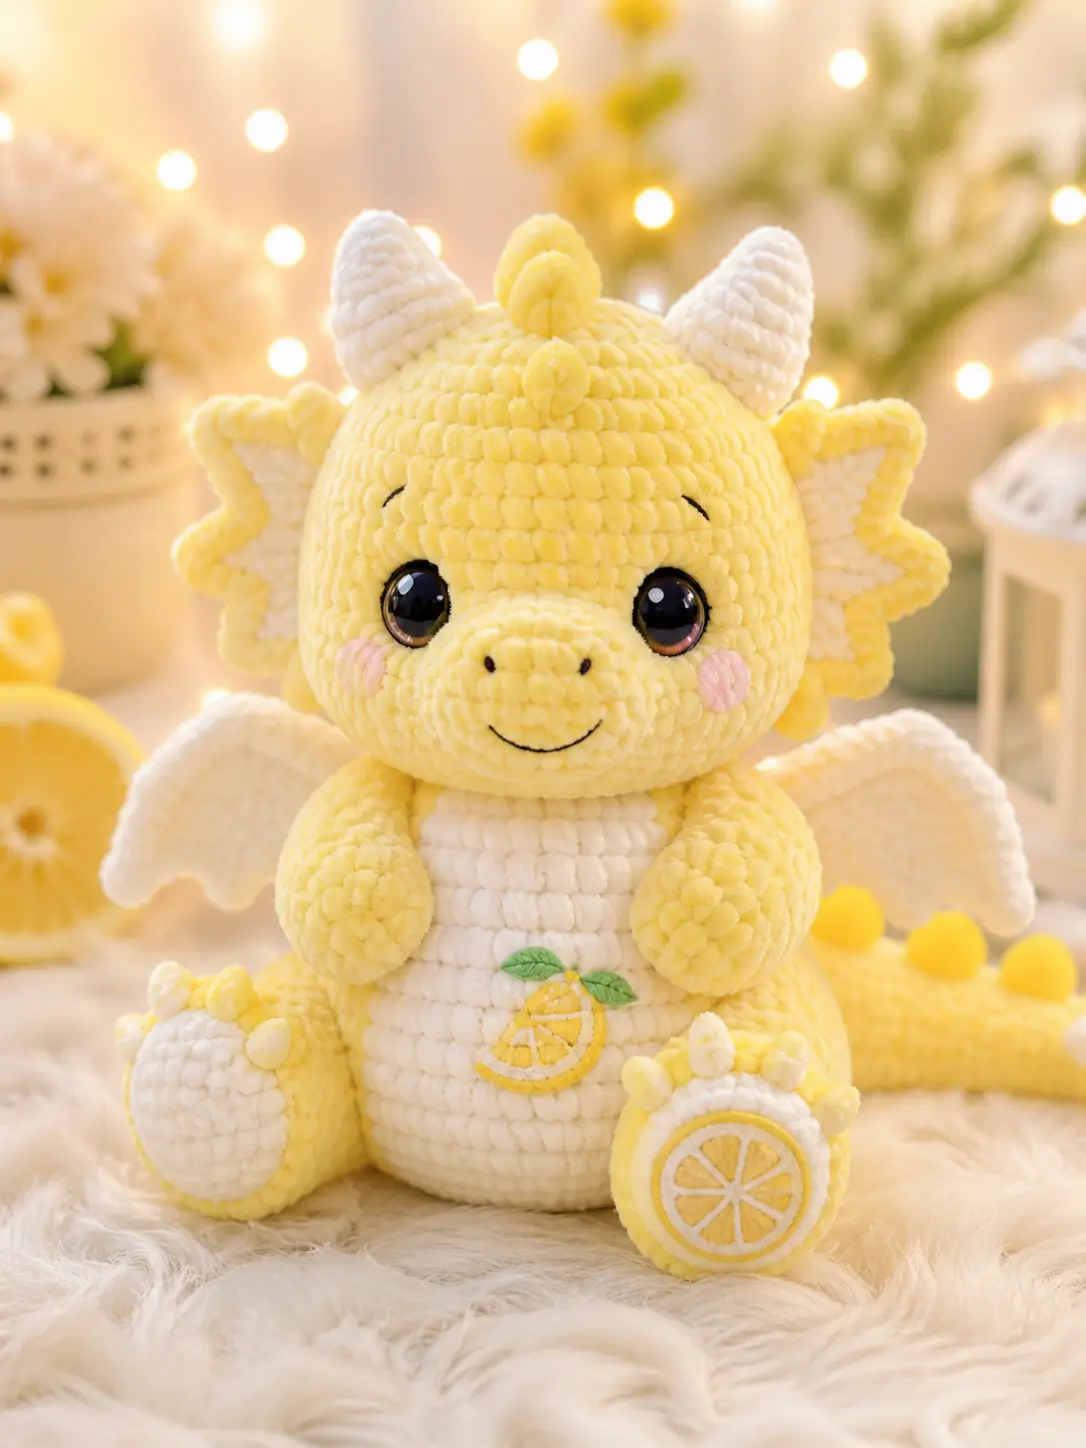
Lemon dragons need citrus logic before dragon logic: round cheeks, slice-marked feet, and wings that read like lemon wedges. This lemon dragon amigurumi crochet pattern uses yellow chenille, white chenille, 25 mm eyes, and a 5 mm hook to make a 20–24 cm seated plush at intermediate level. Its flat appliqué and sturdy limbs make it useful for product photos, market tables, and fruit-themed collections.
The Design: What Makes Lemon Different
The head is wider than the body because the lemon identity sits in the face: snout, cheeks, horns, and side frills. You build the head to a 42-stitch plateau, then keep the body equally broad at the base so the plush can sit without tipping. A narrow body would make the wings pull backward. The maker then shifts from animal anatomy to citrus markers: white wing panels, yellow edging, round foot pads, and a wedge appliqué on the belly. Smaller dragons often lose those details. Not this one. Most failed lemon dragon crochet projects look like yellow dinosaurs because the frills are flat, the foot slices are missing, or the eyes are set too close to the snout. In this citrus dragon amigurumi, every lemon feature gets its own part, not just a color change.
Project Info at a Glance
| Skill Level | Time | Finished Size | Hook | Best For |
|---|---|---|---|---|
| Intermediate | 3–4 hours | 20–24 cm seated | 5 mm | Fruit dragon plush, display toy, market-table sample |
Ribblr’s Lemon Dragon page lists intermediate skill, chenille yarn, and a 5 mm hook; a Ribblr maker using bulky yarn and a 5 mm hook reported about 7.5 inches long, close to 19 cm before photo-style height additions such as horns and crest bumps.
Materials and Tools
Yarn
- Pastel lemon yellow chenille — #6 super bulky — 150 g — Premier Parfait Chunky Sunshine, Yellow, or similar
- White or cream chenille — #6 super bulky — 80–100 g — Premier Parfait Chunky Cream or White
- Blush pink yarn — DK, worsted, or chenille scrap — 5 g — for cheek patches
- Embroidery scraps — black, green, white, and deeper yellow — 2–5 g each — for smile, nostrils, leaves, and lemon segments
Tools
- Hook 5 mm
- Safety eyes 25 mm for this scale; use 30 mm only for a larger plush
- Polyester stuffing
- Yarn needle
- Stitch markers
- Pins
- Scissors
- Black embroidery thread
Premier Parfait Chunky is listed as #6 super bulky, 100 g per skein, and 131 yards per skein; the chunky baby dragon source gives 1.5 skeins main color and 1 skein for add-ons, which supports the 150 g yellow and 80–100 g white planning range.
Abbreviations
MR = magic ring; sc = single crochet; inc = increase; dec = decrease; sl st = slip stitch; ch = chain; BLO = back loop only; bbl = bobble stitch; FO = fasten off. Invisible decrease uses the front loops of the next 2 stitches only, which reduces bumps at the cheeks, belly, and tail tip.
Pattern — Step by Step
Work in a continuous spiral unless a part is marked “worked flat.” The stitch counts below are original and based on standard amigurumi shaping from the photo, not copied from a paid or interactive pattern.
Head
Make 1. Yarn: pastel lemon yellow.
R1: 6 sc in MR (6)
R2: inc ×6 (12)
R3: (sc, inc) ×6 (18)
R4: (2 sc, inc) ×6 (24)
R5: (3 sc, inc) ×6 (30)
R6: (4 sc, inc) ×6 (36)
R7: (5 sc, inc) ×6 (42)
R8–R16: sc around (42)
Place safety eyes between R11 and R12, with 7 visible stitches between the inside posts. Pin the snout before locking the washers.
R17: (5 sc, dec) ×6 (36)
R18: (4 sc, dec) ×6 (30)
R19: (3 sc, dec) ×6 (24)
Stuff firmly, especially under the eyes.
R20: (2 sc, dec) ×6 (18)
R21: (sc, dec) ×6 (12)
R22: dec ×6 (6)
Fasten off. Leave 15 cm tail and close the hole.
Body
Make 1. Yarn: pastel lemon yellow.
R1: 6 sc in MR (6)
R2: inc ×6 (12)
R3: (sc, inc) ×6 (18)
R4: (2 sc, inc) ×6 (24)
R5: (3 sc, inc) ×6 (30)
R6: (4 sc, inc) ×6 (36)
R7: (5 sc, inc) ×6 (42)
R8–R14: sc around (42)
R15: (5 sc, dec) ×6 (36)
R16: sc around (36)
R17: (4 sc, dec) ×6 (30)
R18: sc around (30)
R19: (3 sc, dec) ×6 (24)
Stuff the base flat enough for sitting, but keep the upper body rounded.
R20: (2 sc, dec) ×6 (18)
R21: (sc, dec) ×6 (12)
R22: dec ×6 (6)
Fasten off. Leave 25 cm tail for sewing.
Snout
Make 1. Yarn: pastel lemon yellow.
R1: 6 sc in MR (6)
R2: inc ×6 (12)
R3: (sc, inc) ×6 (18)
R4–R5: sc around (18)
Fasten off. Leave 25 cm tail. Stuff lightly, then embroider 2 small black nostrils across R3 and a curved smile under the snout after sewing.
Arms / Front Legs
Make 2. Yarn: pastel lemon yellow.
R1: 6 sc in MR (6)
R2: inc ×6 (12)
R3: (sc, inc) ×6 (18)
R4–R7: sc around (18)
R8: (sc, dec) ×6 (12)
R9–R11: sc around (12)
Stuff the paw only. Leave the upper arm flatter for clean sewing.
Fasten off. Leave 20 cm tail.
Back Legs
Make 2. Yarn: pastel lemon yellow.
R1: 6 sc in MR (6)
R2: inc ×6 (12)
R3: (sc, inc) ×6 (18)
R4: (2 sc, inc) ×6 (24)
R5–R7: sc around (24)
R8: (2 sc, dec) ×6 (18)
R9–R12: sc around (18)
Stuff the foot firmly at the front and lightly at the hip.
Fasten off. Leave 25 cm tail.
Foot Lemon Pads
Make 2. Yarn: white or cream; embroidery in yellow and white.
R1: 6 sc in MR (6)
R2: inc ×6 (12)
R3: (sc, inc) ×6 (18)
R4: (2 sc, inc) ×6 (24)
Sl st to close (24)
Use yellow embroidery to make a circle just inside the edge, then stitch 6 wedge spokes from center to rim. Add white lines between segments if the pad needs stronger contrast.
Fasten off. Leave 20 cm tail.
Toe Bumps
Make 6. Yarn: pastel lemon yellow or white.
R1: 6 sc in MR (6)
R2: sc around (6)
Fasten off. Leave 12 cm tail. Sew 3 bumps along the top edge of each back foot.
Horns
Make 2. Yarn: white or cream.
R1: 6 sc in MR (6)
R2: sc around (6)
R3: (sc, inc) ×3 (9)
R4: sc around (9)
R5: (2 sc, inc) ×3 (12)
R6–R7: sc around (12)
Stuff only the base. The tip should stay narrow.
Fasten off. Leave 20 cm tail.
Side Frills / Ears
Make 2. Yarn: white or cream inner panel; pastel lemon yellow edge. Worked flat.
Ch 7.
Row 1: sc in second ch from hook and across (6)
Row 2: ch 1, inc, 4 sc, inc (8)
Row 3: ch 1, sc across (8)
Row 4: ch 1, dec, 4 sc, dec (6)
Row 5: ch 1, sc, hdc, dc, hdc, sc, sl st (6)
Switch to yellow. Work 1 sc evenly around the side and top edges, placing (sc, ch 2, sc) into 3 outer points for the scalloped lemon shape.
Fasten off. Leave 25 cm tail.
Wings
Make 2. Yarn: white or cream panel; pastel lemon yellow edge. Worked flat.
Ch 2.
Row 1: 2 sc in second ch from hook (2)
Row 2: ch 1, inc ×2 (4)
Row 3: ch 1, sc, inc, inc, sc (6)
Row 4: ch 1, 2 sc, inc, inc, 2 sc (8)
Row 5: ch 1, 3 sc, inc, inc, 3 sc (10)
Row 6: ch 1, sc across (10)
Switch to yellow. Sc evenly around the wing edge. On the lower edge, make 3 points by working (sc, ch 2, sc) into evenly spaced edge stitches.
Fasten off. Leave 30 cm tail.
Top Crest Bumps
Make 3. Yarn: pastel lemon yellow.
R1: 6 sc in MR (6)
R2: (sc, inc) ×3 (9)
R3: sc around (9)
R4: (sc, dec) ×3 (6)
Fasten off. Leave 15 cm tail. Do not overstuff.
Tail
Make 1. Yarn: pastel lemon yellow.
R1: 6 sc in MR (6)
R2: inc ×6 (12)
R3–R8: sc around (12)
R9: (sc, inc) ×6 (18)
R10–R18: sc around (18)
Stuff lightly so the tail can curve along the side of the body.
Fasten off. Leave 30 cm tail.
Cheek Patches
Make 2. Yarn: blush pink.
R1: 6 sc in MR (6)
R2: inc ×6 (12)
Sl st to close (12)
Fasten off. Leave 15 cm tail. Flatten with the tail ending at the lower edge.
Belly Patch
Make 1. Yarn: white or cream.
R1: 6 sc in MR (6)
R2: inc ×6 (12)
R3: (sc, inc) ×6 (18)
R4: (2 sc, inc) ×6 (24)
R5: (3 sc, inc) ×6 (30)
R6: (4 sc, inc) ×6 (36)
R7–R9: sc around (36)
Fasten off. Leave 35 cm tail. Press flat into an oval before sewing to the body front.
Lemon Wedge Belly Appliqué
Make 1. Yarn: deeper yellow; embroidery in white; leaves in green.
R1: 6 sc in MR (6)
R2: inc ×6 (12)
R3: (sc, inc) ×6 (18)
Fasten off. Fold the circle in half and stitch the straight edge closed to form a wedge. Embroider 4 white segment lines from the folded edge toward the curved edge. Leave 20 cm tail.
Leaves for Belly Lemon
Make 2. Yarn: green embroidery yarn or DK cotton.
Ch 5.
Row 1: sc in second ch from hook, hdc, dc, 3 hdc in last ch; rotate, dc, hdc, sc, sl st to base (10)
Fasten off. Leave 12 cm tail.
Assembly
- Pin the head to the body with the body’s closing round centered under the head. Sew around twice, using the 25 cm body tail.
- Sew the snout across R13–R17 of the head, centered between the eyes. Add stuffing before the final 5 stitches close.
- Embroider nostrils on the snout and a small smile below it with black thread.
- Sew cheek patches 1 round below the eyes, with each cheek 2 stitches away from the snout edge.
- Attach the horns on top of the head between R4 and R8, spaced 8–10 stitches apart.
- Sew the side frills behind the cheeks, with the yellow points facing outward.
- Attach the arms to the upper body at R17–R19, angled inward toward the belly patch.
- Sew the back legs to the lower body, then add the lemon foot pads and toe bumps to the front of each foot.
- Sew the wings to the back at the shoulder line and attach the tail to the lower back, curving it to one side.
- Sew the belly patch to the body front, add the lemon wedge and leaves, then attach the 3 crest bumps along the head centerline.
The plush is complete when the head sits upright, both wings clear the floor, and the lemon pads face forward.
7 Technical Tips
- Stitch marker drift: if the marker moves more than 1 stitch left after R8 of the head, the spiral has tightened unevenly. Reset the marker at the visual back before placing the eyes so the snout seam stays centered.
- Eye placement timing: install 25 mm eyes before Head R18. A 7-stitch gap between the inside posts keeps the snout from crowding the cheeks.
- Stuffing firmness: underfilled chenille collapses at the neck after assembly. Pack the body until it springs back within 2 seconds after a thumb press.
- Invisible decrease failure mode: full-stitch decreases make knots on the cheeks and belly. Use front-loop-only decreases on Head R17–R22 and Body R19–R22.
- Velvet tension: loose loops can ladder when a horn is stuffed. Work the white horn rounds about 10–15% tighter than the yellow head rounds.
- Pinning accuracy: wings often sit one round apart if sewn without checking. Pin both top wing corners 2 rounds below the head-body seam, then compare the plush from the front.
- Tail weaving: chenille tails can work out if clipped at the surface. Weave each sewing tail 8–10 cm through stuffed fabric, change direction twice, then trim under light tension.
Conclusion
Block one photo before publishing: front view, side view, and a close-up of the foot slice. Those three images show the features searchers care about: horns, side frills, wings, lemon pads, and the small belly wedge. Add finished height and hook size in the caption so the project can be compared against other fruit dragon listings. Share the final plush on Pinterest and Instagram with #LemonDragonAmigurumi, then save the tail and wing notes with your project file. For the final pass, check the lemon dragon amigurumi crochet pattern against your own tension: did the side frills read more like lemon wedges or bat ears?









