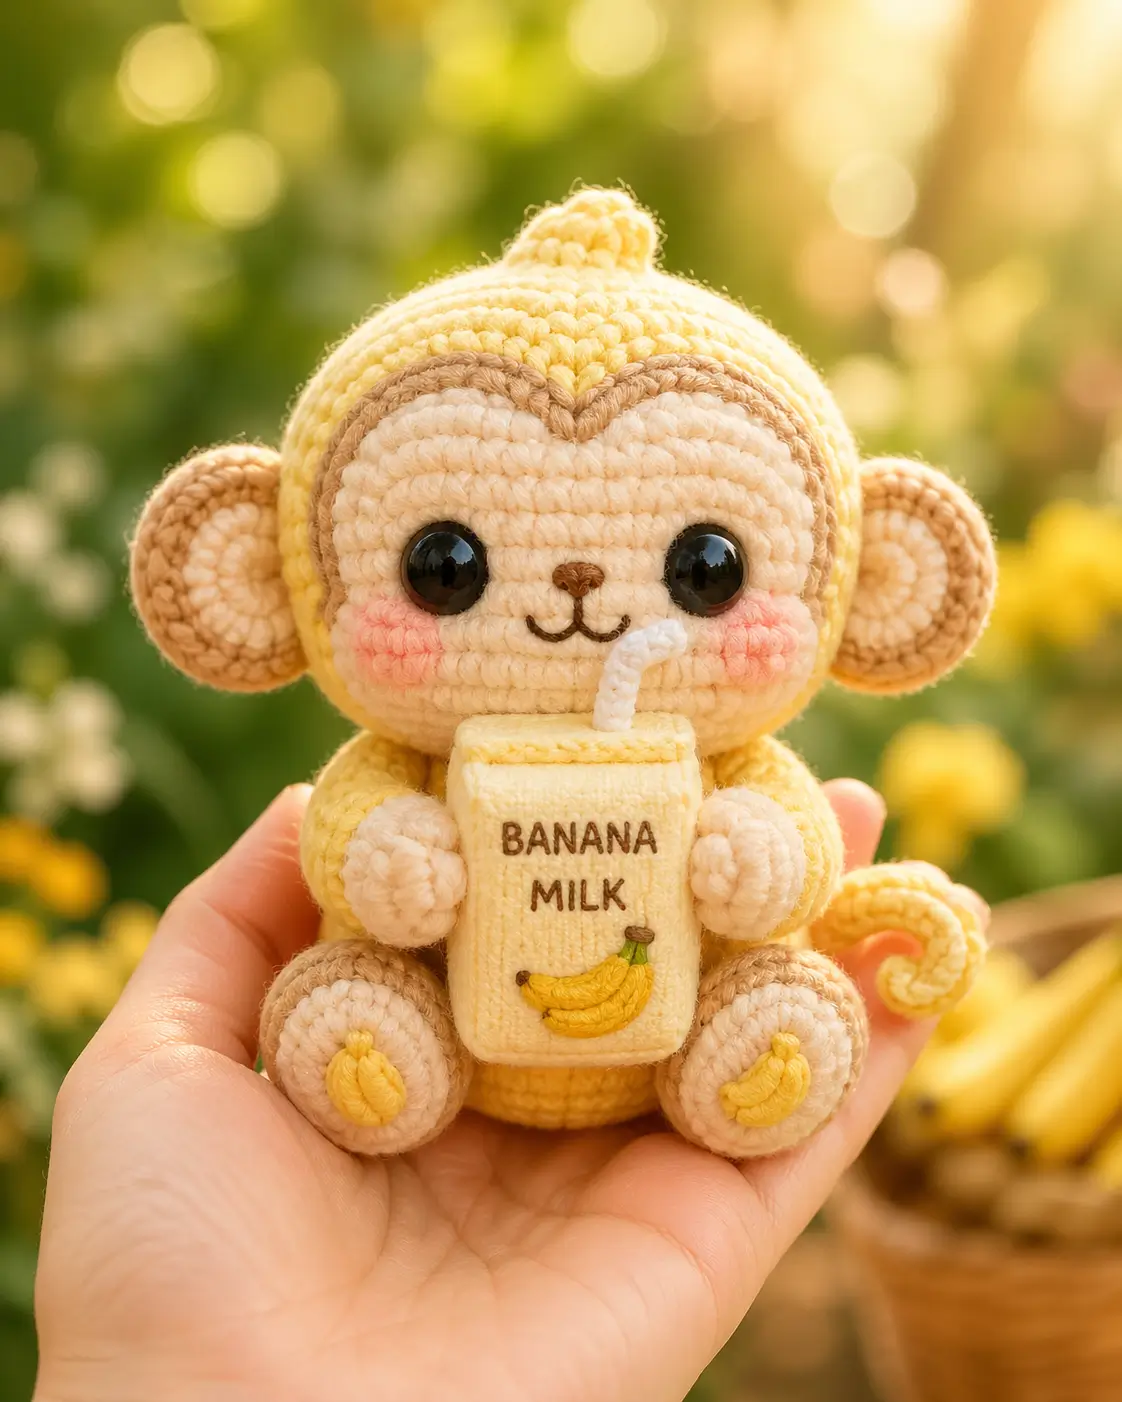
A banana-colored monkey has to read as primate before it reads as fruit carton mascot. This monkey amigurumi crochet pattern uses DK/light worsted yarn, a 3.5 mm hook, 12 mm safety eyes, and a 36-stitch head for a 16 cm sitting toy. Treat it as an intermediate project. The milk carton gives the hands a fixed placement guide.
The Design: What Makes Banana Milk Monkey Different
The design separates monkey anatomy from banana styling. The head stays round at a 36-stitch plateau, while the cream face mask is sewn on as a flat oval; that keeps the safety eyes level and avoids a swollen muzzle. The ears are layered disks, not plain circles, because the tan rim needs depth against the yellow hood. Body shaping is shorter than the head so the milk carton can sit high without hiding the mouth. A banana monkey amigurumi also needs a controlled tail curl, so the tail is a narrow tube pulled into a spiral after stitching. The common error in a crochet monkey with banana theme is placing the ears too low; the toy starts to read like a bear once the ears drop below the eye line.
Project Info at a Glance
| Skill Level | Time | Finished Size | Hook | Best For |
|---|---|---|---|---|
| Intermediate | 4–5 hours | 16 cm sitting | 3.5 mm | Display toy, market sample, fruit-themed collection |
The hook and yarn choice follows DK/light-worsted monkey listings that specify a 3.5 mm hook, while the eye size follows 12 mm safety-eye data for a medium plush monkey.
Materials and Tools
Yarn
- Banana yellow — DK/light worsted — 50 g — Paintbox Cotton DK, Ricorumi DK, or similar
- Cream — DK/light worsted — 15 g — face, paws, soles
- Tan/caramel — DK/light worsted — 10 g — ears and brow border
- Peach — DK/light worsted — 2 g — cheek patches
- White — DK/light worsted — 3 g — straw
- Brown — embroidery thread or DK scrap — nose, mouth, carton lettering
- Bright yellow — DK scrap — banana appliqués
Tools
- Hook 3.5 mm
- 12 mm safety eyes
- Polyester stuffing
- Yarn needle
- Stitch markers
- Pins
- Small scissors
- Brown embroidery needle
Abbreviations
MR = magic ring; sc = single crochet; inc = 2 sc in one stitch; dec = single crochet decrease; sl st = slip stitch; ch = chain; BLO = back loop only; hdc = half double crochet; dc = double crochet; tr = treble crochet. Invisible decrease works through front loops only and hides the R14–R18 head reductions.
Pattern — Step by Step
Continuous spiral unless noted.
Head
Yarn: banana yellow — Source: standard amigurumi math; 36-st plateau benchmark confirmed by published monkey pattern structure.
R1: 6 sc in MR (6)
R2: inc ×6 (12)
R3: (sc, inc) ×6 (18)
R4: (2 sc, inc) ×6 (24)
R5: (3 sc, inc) ×6 (30)
R6: (4 sc, inc) ×6 (36)
R7–R13: sc around (36)
R14: (4 sc, dec) ×6 (30)
R15: (3 sc, dec) ×6 (24)
R16: (2 sc, dec) ×6 (18)
R17: (sc, dec) ×6 (12)
R18: dec ×6 (6)
Pause before R15 if inserting safety eyes through the face mask. Place eyes between R9 and R10, 8 stitches apart.
Fasten off. Close the final hole.
Body
Yarn: banana yellow — Source: standard amigurumi math.
R1: 6 sc in MR (6)
R2: inc ×6 (12)
R3: (sc, inc) ×6 (18)
R4: (2 sc, inc) ×6 (24)
R5: (3 sc, inc) ×6 (30)
R6–R11: sc around (30)
R12: (3 sc, dec) ×6 (24)
R13: sc around (24)
R14: (2 sc, dec) ×6 (18)
R15: sc around (18)
R16: (sc, dec) ×6 (12)
Stuff firmly through the lower half and leave the neck edge slightly flatter for sewing.
Fasten off. Leave a 30 cm tail.
Cream Face Mask
Yarn: cream — Source: standard oval shaping.
Ch 7.
R1: inc in 2nd ch from hook, sc 4, 4 sc in last ch, work down opposite side, sc 4, inc in last loop (16)
R2: inc ×2, sc 4, inc ×4, sc 4, inc ×2 (24)
R3: (sc, inc) ×2, sc 4, (sc, inc) ×4, sc 4, (sc, inc) ×2 (32)
Fasten off. Leave a 35 cm tail. Pin horizontally across the lower front of the head, with the top edge just under R8.
V Brow Border
Yarn: tan/caramel — Source: photo-matched surface detail.
Ch 15.
Row 1: sl st in 2nd ch from hook and next 5 ch, ch 1 for center point, sl st in remaining 8 ch (14 sl st, 1 center ch)
Fasten off. Leave a 25 cm tail. Sew the center point into the top dip of the cream face mask.
Top Banana Nub
Yarn: banana yellow — Source: standard amigurumi cone math.
R1: 6 sc in MR (6)
R2: (sc, inc) ×3 (9)
R3: sc around (9)
R4: (sc, dec) ×3 (6)
Do not overstuff; one pinch of fiberfill is enough.
Fasten off. Leave a 20 cm tail.
Outer Ears
Yarn: tan/caramel — Source: standard amigurumi disk math.
R1: 6 sc in MR (6)
R2: inc ×6 (12)
R3: (sc, inc) ×6 (18)
R4: (2 sc, inc) ×6 (24)
R5: sc around (24)
R6: (2 sc, dec) ×6 (18)
Cup the ear lightly before sewing.
Fasten off. Leave a 30 cm tail.
Inner Ears
Yarn: cream — Source: standard flat-circle math.
R1: 6 sc in MR (6)
R2: inc ×6 (12)
R3: (sc, inc) ×6 (18)
Fasten off. Leave a 20 cm tail. Sew one inner ear inside each outer ear.
Arms / Front Legs
Yarn: cream and banana yellow — Source: standard small-limb math.
Start with cream.
R1: 6 sc in MR (6)
R2: inc ×6 (12)
R3–R4: sc around (12)
R5: switch to banana yellow, sc around (12)
R6: (2 sc, dec) ×3 (9)
R7–R9: sc around (9)
R10: (sc, dec) ×3 (6)
Stuff the paw only. Keep the yellow arm section flat so it can grip the carton.
Fasten off. Leave a 25 cm tail. Make 2.
Back Legs
Yarn: cream and banana yellow — Source: standard small-limb math.
Start with cream.
R1: 6 sc in MR (6)
R2: inc ×6 (12)
R3: (sc, inc) ×6 (18)
R4: sc around (18)
R5: (sc, dec) ×6 (12)
R6: switch to banana yellow, sc around (12)
R7: sc around (12)
R8: (sc, dec) ×4 (8)
Stuff the foot pad lightly. Leave the cream sole visible at the front.
Fasten off. Leave a 25 cm tail. Make 2.
Cheek Patches
Yarn: peach — Source: standard flat-circle math.
R1: 6 sc in MR (6)
R2: inc ×6 (12)
Sl st to first stitch (12)
Fasten off. Leave a 20 cm tail. Make 2.
Curled Tail
Yarn: banana yellow — Source: standard tube shaping; published monkey tails use long narrow tube forms.
R1: 6 sc in MR (6)
R2: (sc, inc) ×3 (9)
R3–R22: sc around (9)
Do not stuff heavily. Run the yarn tail along one side of the tube and pull until the tail curls.
Fasten off. Leave a 35 cm tail.
Banana Milk Carton
Yarn: pale yellow, white, brown, and bright yellow — Source: photo-matched accessory construction.
Front and back panels, make 2 in pale yellow.
Ch 9.
Row 1: sc in 2nd ch from hook and across (8)
Rows 2–12: ch 1, turn, sc across (8)
Side panels, make 2 in pale yellow.
Ch 4.
Row 1: sc in 2nd ch from hook and across (3)
Rows 2–12: ch 1, turn, sc across (3)
Top and bottom panels, make 2 in pale yellow.
Ch 9.
Row 1: sc in 2nd ch from hook and across (8)
Rows 2–3: ch 1, turn, sc across (8)
Sew panels into a small box. Add a thin layer of stuffing before closing the last edge.
Straw, make 1 in white.
Ch 11.
Row 1: sl st in 2nd ch from hook and next 9 ch (10)
Ch 4.
Row 2: sl st in 2nd ch from hook and next 2 ch (3)
Sew the short section at an angle to make a bent straw.
Banana appliqué, make 3 in bright yellow.
Ch 7.
Row 1: sl st, sc, hdc, hdc, sc, sl st across from 2nd ch (6)
Sew one banana to the carton front and one to each foot sole. Embroider “BANANA MILK” with brown thread using short backstitches.
Nose and Mouth
Yarn: brown embroidery thread — Source: photo-matched face detail.
Make a small V-shaped nose centered between the eyes. Work two short mouth curves under the nose, each 3 stitches wide. Anchor the thread at the back of the head and bury the ends inside the stuffing.
Assembly
- Sew the head to the body with the body opening centered under R16 of the head.
- Pin the cream face mask before final eye placement if the washers are not locked yet.
- Attach safety eyes through the mask and head between R9 and R10, 8 stitches apart.
- Sew the V brow border along the upper edge of the face mask, with the point centered.
- Attach the ears from R8 to R12 on each side of the head, keeping their lower edges level with the eyes.
- Sew the top nub to the crown, slightly behind the center point.
- Attach the arms to the front of the body so the cream paws touch the carton sides.
- Sew the back legs to the lower body, angled forward with the banana appliqués facing out.
- Attach the curled tail to the back of the body at R8–R10.
- Sew the milk carton between the paws and add cheeks last, just outside the mouth curve.
The finished toy sits at about 16 cm when worked with DK/light worsted yarn and a 3.5 mm hook.
7 Technical Tips
- Eye placement failure mode: uneven face width. Place the 12 mm eyes 8 stitches apart before closing the head, because a 6-stitch gap makes the monkey look pinched.
- Stitch marker failure mode: drifting brow center. Move the marker every round on the head; one missed stitch shifts the face mask off the vertical center line.
- Stuffing failure mode: head tilt. Fill the body until a finger press sinks no more than 5 mm, then leave the final neck round slightly flat for sewing.
- Invisible dec failure mode: crown holes. Work front-loop-only decreases on R14–R18 of the head; standard decreases can leave visible gaps beside the safety eyes.
- Ear placement failure mode: bear silhouette. Pin the ears with top edges near R8 and lower edges near R12; ears placed below the eyes change the species read.
- Carton failure mode: crushed corners. Cut four yarn tails at 20 cm and tack each vertical carton edge twice before stuffing the box.
- Tail failure mode: loose spiral. After sewing the tail on, weave the yarn tail through 2 cm of the inner curve and tug until the curl holds.
Conclusion
This banana monkey works because the round head, side ears, and curled tail stay readable before the banana styling takes over. Make the head and face mask first, then test the eye spacing with pins before locking washers. The carton should be sewn on after the arms are attached, not before, since the paws set the accessory angle. Save this monkey amigurumi crochet pattern to Pinterest, post the finished toy on Instagram, and tag the project with #BananaMilkMonkey. For the next sample, decide one detail: should the banana milk carton sit straight, or should the straw tilt toward the monkey’s mouth?









