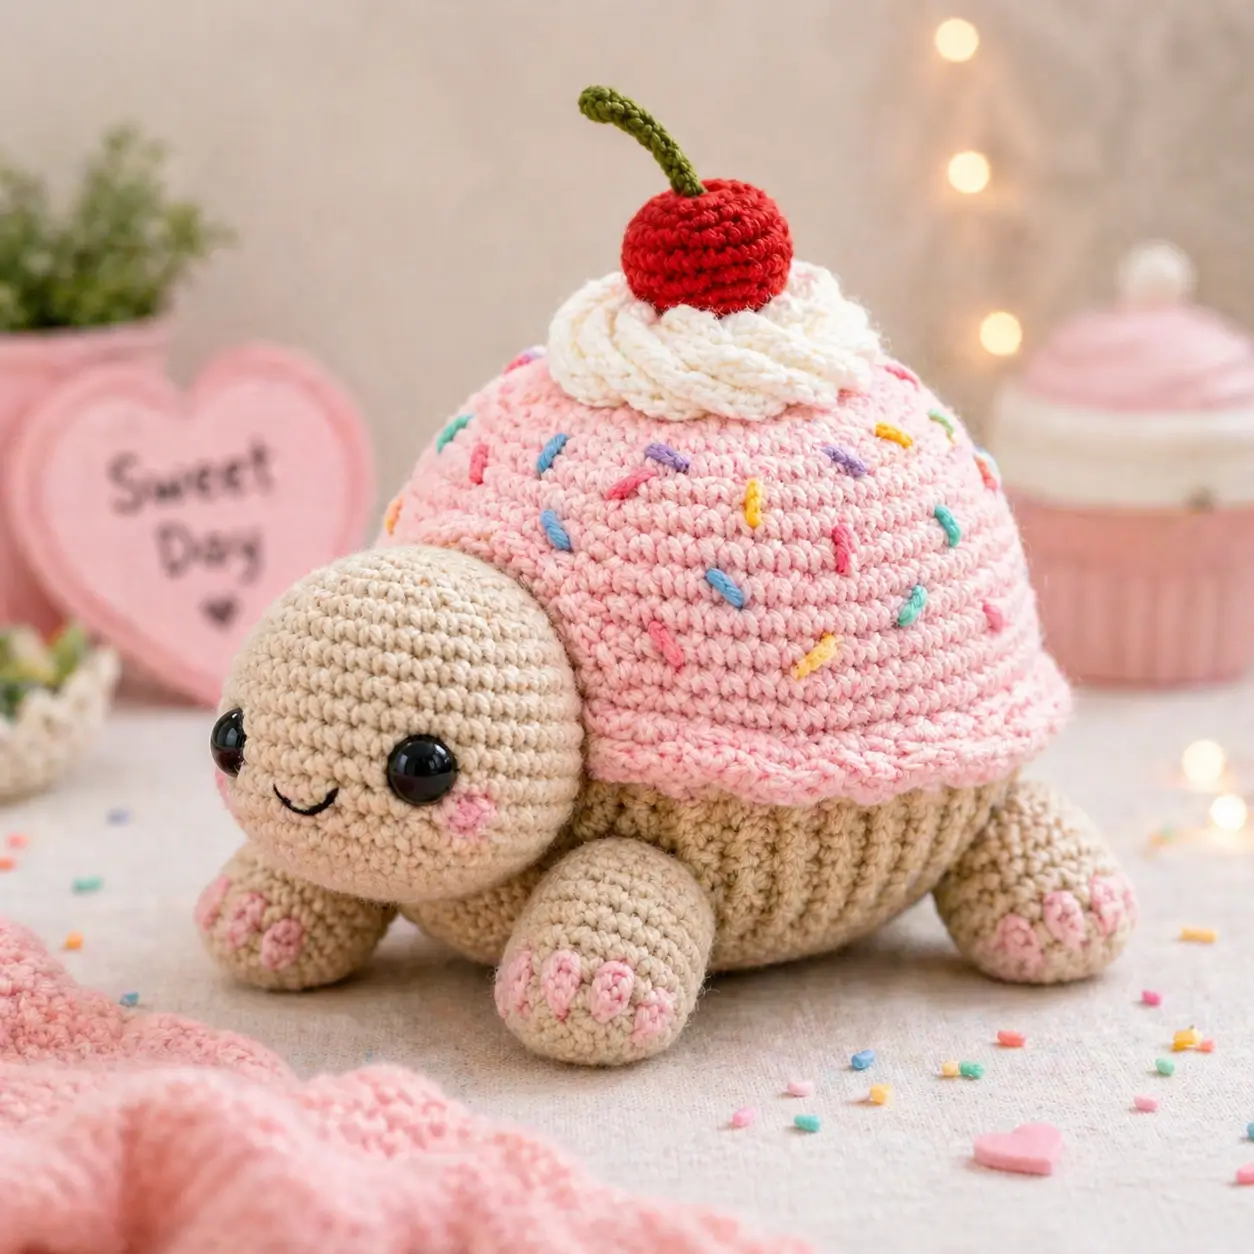
Only a turtle can carry a cupcake without arms, so the shell has to read as dessert before it reads as armor. This cupcake turtle amigurumi pattern uses sport/DK-style yarn, tight single crochet, a domed frosting shell, 9 mm safety eyes, and a cherry stem. Finished height is about 12 cm. Skill level: advanced beginner. Make it as a birthday display turtle with stable legs and clear face placement.
The Design: What Makes This Cupcake Turtle Different
The head is wider than a plain sea turtle head because the dessert shell adds visual weight. A 36-stitch head plateau keeps the face large enough for 9 mm eyes without making the neck look thin. The cupcake liner is worked as a separate closed body, then the pink frosting dome sits over it; this prevents the shell from collapsing into the belly. The scalloped frosting edge is not only decoration. It hides the seam where the shell meets the liner. A common maker mistake with a crochet cupcake turtle is placing the cherry at the mathematical center of the dome; in the photo, the cherry sits slightly forward so the face and topper read together. This dessert amigurumi also needs visible sprinkles, not random thread scraps, so each bar is short, spaced, and angled.
Project Info at a Glance
| Skill Level | Time | Finished Size | Hook | Best For |
|---|---|---|---|---|
| Advanced beginner | 2–4 hours | About 12 cm high | 2.0 mm | Birthday shelf decor, kawaii turtle crochet photos, small handmade gifts |
Materials and Tools
Yarn
- Tan/beige — sport/DK cotton-acrylic — 18–25 g — YarnArt Jeans 07, Paintbox Cotton DK Vanilla Cream, or similar.
- Pastel pink — sport/DK cotton-acrylic — 8–12 g — YarnArt Jeans 74, Paintbox Cotton DK Ballet Pink, or similar.
- Cream/white — sport/DK cotton-acrylic — 5–8 g — YarnArt Jeans 62, Paintbox Cotton DK Paper White, or similar.
- Red — sport/DK cotton-acrylic — 2–3 g — cherry red cotton-acrylic.
- Olive green — sport/DK cotton-acrylic — less than 1 g — stem color.
- Sprinkle colors — embroidery scraps in teal, yellow, blue, purple, and hot pink.
Tools
- Hook 2.0 mm
- 9 mm safety eyes
- Polyester stuffing
- Yarn needle
- Stitch markers
- Sharp embroidery needle
- Pins
- Scissors
Use 10 mm eyes only if your yarn is closer to worsted and the head reaches at least 4.5 cm across before stuffing.
Abbreviations
- MR = magic ring
- sc = single crochet
- inc = increase
- dec = invisible decrease
- sl st = slip stitch
- ch = chain
- BLO = back loop only
- FLO = front loop only
- hdc = half double crochet
An invisible decrease is worked through the front loops of the next 2 sts so the closing line does not leave a stair-step gap.
Pattern — Step by Step
This pattern is worked in a continuous spiral unless a part states otherwise. Use a stitch marker at the first stitch of every round.
Head
Yarn: tan/beige.
R1: 6 sc in MR (6)
R2: inc ×6 (12)
R3: (sc, inc) ×6 (18)
R4: (2 sc, inc) ×6 (24)
R5: (3 sc, inc) ×6 (30)
R6: (4 sc, inc) ×6 (36)
R7–R12: sc around (36)
R13: (4 sc, dec) ×6 (30)
R14: (3 sc, dec) ×6 (24)
R15: (2 sc, dec) ×6 (18)
R16: (sc, dec) ×6 (12)
R17: dec ×6 (6)
Place eyes between R9 and R10, 7 sts apart. Stuff firmly from R13 onward, keeping the underside slightly flat.
Fasten off. Leave 25 cm tail.
Body / Cupcake Liner
Yarn: tan/beige.
R1: 6 sc in MR (6)
R2: inc ×6 (12)
R3: (sc, inc) ×6 (18)
R4: (2 sc, inc) ×6 (24)
R5: (3 sc, inc) ×6 (30)
R6: (4 sc, inc) ×6 (36)
R7: BLO sc around (36)
R8–R13: sc around (36)
R14: (4 sc, dec) ×6 (30)
R15: (3 sc, dec) ×6 (24)
R16: (2 sc, dec) ×6 (18)
R17: (sc, dec) ×6 (12)
R18: dec ×6 (6)
Stuff the liner so the base sits flat. Do not round the bottom like a ball.
Fasten off. Weave in tail.
Vertical Liner Ribs
Yarn: tan/beige.
Join yarn at the BLO ridge from Body R7. Work surface sl st from R7 to R13 in one vertical line. Fasten off. Repeat every 3 sts around the liner for 12 ribs. Each rib spans 7 rounds.
Keep rib tension loose enough that the body does not pinch inward.
Fasten off each rib inside the body.
Pink Frosting Shell
Yarn: pastel pink.
R1: 6 sc in MR (6)
R2: inc ×6 (12)
R3: (sc, inc) ×6 (18)
R4: (2 sc, inc) ×6 (24)
R5: (3 sc, inc) ×6 (30)
R6: (4 sc, inc) ×6 (36)
R7: (5 sc, inc) ×6 (42)
R8–R14: sc around (42)
R15: BLO sc around (42)
R16: (5 sc, dec) ×6 (36)
Stuff lightly only at the crown. The lower edge must stay flexible for sewing over the liner.
Fasten off. Leave 40 cm tail.
Frosting Scalloped Rim
Yarn: pastel pink.
Attach yarn to any front loop left from Frosting Shell R15.
R1: (sl st in next st, 3 hdc in next st, sl st in next st) ×14 (42 base sts used)
The scallops should hang over the cupcake liner by 3–4 mm.
Fasten off. Leave 20 cm tail for tacking any lifted scallop.
Front Legs
Yarn: tan/beige. Make 2.
R1: 6 sc in MR (6)
R2: inc ×6 (12)
R3: (sc, inc) ×6 (18)
R4–R5: sc around (18)
R6: (sc, dec) ×6 (12)
R7–R8: sc around (12)
Stuff the foot end only. Flatten the open edge so the leg points forward.
Fasten off. Leave 25 cm tail.
Back Legs
Yarn: tan/beige. Make 2.
R1: 6 sc in MR (6)
R2: inc ×6 (12)
R3: (sc, inc) ×6 (18)
R4: sc around (18)
R5: (sc, dec) ×6 (12)
R6–R7: sc around (12)
Stuff lightly. Back legs sit farther under the shell and should be shorter than the front legs.
Fasten off. Leave 25 cm tail.
Toe Pads
Yarn: pastel pink. Make 16.
R1: 6 sc in MR (6)
sl st to first sc (6)
Use four toe pads per leg. Flatten each tiny circle before sewing.
Fasten off. Leave 10 cm tail on each pad.
Cheek Patches
Yarn: pastel pink. Make 2.
R1: 6 sc in MR (6)
R2: inc ×6 (12)
sl st to first sc (12)
Cheeks sit one round below the eyes and one stitch outward from each eye post.
Fasten off. Leave 15 cm tail.
Whipped Cream Swirl
Yarn: cream/white.
R1: 6 sc in MR (6)
R2: inc ×6 (12)
R3–R28: sc around (12)
R29: dec ×6 (6)
Stuff lightly every 4 rounds. Coil the tube into a loose spiral 4.5–5 cm wide before sewing it to the frosting shell.
Fasten off. Leave 50 cm tail.
Cherry
Yarn: red.
R1: 6 sc in MR (6)
R2: inc ×6 (12)
R3–R4: sc around (12)
R5: dec ×6 (6)
Stuff with a pea-sized amount of fiberfill. Close the final gap with the tail.
Fasten off. Leave 25 cm tail.
Cherry Stem
Yarn: olive green.
R1: ch 9, starting in second ch from hook sl st 8 (8)
R2: ch 1, sl st back across 8 sts (8)
Curve the stem while sewing so it leans backward by about 20 degrees.
Fasten off. Leave 15 cm tail.
Sprinkles and Mouth
Yarn: embroidery scraps and black thread.
Make 22 sprinkle bars on the pink shell. Each bar should cover 1 stitch width and 1 round height. Use teal, blue, yellow, purple, and hot pink. Place no more than 4 sprinkles in any 2.5 cm square.
For the mouth, embroider a shallow curve across 3 stitches between R11 and R12 of the head. Add one anchoring stitch at the center of the smile so the curve does not lift.
Assembly
- Pin the head to the front of the body with the lower head edge touching Body R8–R10.
- Sew the head on with two passes: one around the neck edge and one through the lower cheek area into the body.
- Center the pink frosting shell over the cupcake liner, leaving the head outside the shell edge.
- Sew Frosting Shell R16 to Body R7, catching the scalloped rim only where it lifts.
- Attach the cheek patches after the head is stable, not before.
- Sew front legs under the head-side shell edge, angled forward by 30 degrees.
- Sew back legs under the rear shell edge, angled outward by 20 degrees.
- Attach four toe pads to each leg, placing the outer two pads slightly higher than the center two.
- Coil the whipped cream on top of the shell, sew through the bottom of the tube every 1 cm, then attach the cherry at the coil center.
- Sew the green stem to the cherry and add sprinkles last so none are hidden under the cream.
The finished turtle has a flat belly, four supported legs, and a raised cupcake shell.
7 Technical Tips
- Spiral drift failure mode: If the marker shifts more than 2 stitches left or right by R10 of the shell, the sprinkle layout will look diagonal. Move the marker up every round and count 42 stitches at the end of each frosting round.
- Stuffing firmness measurement: The head should compress by about 5 mm when pressed, then return to shape. If it collapses more than that, add fiberfill before closing R17.
- Invisible decrease gap: A normal decrease can leave visible holes on tan yarn near the face. Work every dec through front loops only, then pull the stitch snug before the next sc.
- Eye placement timing: Insert 9 mm eyes between R9 and R10 before R13 is worked. After R13, the head opening is too small for clean washer placement.
- Velvet tension adjustment: If substituting velvet or chenille, use a 3.5–4.0 mm hook and stop the head at a 30-st plateau instead of 36. The failure mode is a head larger than the cupcake shell.
- Pinning measurement: Use at least 12 pins around the frosting shell before sewing it to the liner. Fewer pins often creates a tilted cupcake rim that cannot be corrected after the first seam pass.
- Tail weaving length: Weave each yarn tail at least 4 cm inside the body or shell. Shorter buried tails can work out through the pink frosting after the turtle is handled.
Conclusion
Block the shell shape by finger-pressing the frosting dome, then photograph the turtle from a low front angle so the cherry and face read in the same frame. This cupcake turtle amigurumi pattern works because the cupcake mass sits directly over a closed liner rather than hanging from a flat shell. For the next step, make a second version with chocolate frosting and reduce the sprinkle count to twelve if the fabric looks crowded. Share the finished turtle on Pinterest and Instagram, naming the yarn weight and eye size in the caption. Use #CupcakeTurtleAmigurumi. Which detail should lead the design: the pink frosting scallops, the whipped cream coil, or the cherry stem tilt?









