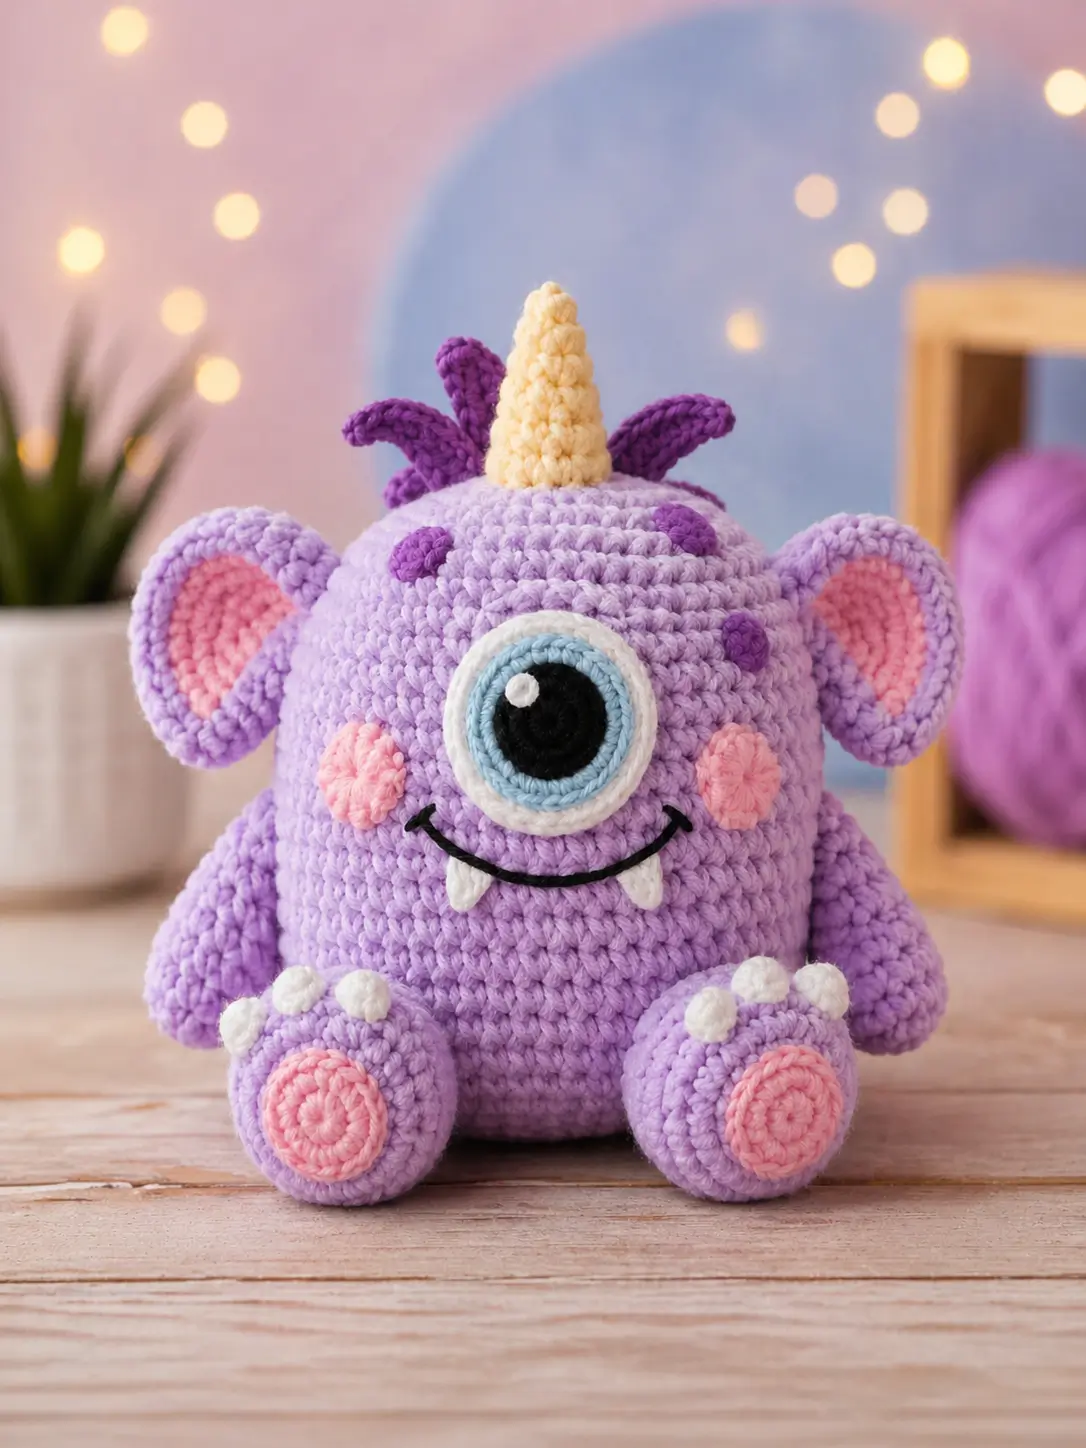
The single centered eye sets the facial math for this purple cyclops amigurumi pattern: every feature must balance around one circle, not a pair. The finished monster is estimated at 16 cm tall from the photo, made with worsted cotton, a 3.0 mm hook, and intermediate assembly. The horn, ears, fangs, blush cheeks, and toe pads create the monster-unicorn shape. The design rewards careful placement.
Quick Answer: What You Need to Know About This Cyclops
A purple cyclops monster amigurumi is built as one rounded body-head, then detailed with a crocheted eye, horn, ears, tufts, fangs, limbs, and foot pads. Use worsted-weight yarn, a 3.0 mm hook, firm polyfill, and a 42-stitch body plateau for a 16 cm sitting plush.
Table of Contents
- What Makes This Purple Cyclops Unique
- Project Info at a Glance
- Materials and Tools
- Abbreviations
- Pattern — Step by Step
- Assembly
- FAQ
- Best Yarn for This Purple Cyclops
- Hook Size Guide
- 7 Technical Tips
- Quick Reference Card
What Makes This Purple Cyclops Unique
This cyclops monster uses a single body-head sphere rather than a separate head and torso. That keeps the silhouette close to the photo: a squat seated plush with the face occupying the upper front third. The most common error when sewing a one-eyed monster face is placing the horn first. That shifts the centerline, then the eye follows the wrong angle. Pin the eye first, then the horn, then the mouth.
Unlike rabbit amigurumi, this cyclops amigurumi depends less on limb symmetry and more on facial stacking. The single eye, cream horn, purple hair tufts, ears, fangs, and pink cheek patches all compete for space on the same rounded surface. The crochet monster pattern below uses a 42-stitch body plateau because the photo suggests a compact 16 cm sitting toy.
Project Info at a Glance
Quick answer: This purple cyclops measures about 16 cm, uses a 3.0 mm hook, and takes about 5–6 hours to complete.
| Skill Level | Time | Finished Size | Hook | Yarn Weight |
|---|---|---|---|---|
| Intermediate | 5–6 hours | 16 cm estimate | 3.0 mm | Medium/worsted #4 |
Materials and Tools
Yarn
- Lavender purple — medium/worsted #4 — 55 g — matte cotton or cotton-acrylic
- Dark purple — medium/worsted #4 — 8 g — hair tufts and brows
- Cream — medium/worsted #4 — 8 g — horn and fangs
- Pink — medium/worsted #4 — 12 g — ears, cheeks, foot pads
- White — medium/worsted #4 — 8 g — eye ring and highlights
- Light blue — medium/worsted #4 — 5 g — iris
- Black — medium/worsted #4 or embroidery floss — 5 g — pupil and mouth
Tools
- Crochet hook: 3.0 mm — chosen for a firm 16 cm cyclops body
- Safety eyes: 12 mm optional — place inside the black crocheted pupil only if the toy is not for a child under three
- Polyfill stuffing — firm density for the round body-head
- Yarn needle — blunt tip
- Stitch markers — at least 4
- Pins — needed for the eye, horn, ears, and limbs
- Scissors
- Black embroidery needle — for the curved mouth
Save this pattern to your Pinterest board before starting — you’ll need to reference the stitch counts throughout.
Abbreviations
| Short | Full Term |
|---|---|
| MR | Magic Ring |
| sc | single crochet |
| inc | increase: 2 sc in same stitch |
| dec | invisible decrease |
| sl st | slip stitch |
| ch | chain |
| BLO | back loop only |
| FO | fasten off |
Magic Ring, Single Crochet, and Stuffing Notes
The Magic Ring starts the body, eye, ears, cheek patches, and foot pads with a closed center. Single crochet creates the dense amigurumi surface visible in the photo. Use invisible decreases on the body-head from R19 onward because standard decreases leave ridges across the front curve. Polyfill stuffing should be added in layers, not as one clump.
Purple Cyclops Amigurumi Pattern — Step by Step
Work in continuous spiral unless a row is named. Counts appear at the end of every round.
Body-Head Orb — Make 1
Yarn: lavender purple.
R1: 6 sc in MR (6)
R2: inc × 6 (12)
R3: [sc, inc] × 6 (18)
R4: [sc 2, inc] × 6 (24)
R5: [sc 3, inc] × 6 (30)
R6: [sc 4, inc] × 6 (36)
R7: [sc 5, inc] × 6 (42)
R8: sc around (42)
R9: sc around (42)
R10: sc around (42)
R11: sc around (42)
R12: sc around (42)
R13: sc around (42)
R14: sc around (42)
R15: sc around (42)
R16: sc around (42)
R17: sc around (42)
R18: sc around (42)
R19: [sc 5, dec] × 6 (36)
R20: [sc 4, dec] × 6 (30)
R21: [sc 3, dec] × 6 (24)
Stuff firmly. Shape a flat base by pressing the lower third against the table.
R22: [sc 2, dec] × 6 (18)
R23: [sc, dec] × 6 (12)
R24: dec × 6 (6)
FO. Close through front loops. Weave tail through stuffing.
Large Crocheted Eye — Make 1
The photo shows a layered eye rather than two separate safety eyes. Add a 12 mm safety eye in the black center only for display toys.
Black pupil
R1: 6 sc in MR (6)
R2: inc × 6 (12)
R3: sc around (12)
FO.
Blue iris
Join light blue in any stitch of pupil R3.
R4: [sc, inc] × 6 (18)
R5: sc around (18)
FO.
White sclera ring
Join white in any stitch of R5.
R6: [sc 2, inc] × 6 (24)
R7: [sc 3, inc] × 6 (30)
R8: sc around (30)
FO, leaving 25 cm tail for sewing. Add a small white highlight with 3–4 satin stitches on the upper left of the black pupil.
Cream Horn — Make 1
Yarn: cream.
R1: 6 sc in MR (6)
R2: sc around (6)
R3: inc × 6 (12)
R4: sc around (12)
R5: sc around (12)
R6: [sc, inc] × 6 (18)
R7: sc around (18)
R8: sc around (18)
R9: sc around (18)
Stuff lightly.
R10: sc around (18)
FO, leaving 20 cm tail. Pin to top center, behind the eye line.
Purple Hair Tufts — Make 5
Yarn: dark purple.
R1: 6 sc in MR (6)
R2: sc around (6)
R3: sc around (6)
R4: inc × 6 (12)
R5: sc around (12)
R6: sc around (12)
Flatten the base. FO with 15 cm tail. Make 2 short tufts by stopping after R5 if a staggered crown is wanted.
Outer Ears — Make 2
Yarn: lavender purple.
R1: 6 sc in MR (6)
R2: inc × 6 (12)
R3: [sc, inc] × 6 (18)
R4: [sc 2, inc] × 6 (24)
R5: sc around (24)
R6: sc around (24)
FO. Do not stuff. Fold slightly into an oval before sewing.
Inner Ear Patches — Make 2
Yarn: pink.
R1: 6 sc in MR (6)
R2: inc × 6 (12)
R3: [sc, inc] × 6 (18)
FO with tail. Sew one patch centered on each outer ear.
Arms — Make 2
Yarn: lavender purple.
R1: 6 sc in MR (6)
R2: inc × 6 (12)
R3: sc around (12)
R4: sc around (12)
R5: [sc, dec] × 4 (8)
R6: sc around (8)
R7: sc around (8)
R8: sc around (8)
R9: sc around (8)
R10: sc around (8)
Lightly stuff lower half only. Flatten top. FO with 18 cm tail.
Legs — Make 2
Yarn: lavender purple.
R1: 6 sc in MR (6)
R2: inc × 6 (12)
R3: [sc, inc] × 6 (18)
R4: sc around (18)
R5: sc around (18)
R6: [sc, dec] × 6 (12)
R7: sc around (12)
R8: sc around (12)
R9: sc around (12)
Stuff firmly. FO with 18 cm tail.
Foot Pads — Make 2
Yarn: pink.
R1: 6 sc in MR (6)
R2: inc × 6 (12)
R3: [sc, inc] × 6 (18)
FO with tail. Sew to the front of each foot.
Toe Bobbles — Make 6
Yarn: white.
R1: 6 sc in MR (6)
R2: sc around (6)
FO. Pull tight into a small dome. Make three for each foot.
Cheek Patches — Make 2
Yarn: pink.
R1: 6 sc in MR (6)
R2: inc × 6 (12)
R3: [sc, inc] × 6 (18)
FO with tail. Do not stuff.
Eyebrows — Make 2
Yarn: dark purple.
Ch 8.
Row 1: sc in 2nd ch from hook and across (7)
FO with tail. Curve each brow above the eye.
Fangs — Make 2
Yarn: white.
Ch 3.
Row 1: sc in 2nd ch from hook, sc in next ch (2)
Row 2: dec across (1)
FO with tail. Knot the tail at the back to thicken the base.
Mouth Embroidery
Use black yarn or embroidery floss. Place a curved smile under the eye, from left cheek edge to right cheek edge. Use backstitch across two rows of the body-head.
Assembly
- Pin the large eye to the upper front of the body-head, centered over R10–R16.
- Sew the eye through the white ring only. Keep the blue iris and black pupil flat.
- Pin the horn above the eye, centered on the top curve. Sew around the base twice.
- Attach purple hair tufts behind and beside the horn. Angle the side tufts outward.
- Sew ears to the sides between R9 and R15. Inner pink patches face forward.
- Attach arms between R14 and R18, angled down.
- Attach legs at the lower front between R19 and R23. Check that the toy sits without rolling.
- Sew foot pads to the front of each leg. Add three white toe bobbles above each pad.
- Sew cheeks below the eye, one on each side of the mouth line.
- Stitch the mouth in a shallow curve, then sew fangs under the curve.
- Add dark purple eyebrows above the eye. Keep them short so they do not compete with the horn.
- Weave every tail through the body at least four passes. Trim only after checking all angles.
Final check: the single eye, horn tip, mouth midpoint, and gap between the legs should align on the same vertical centerline.
Frequently Asked Questions
What size safety eyes do I need for amigurumi?
For this 16 cm cyclops, use a 12 mm safety eye only if placing it inside the crocheted black pupil. For a fully child-safe face, crochet or embroider the whole eye. Safety eyes are measured in millimeters, and size depends on toy scale and visual weight.
What size hook should I use for amigurumi?
Use a 3.0 mm hook with medium/worsted cotton for this monster. Amigurumi generally needs a smaller hook than the yarn label suggests because the fabric must hold stuffing without gaps. If white stuffing shows between stitches, drop to 2.75 mm.
How do you keep stuffing from showing through crochet?
Use tighter single crochet stitches, a smaller hook, and layered polyfill stuffing. Do not overfill the eye area; pressure behind the face stretches stitches. For the body-head, stuff firmly before R22, then add small pieces as the opening closes.
How do you crochet an amigurumi monster?
Start with a Magic Ring, increase in rounds, work a center plateau, then decrease while stuffing. Add monster features after the base is firm. For this cyclops, make the round body-head first, then sew the eye, horn, ears, tufts, limbs, cheeks, fangs, and toe pads.
Best Yarn for This Purple Cyclops
The photo shows crisp stitch definition, so matte cotton or cotton-acrylic works better than fuzzy yarn for this version. The horn, face ring, toe pads, and fangs all need visible edges.
Worsted cotton gives the cleanest outline for the single eye and pink foot pads. It supports defined single crochet fabric when paired with a smaller amigurumi hook.
Cotton-acrylic blends are useful when the maker wants less hand strain. They stretch slightly during sewing, which helps when aligning the ears and horn on the rounded body-head.
Fingering cotton can be used for the eye highlight, brows, and fangs. It is not needed for the full plush, but it helps when small details look bulky in worsted yarn.
Best choice for this purple cyclops: worsted cotton for the main body, with a smaller hook than the label range. The single eye needs crisp color borders more than softness.
Crochet Hook Size Guide for This Cyclops
Hook size controls fabric density more than yarn weight alone. For this 16 cm cyclops amigurumi finished size, start with 3.0 mm and medium/worsted yarn. Amigurumi commonly uses a smaller hook than standard yarn-label guidance to reduce gaps.
If the body becomes stiff before R10, move to 3.25 mm. If stuffing shows through by R7, move to 2.75 mm. Test the swatch with lavender yarn, because pale colors reveal gaps faster than dark purple.
The most complex part is the face stack. A 3.0 mm hook keeps the white eye ring flat enough to sew cleanly. A larger hook may cause the ring to ripple, which makes the single eye look off-center.
Recommended hook style: ergonomic grip with a tapered metal tip. The repeated single crochet rounds and small toe bobbles require control at low stitch counts.
7 Technical Tips
- Mark the front centerline early: Place a marker through R7 and keep it visible. The horn, eye, mouth, and leg gap need the same centerline.
- Sew the eye before the horn: The eye is the largest facial feature. If the horn goes on first, the eye may shift lower or sideways.
- Do not overstuff the horn: A hard horn base tilts forward and pushes into the eye ring. Use only enough polyfill stuffing to hold the cone.
- Flatten the ears with steam-free blocking: Pin the ears flat under a book for 20 minutes. Do not iron acrylic.
- Use smaller stitches for the mouth: Long mouth stitches sag across the rounded body. Backstitch every 2–3 mm.
- Balance toe bobbles before sewing: Pin all six white bobbles first. Uneven toes are more visible than uneven arms in the front photo angle.
- Check the toy from table height: The plush sits low. A face that looks centered from above can look tilted when viewed from the front.
Quick Reference Card
| Finished Size | 16 cm estimate |
|---|---|
| Hook | 3.0 mm |
| Yarn Weight | Medium/worsted #4 |
| Main Yarn | 55 g lavender |
| Safety Eyes | 12 mm optional |
| Body Rounds | R1 6 → R7 42 → R18 42 → R24 6 |
| Eye Rounds | Pupil 12, iris 18, white ring 30 |
| Total Time | 5–6 hours |
| Skill Level | Intermediate |
| Main Techniques | Magic Ring, single crochet, invisible decrease, sewing, embroidery |
Bookmark or pin this card for quick reference while crocheting.
Conclusion
Use the purple cyclops amigurumi pattern as a controlled placement project rather than a shape-only toy: the single eye, horn, ears, tufts, fangs, cheeks, and toe pads all depend on centerline alignment. After finishing, photograph the monster from the front and side before trimming the last tails; this reveals whether the eye ring tilts or the horn leans. If one feature needs correction, remove only that seam and reset it with four pins. The main technical question is eye scale: should the blue iris stay dominant, or should the white ring be wider on your yarn?
Share your finished work on Pinterest and Instagram:
#PurpleCyclopsAmigurumi #KROCHIFYpattern
Last updated: April 2026 — Pattern checked against photo estimates and current hook guidance.









