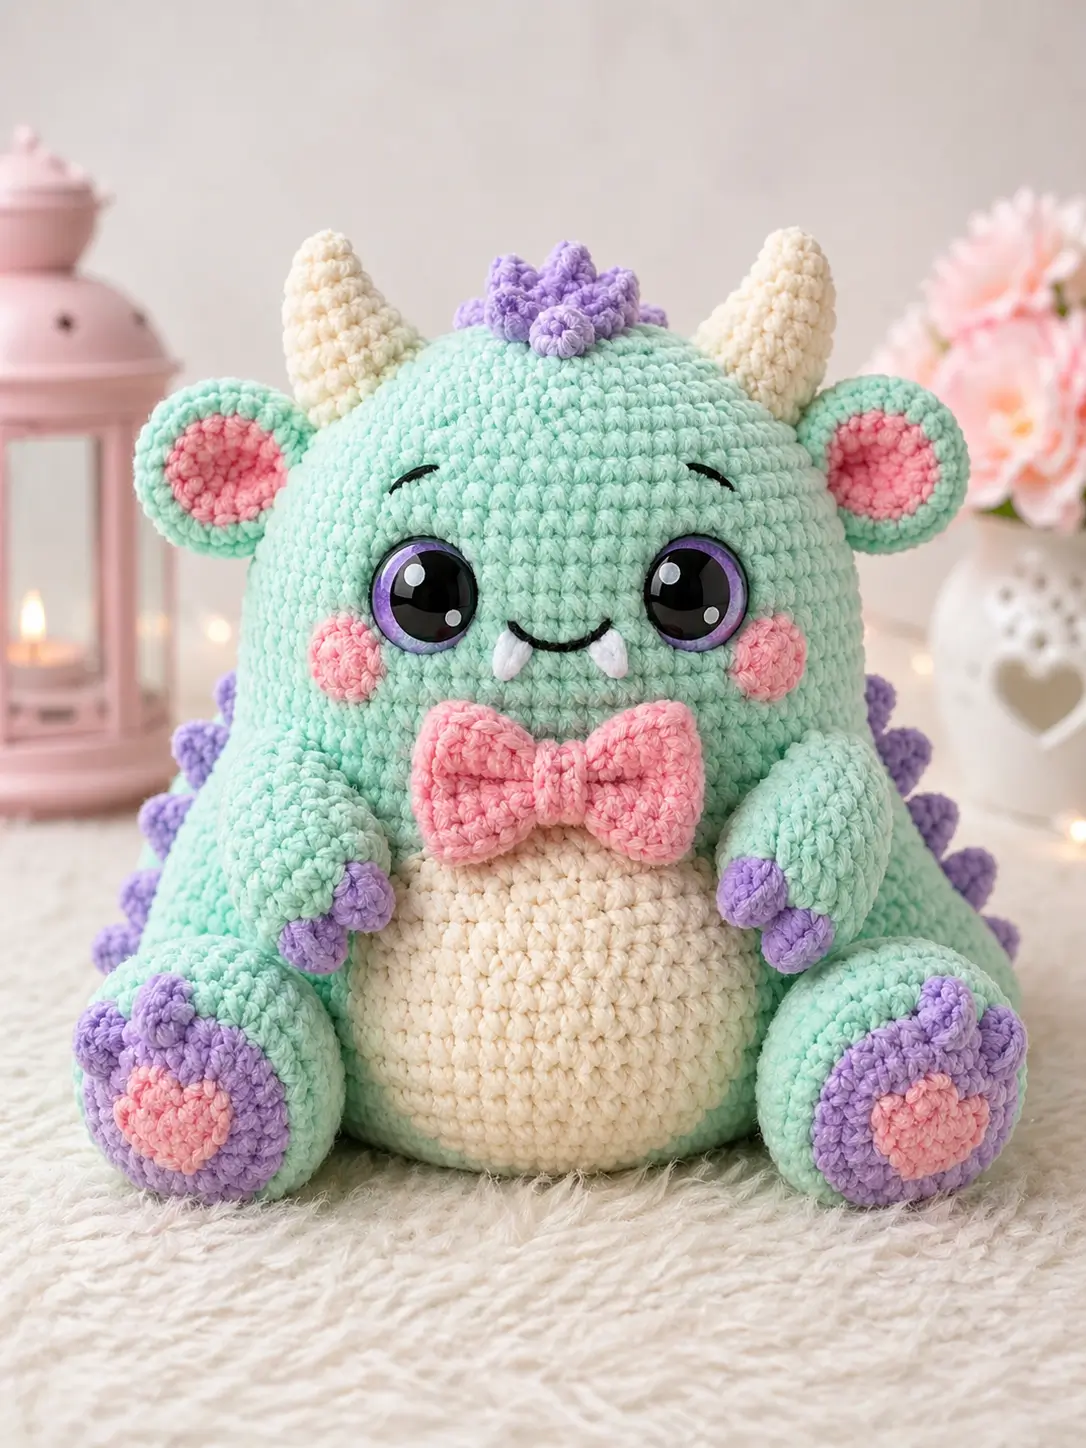
A dragon with round ears and a bow tie cannot use the same build as a winged shelf dragon. This mint dragon amigurumi pattern uses one squat head-body form, 18 mm safety eyes, cream horns, purple spine spikes, and a pink bow. Finished size is about 20 cm with worsted yarn, a 3.0 mm hook, and intermediate assembly skills. The form matches the photo’s rounded toy proportions.
Quick Answer: mint dragon amigurumi pattern
This project builds a seated mint baby dragon with a one-piece head-body base, separate horns, ears, limbs, belly patch, back spikes, bow tie, and flower crown. Use worsted yarn, a 3.0 mm hook, 18 mm safety eyes, firm polyfill stuffing, and locked stitch counts on every round.
Table of Contents
- What Makes This Dragon Unique
- Project Info at a Glance
- Materials and Tools
- Abbreviations
- Pattern — Step by Step
- Assembly
- Frequently Asked Questions
- Best Yarn for This Dragon Amigurumi
- Crochet Hook Size Guide
- 7 Technical Tips
- Quick Reference Card
What Makes This Dragon Unique
This baby dragon is built around a rounded seated silhouette rather than a long neck, open wings, or curled tail. The body and head are treated as one squat amigurumi shell, which keeps the face large enough for oversized safety eyes while giving the lower body room for a cream belly patch.
The round ears are not typical dragon ears. They read more like soft monster ears, so the cream horns and purple spine spikes must carry the dragon identity. The pink bow tie and flower crown add two extra focal points, which means the face embroidery must stay minimal.
The most common error when sewing this style is placing the horns too far outward. That widens the head and crowds the ears. Pin the cream horns first, then set the flower crown between them.
Project Info at a Glance
Quick answer: This baby dragon measures about 20 cm, uses a 3.0 mm hook, and takes approximately 6–8 hours to complete.
| Skill Level | Time | Finished Size | Hook | Yarn Weight |
|---|---|---|---|---|
| Intermediate | 6–8 hours | 20 cm estimated | 3.0 mm | Worsted / light worsted |
Materials and Tools: Safety Eyes and Polyfill Stuffing
Yarn
- Mint green — worsted or light worsted — 70–85 g — main head-body, ears, arms, legs
- Cream — same weight — 20–25 g — horns, belly patch, small fangs
- Lavender purple — same weight — 15–20 g — spine spikes, flower crown, paw accents
- Pink — same weight — 12–15 g — bow tie, cheek patches, ear centers, foot pads
- Black embroidery floss — small amount — smile and brows
Tools
- Crochet hook 3.0 mm — tight enough for the rounded head-body shell
- 18 mm safety eyes — purple-rim eyes match the photo scale
- Polyfill stuffing — firm fill for the body, lighter fill for limbs
- Yarn needle — blunt tip
- Stitch markers — at least 3
- Scissors
- Straight pins — for horn, ear, bow, and belly placement
Save this pattern to your Pinterest board before starting — you’ll need to reference it throughout.
Abbreviations: Magic Ring and Single Crochet
| Short | Full Term |
|---|---|
| MR | Magic Ring |
| sc | Single crochet |
| inc | Increase: 2 sc in same stitch |
| dec | Invisible decrease |
| sl st | Slip stitch |
| ch | Chain |
| BLO | Back loop only |
| FO | Fasten off |
Use invisible decrease for all closing rounds. The front-loop method reduces gaps near the lower body and keeps polyfill stuffing hidden. Magic Ring starts every round piece with 6 sc unless a row-based accessory states otherwise.
Baby Dragon Pattern — Step by Step
Work in continuous spiral unless noted. Mark the first stitch of every round.
Main Head-Body Shell — Make 1
Yarn: mint green
R1: 6 sc in MR (6)
R2: inc × 6 (12)
R3: [sc, inc] × 6 (18)
R4: [sc 2, inc] × 6 (24)
R5: [sc 3, inc] × 6 (30)
R6: [sc 4, inc] × 6 (36)
R7: [sc 5, inc] × 6 (42)
R8: [sc 6, inc] × 6 (48)
R9–R16: sc around (48)
Insert safety eyes between R13–R14, 9 stitches apart.
R17–R21: sc around (48)
R22: [sc 6, dec] × 6 (42)
R23: [sc 5, dec] × 6 (36)
R24: [sc 4, dec] × 6 (30)
R25: [sc 3, dec] × 6 (24)
Stuff firmly through crown, cheeks, and lower body.
R26: [sc 2, dec] × 6 (18)
R27: [sc, dec] × 6 (12)
R28: dec × 6 (6)
FO. Weave tail through front loops and close.
Cream Belly Patch — Make 1
Yarn: cream. Work around the chain.
R1: ch 9; sc in 2nd ch, sc 6, 3 sc in last ch, rotate, sc 6, inc in first base stitch (18)
R2: inc, sc 6, inc × 3, sc 6, inc × 2 (24)
R3: [sc, inc], sc 6, [sc, inc] × 3, sc 6, [sc, inc] × 2 (30)
R4: [sc 2, inc], sc 6, [sc 2, inc] × 3, sc 6, [sc 2, inc] × 2 (36)
R5: sc around (36)
FO, leaving a long tail. Sew low on the front, starting two rounds below the smile.
Cream Horns — Make 2
Yarn: cream
R1: 6 sc in MR (6)
R2: sc around (6)
R3: inc × 6 (12)
R4: sc around (12)
R5: [sc, inc] × 6 (18)
R6–R8: sc around (18)
Stuff lightly. FO, leaving a long sewing tail.
Round Ears — Make 2 Outer, 2 Inner
Outer ear yarn: mint green
R1: 6 sc in MR (6)
R2: inc × 6 (12)
R3: [sc, inc] × 6 (18)
R4: [sc 2, inc] × 6 (24)
R5: sc around (24)
FO, leaving long tail.
Inner ear yarn: pink
R1: 6 sc in MR (6)
R2: inc × 6 (12)
R3: [sc, inc] × 6 (18)
FO. Sew one pink center to each mint ear before attaching ears to head.
Arms — Make 2
Yarn: mint green
R1: 6 sc in MR (6)
R2: inc × 6 (12)
R3–R8: sc around (12)
R9: [sc, dec] × 4 (8)
R10–R12: sc around (8)
Stuff lower half only. Flatten top. FO, leaving long tail.
Purple Paw Toes — Make 6
Yarn: lavender purple
R1: 6 sc in MR (6)
R2: sc around (6)
FO. Sew three toes to each arm tip.
Legs — Make 2
Yarn: mint green
R1: 6 sc in MR (6)
R2: inc × 6 (12)
R3: [sc, inc] × 6 (18)
R4: [sc 2, inc] × 6 (24)
R5–R7: sc around (24)
R8: [sc 2, dec] × 6 (18)
R9: [sc, dec] × 6 (12)
R10–R12: sc around (12)
Stuff firmly in the foot and lightly in the ankle. FO, leaving tail.
Purple Foot Sole — Make 2
Yarn: lavender purple
R1: 6 sc in MR (6)
R2: inc × 6 (12)
R3: [sc, inc] × 6 (18)
R4: [sc 2, inc] × 6 (24)
FO. Sew to the front of each leg.
Pink Foot Pad — Make 2
Yarn: pink
R1: 6 sc in MR (6)
R2: inc × 6 (12)
FO. Sew centered on each purple sole.
Cheek Patches — Make 2
Yarn: pink
R1: 6 sc in MR (6)
R2: inc × 6 (12)
FO. Sew below each safety eye.
Small Fangs — Make 2
Yarn: cream
R1: 6 sc in MR (6)
R2: sc around (6)
R3: sc around (6)
FO. Flatten slightly. Sew under the smile, one on each side.
Purple Spine Spikes — Make 9
Yarn: lavender purple
R1: 6 sc in MR (6)
R2: sc around (6)
R3: inc × 6 (12)
R4: sc around (12)
FO. Flatten each spike into a soft triangle before sewing along the back line.
Pink Bow Tie — Make 2 Loops and 1 Band
Bow loop yarn: pink
R1: 6 sc in MR (6)
R2: inc × 6 (12)
R3: [sc, inc] × 6 (18)
R4–R5: sc around (18)
R6: [sc, dec] × 6 (12)
Flatten. FO. Make second loop.
Center band yarn: pink
Row 1: ch 6, sc in 2nd ch and across (5)
Rows 2–4: ch 1, turn, sc across (5)
FO. Wrap around both loops and sew to back.
Purple Flower Crown — Make 1 Center and 6 Petals
Center yarn: lavender purple
R1: 6 sc in MR (6)
R2: inc × 6 (12)
FO.
Petal yarn: lavender purple
Row 1: ch 5, sc in 2nd ch, hdc 2, 3 hdc in last ch, rotate, hdc 2, sc 1 (9)
Row 2: sl st around edge (9)
FO. Sew six petals around the center.
Assembly
- Pin the cream belly patch to the lower front. Sew around the edge using the cream tail.
- Attach safety eyes if not already locked. Recheck that both eyes sit level across R13–R14.
- Embroider black brows above the eyes with one short curved stitch per side.
- Embroider the smile between R16–R17, 5 stitches wide.
- Sew cheek patches below the eye line, centered under each eye.
- Attach the two cream fangs under the smile, 2 stitches apart.
- Pin horns at crown R5–R8. Angle them slightly outward.
- Sew ears at the side of the head, with the lower edge around R12.
- Sew the flower crown between horns after horn placement is fixed.
- Attach arms at side-front position, angled toward the bow.
- Sew legs to the lower body so the purple soles face forward.
- Sew the pink bow tie above the belly patch and below the mouth.
- Attach purple spine spikes from back crown to lower back.
- Weave each tail through stuffing in four passes before trimming.
- Set the dragon on a flat surface and check that both legs carry equal visual weight.
Frequently Asked Questions
How do you crochet a baby dragon amigurumi?
Crochet the main head-body shell first, then build small dragon identifiers around it: horns, round ears, belly patch, limbs, spine spikes, and face details. Start with MR 6, increase by 6 stitches per round, pause for safety eyes, stuff firmly, then close with 6-stitch decrease rounds.
What yarn works best for a crochet dragon?
Smooth worsted or light worsted yarn works best for this mint dragon because the horns, flower crown, bow tie, and purple spine spikes need clean stitch edges. Cotton-acrylic blends give better definition than plush yarn. Chenille works for larger toys, but small fangs and petals lose shape.
What size safety eyes should I use for a baby dragon?
Use 18 mm safety eyes for a 20 cm seated baby dragon with an oversized face. For a 15 cm version, reduce to 14–16 mm. For a toy intended for children under 3, skip plastic safety eyes and embroider eyes with black yarn or embroidery floss.
How long does a baby dragon amigurumi take to make?
Plan for 6–8 hours. The main shell is fast, but the small parts add time: horns, ears, fangs, flower petals, bow loops, paw toes, and purple spine spikes. Assembly can take 90 minutes because each feature needs pinning before sewing.
Best Yarn for This Dragon Amigurumi
This dragon needs yarn that holds small accessories clearly. The cream horns, pink bow tie, flower crown, purple spine spikes, and round ears all rely on visible stitches. A fuzzy yarn may hide those features.
Worsted cotton-acrylic blend gives the best balance for this build. It has enough body for the one-piece head-body shell and enough stitch definition for the belly patch and petals. Use the same yarn weight across mint, cream, pink, and purple so the parts scale evenly.
Mercerized cotton gives crisp stitch edges. It works well for the flower crown and fangs but can feel firm in the main shell. If using full cotton, stuff in smaller pieces and shape the face slowly.
Acrylic worsted gives more stretch. It helps when sewing round ears and arms because seams can be adjusted without distorting the body. The tradeoff is a softer edge on the bow tie.
Velvet or chenille is not the best choice for this exact photo style. It would enlarge the dragon and blur small pieces. Use chenille only when resizing to 28 cm or larger.
Best choice: light worsted cotton-acrylic with a 3.0 mm hook.
Crochet Hook Size Guide for This Dragon
Hook size controls fabric density more than yarn label size. For this 20 cm mint baby dragon, start with a 3.0 mm hook and worsted or light worsted yarn. The goal is firm fabric with no stuffing gaps across the large face.
For DK yarn, test 2.5–2.75 mm. For standard worsted, test 3.0–3.25 mm. For tight tension, move up by 0.25 mm. For visible polyfill stuffing, move down by 0.25–0.5 mm.
The horn and flower crown need the tighter end of the range. Loose stitches make the horn bases wobble and make the flower petals curl unevenly. The body can tolerate slightly softer tension, but the face cannot.
Recommended hook style: ergonomic handle with a narrow throat. It helps on repeated single crochet rounds and reduces strain when making nine spine spikes.
7 Technical Tips
- Mark every increase round. The main shell grows to 48 stitches. Missing one increase shifts the face line and makes the belly patch look off center.
- Place safety eyes before stuffing hard. Lock the backs after checking both eyes from 30 cm away. Close-up checking hides small height errors.
- Do not overstuff ears. The ears are flat discs. Stuffing them makes the side silhouette too wide and weakens the horn shape.
- Sew the bow after the belly patch. The bow tie should cover the upper edge of the belly patch. Sewing it first creates a visible gap.
- Use four pins for the horns. Pin front, back, inner side, and outer side. Horns twist during sewing unless held at four points.
- Keep spine spikes evenly spaced. Place the first spike behind the flower crown, then space the rest down the back. Uneven spacing is more visible than small stitch tension changes.
- Check the sitting base before closing tails. Set the dragon upright after legs are pinned. Move each leg by 3–5 mm until the body sits without leaning.
Quick Reference Card
| Finished Size | About 20 cm |
|---|---|
| Hook | 3.0 mm |
| Yarn Weight | Worsted / light worsted |
| Main Yarn | 70–85 g mint |
| Safety Eyes | 18 mm |
| Main Shell | R1 6 to R28 6 |
| Main Plateau | 48 stitches |
| Total Time | 6–8 hours |
| Skill Level | Intermediate |
| Main Features | Cream horns, round ears, belly patch, pink bow tie, purple spine spikes, flower crown |
Bookmark or pin this card for fast reference while crocheting.
Conclusion
This mint dragon amigurumi pattern works best when the head-body base stays round, the belly patch sits low, and the bow tie covers the seam line between face and torso. After finishing, photograph the toy from the front and side before weaving the last tails; those views show whether the ears, horns, and spikes are balanced. The main technical question is horn angle: each cream horn should lean outward by only a few millimeters so it frames the flower crown rather than widening the head. Share your finished work on Pinterest and Instagram: #MintDragonAmigurumi #KROCHIFYpattern
Last updated: April 2026 — Pattern built from photo estimates and standard stitch math.









