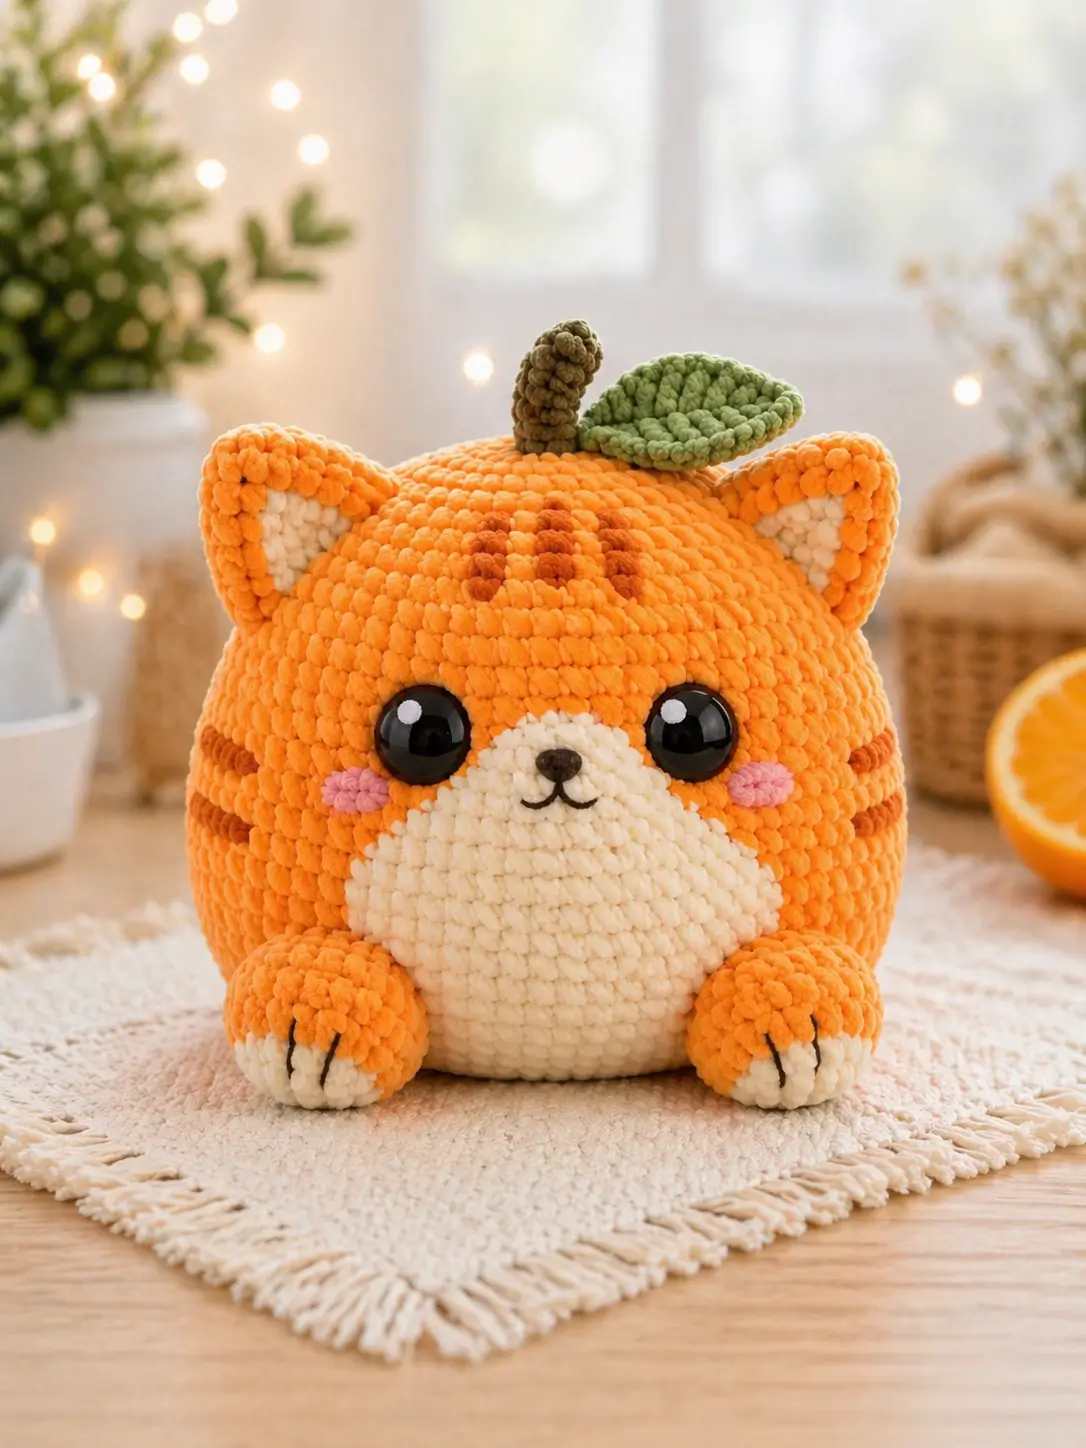
Orange fur, cream muzzle, and a citrus stem create three color zones that must stay balanced. This orange cat amigurumi pattern builds a 22 cm seated plush with bulky chenille, a 4.5 mm hook, 18 mm safety eyes, and intermediate shaping. The round body uses tabby stripe embroidery, while the top leaf gives the toy a fruit-cat profile without changing the core cat structure.
Quick Answer: What You Need to Know
This citrus tabby crochet project uses one round head-body form, two triangular ears, two front paws, a cream face-belly patch, safety eyes, polyfill stuffing, and a small stem with a leaf. Work the main form in spiral rounds, sew details last, and check symmetry before closing.
Table of Contents
- What Makes This Cat Unique
- Project Info at a Glance
- Materials and Tools
- Magic Ring and Single Crochet Abbreviations
- Orange Cat Amigurumi Pattern — Step by Step
- Assembly
- Frequently Asked Questions
- Best Yarn for This Cat
- Hook Size Guide
- Safety Eyes and Polyfill Stuffing Placement
- Tabby Stripes, Citrus Stem, and Leaf Details
- 7 Technical Tips
- Quick Reference Card
What Makes This Cat Unique
The design problem is the rounded body. A normal standing cat shape would stretch the torso and reduce the fruit-like outline, so this pattern uses one large sphere for the head and body. The cream patch is sewn on as a separate flat piece because chenille colorwork can blur the muzzle edge. The ears stay triangular and unstuffed to keep the silhouette crisp. The most common error when sewing this style is placing the safety eyes too high; that turns the plush into a plain ball with ears. Place the eyes below the widest part of the sphere, then center the nose between them.
Unlike a long cat plush, this tabby needs visible front-weight balance. The paws sit low and forward so the finished size reads as a seated animal, not a round cushion.
Project Info at a Glance
Quick answer: This citrus tabby plush measures about 22 cm, uses a 4.5 mm hook, and takes about 5–7 hours to complete.
| Skill Level | Time | Finished Size | Hook | Yarn Weight |
|---|---|---|---|---|
| Intermediate | 5–7 hours | 22 cm | 4.5 mm | Bulky chenille |
Materials and Tools
Yarn
- Orange bulky chenille — 90 g
- Cream bulky chenille — 35 g
- Pink bulky chenille — 5 g
- Olive brown bulky chenille — 5 g
- Green bulky chenille or worsted cotton held double — 8 g
- Black embroidery thread — nose, mouth, paw lines
Tools
- Crochet hook 4.5 mm — tight enough for the round body while still workable with plush yarn
- Safety eyes 18 mm — large eyes match the oversized face in the photo
- Polyfill stuffing — firm density for the sphere
- Yarn needle — large eye, blunt tip
- Locking stitch markers — at least 2
- Sewing pins — needed for the cream patch and ears
- Scissors
Save this pattern to your Pinterest board before starting — you’ll need to reference the stitch counts throughout.
Magic Ring and Single Crochet Abbreviations
| Short | Full Term |
|---|---|
| MR | Magic Ring |
| sc | Single crochet |
| inc | Increase: 2 sc in same stitch |
| dec | Invisible decrease |
| sl st | Slip stitch |
| ch | Chain |
| BLO | Back loop only |
| FO | Fasten off |
| st | Stitch |
The Magic Ring gives closed centers on the body, cheeks, paws, and cream patch. Single crochet forms the dense amigurumi fabric. For invisible decrease, work through the front loops of 2 stitches before pulling through; this reduces the open gap that can show polyfill stuffing.
Orange Cat Amigurumi Pattern — Step by Step
Work in continuous spiral unless noted. Use a stitch marker at the first stitch of each round.
Main Head-Body Sphere — Make 1
Yarn: Orange bulky chenille
- R1: 6 sc in MR (6)
- R2: inc × 6 (12)
- R3: [sc, inc] × 6 (18)
- R4: [sc 2, inc] × 6 (24)
- R5: [sc 3, inc] × 6 (30)
- R6: [sc 4, inc] × 6 (36)
- R7: [sc 5, inc] × 6 (42)
- R8: sc around (42)
- R9: sc around (42)
- R10: sc around (42)
- R11: sc around (42)
- R12: sc around (42)
- R13: sc around (42)
Insert safety eyes between R12 and R13, 12 stitches apart. Do not lock washers until the cream patch is pinned in place.
- R14: sc around (42)
- R15: sc around (42)
- R16: sc around (42)
- R17: sc around (42)
- R18: sc around (42)
- R19: sc around (42)
- R20: [sc 5, dec] × 6 (36)
- R21: [sc 4, dec] × 6 (30)
- R22: [sc 3, dec] × 6 (24)
Start firm stuffing. Shape the sphere by pressing stuffing outward toward the sides, not upward.
- R23: [sc 2, dec] × 6 (18)
- R24: [sc, dec] × 6 (12)
- R25: dec × 6 (6)
FO. Weave through front loops of remaining 6 stitches. Pull closed and hide tail inside the body.
Cream Face-Belly Patch — Make 1
Yarn: Cream bulky chenille
This piece is sewn flat to the front from below the eyes to the lower belly.
- R1: 6 sc in MR (6)
- R2: inc × 6 (12)
- R3: [sc, inc] × 6 (18)
- R4: [sc 2, inc] × 6 (24)
- R5: [sc 3, inc] × 6 (30)
- R6: [sc 4, inc] × 6 (36)
Sl st into next stitch. FO with 35 cm tail. Do not stuff.
Outer Ears — Make 2
Yarn: Orange bulky chenille
Work as small triangular cones. Do not stuff.
- R1: 6 sc in MR (6)
- R2: [sc 2, inc] × 2 (8)
- R3: [sc 3, inc] × 2 (10)
- R4: [sc 4, inc] × 2 (12)
- R5: [sc 5, inc] × 2 (14)
- R6: [sc 6, inc] × 2 (16)
- R7: sc around (16)
Flatten the ear. FO with 25 cm tail.
Inner Ear Patches — Make 2
Yarn: Cream bulky chenille
Work flat rows.
- Row 1: ch 5, sc in 2nd ch from hook, sc 3 (4)
- Row 2: ch 1, turn, dec, sc 2 (3)
- Row 3: ch 1, turn, dec, sc 1 (2)
- Row 4: ch 1, turn, dec (1)
FO with 20 cm tail. Sew one cream patch inside each orange ear.
Front Paws — Make 2
Yarn: Cream and orange bulky chenille
- R1: With cream, 6 sc in MR (6)
- R2: inc × 6 (12)
- R3: [sc, inc] × 6 (18)
- R4: sc around (18)
- R5: Change to orange, [sc, dec] × 6 (12)
- R6: sc around (12)
- R7: sc around (12)
- R8: [sc 2, dec] × 3 (9)
Stuff lightly. Flatten opening. FO with 25 cm tail. Embroider 3 short black claw lines on each cream toe area.
Cheek Patches — Make 2
Yarn: Pink bulky chenille
- R1: 6 sc in MR (6)
- R2: inc × 6 (12)
Sl st into next stitch. FO with 18 cm tail. Do not stuff.
Citrus Stem — Make 1
Yarn: Olive brown bulky chenille
- R1: 6 sc in MR (6)
- R2: sc around (6)
- R3: sc around (6)
- R4: sc around (6)
- R5: sc around (6)
- R6: sc around (6)
- R7: sc around (6)
Stuff lightly with a thin strip of polyfill stuffing. FO with 20 cm tail.
Leaf — Make 1
Yarn: Green bulky chenille or worsted cotton held double
Work around both sides of the chain.
- R1: ch 9. Starting in 2nd ch from hook: sl st 1, sc 1, hdc 2, dc 2, hdc 1, 3 sc in last ch; work opposite side: hdc 1, dc 2, hdc 2, sc 1, sl st 1 (18)
- R2: ch 1, sc 8, 3 sc in tip stitch, sc 8, sc 3 around base (22)
Sl st to finish. FO with 25 cm tail.
Tabby Stripes and Face Embroidery
Use brown yarn for tabby stripes and black embroidery thread for face details.
- Forehead: make 3 short vertical stripes between the ears, centered above the eyes.
- Side stripes: make 2 horizontal stripes on each side of the body at eye level and lower cheek level.
- Nose: embroider a small triangle between the eyes, centered on the cream patch.
- Mouth: stitch a short vertical line below the nose, then two curved mouth lines.
- Paw marks: add 3 short black lines on each cream paw tip.
Do not pull embroidery tight. Plush yarn dents fast, and tight surface stitches distort the sphere.
Assembly
- Pin the cream patch to the front of the body. The top edge should sit between the eyes, and the lower edge should reach the lower third of the sphere.
- Sew the patch with small whipstitches through the back loop of the patch edge. Keep the patch flat.
- Lock the safety-eye washers only after the patch is centered.
- Sew ears at R5–R8 on the top sides, 10–12 stitches apart across the crown.
- Attach inner ear patches after the ears are sewn, so the cream area follows the final ear angle.
- Sew paws at R19–R22 on the lower front. Angle them slightly inward.
- Sew cheek patches below and outside the eyes, one on each side of the cream patch.
- Sew the stem to the crown over R1–R2.
- Sew the leaf beside the stem, angled slightly to the right.
- Add tabby stripes last, after all sewn parts are fixed.
Final check: the eyes, nose, and stem should form a centered vertical line when viewed from the front.
Frequently Asked Questions
How do you crochet a cat amigurumi?
Start with a Magic Ring, increase in single crochet until the body reaches the planned width, work several plain rounds, then decrease while adding polyfill stuffing. Add ears, paws, face pieces, safety eyes, and embroidery after the main body is firm enough to hold shape.
What size safety eyes should I use for a crochet cat?
For a 22 cm plush cat, 18 mm safety eyes match the oversized face shown in the photo. Smaller 12 mm eyes create a more realistic face. For toys for children under 3, replace plastic safety eyes with embroidered or crocheted eyes.
What hook size is best for amigurumi?
The best hook size is smaller than the yarn label’s general recommendation. For bulky chenille, start with 4.5 mm and check for stuffing gaps. If white stuffing shows between stitches, drop to 4.0 mm. If hand strain appears within 30 minutes, test 5.0 mm with firmer stuffing.
Can I make this cat larger with thicker yarn?
Yes. Thicker yarn and a larger hook increase the finished size while keeping the same round counts. Keep the same stitch math, then resize the eyes, stem, and leaf to match.
Best Yarn for This Cat
This cat needs yarn that hides color joins and supports a round stuffed form. Bulky chenille matches the photo because the pile softens stitch definition and creates a plush surface. The tradeoff is lower visibility when counting rounds, so stitch markers are not optional.
Bulky chenille gives the closest result to the reference photo. Use it for the orange body, cream patch, paws, cheeks, and stem. Keep tension firm but not tight.
Worsted cotton gives sharper stripes and cleaner ears. Use it for a smaller display piece with more visible stitch definition. It will not match the soft texture in the photo.
Acrylic worsted is forgiving during sewing. It works for practice pieces, but the finished toy will be smaller and less rounded unless you increase to a higher plateau count.
Best match for this design: bulky chenille for the body, with the same yarn family for all visible parts. Mixing fiber types can make the leaf sharper, but it may stand out more than intended.
Hook Size Guide
Hook size controls fabric density. The label recommendation for bulky yarn is usually aimed at garments or accessories, not stuffed toys. Amigurumi fabric needs smaller gaps because polyfill stuffing pushes outward from inside the piece.
For this 22 cm cat, start with a 4.5 mm hook. This size keeps chenille stitches compact while leaving enough room to insert the hook without tearing the yarn pile.
| Result | Adjustment |
|---|---|
| Stuffing visible | Drop to 4.0 mm |
| Body feels stiff before stuffing | Move to 5.0 mm |
| Ears collapse | Add one more plain round or tighter tension |
| Patch ripples | Use fewer sewing stitches or loosen edge tension |
The citrus stem is the most hook-sensitive part. If it twists too much, remake it with a 4.0 mm hook and lighter stuffing.
Safety Eyes and Polyfill Stuffing Placement
Safety eyes should be inserted before the body opening becomes too narrow. For this design, the placement point is between R12 and R13, 12 stitches apart. Pin the cream face-belly patch before locking the washers; that gives a clear reference for eye symmetry.
Polyfill stuffing should be added in stages. Fill the top and side walls first, then the front face area, then the base. Overstuffing the front pushes the safety eyes outward and makes the cream patch buckle. Understuffing the base makes the cat lean backward.
For child safety, embroidered eyes are the safer replacement for children under 3.
Tabby Stripes, Citrus Stem, and Leaf Details
The tabby stripes should be embroidered after assembly because the body shifts during sewing. Place 3 short stripes above the eyes and 2 side stripes on each side. Keep all side stripes short; long stripes curve with the sphere and can look uneven from the front.
The citrus stem gives the design its fruit-cat identity. Sew it upright over the crown center, then angle the leaf beside it. The leaf should touch the stem base, not float behind it. A loose leaf seam is the first part likely to catch during handling, so sew around the base twice.
7 Technical Tips
- Mark every round on chenille. Plush yarn hides stitches. Move the marker at the first stitch of every round, not every few rounds.
- Pin the cream patch before locking eyes. Eye placement looks different after the patch is added. Washers are difficult to remove from safety eyes.
- Stuff the sphere in layers. Add small pieces of polyfill stuffing around the walls first, then fill the center. One large clump creates flat spots.
- Use short embroidery floats. Long tabby stripes snag and distort the plush surface. Anchor each stripe with separate stitches.
- Keep ears flat. Stuffed ears make the head too wide and reduce the citrus silhouette. Flat ears also frame the stem better.
- Sew paws low. Paws placed too high cover the cream patch. Set them on the lower third of the body.
- Reinforce the stem base. Pass the yarn tail through the crown, across the inside stuffing, and back to the stem base before trimming. This prevents wobble.
Quick Reference Card
| Finished Size | 22 cm |
|---|---|
| Hook | 4.5 mm |
| Yarn Weight | Bulky chenille |
| Main Yarn | 90 g orange |
| Accent Yarn | 35 g cream, 8 g green, 5 g brown, 5 g pink |
| Safety Eyes | 18 mm |
| Main Body | R1 6 → R7 42 → R25 6 |
| Paws | Make 2, R1 6 → R8 9 |
| Ears | Make 2, R1 6 → R7 16 |
| Total Time | 5–7 hours |
| Skill Level | Intermediate |
Bookmark or pin this card for round-count checks while crocheting.
Conclusion
This orange cat amigurumi pattern finishes as a 22 cm seated plush with a round orange body, cream face-belly patch, triangular ears, front paws, tabby stripes, and citrus crown detail. After finishing, photograph the front view before heavy handling; plush yarn compresses slightly around sewn joins. The key technical check is face alignment: the stem, nose, patch center, and body base should sit on one vertical axis.
Share your finished work on Pinterest and Instagram:
#OrangeCatAmigurumi #KROCHIFYpattern
Last updated: April 2026 — Pattern verified against uploaded reference photo and current hook/safety-eye guidance.









