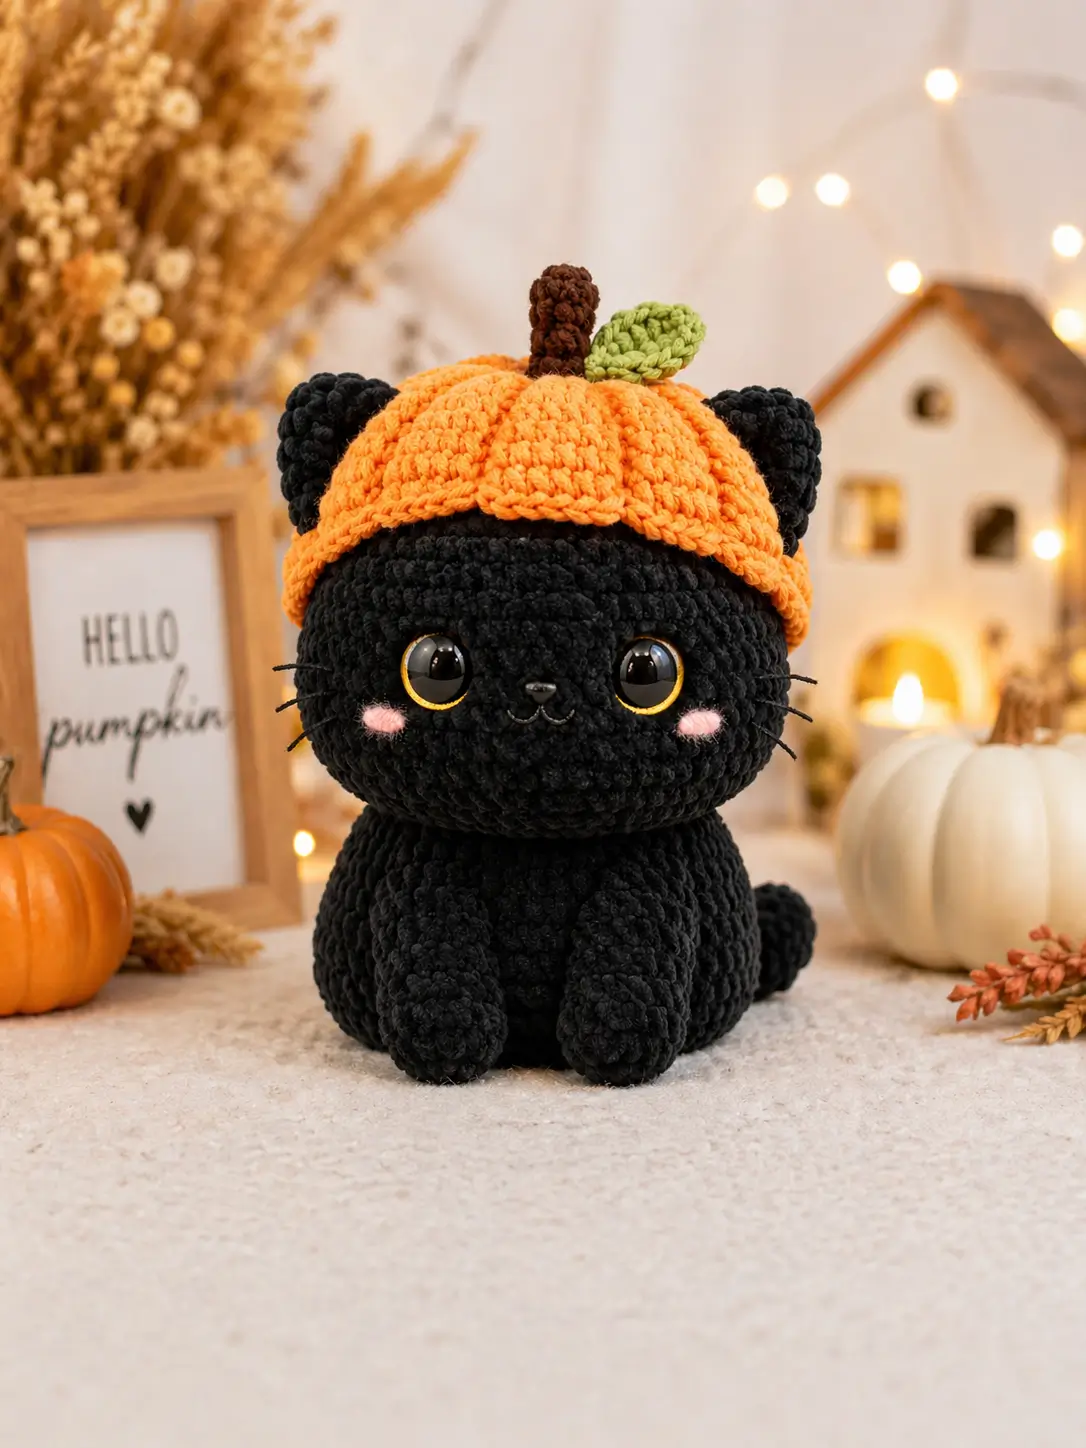
A black cat in a pumpkin cap needs ear clearance before any facial detail can work. This black cat pumpkin hat crochet pattern builds a 16 cm seated plush with bulky chenille yarn, a 4.0 mm hook, and intermediate shaping. The fixed cap is sewn in place, so the ears stay visible while the ribbed pumpkin crown keeps its round harvest form.
Quick Answer: What You Need to Know
This project makes a seated black cat plush with a ribbed orange pumpkin hat, brown stem, green leaf, pink cheeks, embroidered whiskers, and gold-rim safety eyes. Use bulky chenille yarn, a 4.0 mm hook, firm polyfill stuffing, and continuous single crochet rounds with MR 6 construction.
Table of Contents
- What Makes This Black Cat Unique
- Project Info at a Glance
- Materials and Tools
- Abbreviations
- Magic Ring, Single Crochet, and Safety Eyes Notes
- Pattern — Step by Step
- Assembly
- FAQ
- Best Yarn for This Pattern
- Hook Size Guide for This Cat
- 7 Technical Tips
- Quick Reference Card
What Makes This Black Cat Unique
This black cat uses a larger head than body, which matches the photo’s plush balance and leaves room for wide gold-rim safety eyes. The pumpkin hat needs a wider stitch count than the head crown because chenille yarn compresses when sewn down. The hat is not a full helmet; it is a shallow cap with a scalloped lower edge, so the black ears remain visible.
The most common error when sewing this cat head is setting the cap too low. That covers the eye line and makes the face look crowded. Pin the pumpkin hat after the safety eyes are locked, then measure 2 rounds above the eye placement before stitching. Unlike a plain cat plush, this design needs extra vertical clearance for the stem and leaf.
Project Info at a Glance
Quick answer: this pumpkin cap cat measures about 16 cm, uses a 4.0 mm hook, and takes about 5–6 hours.
| Skill Level | Time | Finished Size | Hook | Yarn Weight |
|---|---|---|---|---|
| Intermediate | 5–6 hours | 16 cm estimate | 4.0 mm | Bulky chenille |
For a pumpkin hat cat amigurumi, hook size affects the cap fit more than the body. A loose cap fabric stretches down over the ears, while a tight cap keeps the scalloped edge above the eye line.
For a pumpkin hat cat amigurumi, finished size changes fast when moving from sport yarn to bulky chenille. Published pumpkin cat examples range around 12 cm with finer yarn, while chunky yarn samples use larger hooks and bulkier fabric.
For a pumpkin hat cat amigurumi, stitch count should stay balanced: 36 stitches for the head plateau, 30 stitches for the body plateau, and 42 stitches for the cap rim.
Materials and Tools
Yarn
- Black chenille yarn — bulky or compact super bulky — about 55 g
- Orange chenille yarn — same weight — about 30 g
- Brown yarn — same or slightly thinner — about 5 g
- Green yarn — same or slightly thinner — about 4 g
- Pink yarn or embroidery floss — about 2 g
Tools
- Crochet hook 4.0 mm — tight enough for plush fabric with chenille yarn
- Safety eyes 12–14 mm — gold-rim cat eyes match the photo scale
- Polyfill stuffing — firm density for head and body
- Yarn needle — blunt tip
- Stitch markers — 3 minimum
- Black or dark gray embroidery thread — whiskers and mouth
- Scissors
Save this pattern to your Pinterest board before starting — you’ll need to reference the stitch counts throughout.
Abbreviations
| Short | Full Term |
|---|---|
| MR | Magic Ring |
| sc | single crochet |
| inc | increase, 2 sc in same stitch |
| dec | invisible decrease |
| sl st | slip stitch |
| ch | chain |
| BLO | back loop only |
| FLO | front loop only |
| hdc | half double crochet |
| dc | double crochet |
| FO | fasten off |
The invisible decrease joins the front loops of 2 stitches before the final pull-through. That keeps the single crochet surface cleaner on black chenille yarn, where gaps expose pale polyfill stuffing.
Magic Ring, Single Crochet, and Safety Eyes Notes
Magic Ring starts every rounded plush part at 6 stitches. Each increase round adds 6 stitches. Each decrease round removes 6 stitches. This pattern follows that math for the head, body, feet, cheeks, tail, and pumpkin hat.
Single crochet forms the main fabric. Keep the stitches compact, not stiff. The goal is a surface that hides stuffing while still allowing the head to round out.
Safety eyes should be placed before the head opening becomes too small. For toys given to children under 3, embroider eyes instead.
black cat pumpkin hat crochet pattern — Step by Step
Work in continuous spiral unless a row says otherwise. Count every round before moving forward.
Head — Make 1
Yarn: black chenille.
R1: 6 sc in MR (6)
R2: inc × 6 (12)
R3: [sc, inc] × 6 (18)
R4: [sc 2, inc] × 6 (24)
R5: [sc 3, inc] × 6 (30)
R6: [sc 4, inc] × 6 (36)
R7: sc around (36)
R8: sc around (36)
R9: sc around (36)
R10: sc around (36)
R11: sc around (36)
R12: sc around (36)
R13: sc around (36)
Place safety eyes between R9 and R10, 8 stitches apart. Add the washers after checking the face from the front and side.
R14: [sc 4, dec] × 6 (30)
R15: [sc 3, dec] × 6 (24)
R16: [sc 2, dec] × 6 (18)
Stuff firmly. Add more stuffing to the cheek area under each eye.
R17: [sc, dec] × 6 (12)
R18: dec × 6 (6)
FO. Close the final hole. Leave a 20 cm tail if sewing the head to body with the same strand.
Body — Make 1
Yarn: black chenille.
R1: 6 sc in MR (6)
R2: inc × 6 (12)
R3: [sc, inc] × 6 (18)
R4: [sc 2, inc] × 6 (24)
R5: [sc 3, inc] × 6 (30)
R6: sc around (30)
R7: sc around (30)
R8: sc around (30)
R9: sc around (30)
R10: sc around (30)
R11: sc around (30)
R12: [sc 3, dec] × 6 (24)
R13: [sc 2, dec] × 6 (18)
Stuff the lower body firmly and the upper body moderately. A firm lower body keeps the seated cat stable.
R14: [sc, dec] × 6 (12)
R15: dec × 6 (6)
FO. Close the hole. Leave a long tail for joining.
Front Paws — Make 2
Yarn: black chenille.
R1: 6 sc in MR (6)
R2: inc × 6 (12)
R3: sc around (12)
R4: sc around (12)
R5: [sc, dec] × 4 (8)
R6: sc around (8)
R7: sc around (8)
R8: sc around (8)
R9: sc around (8)
R10: sc around (8)
Add a small amount of stuffing to the paw end only. FO and leave a 15 cm sewing tail.
Feet — Make 2
Yarn: black chenille.
R1: 6 sc in MR (6)
R2: inc × 6 (12)
R3: [sc, inc] × 6 (18)
R4: sc around (18)
R5: sc around (18)
R6: [sc, dec] × 6 (12)
R7: sc around (12)
R8: sc around (12)
R9: sc around (12)
R10: sc around (12)
Stuff firmly at the toe end. FO and leave a 15 cm tail.
Ears — Make 2
Yarn: black chenille.
R1: 6 sc in MR (6)
R2: inc × 6 (12)
R3: [sc, inc] × 6 (18)
R4: sc around (18)
Do not stuff. Flatten each ear, then pinch one edge into a soft point while sewing. FO and leave an 18 cm tail.
Tail — Make 1
Yarn: black chenille.
R1: 6 sc in MR (6)
R2: inc × 6 (12)
R3: sc around (12)
R4: sc around (12)
R5: sc around (12)
R6: sc around (12)
R7: sc around (12)
R8: sc around (12)
R9: sc around (12)
R10: sc around (12)
R11: sc around (12)
R12: sc around (12)
Stuff lightly so the tail can curve. FO and leave a 20 cm tail.
Cheek Patches — Make 2
Yarn: pink.
R1: 6 sc in MR (6)
R2: inc × 6 (12)
FO and leave a 12 cm tail. Do not stuff. Flatten into an oval while sewing.
Pumpkin Hat — Make 1
Yarn: orange chenille.
R1: 6 sc in MR (6)
R2: inc × 6 (12)
R3: [sc, inc] × 6 (18)
R4: [sc 2, inc] × 6 (24)
R5: [sc 3, inc] × 6 (30)
R6: [sc 4, inc] × 6 (36)
R7: [sc 5, inc] × 6 (42)
R8: sc around (42)
R9: sc around (42)
R10 scallop edge: [sl st, hdc, dc, hdc, sl st, sc] × 7 (42)
FO and leave a 40 cm sewing tail. The cap should sit over the top third of the head.
Pumpkin Rib Lines — Make 7 Surface Lines
Yarn: orange or darker orange thread.
Attach yarn at the MR center of the hat. Surface slip stitch or embroider one vertical line from the crown to a scallop valley. Repeat at each valley. Keep all 7 lines evenly spaced.
Each line crosses about 8–9 visible rounds from crown to rim.
Stem — Make 1
Yarn: brown.
R1: 6 sc in MR (6)
R2: inc × 6 (12)
R3: sc around (12)
R4: sc around (12)
R5: sc around (12)
R6: [sc, dec] × 4 (8)
R7: sc around (8)
R8: sc around (8)
Stuff lightly. FO and leave a 15 cm tail.
Leaf — Make 1
Yarn: green.
Ch 7. Work into the second chain from hook.
Row 1: sl st, sc, hdc, dc, hdc, 3 sc in last chain; turn to the opposite side of chain, hdc, dc, hdc, sc, sl st (12)
FO and leave a 12 cm tail. Pinch the base when sewing beside the stem.
Face Embroidery
Use black or dark gray thread for the mouth. Place the nose between R10 and R11, centered between the eyes. Stitch a small inverted triangle over 2 stitches. Add a short vertical line below it, then two curved mouth stitches.
For whiskers, stitch 3 lines on each side between R10 and R12. Keep the outer tips level.
Assembly
- Pin the head to the body with the head centered and slightly forward.
- Sew the head to the body using mattress stitch. Work twice around the neck.
- Pin the ears to the head between R3 and R7, about 9 stitches apart across the crown.
- Sew the ears down before adding the pumpkin hat.
- Place the pumpkin hat over the crown. Keep the lower scallop edge above the eyes.
- Sew around the hat rim, catching only the inside edge of each scallop.
- Sew the stem to the top center of the pumpkin hat.
- Sew the leaf beside the stem, angled toward the right side.
- Attach front paws to body R8–R12, tilted inward.
- Attach feet to the lower front of the body at R3–R6.
- Sew the tail to the back right side of the body between R5 and R8. Curve it upward before the final tack stitch.
- Sew cheek patches below the eyes, one round lower than the eye centers.
- Add mouth and whisker embroidery after the cheeks, so the face spacing stays clean.
- Weave each yarn tail through the stuffing in 4 directions before trimming.
- Check the cat from front, side, and top. The stem should sit upright, the leaf should not cover an ear, and both eyes should remain visible.
Frequently Asked Questions
How do you crochet a pumpkin cat?
Crochet the cat first, then add the pumpkin cap. Make the black head, body, ears, limbs, tail, and cheeks in spiral rounds. Make the orange cap wider than the head crown, sew rib lines from crown to rim, then attach the brown stem and green leaf.
What size safety eyes do I need for amigurumi?
Use 12–14 mm safety eyes for this 16 cm chenille cat. Smaller DK or sport-weight cats often use 8–10 mm eyes. Place the eyes before closing the head, then check spacing from 30 cm away before pressing the washers into place.
What hook size should I use for amigurumi?
Use a hook smaller than the yarn label suggests when making stuffed toys. For this bulky chenille cat, 4.0 mm produces dense fabric. If stuffing shows through, move down to 3.5 mm. If the fabric curls tightly, move up to 4.5 mm.
Is a pumpkin cat amigurumi suitable for beginners?
This pattern fits advanced beginners who already know Magic Ring, single crochet, increases, invisible decreases, and sewing parts. The cat body is basic, but the pumpkin hat, scalloped rim, rib placement, and face alignment add intermediate finishing work.
Best Yarn for This Pattern
The photo shows a soft plush surface, so chenille yarn is the closest match. Chenille yarn hides individual stitches and gives the black cat a rounded toy finish. It also makes the pumpkin hat look thick enough to sit like a cap rather than a flat applique.
Bulky chenille works well for the black cat because the head needs volume. The downside is lower stitch visibility. Count rounds with a locking marker and check each increase round before moving forward.
Worsted acrylic gives clearer stitch definition and stronger rib lines on the pumpkin hat. It also makes sewing easier because the needle passes through the fabric with less drag.
Cotton yarn gives the cleanest Magic Ring and single crochet detail. Use cotton if the pattern will become a display item rather than a plush toy. Cotton shows every increase and decrease, so the pumpkin ribs look sharper.
For the closest photo match, use black chenille for the cat and orange chenille for the pumpkin hat. Use slightly thinner brown and green yarn for the stem and leaf so the top detail does not become too bulky.
Hook Size Guide for This Cat
Hook size controls fabric density more than yarn weight alone. For this 16 cm cat, start with 4.0 mm. That hook makes the pumpkin hat firm enough to keep its rim shape. It also keeps the black head from stretching around the safety eyes.
If white stuffing dots appear between stitches, change to 3.5 mm or reduce stuffing pressure. If the chenille yarn sheds or the hook catches every stitch, move to 4.5 mm and tighten the stuffing gradually.
The most complex part is the pumpkin hat edge. A hook that is too large makes the scallops flare outward. A hook that is too small makes the cap too tight to sit over the ears.
7 Technical Tips
- Mark every round start. Black chenille hides the first stitch. Use a bright marker and move it every round.
- Count each increase round. The head must reach 36 stitches. The hat must reach 42 stitches. That 6-stitch difference creates the cap fit.
- Place safety eyes before R14. After R14, the head opening narrows and the washers become harder to press flat.
- Stuff the cheeks from the sides. Add small pieces under each eye before filling the center. This prevents a flat face.
- Pin the pumpkin hat first. Do not sew from one side around without pins. The rim will drift lower on one ear.
- Use vertical rib guides. Mark 7 scallop valleys, then stitch ribs from the crown to each valley.
- Control polyfill stuffing. Add smaller pieces rather than one large clump. Large clumps create ridges under chenille yarn.
Quick Reference Card
| Finished size | About 16 cm |
|---|---|
| Hook | 4.0 mm |
| Yarn weight | Bulky chenille |
| Main yarn | Black, about 55 g |
| Accent yarn | Orange 30 g, brown 5 g, green 4 g, pink 2 g |
| Safety eyes | 12–14 mm |
| Head rounds | R1 6 to R18 6 |
| Body rounds | R1 6 to R15 6 |
| Hat rounds | R1 6 to R10 42 |
| Total time | 5–6 hours |
| Skill level | Intermediate |
Bookmark or pin this card for quick reference while crocheting.
Conclusion
The black cat pumpkin hat crochet pattern is complete when the cap rim sits above the eyes, the ears remain visible, and the stem stands centered over the head. After finishing, check the face spacing before trimming yarn tails; chenille is hard to reopen once tails are buried. The key technical question is cap tension: does the orange rim touch the ear bases without pulling them inward? If yes, the structure is balanced.
Share your finished work on Pinterest and Instagram:
#PumpkinHatCat #KROCHIFYpattern
Last updated: April 2026 — Pattern written from the supplied photo.









