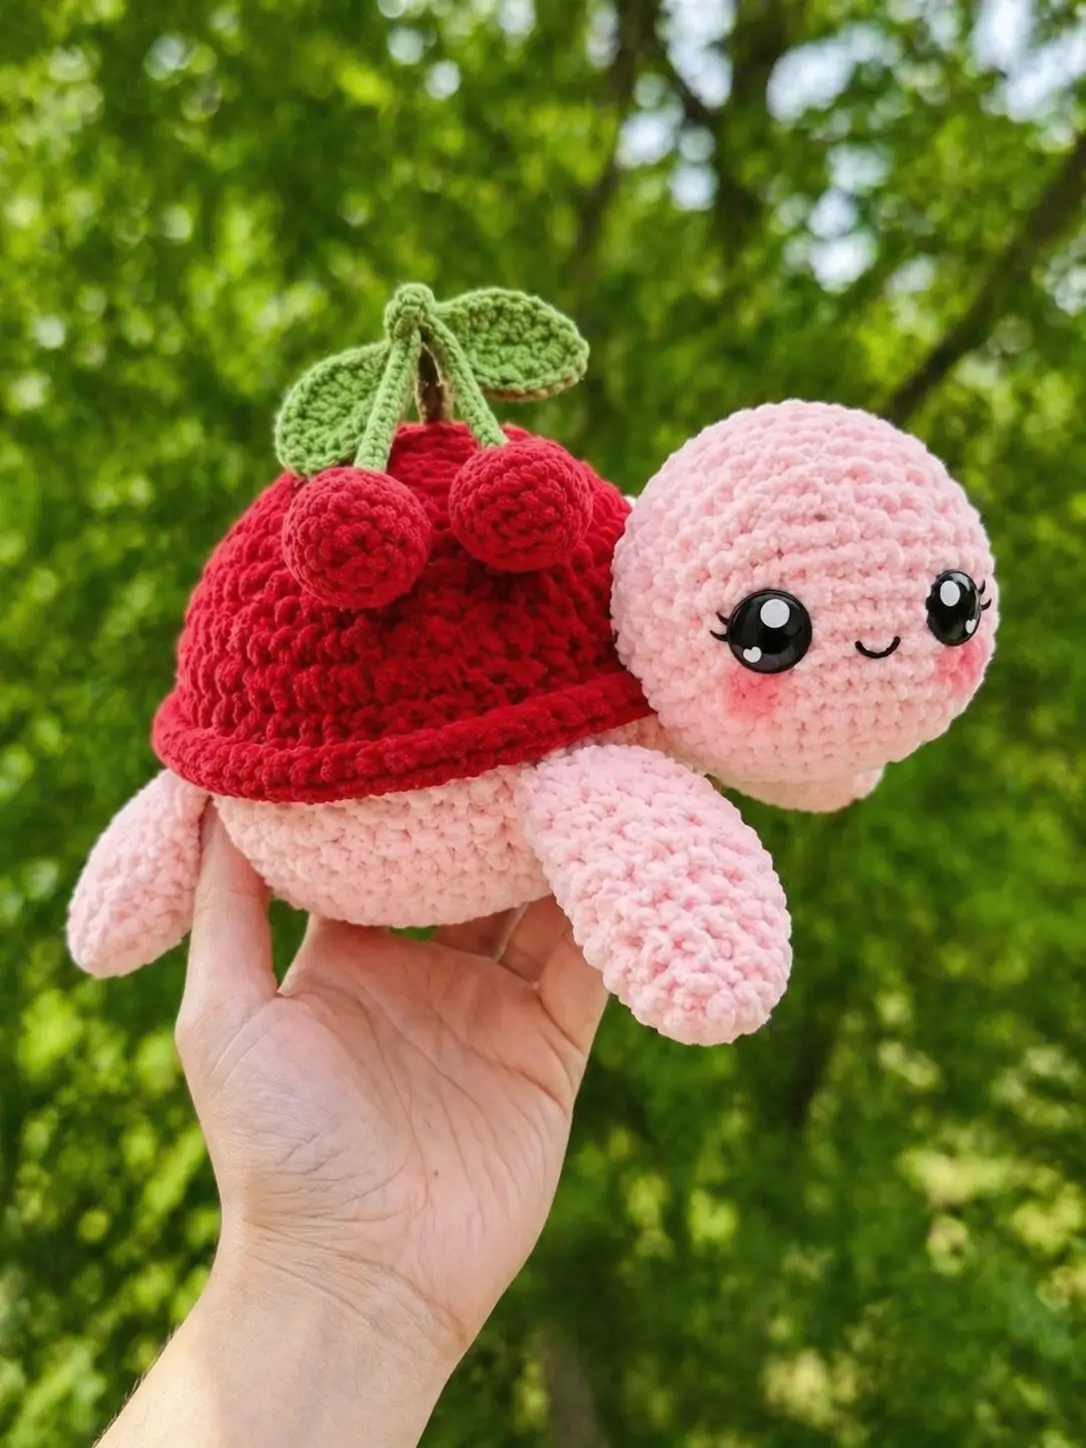
A turtle shell shaped like a red berry changes the whole balance problem. This strawberry turtle amigurumi pattern makes a 22 cm chenille plush with a 4.5 mm hook, 18 mm safety eyes, pink flippers, a red domed shell, and cherry stems. The shell needs more height than a normal sea turtle, while the head must stay forward enough to remain visible under the rim.
Quick Answer: Strawberry Turtle Amigurumi Pattern
This project is a chenille sea turtle with a pink body, red strawberry-style shell, raised shell rim, cherry fruits, green leaves, safety eyes, embroidered smile, and soft flippers. Use a 4.5 mm hook, bulky plush yarn, firm stuffing, and continuous spiral rounds with full stitch counts.
Table of Contents
- What Makes This Strawberry Turtle Unique
- Project Info at a Glance
- Materials and Tools
- Magic Ring, Single Crochet, and Abbreviations
- Pattern — Step by Step
- Assembly
- Frequently Asked Questions
- Best Yarn for This Turtle
- Crochet Hook Size Guide
- 7 Technical Tips
- Quick Reference Card
What Makes This Strawberry Turtle Unique
The shell is not a normal turtle shell with red yarn. It is a berry dome with a raised rim and a separate cherry topper. That changes the construction. The body must stay low and oval so the red shell reads as the main surface, while the head needs enough length to clear the shell edge. A short head gets visually buried.
The most common error when sewing this turtle is placing the shell too far forward. That makes the head look attached to the shell rather than the body. Pin the shell first, check the side profile, then sew.
Unlike a flower turtle or pie turtle, this design uses fruit signals in three layers: red dome, green leaf cluster, and round cherry fruits. For this plush turtle, the hook size and finished size need to work together because chenille expands every curve.
Project Info at a Glance
Quick answer: This turtle measures about 22 cm long, uses a 4.5 mm hook, and takes about 4–5 hours to complete.
| Skill Level | Time | Finished Size | Hook | Yarn Weight |
|---|---|---|---|---|
| Intermediate | 4–5 hours | 22 cm long | 4.5 mm | Bulky chenille |
Materials and Tools
Yarn
- Pale pink chenille yarn — bulky 5 — 70 g — for head, body, and flippers
- Red chenille yarn — bulky 5 — 55 g — for berry shell, rim, and cherry fruits
- Green chenille yarn — bulky 5 — 12 g — for leaves and cherry stems
- Brown chenille or worsted yarn — 3 g — for center stem
- Black embroidery thread — scrap amount — for mouth and lashes
- Pink blush yarn or textile-safe blush — small amount — for cheeks
Tools
- Crochet hook: 4.5 mm
- Safety eyes: 18 mm glossy black, estimated from photo
- Polyfill stuffing: firm density
- Yarn needle: large blunt chenille needle
- Stitch markers: 4 locking markers
- Pins: for shell and head placement
- Scissors
Save this pattern to your Pinterest board before starting — you’ll need to reference the stitch counts throughout.
Magic Ring, Single Crochet, and Abbreviations
| Short | Full Term |
|---|---|
| MR | Magic Ring |
| sc | Single crochet |
| inc | Increase, 2 sc in same stitch |
| dec | Invisible decrease |
| sl st | Slip stitch |
| ch | Chain |
| BLO | Back loop only |
| FLO | Front loop only |
| hdc | Half double crochet |
| st | Stitch |
The Magic Ring starts every round component with 6 sc. Each increase round adds 6 stitches. Each decrease round removes 6 stitches. Single crochet keeps the chenille fabric dense enough for stuffing, while the invisible decrease prevents gaps on the pink head and red shell.
Strawberry Turtle Pattern — Step by Step
Work in continuous spiral rounds unless stated otherwise. Use a stitch marker at the first stitch of every round.
Head — Make 1
Yarn: pale pink chenille.
- R1: 6 sc in MR (6)
- R2: inc × 6 (12)
- R3: [sc, inc] × 6 (18)
- R4: [sc 2, inc] × 6 (24)
- R5: [sc 3, inc] × 6 (30)
- R6: [sc 4, inc] × 6 (36)
- R7–R10: sc around (36)
- R11: sc 10, inc, sc 14, inc, sc 10 (38)
- R12: sc around (38)
- R13: sc 10, dec, sc 14, dec, sc 10 (36)
- R14: [sc 4, dec] × 6 (30)
Insert safety eyes between R9 and R10, 9 stitches apart. The face should sit slightly high because the shell rim covers part of the neck line.
- R15: [sc 3, dec] × 6 (24)
- R16: [sc 2, dec] × 6 (18)
- Stuff firmly with polyfill stuffing.
- R17: [sc, dec] × 6 (12)
- R18: dec × 6 (6)
Fasten off. Leave 25 cm tail.
Body Base — Make 1
Yarn: pale pink chenille.
- R1: 6 sc in MR (6)
- R2: inc × 6 (12)
- R3: [sc, inc] × 6 (18)
- R4: [sc 2, inc] × 6 (24)
- R5: [sc 3, inc] × 6 (30)
- R6: [sc 4, inc] × 6 (36)
- R7: [sc 5, inc] × 6 (42)
- R8–R11: sc around (42)
- R12: [sc 5, dec] × 6 (36)
- R13: [sc 4, dec] × 6 (30)
- R14: [sc 3, dec] × 6 (24)
- Stuff with polyfill stuffing. Keep the underside flatter than the shell.
- R15: [sc 2, dec] × 6 (18)
- R16: [sc, dec] × 6 (12)
- R17: dec × 6 (6)
Fasten off. Weave tail through front loops and close.
Red Shell Dome — Make 1
Yarn: red chenille.
- R1: 6 sc in MR (6)
- R2: inc × 6 (12)
- R3: [sc, inc] × 6 (18)
- R4: [sc 2, inc] × 6 (24)
- R5: [sc 3, inc] × 6 (30)
- R6: [sc 4, inc] × 6 (36)
- R7: [sc 5, inc] × 6 (42)
- R8–R13: sc around (42)
- R14: BLO sc around (42)
- R15: [sc 5, dec] × 6 (36)
Fasten off. Leave 45 cm tail for sewing.
Do not overstuff the shell. A berry shell needs height, not a hard ball. Add enough stuffing to lift the dome 4–5 cm above the body base.
Raised Red Shell Rim — Make 1
Yarn: red chenille.
- Ch 43.
- Row 1: sc in 2nd ch from hook and across (42)
- Row 2: ch 1, turn, sc across (42)
- Row 3: ch 1, turn, sc across (42)
Fasten off. Leave 45 cm tail.
Wrap the rim around the lower shell edge. Sew it over R14 of the shell dome so it forms a soft lip.
Front Flippers — Make 2
Yarn: pale pink chenille.
- R1: 6 sc in MR (6)
- R2: inc × 6 (12)
- R3: [sc, inc] × 6 (18)
- R4–R6: sc around (18)
- R7: [sc 4, dec] × 3 (15)
- R8: sc around (15)
- R9: [sc 3, dec] × 3 (12)
- R10–R12: sc around (12)
- R13: [sc 2, dec] × 3 (9)
- R14: sc around (9)
Flatten. Do not stuff the last 3 rounds. Fasten off. Leave 22 cm tail.
Back Flippers — Make 2
Yarn: pale pink chenille.
- R1: 6 sc in MR (6)
- R2: inc × 6 (12)
- R3: [sc, inc] × 6 (18)
- R4–R5: sc around (18)
- R6: [sc 4, dec] × 3 (15)
- R7: [sc 3, dec] × 3 (12)
- R8: [sc 2, dec] × 3 (9)
Flatten. Fasten off. Leave 18 cm tail.
Cherry Fruits — Make 2
Yarn: red chenille.
- R1: 6 sc in MR (6)
- R2: inc × 6 (12)
- R3: [sc, inc] × 6 (18)
- R4–R5: sc around (18)
- R6: [sc, dec] × 6 (12)
- Stuff firmly.
- R7: dec × 6 (6)
Fasten off. Leave 20 cm tail.
Cherry Stems — Make 2
Yarn: green chenille.
- Ch 11.
- Row 1: sl st in 2nd ch from hook and across (10)
Fasten off. Leave 15 cm tail on both ends.
For firmer stems, work over a doubled yarn strand or insert a pipe cleaner only for display pieces, not toys for children.
Center Stem — Make 1
Yarn: brown chenille or worsted yarn.
- R1: 6 sc in MR (6)
- R2–R5: sc around (6)
Fasten off. Leave 15 cm tail.
Leaves — Make 4
Yarn: green chenille.
- Ch 7.
- Row 1: sc in 2nd ch from hook, hdc, hdc, sc, sl st, sl st (6)
- Turn to work opposite side of chain.
- Row 2: sl st, sl st, sc, hdc, hdc, sc (6)
Fasten off. Leave 15 cm tail.
Cheek Blush — Make 2 Optional Flat Ovals
Yarn: soft pink, lighter or darker than head.
- R1: 6 sc in MR (6)
- R2: inc × 6 (12)
Fasten off. Leave 12 cm tail.
The photographed cheeks appear brushed rather than crocheted. Use flat ovals only if the plush will be handled often.
Smile and Lashes
Use black embroidery thread.
- Smile: one shallow curve between R11 and R12 of the head, centered below the eyes.
- Lashes: two short stitches at each outer eye corner.
- Knot thread inside the head before final closing when possible.
Assembly
Safety Eyes Placement
Install both safety eyes before the head closes. The backs become hard to press once stuffing fills the head. Check placement before pressing the washers on.
- Pin the head to the front of the body base between R8 and R12.
- Sew the head with mattress stitch. Keep the face angled slightly upward.
- Pin front flippers to the body sides at R8–R10.
- Sew front flippers angled downward and forward.
- Pin back flippers at R11–R13.
- Sew back flippers flatter than the front pair.
- Center the red shell dome on the body. The front shell edge should sit behind the neck seam.
- Add shell stuffing under the dome before closing the last third of the seam.
- Sew the red rim around the lower shell edge.
- Sew the brown center stem to the shell top.
- Attach green leaves around the center stem.
- Sew green cherry stems to the center point.
- Attach cherry fruits to the ends of the green stems.
- Add blush or cheek ovals below the eye line.
- Weave every tail through stuffing in at least four directions.
Final check: the turtle should sit with the shell centered, cherries balanced, and head fully visible from the front.
Frequently Asked Questions
What is the finished size of Strawberry turtle amigurumi?
This photo-matched version finishes about 22 cm long and 13 cm tall when made with bulky chenille yarn and a 4.5 mm hook. Smaller yarn changes the size.
Is Strawberry turtle amigurumi suitable for beginners?
This build is better for confident beginners moving into intermediate work. The stitches are basic, but the shell rim, cherry stems, safety eyes, and multi-part assembly require accurate placement. A first-time maker should practice Magic Ring, single crochet, invisible decrease, and flat sewing before starting.
What language is this Crochet pattern in?
This pattern is written in English using US crochet terms. The abbreviations include MR, sc, inc, dec, sl st, ch, BLO, FLO, and hdc.
What materials are needed for Strawberry turtle amigurumi?
You need pale pink, red, green, and brown yarn; 18 mm safety eyes; 4.5 mm hook; polyfill stuffing; stitch markers; pins; scissors; and a yarn needle. For children under 3, replace plastic eyes with embroidered eyes because small parts can create a choking hazard.
Best Yarn for This Turtle
The red shell and cherry topper need a yarn that holds round shapes without showing gaps. Chenille works well for the photographed plush style because the fuzzy pile softens the shell dome and makes the flippers look padded.
Bulky chenille yarn is the closest match for the photo. Use it for the pink body, red shell, cherries, and green leaves. Chenille hides minor tension changes but can shed if pulled repeatedly through tight stitches.
Worsted cotton yarn gives cleaner stitch definition. It is useful for a smaller desk-sized version, but the shell will look more textured and less plush. If using cotton, reduce the eye size to 10–12 mm.
Acrylic worsted yarn is more forgiving during assembly. It works for test versions because seams can be removed with less damage than chenille.
Best choice for this design: bulky chenille for the main turtle and chenille or soft acrylic scraps for the green stems. The shell has a 42-stitch plateau, so the yarn needs enough body to hold a raised dome.
Crochet Hook Size Guide for This Turtle
Hook size controls fabric density more than the yarn label alone. Stuffed amigurumi often needs a smaller hook to keep the fabric tight.
For this turtle at 22 cm finished size, start with a 4.5 mm hook. That hook is small enough to tighten bulky chenille but large enough to avoid crushed stitches.
If stuffing shows through the pink head, drop to 4 mm. If the cherry stems curl too tightly, make the stems with a 5 mm hook or switch to worsted yarn. For the shell rim, keep the same 4.5 mm hook so the rim does not flare.
The most complex hook-size issue is the cherry topper. Too small a hook makes the stems stiff and short. Too large a hook makes the cherries sag.
7 Technical Tips
- Mark every increase round. The shell uses 42 stitches at its widest point. If one increase is missed, the berry dome turns oval.
- Stuff the head before R17. Waiting until the final 6-stitch opening causes uneven pressure behind the safety eyes.
- Keep the shell rim separate. Crocheting the rim directly into the shell makes the lower edge too rigid. A sewn strip gives a softer lip.
- Pin the shell before sewing the head seam closed. The head needs to project beyond the shell rim by 2–3 cm.
- Use invisible decrease on the face. Standard decreases leave dents near the smile area.
- Balance the cherry stems before knotting. The stems should lean outward at matching angles. Uneven stems make the topper pull to one side.
- Weave chenille tails deeply. Chenille tails loosen faster than cotton tails. Four passes through stuffing reduces surface loops.
Quick Reference Card
| Finished Size | 22 cm long |
|---|---|
| Hook | 4.5 mm |
| Yarn Weight | Bulky chenille |
| Main Yarn | 70 g pale pink |
| Red Yarn | 55 g |
| Green Yarn | 12 g |
| Safety Eyes | 18 mm |
| Head Rounds | R1–R18 |
| Body Rounds | R1–R17 |
| Shell Rounds | R1–R15 |
| Total Time | 4–5 hours |
| Skill Level | Intermediate |
Bookmark or pin this card for quick reference while crocheting.
Conclusion
The strawberry turtle amigurumi pattern works best when the turtle body stays low and the shell carries the fruit identity. After finishing, photograph it from a front three-quarter angle so the face, red shell rim, green leaves, cherry stems, and flippers all show in one frame. The main technical question to check is shell balance: does the topper sit centered without pulling the turtle backward? If not, remove a small amount of shell stuffing and resew the shell front edge lower.
Share your finished work on Pinterest and Instagram:
#StrawberryTurtleAmigurumi #KROCHIFYpattern
Last updated: April 2026 — Pattern verified against the uploaded photo and comparable public pattern data.









