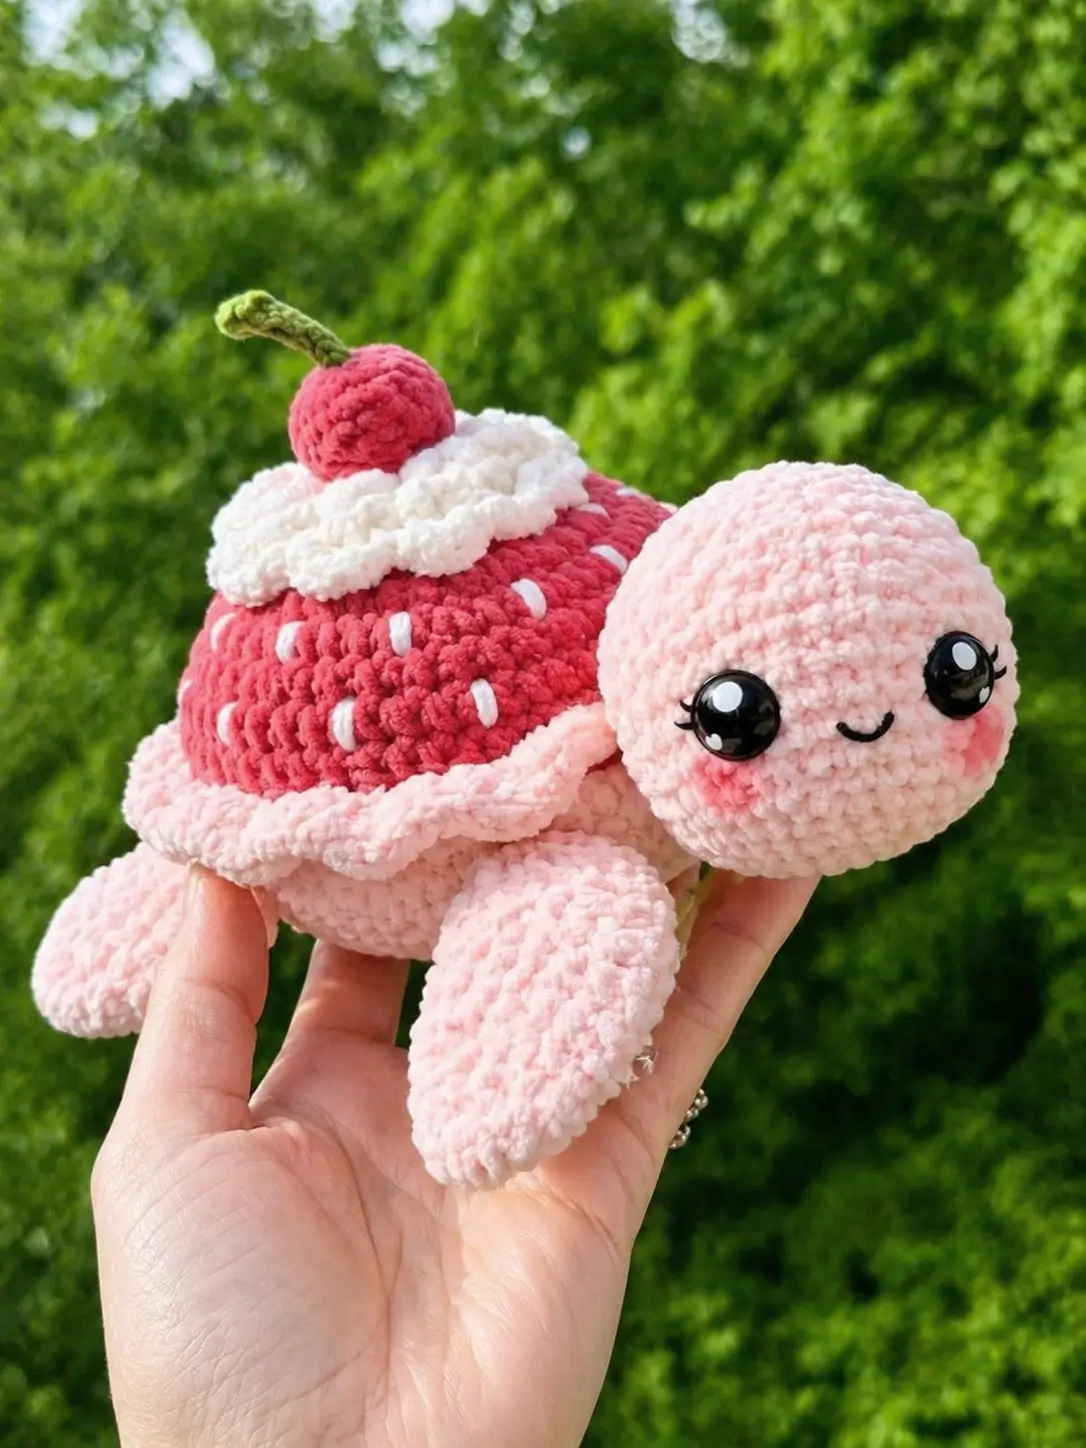
The strawberry shell must sit high enough to read as fruit, not as a flat backpack. This pink strawberry turtle amigurumi crochet pattern makes a 23 cm plush with a 5 mm hook, super bulky chenille, 16 mm safety eyes, and an intermediate skill level. The raised cream ring, cherry, and piped lower shell give the turtle a dessert-style silhouette while keeping the body stable.
Quick Answer: What You Need to Know
This turtle plush uses super bulky chenille, a 5 mm hook, 16 mm safety eyes, and firm polyfill stuffing. The build starts with MR 6 shaping, grows by +6 on increase rounds, reduces by -6 on decrease rounds, and finishes with a domed strawberry shell plus cream and cherry details.
Table of Contents
- What Makes This Turtle Unique
- Project Info at a Glance
- Materials and Tools
- Abbreviations
- Pattern — Step by Step
- Assembly
- FAQ
- Best Yarn for This Turtle
- Hook Size Guide
- 7 Technical Tips
- Quick Reference Card
What Makes This Turtle Unique
This turtle is built around a dessert shell, not a standard reptile shell. The red dome needs enough height to read as a strawberry, so the shell increases to 48 stitches before tapering. The pale pink body stays lower and wider, which keeps the animal profile visible under the fruit layer. A separate lower ruffle creates the scalloped edge seen in the photo and hides the join between body and shell.
The most common error when sewing this turtle head is setting it too high. A high neck makes the shell look like a hat. Pin the head low against the front body oval so the strawberry shell remains the dominant shape. Unlike a plain turtle plush, this design also needs surface embroidery. White seed stitches must be short and vertical so they do not look like random stripes.
Project Info at a Glance
Quick answer: This dessert turtle measures about 23 cm long, uses a 5 mm hook, and takes about 4–5 hours to complete.
| Skill Level | Time | Finished Size | Hook | Yarn Weight |
|---|---|---|---|---|
| Intermediate | 4–5 hours | 23 cm long | 5 mm | Super bulky chenille |
Materials and Tools
Yarn
- Pale blush pink chenille — size 6 super bulky — 70 g for head, body, and flippers
- Deep strawberry red chenille — size 6 super bulky — 45 g for domed shell and cherry
- White chenille — size 6 super bulky — 20 g for cream ring and cream top
- Olive green chenille or worsted yarn — 5 g for stem
- White worsted yarn or embroidery yarn — scrap amount for strawberry seeds
- Pink embroidery yarn or soft pastel — optional blush
Tools
- Crochet hook 5 mm — tight enough for dense plush fabric with this size
- Safety eyes 16 mm — scaled to the large round head in the photo
- Polyfill stuffing — firm density for the head and shell
- Yarn needle — blunt tip
- Stitch markers — at least 4
- Pins — useful for shell and head alignment
- Scissors
Save this pattern to your Pinterest board before starting — you’ll need to reference the stitch counts throughout.
Abbreviations
| Short | Full Term |
|---|---|
| MR | Magic Ring |
| sc | Single crochet |
| inc | Increase: 2 sc in same stitch |
| dec | Invisible decrease |
| sl st | Slip stitch |
| ch | Chain |
| BLO | Back loop only |
| FLO | Front loop only |
| hdc | Half double crochet |
| st | Stitch |
The invisible decrease uses front loops of two stitches before finishing as one stitch. This helps reduce gaps in amigurumi fabric, especially with pale chenille and visible face shaping.
Pink Strawberry Turtle Amigurumi Crochet Pattern — Step by Step
Work in continuous spiral unless a row says otherwise. Stitch counts are listed at the end of every round.
Head — Make 1
Yarn: pale blush pink.
R1: 6 sc in MR (6)
R2: inc × 6 (12)
R3: [sc, inc] × 6 (18)
R4: [sc 2, inc] × 6 (24)
R5: [sc 3, inc] × 6 (30)
R6: [sc 4, inc] × 6 (36)
R7: [sc 5, inc] × 6 (42)
R8: sc around (42)
R9: sc around (42)
R10: sc around (42)
R11: sc around (42)
R12: sc around (42)
R13: [sc 5, dec] × 6 (36)
R14: [sc 4, dec] × 6 (30)
R15: [sc 3, dec] × 6 (24)
Insert safety eyes between R9 and R10, 10 stitches apart. Stuff firmly.
R16: [sc 2, dec] × 6 (18)
R17: [sc, dec] × 6 (12)
R18: dec × 6 (6)
Fasten off. Leave 25 cm tail.
Body / Underside — Make 1
Yarn: pale blush pink.
R1: 6 sc in MR (6)
R2: inc × 6 (12)
R3: [sc, inc] × 6 (18)
R4: [sc 2, inc] × 6 (24)
R5: [sc 3, inc] × 6 (30)
R6: [sc 4, inc] × 6 (36)
R7: [sc 5, inc] × 6 (42)
R8: sc around (42)
R9: sc around (42)
R10: sc around (42)
R11: BLO sc around (42)
R12: [sc 5, dec] × 6 (36)
R13: [sc 4, dec] × 6 (30)
Stuff to a low oval shape.
R14: [sc 3, dec] × 6 (24)
R15: [sc 2, dec] × 6 (18)
R16: [sc, dec] × 6 (12)
R17: dec × 6 (6)
Fasten off. Hide tail.
Front Flippers — Make 2
Yarn: pale blush pink.
R1: 6 sc in MR (6)
R2: inc × 6 (12)
R3: [sc, inc] × 6 (18)
R4: sc around (18)
R5: sc around (18)
R6: [sc, dec] × 6 (12)
R7: sc around (12)
R8: sc around (12)
R9: [sc 4, dec] × 2 (10)
R10: sc around (10)
Flatten opening. Do not overstuff. Fasten off with 18 cm tail.
Back Flippers — Make 2
Yarn: pale blush pink.
R1: 6 sc in MR (6)
R2: inc × 6 (12)
R3: [sc, inc] × 6 (18)
R4: sc around (18)
R5: [sc 4, dec] × 3 (15)
R6: [sc 3, dec] × 3 (12)
R7: sc around (12)
R8: [sc 4, dec] × 2 (10)
Flatten opening. Add light stuffing at the rounded end only. Fasten off with 18 cm tail.
Domed Strawberry Shell — Make 1
Yarn: deep strawberry red.
R1: 6 sc in MR (6)
R2: inc × 6 (12)
R3: [sc, inc] × 6 (18)
R4: [sc 2, inc] × 6 (24)
R5: [sc 3, inc] × 6 (30)
R6: [sc 4, inc] × 6 (36)
R7: [sc 5, inc] × 6 (42)
R8: [sc 6, inc] × 6 (48)
R9: sc around (48)
R10: sc around (48)
R11: sc around (48)
R12: [sc 6, dec] × 6 (42)
R13: [sc 5, dec] × 6 (36)
Fasten off with 35 cm tail. Stuff lightly under the dome during assembly.
Lower Pink Ruffle — Make 1
Yarn: pale blush pink. Work into the BLO ridge from body R11.
R1: join yarn, sc around ridge (42)
R2: [sc, inc] × 21 (63)
R3: sc around (63)
Fasten off with 25 cm tail. The edge should sit under the red shell.
White Cream Ring — Make 1
Yarn: white chenille. This ring sits around the top of the red shell.
R1: ch 37, join without twisting (36)
R2: sc around (36)
R3: [sc 2, inc] × 12 (48)
R4: [sl st, hdc 3 in next st, sl st] × 16 (48 base stitches used)
Fasten off with 25 cm tail.
Cream Top Disc — Make 1
Yarn: white chenille.
R1: 6 sc in MR (6)
R2: inc × 6 (12)
R3: [sc, inc] × 6 (18)
R4: [sc 2, inc] × 6 (24)
R5: [sl st, hdc 3 in next st, sl st] × 8 (24 base stitches used)
Fasten off with 20 cm tail.
Cherry — Make 1
Yarn: deep strawberry red.
R1: 6 sc in MR (6)
R2: inc × 6 (12)
R3: [sc, inc] × 6 (18)
R4: sc around (18)
R5: [sc, dec] × 6 (12)
Stuff firmly.
R6: dec × 6 (6)
Fasten off with 15 cm tail.
Stem — Make 1
Yarn: olive green.
R1: ch 9 (9)
R2: starting in second ch from hook, sc across (8)
R3: ch 1, turn, sc across (8)
Fasten off with 12 cm tail. Curve while sewing to match the photo.
Strawberry Seeds
Use white worsted yarn or embroidery yarn. Make 12–16 short vertical stitches across the red shell. Keep them between R5 and R12, not on the shell edge.
Blush and Mouth
Use soft pink yarn or pastel for cheeks under the eyes. Embroider a small black smile between R10 and R11 of the head, 3 stitches wide.
Assembly
- Pin the red shell over the body so the shell front begins behind the head seam.
- Add light stuffing under the shell dome before closing the back half.
- Sew the shell to the body using a mattress stitch along the lower shell edge.
- Attach the head low at the front of the body, centered between the front flippers.
- Sew front flippers at body R8–R10, angled slightly forward.
- Sew back flippers at body R9–R12, angled outward.
- Attach the lower pink ruffle so it hides the shell-to-body join.
- Sew the white cream ring around the top shell, centered over R4–R8 of the shell.
- Sew the cream top disc over the ring opening.
- Attach the cherry to the cream center and sew the stem into the cherry top.
- Add white seed stitches after shell sewing, not before.
- Weave each tail through stuffing in four directions before trimming.
A flat table test should show three contact points: both lower flippers and body underside. If the turtle rolls backward, remove a little shell stuffing near the rear.
Frequently Asked Questions
Is a strawberry turtle amigurumi suitable for beginners?
A strawberry turtle is better for confident beginners or intermediate makers. The head and body use standard MR 6 shaping, but the shell layers, cream trim, and cherry topper require careful pinning. A first-time maker should finish one plain turtle before adding dessert-shell details.
What materials are needed for a strawberry turtle plush?
You need pale pink chenille, red chenille, white chenille, green scrap yarn, 16 mm safety eyes, polyfill stuffing, a 5 mm crochet hook, stitch markers, pins, scissors, and a yarn needle. The photo version also uses white embroidery stitches for strawberry seeds and a small black mouth.
Can I sell finished turtles made from this pattern?
Finished items can usually be sold when the maker owns the pattern rights or the pattern grants that permission. Policies vary by designer. For KROCHIFY use, credit the pattern source, do not repost the written instructions, and photograph your own finished turtle for listings.
How do I print the pattern out?
Copy the article into a print view or browser reader mode, then print only the pattern, materials, assembly, and quick reference card sections. Remove schema and Pinterest text before printing. Keep the round counts visible because the shell and ruffle depend on exact stitch math.
Best Yarn for This Turtle
The photographed turtle relies on plush texture. Smooth cotton would show every increase and decrease, which weakens the dessert-shell look. Chenille hides minor shaping changes and gives the red shell a rounded strawberry surface.
Best overall: Premier Parfait Chunky. It is a #6 polyester chenille with 100 g and 131 yd / 120 m per skein, which fits this 23 cm plush scale. One skein pale pink and one skein red cover the main body and shell with leftover yarn for small edits.
Best soft-structured option: Hobbii Honey Bunny. It is also 100% polyester, 100 g, 120 m, and super bulky. The listed label hook is larger than this pattern hook, but amigurumi often sizes down to prevent stuffing gaps.
Not ideal for this exact photo: firm cotton. Cotton gives crisp stitch definition, but this turtle needs a plush dessert look. Cotton is useful for a mini display version, not for the same soft shell volume.
Use the same yarn family for pink, red, and white. Mixing chenille brands can change shell height by 5–10 mm, which matters when the cream ring must sit flat.
Crochet Hook Size Guide for This Turtle
Hook size controls stuffing visibility. The photo shows dense plush fabric, so a 5 mm hook is the most reliable starting point with size 6 chenille.
| Test Swatch Result | Action |
|---|---|
| Stuffing shows between stitches | Drop to 4.5 mm |
| Fabric feels stiff and painful to work | Move to 5.5 mm |
| Shell collapses after stuffing | Add more polyfill or keep 5 mm |
| Cream ring ripples too much | Reduce one increase round in trim |
A soft-grip 5 mm hook works well for this scale because the shell and body both need tight, repeated single crochet rounds.
7 Technical Tips
- Mark the shell start. The red shell has the most visible spiral drift. Place a marker at R1 and move it every round.
- Stuff the head before the final two decrease rounds. R16 still gives enough opening for firm polyfill placement. Later stuffing can distort the face.
- Pin the head from the side first. Front alignment alone can hide a raised neck. Side view shows whether the shell reads as a turtle back or a hat.
- Keep seeds short. Long white stitches turn into stripes. Each seed should cover about one round height.
- Use light shell stuffing. The red dome needs height but not hard pressure. Too much stuffing pushes the shell away from the body seam.
- Sew cream after the shell is attached. This prevents the ring from shifting when the red dome is pulled into place.
- Balance the cherry last. The cherry changes the weight line at the shell top. Attach it after the turtle passes the flat table test.
Quick Reference Card
| Finished Size | About 23 cm long |
|---|---|
| Hook | 5 mm |
| Yarn Weight | Super bulky chenille / size 6 |
| Main Yarn | 70 g pale blush pink |
| Shell Yarn | 45 g deep red |
| White Yarn | 20 g |
| Safety Eyes | 16 mm |
| Head Rounds | R1–R18, 6 to 42 to 6 |
| Body Rounds | R1–R17, 6 to 42 to 6 |
| Shell Rounds | R1–R13, 6 to 48 to 36 |
| Time | 4–5 hours |
| Skill Level | Intermediate |
Bookmark or pin this card for quick reference while crocheting.
Conclusion
The pink strawberry turtle amigurumi crochet pattern works because the shell is treated as the main structure, not a surface patch. After finishing, check the side profile first: the red shell should arch over the body, the cream should sit centered, and the cherry should not pull the plush backward. If one area needs correction, adjust shell stuffing before editing the head or flippers. The most useful next test is balance. Set the turtle on a flat surface and confirm that the head faces forward without twisting.
Share your finished work on Pinterest and Instagram:
#StrawberryTurtleAmigurumi #KROCHIFYpattern
Last updated: April 2026.









