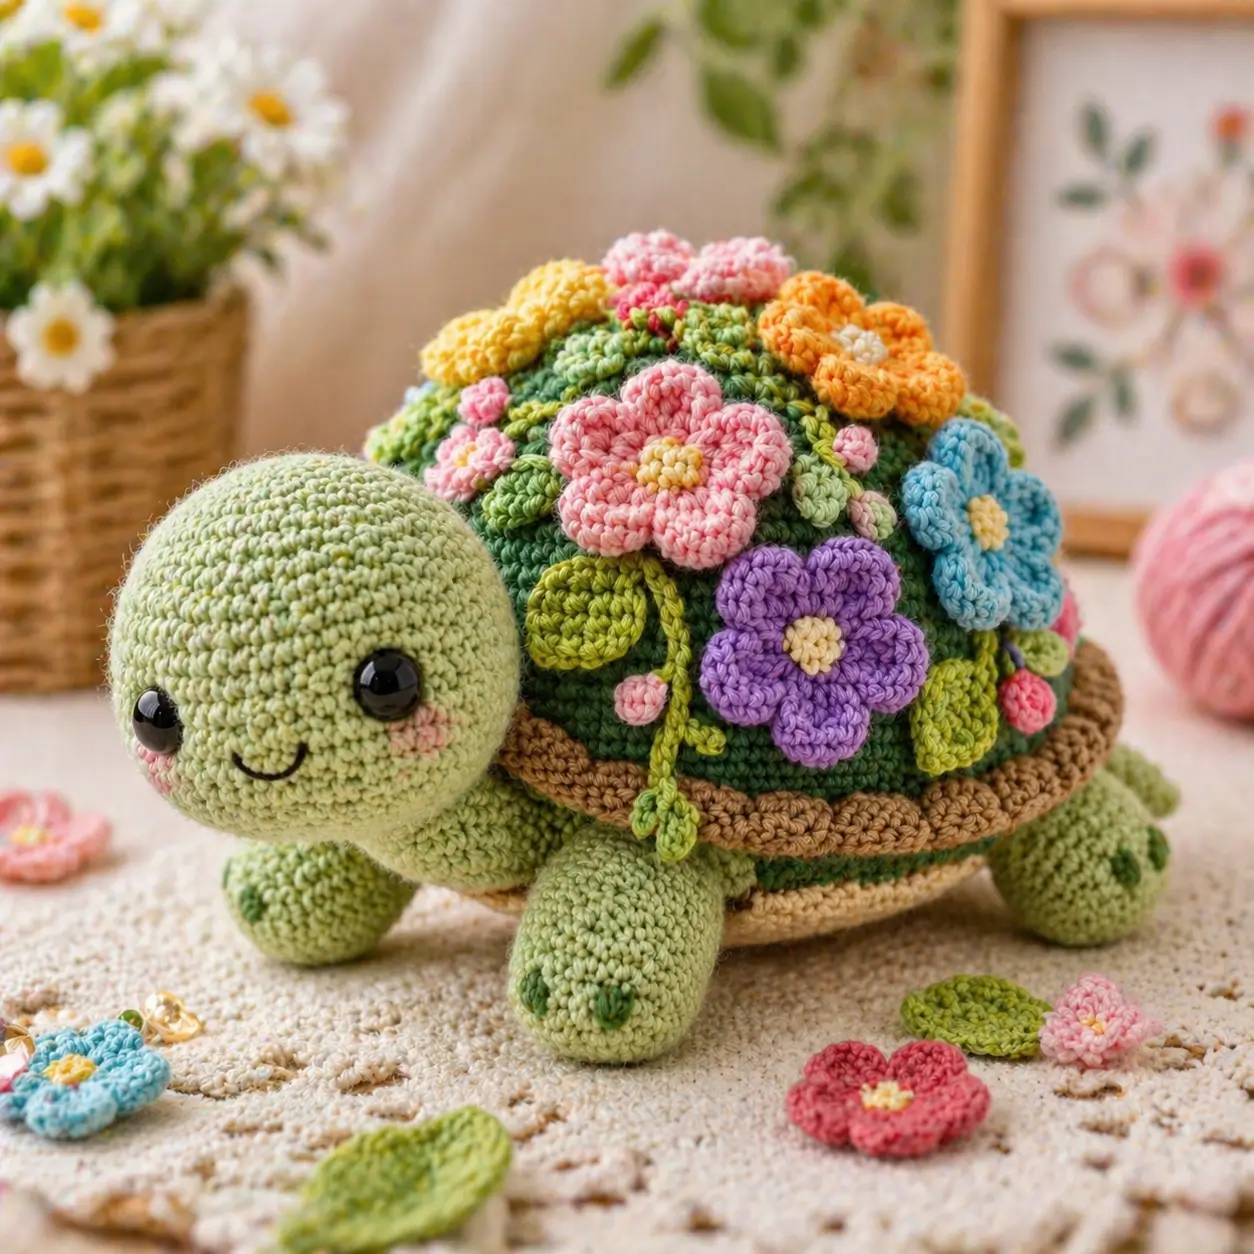
A turtle shell becomes a balance problem the moment you load it with layered flowers. This turtle amigurumi crochet pattern uses DK cotton, a 2.5 mm hook, and 8-10 mm eyes to build a compact floral turtle at an intermediate level. The project finishes in a small display range, and the raised shell garden makes it practical for nursery shelves, market tables, or styled product photos.
The Design: What Makes This Turtle Different
You need three shapes to read instantly: a low body, a forward head angle, and a shell dome that stays wider than the cheeks. The body is built as a shallow closed form so the turtle sits flat instead of rocking when the flowers go on. The shell is made separately and capped with appliqués; that keeps a crochet flower turtle pattern crisp because petals hold their outline on a stable curve rather than sinking into stuffing. A tan rim breaks the shell away from the body, which matters in a boho turtle crochet pattern where color contrast carries most of the silhouette. One common mistake shows up fast: flowers get pushed too far toward the front third of the shell. Then the head reads small, the balance shifts forward, and the turtle stops looking grounded. Current turtle pattern results also lean plain, plush, or removable-shell, leaving this floral cotton approach underexplained.
Project Info at a Glance
| Skill Level | Time | Finished Size | Hook | Best For |
|---|---|---|---|---|
| Intermediate | 1-2 hrs base turtle + decoration time | 10 × 11 cm benchmark | 2.5 mm | shelf decor, market sample, nursery styling |
Materials and Tools
Yarn
- Sage green — DK cotton — about 25 g — Paintbox Yarns Cotton DK or similar
- Dark green — DK cotton — about 20 g — Paintbox Yarns Cotton DK or similar
- Tan — DK cotton — about 10 g — any matte cotton for shell rim
- Cream — DK cotton — about 10 g — for belly patch and flower centers
- Pink, lavender, sky blue, yellow, orange, leaf green — DK cotton scraps — 3 to 5 g each — small floral amounts
Tools
- Hook 2.5 mm
- Safety eyes 10 mm
- Polyester stuffing
- Tapestry needle
- Stitch markers
- Black embroidery thread
- Pins or clips for shell layout
Abbreviations
MR = magic ring
sc = single crochet
inc = increase
dec = decrease
sl st = slip stitch
ch = chain
BLO = back loop only
FLO = front loop only
dc = double crochet
hdc = half double crochet
Use invisible decrease through the front loops of the next two stitches when closing the head and body, because a standard decrease leaves wider holes on tightly stuffed parts.
Pattern — Step by Step
Continuous spiral unless noted.
Head (Make 1)
Yarn: sage green
R1: 6 sc in MR (6)
R2: inc x6 (12)
R3: [sc, inc] x6 (18)
R4: [2 sc, inc] x6 (24)
R5: [3 sc, inc] x6 (30)
R6: [4 sc, inc] x6 (36)
R7: sc around (36)
R8: sc around (36)
R9: sc around (36)
R10: sc around (36)
R11: sc around (36)
R12: sc around (36)
R13: sc around (36)
Insert eyes between R10 and R11, 10 stitches apart. Embroider the smile one round below eye level.
R14: [4 sc, dec] x6 (30)
R15: [3 sc, dec] x6 (24)
R16: [2 sc, dec] x6 (18)
Stuff firmly through the lower face so the muzzle stays round.
R17: [sc, dec] x6 (12)
R18: dec x6 (6)
Fasten off. Leave 25 cm tail.
Body (Make 1)
Yarn: dark green
R1: 6 sc in MR (6)
R2: inc x6 (12)
R3: [sc, inc] x6 (18)
R4: [2 sc, inc] x6 (24)
R5: [3 sc, inc] x6 (30)
R6: [4 sc, inc] x6 (36)
R7: [5 sc, inc] x6 (42)
R8: sc around (42)
R9: sc around (42)
R10: sc around (42)
R11: sc around (42)
R12: [5 sc, dec] x6 (36)
R13: [4 sc, dec] x6 (30)
R14: [3 sc, dec] x6 (24)
Stuff the lower half more firmly than the upper half so the shell can sit flat on top.
R15: [2 sc, dec] x6 (18)
R16: [sc, dec] x6 (12)
R17: dec x6 (6)
Fasten off. Leave 30 cm tail.
Top Shell (Make 1)
Yarn: dark green
R1: 6 sc in MR (6)
R2: inc x6 (12)
R3: [sc, inc] x6 (18)
R4: [2 sc, inc] x6 (24)
R5: [3 sc, inc] x6 (30)
R6: [4 sc, inc] x6 (36)
R7: [5 sc, inc] x6 (42)
R8: sc around (42)
R9: sc around (42)
R10: sc around (42)
R11: sc around (42)
R12: BLO sc around (42)
Working R12 in BLO leaves the front loops free for the rim.
Fasten off. Leave 40 cm tail.
Shell Rim (Make 1)
Yarn: tan
Join tan yarn in any free front loop from shell R12.
R1: [sl st in next st, 3 dc in next st, sl st in next st] x14 (42 foundation stitches used)
Fasten off. Leave 15 cm tail.
Belly Patch (Make 1)
Yarn: cream
R1: 6 sc in MR (6)
R2: inc x6 (12)
R3: [sc, inc] x6 (18)
R4: [2 sc, inc] x6 (24)
R5: [3 sc, inc] x6 (30)
R6: [4 sc, inc] x6 (36)
Fasten off. Leave 25 cm tail.
Front Legs (Make 2)
Yarn: sage green
R1: 6 sc in MR (6)
R2: inc x6 (12)
R3: [sc, inc] x6 (18)
R4: sc around (18)
R5: sc around (18)
R6: [sc, dec] x6 (12)
R7: sc around (12)
R8: sc around (12)
Stuff the lower half only. Embroider two short dark-green toe marks at the front.
Fasten off. Leave 20 cm tail.
Back Legs (Make 2)
Yarn: sage green
R1: 6 sc in MR (6)
R2: inc x6 (12)
R3: [sc, inc] x6 (18)
R4: sc around (18)
R5: [sc, dec] x6 (12)
R6: sc around (12)
R7: sc around (12)
Stuff the lower half only. Add the same toe marks after sewing if access is easier.
Fasten off. Leave 20 cm tail.
Tail (Make 1)
Yarn: sage green
R1: 4 sc in MR (4)
R2: [sc, inc] x2 (6)
R3: sc around (6)
R4: sc around (6)
Fasten off. Leave 15 cm tail.
Cheek Patches (Make 2)
Yarn: blush pink
R1: 6 sc in MR (6)
R2: inc x6 (12)
Fasten off. Leave 12 cm tail.
Large Five-Petal Flowers (Make 3)
Yarn: pink, lavender, sky blue with cream or yellow centers
R1: With center color, 5 sc in MR, sl st to first sc (5)
R2: Change to petal color, [ch 2, 2 dc, ch 2, sl st] in each stitch around (5 petals)
Fasten off. Leave 18 cm tail.
Medium Flowers (Make 2)
Yarn: yellow and orange mixes
R1: With center color, 6 sc in MR, sl st to first sc (6)
R2: Change to petal color, [ch 1, hdc, 2 dc, hdc, sl st] in each stitch around (6 petals)
Fasten off. Leave 15 cm tail.
Small Blossoms (Make 5)
Yarn: soft pink
R1: 5 sc in MR, sl st to first sc (5)
R2: [ch 1, hdc, ch 1, sl st] in each stitch around (5 petals)
Fasten off. Leave 12 cm tail.
Leaves (Make 8)
Yarn: leaf green
Ch 7.
Row 1: Starting in 2nd ch from hook, sl st, sc, hdc, dc, hdc, sc; work on opposite side of foundation ch with sc, hdc, dc, hdc, sc, sl st (12 edge stitches)
Fasten off. Leave 12 cm tail.
Vines (Make 2)
Yarn: leaf green
Ch 18.
Row 1: Starting in 2nd ch from hook, sl st in each chain back (17)
Fasten off. Leave 12 cm tail.
Assembly
- Sew the head to the front of the body, centered across the upper front third, with the chin angled slightly downward.
- Attach the cheek patches just below and slightly outside each eye.
- Sew the front legs to the lower front sides of the body so the turtle can brace forward without lifting the shell.
- Sew the back legs to the lower rear sides, keeping both pairs level when viewed from the front.
- Attach the tail between the back legs at the body seam line.
- Center the belly patch on the underside and sew it down with a neat whip stitch.
- Pin the top shell onto the back so it sits higher than the head base but does not overlap the eye line when viewed from the side.
- Sew the shell in place, then spread the tan rim outward so the edge reads as a separate shell border.
- Pin the leaves, vines, and flowers before sewing; keep the front third of the shell lighter than the center and back.
- Weave in every tail, adjust stuffing by hand, and flatten the four foot points on the table surface.
The finished turtle should sit on four stable contact points with the shell centered and the head projecting forward.
7 Technical Tips
- Stitch marker drift: Move the marker every round instead of trusting the previous placement. On a 42-stitch shell, a one-stitch drift throws the flower cluster off center by the time you pin the rim.
- Stuffing firmness: Pack the lower face firmly and the crown more lightly. Too much stuffing above the eye line pushes 10 mm eyes outward and makes the smile flatten.
- Invisible decrease: Use invisible decreases on the head and body closing rounds only. A standard decrease on DK cotton leaves visible holes at R15-R17 where the stuffing pressure is highest.
- Eye placement timing: Insert the eyes before the final head decreases. Waiting until after R16 leaves too little room to seat washers cleanly, especially if the head is already fully stuffed.
- Velvet tension substitution: If you swap DK cotton for velvet or chenille, drop the flower count or widen the shell spacing. Velvet compresses the stitch valleys, so layered petals stack upward faster and the shell can look crowded at the center.
- Pinning order: Pin the largest flower first, then place leaves, then fill gaps with medium and small blossoms. Starting with small flowers creates dead space, and the shell loses the dome-to-garden rhythm visible from the side.
- Tail weaving: Split the tail yarn and weave in opposite directions for at least 4 cm each way. A single short pass can pull loose when the rear legs are handled during display or shipping.
Conclusion
The main build here is compact; the shell decoration is where the project gains identity. Next, sew one large center flower, two side flowers, and four leaves first, then judge the balance before adding the smaller blossoms. Save a side photo and a top photo for Pinterest, and post the finished piece on Instagram with #FlowerShellTurtlePattern so the shell layout is easy to compare. A good follow-up test is to shift the blue flower one leaf-space backward and see whether the head reads larger in profile. Which placement suits this turtle better for you: the purple flower low at center, or higher toward the shell crown in this turtle amigurumi crochet pattern?









