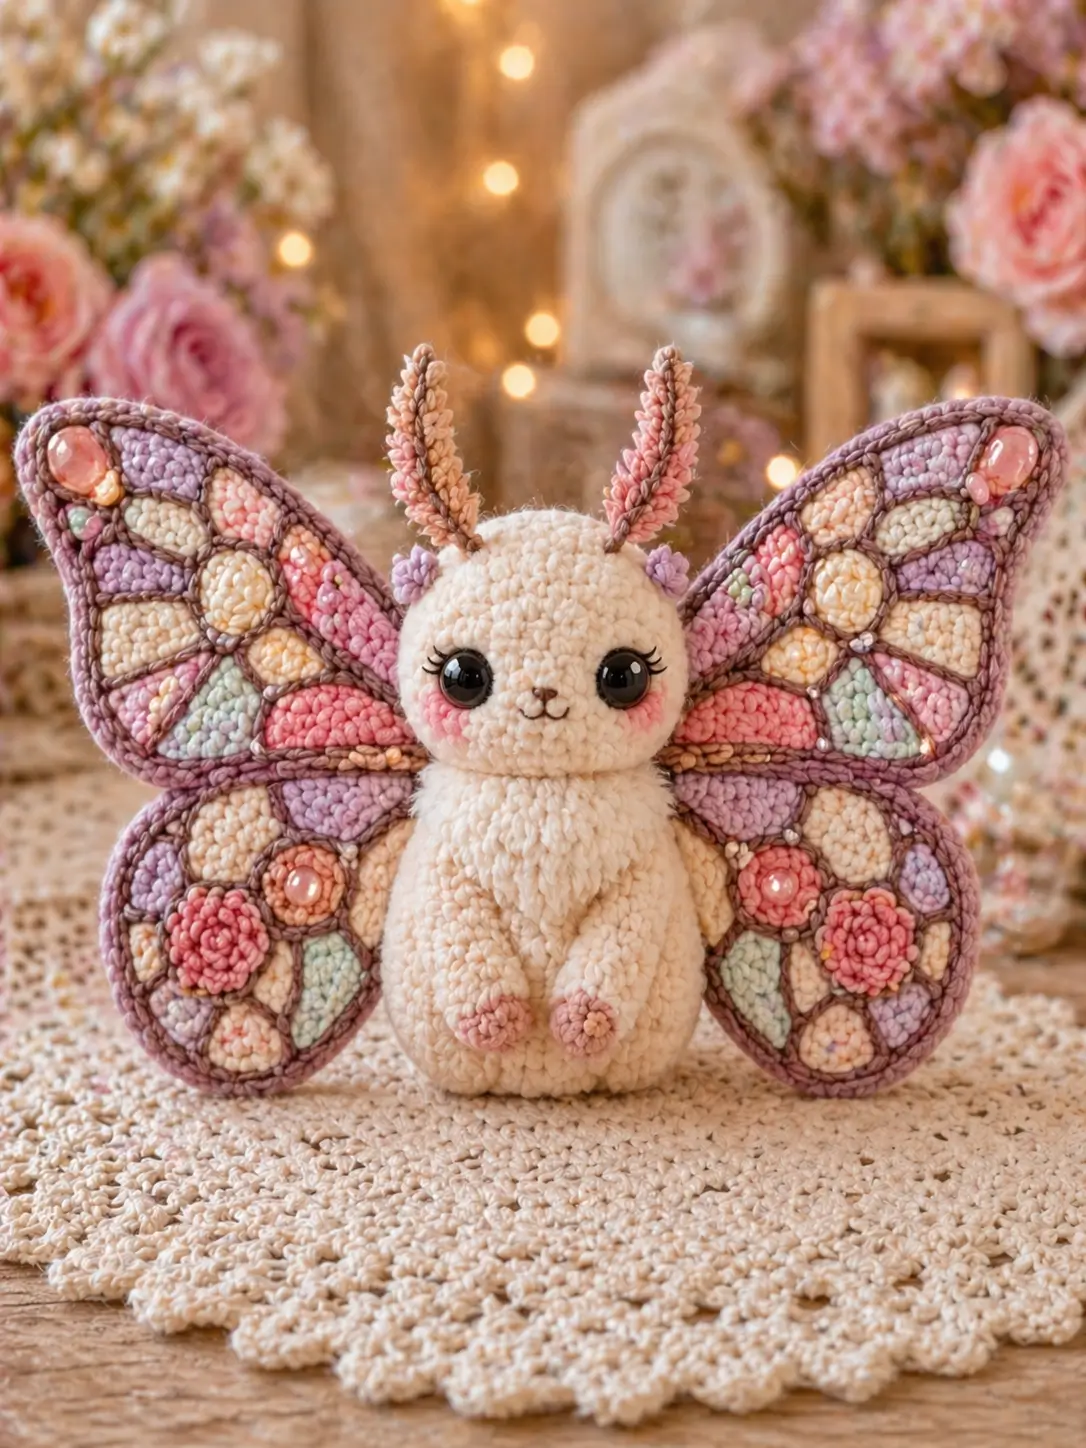
Butterfly rabbits need ears and wings to compete for the same vertical space. This butterfly bunny amigurumi crochet pattern sets a 15 cm seated rabbit under tall ears, with appliqué wings that read as stained glass. Use DK cotton or brushed velvet-look yarn, a 2.5 mm hook, 10 mm safety eyes, stuffing, and basic embroidery; the build is intermediate because the wings need pinning. It suits display when a plain bunny needs visible back detail.
The Design: What Makes the Butterfly Bunny Different
You build the rabbit first, then treat the wings as a separate flat structure. That choice keeps the bunny stable; heavy wings sewn into the body while stuffing is loose can pull the spine backward. The head uses a 36-stitch medium plateau, not an oversized 48-stitch ball, so the face stays round without hiding the long ears. Small cheek patches replace heavy blush-only finishing because the photo shows visible pink circles beside glossy eyes. The maker should also separate the upper and lower wing lobes before adding colored panes. In a bunny with butterfly wings crochet project, one common mistake is sewing the wings too low; the lower lobes should frame the hips while the upper lobes begin behind the cheek line. This fairy bunny crochet pattern uses that proportion so the back view still reads as butterfly, not cape.
Project Info at a Glance
| Skill Level | Time | Finished Size | Hook | Best For |
|---|---|---|---|---|
| Intermediate | 7–9 hours | 15 cm seated body; about 20 cm with ears | 2.5 mm | Display amigurumi, wing appliqué practice, pastel scrap yarn |
Size and yarn choices are based on comparable butterfly-bunny and bunny-with-butterfly listings that use 15 cm body scales, DK/light-worsted yarn, sport references, and 2.0–2.5 mm hooks.
Materials and Tools
Yarn
- Cream — DK/light-worsted — 50 g — YarnArt Jeans, Ricorumi DK, or similar cotton blend.
- Mauve/taupe — DK/light-worsted — 15 g — wing borders and vein cords.
- Pink — DK/light-worsted — 10 g — cheeks, paw pads, wing panes, rosettes.
- Lavender — DK/light-worsted — 8 g — wing panes and ear flowers.
- Peach/yellow — DK/light-worsted — 10–25 g — wing panes.
- Mint — DK/light-worsted — 5 g — small wing panes.
- Brown embroidery thread — small amount — nose and mouth.
- Black embroidery thread — small amount — lashes.
Tools
- Hook 2.5 mm
- 10 mm safety eyes for DK scale; use 12 mm only for thicker velvet yarn.
- Polyester fiberfill
- Yarn needle
- Stitch markers
- Pins
- Scissors
- Optional beads or flat-back gems for decoration only, not for toys for children.
Abbreviations
MR = magic ring; sc = single crochet; inc = 2 sc in one stitch; dec = single crochet decrease; sl st = slip stitch; ch = chain; BLO = back loop only; hdc = half double crochet. An invisible decrease is worked through the front loops of the next two stitches so closing rounds avoid paired bumps.
Pattern — Step by Step
Continuous spiral unless noted.
Head
Yarn: cream — Source: Standard amigurumi math.
R1: 6 sc in MR (6)
R2: inc ×6 (12)
R3: (sc, inc) ×6 (18)
R4: (2 sc, inc) ×6 (24)
R5: (3 sc, inc) ×6 (30)
R6: (4 sc, inc) ×6 (36)
R7–R13: sc around (36)
R14: (4 sc, dec) ×6 (30)
R15: (3 sc, dec) ×6 (24)
R16: (2 sc, dec) ×6 (18)
Insert safety eyes between R10 and R11, 7 stitches apart. Embroider lashes before the back washers are pressed on.
R17: (sc, dec) ×6 (12)
R18: dec ×6 (6)
Stuff firmly, especially under the eye line.
Fasten off. Leave 20 cm tail and close the remaining hole.
Body
Yarn: cream — Source: Standard amigurumi math.
R1: 6 sc in MR (6)
R2: inc ×6 (12)
R3: (sc, inc) ×6 (18)
R4: (2 sc, inc) ×6 (24)
R5: (3 sc, inc) ×6 (30)
R6: (4 sc, inc) ×6 (36)
R7–R12: sc around (36)
R13: (4 sc, dec) ×6 (30)
R14: (3 sc, dec) ×6 (24)
R15: (2 sc, dec) ×6 (18)
Stuff to a seated oval. The base should be firmer than the neck.
R16: (sc, dec) ×6 (12)
R17: dec ×6 (6)
Fasten off. Leave 25 cm tail for sewing to the head.
Front Legs / Arms — Make 2
Yarn: cream — Source: Standard amigurumi math.
R1: 6 sc in MR (6)
R2: inc ×6 (12)
R3–R7: sc around (12)
Stuff only the lower half so the arms hang close to the body.
R8: dec ×6 (6)
Fasten off. Leave 18 cm tail.
Back Legs / Feet — Make 2
Yarn: start pink for paw pad, change to cream — Source: Standard amigurumi math.
R1: 6 sc in MR with pink (6)
R2: inc ×6 (12)
R3: sc around in BLO with cream (12)
R4–R5: sc around (12)
Add a light pinch of stuffing to each foot.
R6: dec ×6 (6)
Fasten off. Leave 20 cm tail.
Ears — Make 2
Yarn: cream outside, pink inner embroidery or surface stitches — Source: Standard amigurumi math.
R1: 6 sc in MR (6)
R2: inc ×6 (12)
R3: (sc, inc) ×6 (18)
R4–R11: sc around (18)
R12: (sc, dec) ×6 (12)
R13–R15: sc around (12)
R16: dec ×6 (6)
Do not stuff. Flatten each ear and surface-stitch a pink center ridge from base to tip.
Fasten off. Leave 25 cm tail.
Muzzle
Yarn: cream — Source: Standard amigurumi math.
R1: 6 sc in MR (6)
R2: inc ×6 (12)
R3: sc around (12)
Fasten off. Leave 20 cm tail. Embroider a small brown Y-shaped nose after sewing.
Cheek Patches — Make 2
Yarn: pale pink — Source: Standard amigurumi math.
R1: 6 sc in MR (6)
R2: inc ×6, sl st to first stitch (12)
Fasten off. Leave 15 cm tail. Keep flat.
Upper Wing Lobes — Make 2
Yarn: pastel base color; mauve border added later — Source: Standard amigurumi math.
R1: 6 sc in MR (6)
R2: inc ×6 (12)
R3: (sc, inc) ×6 (18)
R4: (2 sc, inc) ×6 (24)
R5: (3 sc, inc) ×6 (30)
R6: (4 sc, inc) ×6 (36)
R7–R8: sc around (36)
R9: (4 sc, dec) ×6 (30)
R10: (3 sc, dec) ×6 (24)
R11: (2 sc, dec) ×6 (18)
Flatten without stuffing. Pinch the inner edge into a shallow angle before sewing.
Fasten off. Leave 30 cm tail.
Lower Wing Lobes — Make 2
Yarn: pastel base color; mauve border added later — Source: Standard amigurumi math.
R1: 6 sc in MR (6)
R2: inc ×6 (12)
R3: (sc, inc) ×6 (18)
R4: (2 sc, inc) ×6 (24)
R5: (3 sc, inc) ×6 (30)
R6–R7: sc around (30)
R8: (3 sc, dec) ×6 (24)
R9: (2 sc, dec) ×6 (18)
R10: (sc, dec) ×6 (12)
Flatten without stuffing. Curve the outer lower edge under the body line.
Fasten off. Leave 30 cm tail.
Wing Border Cords — Make 4
Yarn: mauve/taupe — Source: Standard appliqué method.
Upper lobe border:
Row 1: ch 42 (42)
Row 2: sl st in second ch from hook and across (41)
Fasten off. Leave 20 cm tail.
Lower lobe border:
Row 1: ch 34 (34)
Row 2: sl st in second ch from hook and across (33)
Fasten off. Leave 20 cm tail.
Wing Vein Cords — Make 8–10
Yarn: mauve/taupe — Source: Standard appliqué method.
Short veins:
Row 1: ch 12 (12)
Row 2: sl st in second ch from hook and across (11)
Fasten off. Leave 12 cm tail.
Long veins:
Row 1: ch 18 (18)
Row 2: sl st in second ch from hook and across (17)
Fasten off. Leave 12 cm tail.
Wing Pane Patches — Make 12–16
Yarn: pink, peach, lavender, mint, cream — Source: Standard amigurumi math.
Small panes:
R1: 6 sc in MR (6)
R2: inc ×6, sl st to first stitch (12)
Fasten off. Leave 12 cm tail.
Large panes:
R1: 6 sc in MR (6)
R2: inc ×6 (12)
R3: (sc, inc) ×6, sl st to first stitch (18)
Fasten off. Leave 15 cm tail.
Tail
Yarn: cream — Source: Standard amigurumi math.
R1: 6 sc in MR (6)
R2: inc ×6 (12)
R3: sc around (12)
R4: dec ×6 (6)
Fasten off. Leave 18 cm tail.
Mini Rosettes and Ear Flowers
Yarn: pink and lavender — Source: Standard crochet flower strip.
For each rosette:
Row 1: ch 13 (13)
Row 2: 2 sc in second ch from hook and in each ch across (24)
Roll the strip into a spiral and stitch through the base. Fasten off with a 15 cm sewing tail.
For each small ear flower:
R1: 6 sc in MR, sl st to first stitch (6)
R2: (ch 2, sl st in next stitch) ×6 (6 petals)
Fasten off. Leave 12 cm tail.
Assembly
- Sew the head to the body with the body tail, passing through both loops of the body top and the lower head stitches.
- Sew the muzzle between the eyes, centered across R11–R13 of the head.
- Embroider the brown nose and short mouth line on the muzzle.
- Sew the cheek patches below the eyes, one patch on each side of the muzzle.
- Attach the ears to the head between R3 and R5, angled slightly outward so they do not cover the wing tops.
- Sew the front legs to the upper body, with the ends pointing toward the belly center.
- Sew the back feet to the base front, pink pads facing forward.
- Join each upper wing lobe to its lower lobe, then sew the paired wings to the back from neck line to hip line.
- Sew the wing border cords around the lobes, then stitch vein cords from the inner wing edge toward the outer edge.
- Add pane patches, rosettes, ear flowers, optional flat gems, and the tail last.
The finished piece is a seated butterfly bunny with four visible wing lobes and a balanced upright ear line.
7 Technical Tips
- Marker drift: Move the stitch marker at the start of every round; a two-stitch drift will push the muzzle off center. Check the face axis before closing R14 of the head.
- Stuffing firmness: Under-stuffed heads collapse below 10 mm eyes and create dents around the washers. Pack the head firmly at R16, then add only small pieces before R18.
- Invisible decrease gaps: Standard decreases can leave paired holes on cream yarn. Use invisible decreases on R14–R18 of the head and R13–R17 of the body.
- Eye placement timing: Eyes must be tested before R14 closes the head opening too much. Set them between R10 and R11, 7 stitches apart, then embroider lashes before locking washers.
- Velvet tension: Velvet yarn can grow by 1–2 cm after stuffing if the hook is too large. Drop to a 2.5 mm hook for DK velvet-look yarn or a 3.0 mm hook for worsted chenille.
- Wing pinning: Wings sewn without pins often tilt downward by 5–8 mm on the heavier side. Pin the upper lobe first, then check the lower lobe height from the front.
- Tail weaving: Short yarn tails work loose when wings are handled. Leave at least 15–20 cm on limbs and 30 cm on wing lobes, then weave through three separate stitch paths.
Conclusion
This build depends on proportion more than stitch difficulty. The rabbit body stays compact, the ears stay vertical, and the wings carry most of the color work. Before sewing, lay the four wing lobes flat and photograph both sides; asymmetry is easier to correct before the borders and panes are attached. Save the butterfly bunny amigurumi crochet pattern notes to your project tracker, then make one test cheek patch and one wing pane before cutting all accent colors. Share the finished bunny on Pinterest and Instagram with #ButterflyBunnyPattern. Which wing pane color should sit closest to the bunny’s cheek: pink, lavender, peach, or mint?









